Thursday, August 29, 2019

Guest Designer - Lyla Larimore

It is time to introduce our Guest Designer for the Bits and Bobs challenge.  Say hello to Lyla Larimore of A Chief's Wife's Heart's A' Fire.


My name is Lyla Larimore- I’m the Chief’s Wife on my blog; “A Chief’s Wife’s Heart’s A’Fire”. I’ve been following TFJB Challenge Blog since 2015 when I decided to join in on their Tim Holtz Compendium of Curiosities Book 3. This is one of several times being a Guest Designer since then, and I am soooo excited for this “Bits and Bobs” Challenge #19 for this year!


As you can see by the pile, I’m a bonafide “Don’t toss that out- I’ll use it!” hoarder of scraps, so this was right up my path.


It’s no secret that I am a fan of Americana and Old Glory, and I’ve created something that celebrates how I came to use that love of the Red White and Blue to fill our home with a Primitive Americana “Eclectic” look that shows the love of family. This project is also a gift to a Bestie 1st Cousin whom I credit with “Sharing Americana Love” with me.

Break out that box of scrap paper, that jar of odds and ends, those spools of ribbon you were saving ‘just because’, and get to work! Use the Design Team’s shared project photos on the Challenge’s page, and be sure to heck out on my blog by clicking on the link. Then join in on the fun by sharing your own inspirational make with us here on TFJB Challenge Blog!

* * *
Once you have popped over to Lyla's blog to check out the details about her sweet tags, do come back and share what you have created with the bits and bobs in your craft room. The challenge can be found HERE and runs through 11:55 pm EST on Tuesday, September 10th.

Our next Saturday Showcase will be on September 7th so save the date because you won't want to miss the inspiration our designer will be sharing.

Wednesday, August 28, 2019

Bits and Bobs

Welcome back to a new challenge on The Funkie Junkie Boutique Challenge!  Suzz here, hosting the new challenge "Bits and Bobs".

"Do you have a pile of leftover scraps from projects previously made or even a half finished project waiting for you to get the time to complete it?   This is the challenge for you!  It is time to pull out those scraps, remnants or half finished projects and pull them together into a fabulous shabby chic or vintage project.  Make sure to mention in your post what part of your project was a scrap or remnant."

The winner will earn a chance to be a Guest Designer at a future date here at The Funkie Junkie Boutique blog, and everyone who enters and follows the rules will go into the draw for the chance to win a $25 spending spree at The Funkie Junkie Boutique. There are also Top 3 Badges for three additional outstanding entries, chosen by the Design Team.

The guidelines for entering are simple; create a new vintage or shabby chic project following the challenge theme, link it below to your post (not just your blog) and also include a link back to this challenge in your post. You can combine our challenge with up to 10 challenges (including this one) to be in with a chance of winning. If you are entering through a public forum (such as Instagram) you'll need to include the words 'Funkie Junkie Boutique Challenge'. Also, please be sure to turn off your Word Verification so our Design Team can leave comments on your blogs. Make sure you follow these rules as unfortunately, we have had to eliminate entrants from the prize draws in the past.

Look at all this fabulous art created by the design team from their scrap pile or unfinished projects:

Cec Wintonyk - CW Creations


Ginny Nemchak - Polly's Paper Studio


Sara Emily - sarascloset


Jenny Marples - Pushing The Right Buttons


Suzanne Czosek - Suzz's Stamping Spot 

Tim Holtz Layering Stencil Doily Sizzix Mixed Media #2 Die Idea-Ology Baubles Paper Doll Stampers Anonymous Nature Walk For the Funkie Junkie Boutique

Pull out those scraps or half finished projects and join us in the challenge using the link below!

Suzz


Saturday, August 24, 2019

Saturday Showcase - Sizzix 3D Crackle and Chapter 3 Dies

Hi everyone and welcome to this week's Saturday Showcase. If you haven't been here before, this feature allows the Design Team to share tutorials and products available from The Funkie Junkie Boutique with you and get your creative wheels whirling. This time the focus is on Tim Holtz 3D Crackle Texture Fade, and I've paired it with some of his newer Chapter 3 dies and a 3D Impresslit. I love that you can get totally different effects from this folder depending on how you place your paper into it.

Sara Emily Barker for The Funkie Junkie Boutique Blog https://frillyandfunkie.blogspot.com/ Tim Holtz Crackle 3D Tutorial

Below are the steps I took to make three different cards using the puffy effect. I've also included some observations and tips in italics.

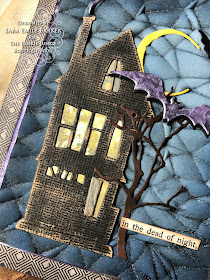
Sara Emily Barker for The Funkie Junkie Boutique Blog https://frillyandfunkie.blogspot.com/ Halloween Card  1

Sara Emily Barker for The Funkie Junkie Boutique Blog https://frillyandfunkie.blogspot.com/ Halloween Card  2

Sara Emily Barker for The Funkie Junkie Boutique Blog https://frillyandfunkie.blogspot.com/ Halloween Card  3

Ghost Town Card 

1. Emboss heavy black card panel with Crackle 3D embossing folder following manufacturer's suggestions. (It doesn't matter which way you place it in the folder since there's no pattern or color difference from front to back.)

2. Spritz puffy side lightly with Pumice Stone Distress Oxide Spray and allow to dry.

3.  Blend with Antique Linen and Chipped Sapphire Distress Oxide ink.

Sara Emily Barker for The Funkie Junkie Boutique Blog https://frillyandfunkie.blogspot.com/ Tutorial  1

I love how the tiny specks of spray settle in the cracks and the inks blend so smoothly over the raised puffs creating an eerie background.

4. Cut the large foreground bat (Bat Crazy), the curl of smoke (Ghost Town) and one of the mat panels from sanded Confections Metallic Card. Color each of these die cuts with Black Soot crayon.

5. Cut a second Bat Crazy from black card and layer the metallic one over it to create a shadow.

6.  Cut house (Ghost Town) from Classic Kraft stock and sand.  Layer the house over a stamped scrap in Forest Moss oxide ink. (This was in my stash.)

7. Die cut the tree (Ghost Town), the moon and tiny bats (Haunted House) and a little door from scraps (the door is colored wood grain card stock).

8. Darken a panel from Tim's old Regions Beyond Paper Stash and layer with prepared Confections and 3D panels.  Edge a Halloween Clippings sticker  with ink and adhere die cuts and sticker with Collage Medium.

Look how cool it looks when you flip your black paper over and blend the ridges with Antique Linen  Oxide ink!

Sara Emily Barker for The Funkie Junkie Boutique Blog https://frillyandfunkie.blogspot.com/ Tutorial 2

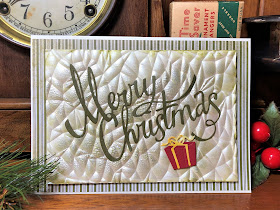
Don't limit your use of this versatile embossing folder to just Halloween. Here's a simple Christmas card embellished with Christmas Ribbons and Festive Things Thinlits die cuts.

Sara Emily Barker for The Funkie Junkie Boutique Blog https://frillyandfunkie.blogspot.com/ Christmas Card 1

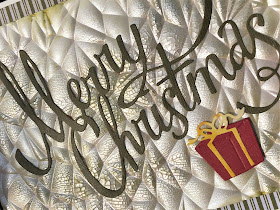
Sara Emily Barker for The Funkie Junkie Boutique Blog https://frillyandfunkie.blogspot.com/ Christmas Card 2

Merry Christmas Card

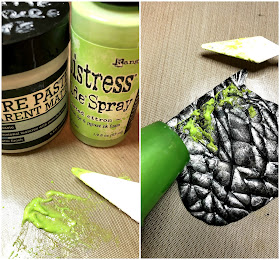
1. Cut a panel of Mixed Media Heavystock to desired size. Smear it with Prima Platinum Crackle Paste using a palette knife and set it aside to dry.

Sara Emily Barker for The Funkie Junkie Boutique Blog https://frillyandfunkie.blogspot.com/ Tutorial 3

 I love this paste; it offers a gorgeous texture when dry and it doesn't chip off even when embossed like this.

2. When paste is completely dry, emboss it with the Crackle 3D folder, placing it in the folder with the crackled side down, over the recesed side of the folder. **Because it is thicker, I adjusted my embossing sandwich before running it through my die cut machine: base plate with no tabs, followed by the dampened paper in the folder, with a cutting plate on top.  Adjust your sandwich according to your individual machine. Never force the sandwich through to avoid damage to your machine.**

3. Enhance the cracks with Peeled Paint crayon.

4. Layer the embossed panel over a panel of old Christmas paper stash using foam adhesive and adhere to card blank.

5. Die cut Merry Christmas (Christmas Ribbons) from Classic Kraft Stock and gift (Festive Things) from scraps. Adhere  die cuts with collage medium. You could also use Sizzix Adhesive Sheets.

It's a simple card that truly takes less than 10 minutes, except for dry time for the paste. I think this will be my assembly line card this year--I can make it different by adjusting colors, leaving off the paste and using different Festive Things die cuts to embellish.

Sara Emily Barker for The Funkie Junkie Boutique Blog https://frillyandfunkie.blogspot.com/ Everyday Card 1

Sara Emily Barker for The Funkie Junkie Boutique Blog https://frillyandfunkie.blogspot.com/ Everyday Card 2

Sara Emily Barker for The Funkie Junkie Boutique Blog https://frillyandfunkie.blogspot.com/ Everyday Card 3

All Purpose Card

1. Cut an elongated piece of sanded silver Metallic Kraft Stock and place one end metallic side down into the folder, over the recessed side.  Emboss per manufacturer's suggestions. Repeat with opposite end of card. You will get a join line, but that's easily covered with ribbon, trim or a die cut. Swipe edges of panel with Black Soot paint allowing it to dry a few minutes. Then wipe gently with a clean cloth leaving some of the color behind. Adhere embossed panel to a card blank.

2. Cut and emboss silver Metallic Kraft Stock with Star Trim 3D Impresslits embossing folder/die.  Swipe with Black Soot paint, following the same steps as above.

 It's so easy to customize this trim by swiping it with Distress paint color of your choice.

3.  Die cut Wildflower Stem from black card.  Adhere Wildflower Stem, Star Trim and an Occasions Small Talk sticker with collage medium.

Try using this adaptable embossing folder on your favorite color of Metallic Kraft Stock. This is a super easy way to add impact to a simple design. This card is so simple to make; it literally took just a couple minutes to put together.
 *******
You could also use the folder to add interest to patterned paper. Here's a scrap of Regions Beyond paper embossed and blended with Ground Espresso and Black Soot inks to give you an idea. The one on the left was placed with the spiders facing down into the recessed side of the folder. The one on the right, the concentric squares are facing up into the puffy side.

Sara Emily Barker for The Funkie Junkie Boutique Blog https://frillyandfunkie.blogspot.com/ Tutorial 4

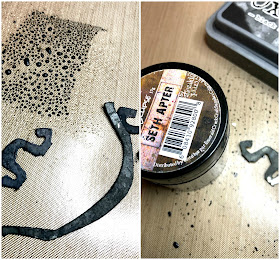
How about embossing a die cut? Here I die cut the Cauldron Bigz from sanded metallic Kraft Stock.

Sara Emily Barker for The Funkie Junkie Boutique Blog https://frillyandfunkie.blogspot.com/ Spooky Cauldron

I'll use this on another project closer to Halloween, since this post is already way too long. The photos below will outline the steps I took.

Sara Emily Barker for The Funkie Junkie Boutique Blog https://frillyandfunkie.blogspot.com/ Spooky Cauldron Tutorial 1
Sara Emily Barker for The Funkie Junkie Boutique Blog https://frillyandfunkie.blogspot.com/ Spooky Cauldron Tutorial 2
Sara Emily Barker for The Funkie Junkie Boutique Blog https://frillyandfunkie.blogspot.com/ Spooky Cauldron Tutorial 3

I hope I've given you lots of ideas for how to get creative with your Crackle 3D Texture Fade! Remember, you have until August 27 at midnight to enter our current challenge Let's Do It Again! I hope to see you there!

 Happy crafting!
 Sara Emily

Links to the products used from The Funkie Junkie Boutique:
Sizzix Chapter 3 Sizzix 3-D Texture Fades Embossing Folder - Crackle
Sizzix 3-D Impresslits Embossing Folder - Star Trim
Sizzix Chapter 3 Sizzix Thinlits Die Set - Ghost Town
Sizzix Chapter 3 Sizzix Thinlits Die Set - Bat Crazy
Sizzix Chapter 3 Bigz Die - Cauldron
Sizzix Chapter 3 Sizzix Thinlits Die Set - Christmas Ribbon
Sizzix Chapter 3 Sizzix Thinlits Die Set - Festive Things
Tim Holtz Sizzix Thinlits Die Set 5PK - Wildflower Stems #2
Sizzix Thinlits Die Set - Haunted House 3PK by Tim Holtz
Tim Holtz Idea-ology 8 x 8 Classic Kraft Stock
Tim Holtz Idea-ology 8 x 8 Metallic Kraft Stock
Tim Holtz Idea-ology 8 x 8 Metallic Confections Kraft Stock 
Tim Holtz Ranger Distress Mixed Media Heavystock 8.5x11 inches
Tim Holtz Distress Woodgrain Cardstock 8.5x11"
Tim Holtz Ranger Distress Paint - Black Soot
Ranger Tim Holtz Distress Ink Pad: Black Soot, Frayed Burlap, Ground Espresso
Ranger Tim Holtz Distress Oxide Spray - Pumice Stone
Ranger Tim Holtz Distress Oxide Pad: Antique Linen, Chipped Sapphire, Forest Moss
Ranger Tim Holtz Distress Crayons: Black Soot, Peeled Paint
Ranger Tim Holtz Distress Collage Medium Matte
Ranger Texture Paste - Transparent Matte
Tim Holtz Ranger Distress Grit Paste
Tim Holtz Idea-ology Clippings Stickers, Halloween
Prima Art Extravagance: Texture Paste Platinum Crackle


Monday, August 19, 2019

Challenge Winners - Marvellous Metallics

Today we are excited to announce our winners from the 'Marvellous Metallics' challenge. Thank you to everyone who shared their wonderful creations with us. We loved seeing them all.


There were so many amazing entries and it was a close run thing but in the end we chose #16 Cathy Frailey (It's Oddly Appealing). You would never believe what these fabulous steampunk goggles are made from and they sure took our breath away. Make sure to check them out HERE. Congratulations to Cathy on being our favorite and winning the opportunity to be a Guest Designer here at The Funkie Junkie Boutique blog for a future challenge. You will be contacted with all the details.

And now our picks for the three winners of the Funkie Junkie Boutique Blog Top 3 Badges for this challenge. As already mentioned it was so difficult to choose between these entries and we recommend you hop on over to take a look at them all. In numerical order they are; #2 Ann Chuang (Ann Chuang Crafts) #13 Birgit Johansson (Cards R Fun) and #21 Elly (Elly's Creaties). Please email Linda at thefunkiejunkie@gmail.com for the codes for the Top 3 badges so that you can display them proudly on your blog.


And finally we have a randomly chosen lucky winner for the $25 gift certificate to The Funkie Junkie Boutique. Our congratulations this time go to #25 Drea Slee (Drea's Scraps of Inspiration)! Again, please do make sure you check out her amazing project for this challenge. Please email Linda at thefunkiejunkie@gmail.com for the gift certificate details.

Thank you again from all of us here at The Funkie Junkie Boutique Blog to everyone who took part in this challenge and congratulations to all our winners. The current challenge, 'Let's Do It Again!' runs through Tuesday, August 27th and we look forward to seeing your entries!

Have a great week everyone.

Thursday, August 15, 2019

Guest Designer - Lisa Hoel

Please say hello and give a warm welcome to our Guest Designer for the Let's Do It Again challenge.  Lisa Hoel of Creative Juice, Fresh Squeezed was the Design Team's Top Pick from the Water, Water, Everywhere challenge.


Hello, my name is Lisa Hoel and I’m a lifelong craft lover. I’ve been ‘arting’ ever since I first picked up a crayon! Paper crafts have been my main focus for the past fifteen years or so and I love to make detailed, layered, textured, mixed-media type projects. I am not usually a clean and simple type artist. ;-) My background is in graphic design and I'm blessed to be married to the greatest guy in the world and have two dynamic boys.


I created an altered Altoid tin garden scene back in 2012 but was inspired to "Do It Again" to incorporate more details and Tim Holtz dies and Idea-ology pieces that didn't exist the first time around.


Here is a side-by-side photo of the original project (on the left) and the do-over (on the right) so you can see the differences.

* * *

You can see all the details of the original altered tin here and then you will want to see how the new version of this wonderful project by Lisa came together by clicking here.

Once you have checked out Lisa's projects, come on back and share your "made again" creation.  The challenge can be found HERE and runs through 11:55 pm EST on Tuesday, August 27th,

Wednesday, August 14, 2019

Let's Do It Again!

Welcome back to another Funkie Junkie Boutique challenge! It's Sara Emily here to host our new challenge called 'Let's Do It Again!'.  Have you ever made something that you wish you could do over? Perhaps it was a technique you tried and didn't get the results you were hoping for. Maybe you didn't have just the right product you wanted to make your project just perfect. Or maybe a friend asked you to make something like it for them. Now's your chance for a do-over. Choose one of your own posted vintage or shabby chic projects and do it over with a bit of a twist. Be sure to link back to the post of the project you are making over and tell us why you wanted to do it a second time and what's different about it this time. We like to see your entry be in the vintage or shabby chic style we prefer.

The winner will earn a chance to be a Guest Designer at a future date here at The Funkie Junkie Boutique blog, and everyone who enters and follows the rules will go into the draw for the chance to win a $25 spending spree at The Funkie Junkie Boutique. There are also Top 3 Badges for three additional outstanding entries, chosen by the Design Team.

The guidelines for entering are simple; create a new vintage or shabby chic project following the challenge theme, link it below to your post (not just your blog) and also include a link back to this challenge in your post. You can combine our challenge with up to 10 challenges (including this one) to be in with a chance of winning. If you are entering through a public forum (such as Instagram) you'll need to include the words 'Funkie Junkie Boutique Challenge'. Also, please be sure to turn off your Word Verification so our Design Team can leave comments on your blogs. Make sure you follow these rules as unfortunately, we have had to eliminate entrants from the prize draws in the past.

The Design Team has created some wonderful 'Do Over' projects to get you started:

Cec Wintonyk - CW Creations


Suzanne Czosek - Suzz's Stamping Spot

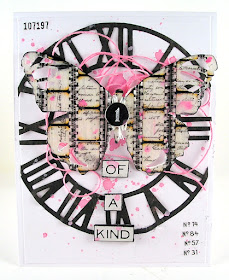
Sizzix Timekeeper Die Sizzix Tattered Butterfly Stampers Anonymous Entomology For The Funkie Junkie Boutique

Sara Emily -  sarascloset


Jenny Marples - Pushing The Right Buttons


Ginny Nemchak -  Polly's Paper Studio


After you have checked out these fabulous projects, we hope you will come on back and share your Let's Do It Again projects with us using the link below. We can't wait to see what you make!

Saturday, August 10, 2019

Saturday Showcase - Dina Wakley Scribble Sticks

It is Cec here and I am presenting the Saturday Showcase this time.  I am going to share a couple of projects I made with the Scribble Sticks from Dina Wakley.

The Scribble Sticks are the shape of crayons you used as a kid but don't have any wax in them, which is the part I love the most.  They react with water, are highly pigmented and can be used in a variety of ways.  There are three sets and the colours are the same as the Dina Wakley paints.


For my first project, I made a tag.


I started with a 4" x 8" tag that I cut from mat board because I needed something that would stand up to wet media and didn't have any of the many options available from The Funkie Junkie Boutique that are perfect for this type of project.

Some chipboard honeycomb bits that my husband cut for me on the laser cutter were added next and then both sides of the tag were covered with White Gesso (Dina Wakley).


Next I dry brushed some Lime Acrylic Paint (Dina Wakley) over both sides of the tag.  I used a Mini Mister (Tim Holtz) to spritz the front with water and let it run.


I used the Lime and Olive sticks to scribble on the tag in random areas (I added some Peacock but forgot to include it in the photo).  To blend the colour I dipped a paint brush in water and went over the scribbles.


To add more colour, I dropped water in a few spots on the tag and dipped the Evergreen stick in the puddles until I got the amount of colour I wanted and then moved the tag around to let it run.

I continued to drip colour on the tag alternating it with bits of White Gesso rubbed on with my finger until I was happy with the background.


Some Magenta was scribbled through a Polka Dotty stencil (Wendy Vecchi) on the top right and bottom left corners and then leaving the stencil in place, I blended it with water.  I found it bled a bit so while it was still wet, I gently patted it with some paper toweling and quite liked the result.

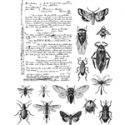
I added some additional stenciling with a Burlap Stencil (Tim Holtz) and Pink Peony Archival Ink (Wendy Vecchi).  Next came some stamping with Orange Blossom Archival Ink (Wendy Vecchi) and a star in a circle stamp (Tim Holtz).  I found these elements a bit dark so I knocked them back with some watered down White Gesso rubbed on with my finger and then I stamped some Text from the Entomology set (Tim Holtz) and Watering Can Archival Ink (Wendy Vecchi).  Some splatters of white paint were also added.


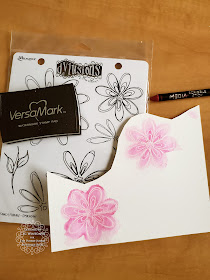
The medium flower from the Fancy Florals set (Dylusions) was stamped onto watercolour card stock with Versamark (Tsukineko) and heat embossed with clear embossing powder (Ranger).  I coloured all three flowers (the third one was out of camera range) with the Magenta stick.  This time I dipped my paint brush in water and then rubbed it against the bottom of the stick to pick up some colour before I applied it to the card stock.  I went back as many times as needed to add some shading.  I also made sure I coloured outside the lines so I could see where to fussy cut - any other time I would be making sure I didn't go outside the lines.

To make the topper, I dyed some seam binding with the Evergreen stick by dripping water about the size of a quarter onto my kraft mat and then dipping the end of the stick in it.  Note: Because the end of the stick softens in the water be sure to set it down where the end can hang over the edge until it dries so you don't lose any pigment by letting it rub up against something.

The sentiment words are stickers from the Big Chat collection (Tim Holtz) and they have been added to strips of card stock painted with the Evergreen stick.  One flower was adhered with Scor Tape and the other two with dimensional foam dots.


For my second project, I made an art journal page.


I started creating the background by mixing the sticks in little puddles of water and then dripping them on the substrate using a pipette.  To control the flow of the colour I used the end of the pipette to move it around rather than picking the sheet up because I didn't want long runs of colour.

I added some stenciling with a Harlequin Stencil (Tim Holtz) and Deep Purple Archival Ink (Ranger) as well as the Dots and Stripes Borders Stencil (Wendy Vecchi) and Forget-Me-Not Archival Ink (Wendy Vecchi).  Then I took a brayer and rolled a thin coat of White Gesso over the whole page.

I used the Elephant stick to add some Asemic writing and went over it with a barely damp paint brush.

                   
I hand cut some hearts from watercolour card stock and painted them with the Magenta and Blackberry sticks using them on their own as well as mixed together.  When they dried I added wiggly borders with a fine Pigma Micron pen (Sakura).

The next step was to stamp each heart with text from the Entomology set using Watering Can Archival Ink.  That was followed by stenciling using the Checkmate Stencil (Wendy Vecchi) and Twisted Citron Distress Ink (Tim Holtz, the Dots and Stripes Borders Stencil (Wendy Vecchi) and Picked Raspberry DI and finally the Bubble Stencil (Tim Holtz) and Picket Fence DI.

I painted some punched flowers with the Cheddar stick and added spiral centres with a Purple Glaze Pen (Sakura).  The hearts were adhered to the page using Scor Tape and the flowers were added with dimensional foam.  Finally I added a sentiment of words from the Big Chat sticker collection mounted on top of card stock painted with the Evergreen stick.


Dina says that the Scribble Sticks can be used on top of her paints so I painted a little manilla tag from the office supplies store with some of her Lime Acrylic Paint and then added marks.  I found that a barely damp paint brush was the best way to blend the marks but keep them distinct.  If you have too much water the pigment moves too much.

I also tested the bright coloured sticks on Kraft card stock and found the colours stayed lovely and vibrant.  I really should have tried to see what happens on black card stock.

I hope you will give these a try.  I love them and my very artistic Granddaughter saw them and tried to talk me out of them because she thought they were fabulous - I prevailed and they are still in my craft stash and not in hers.

Supplies used with links to The Funkie Junkie Boutique for those used or suggested:

Dots and Stripes Border Stencil (Wendy Vecchi) - no longer available
Fancy Florals Stamp Set (Dylusions) - no longer available
Tags (Various)