Hello, it's Sara Emily here! It's time for our Saturday Showcase feature, and today I'll be shining a spotlight on Tim Holtz Decor Frames Bigz Die by Sizzix and Tim Holtz Layering Stencils by Stamper's Anonymous. Linda has the Decor Frames in stock at
The Funkie Junkie Boutique and also offers an extensive stock of stencils. I have two projects to share with you and then, as promised, I'll share my steps on how I made my background and Decor Frame for my DT project for our current challenge, 'Positively Pensive'.
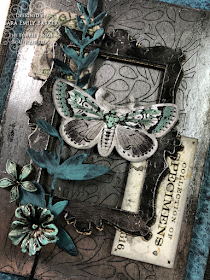
First here are some close ups of the card.
Now, let's get started with making the card shown above.
Die cut the rectangle frame from Metallic Kraft Stock in silver. Using a ball point pen that is dried up and the Halftone stencil, outline circles randomly on the frame.
Apply Black Soot paint over the surface and dry.
Now do the same with Picket Fence paint.
Apply a second coat of Black Soot paint. Allow to sit until paint is just dry to touch.
Using a clean cloth, vigorously wipe the frame, switching to another clean area of cloth as soon as it becomes soiled. This will leave the paint not only in the recesses, but some on the flat surface as well, giving it a vintage patina.
Cut a second frame from black Classic Kraft Stock, gently sand and adhere metallic frame to it, offsetting slightly.
Next, I use the same technique on a lightly sanded metallic panel that will become the focal panel. I used the mini Splash stencil from set #26.
I cut a panel of Cracked Leather Cardstock that will be my background, and lightly color around the edges with Cracked Pistachio Paint and dry.
I sprayed it with Black Soot Distress Spray Stain and dried. I wasn't totally happy with it, so I lightly brushed it with Patina Green Matte Wax on my finger to lighten it up a bit.
To finish the card I chose a couple of metallic flowers from Adornments Florals pack and colored them with Cracked Pistachio and Evergreen Bough paint and Mushroom alcohol ink. I also chose some Field Notes ephemera pieces and unified them by applying Black Soot crayon thinned with water to each of the pieces. I used a Wildflower Stem die cut from my stash that was cut from black card and smudged with Patina Green wax. All of my elements were assembled and adhered with Distress Collage Medium Matte.
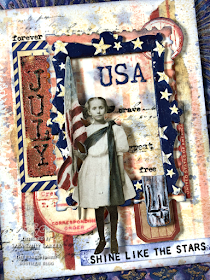
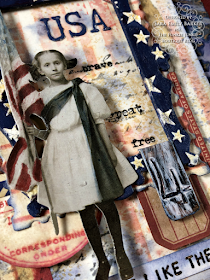
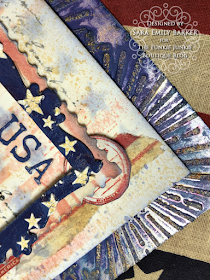
Here's a quite different card I made with another rectangle Decor Frame die cut and lots of stencils. I'll share my steps following some close ups.
Let's get started...
I start by making my Decor Frame, not really knowing how this will all come together. (Sometime you just have to play and let your creativity take on a life of it's own.)
1. Paint Decor Frame die cut from chipboard with Chipped Sapphire paint. Allow to dry thoroughly.
2. Apply coat of Collage Matte Medium to seal the color. Allow to dry thoroughly. (collage medium omitted in photo)
3. Apply Crackle paste through the Falling Stars mini stencil (set #38 ), sprinkle with Antique Linen Embossing Glaze and allow the paste to dry. When it's dry, heat the powder to melt.
I recently got my hands on a large supply of medical tapes when our local movie studio sold off some of it's props, including rolls of cloth and paper washi style tape (directly above). Inspired by teammate Suzz, I wanted to try some stenciling on them to make my own washi tapes. I used ink and then spray on the cloth tape and paint and spray on the paper tape above. I ended up only using the striped tape on my project.
I used Fired Brick Distress Oxide ink and blended it through the Stripes Mini stencil onto a scrap. (Not pictured; I later cut Stacked Postage from it to back the Decor Frame.) I sprayed the inky stencil lightly with water and flipped it onto a watercolor panel to make a monoprint (shown in photo above).
I blended Chipped Sapphire ink through the Stars stencil.
And spritzed with water to allow the ink to bleed.
I spritzed a little Antique Linen spray on my mat and sprayed it with water. I dipped the panel into the watery color here and there, drying between dips so as not to allow the background to blend too much.
After drying the panel, I blended with Antique Linen ink and added some of my tape. I then did some stamping with Black Soot ink and the script stamp from Tiny Toadstools and Tiny Text in Archival ink. A couple of old Remnant Rubs spell out a few more descriptive words. I later blended the edges with Chipped Sapphire ink.
Now I start on the back panel. I used the mini rays, mini falling stars (both from set #38) and regular Stars stencils and Translucent Grit paste on silver Metallic Kraft stock and allowed the paste to dry.
After trying a bit of Chipped Sapphire paint on the panel, I decided it needed to be roughed up a bit to allow the paint to grab better. I buffed the surface with steel wool.
I scribbled Tarnished Brass crayon over the embossing and heated to bake it into the surface. From here on, it looks like I forgot to take process photos, but you can see by the close up photos that I painted a coat of Chipped Sapphire paint over the edges of the background that would show and sprayed with water. I allowed the watery paint to mingle around the stenciled rays and stars by tipping the panel as I dried it. Lastly, I applied more of the crayon to the embossing and then edged with Faded Jeans Archival ink.
I layer the watercolor background over the shimmery back panel with a layer of fun foam between them and work on my collage.
I spelled out July on a scrap on silver metallic kraft stock by adhering Alphanumeric Tiny Type Upper die cut letters, and also used the letters to spell out USA. The July panel was embossed with Fired Brick Embossing Glaze and scribbled with Frayed Burlap and Chipped Sapphire crayons. USA was painted with Chipped Sapphire paint.
The patriotic Paper Doll is colored with Chipped Sapphire crayon and a water brush, and Fired Brick Embossing Glaze. I buffed the Fired Brick stripes with steel wool to remove the shine.
A couple of Field Notes Labels were inked and fussy cut and a few ephemera pieces from the Keepsakes pack add to the layers. The Type Chip '4' is altered with paint and crayon.
To finish the card, I stamped and heat embossed the quote from Tiny Text onto a scrap and inked it with Chipped Sapphire.
And now I'll move on to my Choose to Shine vignette. First, here's how I decorated the oval Decor Frame.
Apply Texture paste through the Ornate mini stencil (set #25) and allow to dry.
1. Paint with Black Soot paint and dry.
2. Swipe just the raised surfaces of the frame with Copper Metallic Wax. (not pictured; see closeup above)
Don't forget to use the 'waste' from the Decor Frames. Here I cut an Oval Decor Frame from a scrap of Wood Grain paper I had already colored in my stash. I'll set the frame aside for a future use. To unify the oval, I blended with Tumbled Glass ink and then splattered it with watery Black Soot paint. I adhered waste chipboard to the reverse side of the oval before adhering to the background to elevate it within the frame.
And now here's the how-to for the background.
1. I chose Rose Gold Metallic Kraft Stock and grabbed my defunct pen. I place the Bouquet stencil on the panel and tape to stabilize. I outline the floral design into the paper. You can see that I scribbled lines within some of the outlines.
2. I blend Matte Wax over the scratched surface and wipe excess with a clean cloth leaving the color in the recesses.
3. I paint over the entire surface with Picket Fence paint, allow to dry a bit, and again wipe excess with a clean cloth.
I pounce the etched panel with Mushroom alcohol ink applied to felt applicator. I spray with alcohol and dry with my heat tool. Lastly, I do some stamping with Black Soot Archival ink and Field Notes stamps. Then it's just a matter of assembling the panel and all of it's elements. Closeups and additional details of the completed project can be seen here.
I hope I've given you some ideas on how the Decor Frames can be used in very different ways and inspired you to use your stencils in a unique way. Remember there's still time to get those Positively Pensive projects linked up! Happy crafting! Sara Emily
These products were used and can be purchased at
The Funkie Junkie Boutique:
Sizzix Chapter 2 Tim Holtz Bigz Die - Decor Frames
Stampers Anonymous Tim Holtz Stencils: Bouquet, Stars, Halftone, Mini Set #25, #26, #38
Stampers Anonymous Tim Holtz Stamp Set - Field Notes
Stampers Anonymous Tim Holtz Stamp Set - Tiny Text
Sizzix Chapter 1 Tim Holtz Thinlits Dies - Scribbly Butterflies
Sizzix Chapter 1 Tim Holtz Thinlits Dies - Alphanumeric Tiny Type Upper
Tim Holtz Idea-ology Ephemera Pack, Keepsakes
Tim Holtz Idea-ology Ephemera, Field Notes
Tim Holtz Idea-ology Adornments Floral
Tim Holtz Idea-ology Type Chips
Tim Holtz Idea-ology 8 x 8 Metallic Kraft Stock - Silver, Rose Gold
Tim Holtz Distress Cracked Leather Cardstock
Tim Holtz Distress Woodgrain Cardstock
Ranger Tim Holtz Distress Collage Medium Matte
Tim Holtz Distress Grit Paste
Tim Holtz Distress Texture Paste - Matte, Crackle
Tim Holtz Distress Embossing Dabber
Tim Holtz Distress Embossing Pen 2pk
Tim Holtz Distress Embossing Glaze - Weathered Wood, Fired Brick, Antique Linen
Ranger Tim Holtz Distress Ink Pad - Ground Espresso, Fired Brick, Antique Linen, Frayed Burlap, Black Soot, Chipped Sapphire, Tumbled Glass
Ranger Tim Holtz Distress Archival Mini Ink Pad - Faded Jeans, Black Soot
Tim Holtz Distress Oxide Ink Pad - Fired Brick
Ranger Tim Holtz Distress Crayons - Chipped Sapphire, Black soot, Frayed Burlap, Tarnished Brass
Tim Holtz Distress Spray Stain - Black Soot, Antique Linen
Tim Holtz Distress Paint - Black Soot, Weathered Wood, Fired Brick, Chipped Sapphire, Picket Fence, Cracked Pistachio, Evergreen Bough
Prima Finnabair Art Alchemy Wax Paste - Patina Green
VersaMark Watermark Ink Stamp Pad
Ranger Tim Holtz Alcohol Ink - Mushroom
Ranger Embossing Powder - Clear - Super Fine Detail


