Wednesday, November 30, 2022

Tim Holtz 2022 Chapter 4 Christmas Stamp Sets from Stampers Anonymous

  Chapter 4 Stamps is our theme for the next two weeks here at The Funkie Junkie Boutique's Inspiration Ave! Check back in for all Design Team makes as the days go by to find out which set they chose, and what they created with it. Remember to leave a comment here on the page, so you will be entered into our random drawing for a $25 shopping spree at The Funkie Junkie Boutique!

  This is Lyla, leading off with Tim's Department Store (CMS458). Read on and I'll show you what I did with this awesomely Christmas stamp set..


Happy Mail again- from The Funkie Junkie Boutique, of course!
I've chosen Stampers Anonymous Tim Holtz Stamp Set - Department Store
for this make. I not only love the music notes and 
the old-fashioned-looking Merry Christmas sentiment, especially,
 but for this, I wanted to try a layered wreath.
*Links for products will be listed at the end of this first part.

Remember from an earlier posted make; I got my hands on 
Sets 1 & 3 of the TH Distress Watercolor Pencils.
Now was my chance to do some real coloring with them!

I covered the Tag and included Reinforcer piece with plain cream cardstock.
I like to make a back Reinforcer, so I always cut layers 
of plain circle die of same size and simply cut a hole to fit.

I burnished all the edges with my TH Sanding Block, 
then added a thick-in-some-places/thin-in-some-places layer of 
Ranger TH Translucent Crackle Paste.
 If you haven't tried this product by now: you surely will want to after
you've seen what it can do! I allowed this to dry overnight.
After the cracks appeared and were dry, 
I scrubbed some Ground Espresso Distress Crayon
into them, and also went around the Etcetera Tag/reinforcers edges,
 then heat dried again.

I got out some Ranger Archival Ink in Jet Black 
and some watercolor paper and began making some 
practice stamped images with my TH Stamping Platform.

I'm one of those folks who is "stamp challenged" so I made several images
from which I would be able to choose the best parts of 3 images...
one full, one ribbon, one all ivy leaves/berries.
From these, I would form the layers.

Distress Watercolor Pencils are the best things yet!
But I'm certainly not one to toss out my Distress Crayons.
They still come in very handy- 
especially if you don't have the shade you want in a Pencil.

I've got my 3 chosen and colored, and also my sentiment from the Stamp Set.
With my plan in place by (No. 2) penciling under one that will be cut up,
I made sure to heat dry everything first. 

Next came the cutting. TH Tiny Snips are great for the 
tight turns of corners on the wreath!
Now, I was free to layer it all up with some 
Sizzix double-sided foam sheets.

Note to Self: Self, check which house (Indiana or Florida) 
you are sending your dies to
or you will end up not using them until the next year!
It worked out ok in my case, but I have no idea if 
TH Fireside is still in production at all.
It does, however work well with Etcetera Scalloped Trims used here.

I cut a few layers of Fireside out of Kraft Stock Stack (Warm)
using the BACKSIDE of the paper. 
The brown of the back just looked better as "wood".
Then ran the paper through my Big Shot with TH 3D Impresslit, Lumber
(You can also use Mini Lumber, which may fit scale better.)
using Black Soot Distress Oxide onto the folder's indents.
I also cut pieces to fit the Etcetera Shelf pieces.
Then edged all of it with Distress Oxide in Ground Espresso with a 
bit of DO Black Soot where the smoke of a fire would leave smudges.

Cutting out the smaller detail pieces was a bit hard for me,
but well worth doing so after the make was finished!
I used Glossy Accents for all adhesion, which allows bending 
the flames while it's still wet. That gave the black grate some
real dimension around the fire.

I inked up all the edges of the layered wreath and several pieces
from the TH Christmas Layers 2022, even if I didn't use them all.

Here's where the Little Golden Book "The Christmas Story"
came into play. I took my book (which is an original first print 
which I found many years ago in a yard sale- a scored treasure!)
and carefully copied each page onto my computer.
I have a program which helps me size/shop photos for printing. 
Then printed it out on plain paper and using plain white cardstock to form
the outside cover in which the zig-zag folded pages fit between.
A paper string is added into the spine before the final gluing 
(Glossy Accents). Making a tiny book fit to 1 inch size 
was easy following this method.
And that is how it ended up in my make.
*Please be aware of copyrights/rules of use to printed books. 


Here's a list of links to help you find products to make this Tag:


Now let's see what I ended up with...


Hoarded away TH Crinkle Ribbon (retired) with some
Antique Linen Distress Oxide.

A few TH Christmas Confection sticks cut in half add a bit of whimsy.


The grundgy-ness of this Tag shows through- on both sides.

Grab your glasses to read "The Christmas Story"
which is the entire point of CHRISTmas itself.

The 'official Christmas postcard: From Our House To Yours!

A Silver Snowflake Charm on a TH Wire Pin as the 
perfect touch for the ribbon.
Linda (owner of TFJB) always adds little freebies 
in the Happy Mail that goes out!

A Christmas stamp from the TH Christmas Layers pack.


Thanks so much for joining me to kick off 
another round of fun & creativity 
here on Inspiration Ave!
Don't forget to check back for MORE from the rest of our 
talented TFJB Design Team in the coming days!
The next post you'll see from me will be typed from the 
(hopefully much warmer) Florida Emerald Coast.
I'll be taking as much of my Craft Studio as I can pack
so I'll be able to create more over the winter months to share with you
and inspire you to join us and create your own makes!


Until next time... 

Stay Safe &
HAPPY BLOGGING!!

Monday, November 28, 2022

Laura's Tim Holtz Christmas Ideology Inspiration

 Good morning!
I am so excited to share my next project I created for The Funkie Junkie Boutique!


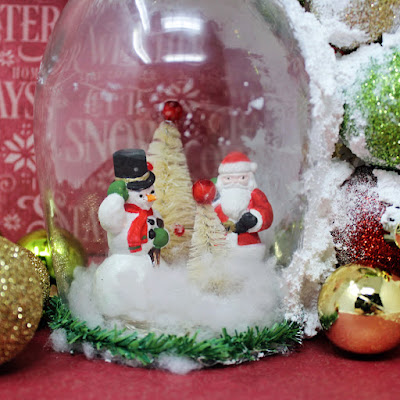
When I received the Salvaged Santa and Snowman I knew what I wanted to create....


I painted the Santa and Snowman with acrylic paints and added some beads to a couple of the
Tim Holtz Idea-ology Woodland Tree Lot


 I wrapped the bottom of the wine glass with the
Tim Holtz Idea-ology Pine Twine

I then added some snowtex and ornaments!


 I wrapped the candle and wine glass stem with the twine and then added the
Tim Holtz Idea-ology Adornments


To finish it off I added some lights!

So what do you think?  Would you like to have this amongst your Christmas decorations?  

Thanks for stopping by
Laura

Friday, November 25, 2022

Shimmer & Shine - Tim Holtz Christmas Idea-Ology Inspiration

Hi!  Suzz here.  I loved the shimmer and shine found in the Christmas release from Idea-ology Tim Holtz and used that to inspire a few different projects. 


The droplets had me thinking of different ways I could use them on my Christmas themed projects.  I decided to use them first to create a Christmas wreath.

I used a circle die cut to trace a circle in the center of the card and then I applied tape in the circle.  I then pulled out the color combination of droplets I wanted to use in various sizes. (light blue, silver, white).  

I placed the largest droplet size in one color and place them equally spaced around the circle.    I repeated the process with the next color until all the large sized droplets were placed.  I then repeated the process with the next size down.  I ended up having to shift some of them at the end with the smallest ones. 

To finish off the card I stamped a sentiment in gray ink and sprayed a shimmery ribbon with mica stain spray to blend with the colors of the wreath.

Next I started to play with the glitzy deco sheets. 

To cut out my images with the deco paper I used wax paper in between the die and the deco sheet.  This will help loosen up the release of a die.  I also used the metal shim to get a clean cut.  The thinlets required the extra pressure to help keep the edges cut with all the details.  I also ran them back and forth a few times to get the best cut. 

I used two different sized stars laid together on the cutting board to get my star outline.  I then cut a piece of the deco sheet as the background layer of my tag.  I accented with a few droplets and the sentiment.  I finished it off with some died ribbon and a shiny bell!  

My final tag highlights the shimmery snowflakes. 


The background was stamped with a silver ink using the beautiful renaissance stamp.  Then heat set the ink before adding an edge of silver embossing and a sentiment embossed in gold.  The snowflakes were cut and added with a touch of bling using the droplets.  

The ribbon was embossed using silver tinsel embossing powder.  I used versamark ink  to sponge the ribbon and then dipped it in embossing powder and heat set the embossing powder.  

I hope this has you inspired to pull out your idea-ology and start embellishing!


Thanks for stopping by! 

Suzz

Products: 

Wednesday, November 23, 2022

Tim Holtz Christmas Idea-ology Assemblage

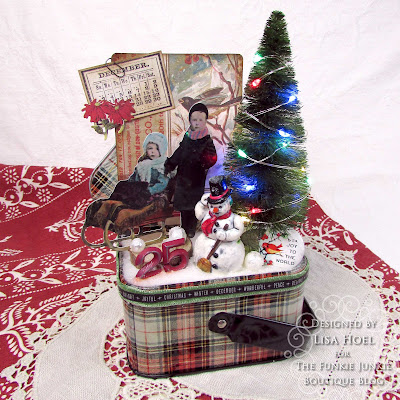
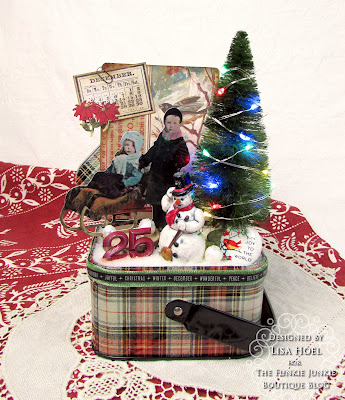
Hello, Lisa Hoel here. I'm really getting revved up for my favorite making season, Christmas time! Our Funkie Junkie Focus this time around is on Tim Holtz's Christmas Idea-ology which I am a big fan of. All those fabulous bits and bobs. Love it! I created an assemblage in a Festive Tin

Lisa Hoel for The Funkie Junkie Blog - Christmas Idea-ology assemblage #creativejuicefreshsqueezed  #tim_holtz  #thefunkiejunkie #thefunkiejunkieboutique #frillyandfunkie

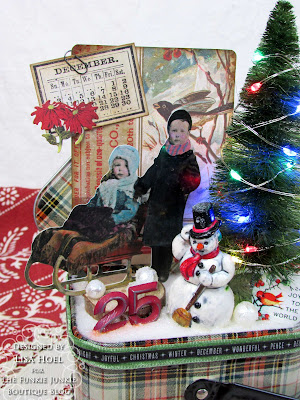
Bottle brush trees, tiny lights, snowman… these definitely fall in the "a few of my favorite things" category.

Lisa Hoel for The Funkie Junkie Blog - Christmas Idea-ology assemblage #creativejuicefreshsqueezed  #tim_holtz  #thefunkiejunkie #thefunkiejunkieboutique #frillyandfunkie

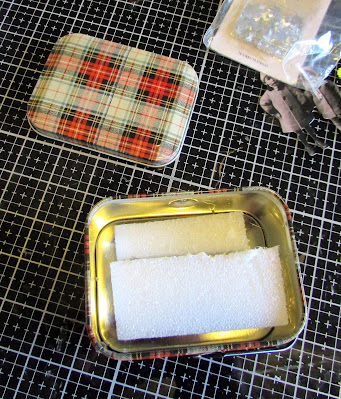
Let's take a look at some of the building process.

1) I cut some styrofoam blocks and hot glued them into place inside the tin. I made an area at the back of the tin to tuck the lid into.


Hot glued the lid in place.

I didn't take a photo, but I cut a piece of white mat board to cover the foam and create a platform to glue all the elements onto.

2) I prepared all the Idea-olgy parts I wanted to include. The metal numbers I painted with the new Lumberjack Plaid paint. It IS a good red! Can't wait to play more with this new color.


The snowballs are Baubles that I smeared with Snowfall Grit Paste. The Salvaged Snowman I painted with acrylic paints (such great detail!) 

The Tree Lot bottle brush tree I colored with Rustic Wilderness Spray Stain as well as Mica Stains Tree Lot and Fresh Balsam. TIP: I covered the wooden tree base with masking tape before I sprayed the tree. It kept it clean so the Distress wouldn't bleed into the snow in the final assemblage.

3) I tried using the new Distress Watercolor Pencils to color the Paper Dolls. They work really well! Paula Cheney has a really great tutorial on how to do it on her blog. FYI, this particular doll is from one of the past years' Christmas collections so I'm not sure if this one is in the 2022 pack. 


4) I hot glued in the main elements and then spread Snowfall Grit Paste around them with a small palette knife. While the paste was wet, I also used the 
Glitter Duster to add Rock Candy Dry Glitter to the scene for even more sparkle.


Thanks for stopping by and Happy Thanksgiving! I hope you are inspired to go get crafty! Keep an eye here on the Funkie Junkie Boutique Blog because you are now getting regular doses of expanded (and inspiring) content each week. Don't forget you can win a $25.00 gift card by using Idea-ology Christmas Products and tagging The Funkie Junkie Boutique on Instagram. We will choose one winner from those that participate.

Lisa Hoel for The Funkie Junkie Blog - Christmas Idea-ology assemblage #creativejuicefreshsqueezed  #tim_holtz  #thefunkiejunkie #thefunkiejunkieboutique #frillyandfunkie

Supplies used:
Idea-ology Christmas Festive Tin
Idea-ology Christmas Paper Dolls
Idea-ology Christmas Tiny Lights
Idea-ology Christmas Vintage Flair
Idea-ology Christmas Wood Slices
Idea-ology Christmas Pocket Cards
Idea-ology Christmas Tree Lot
Idea-ology Christmas Design Tape
Idea-ology Christmas Salvaged Snowman
Idea-ology Christmas Baubles
Idea-ology Velvet Trims
Idea-ology Mini Paper Clips
Idea-ology Metal Numbers
Ranger Archival Inks - Vintage Photo
Distress Spray Stain - Rustic Wilderness
Distress Grit Paste - Snowfall
Distress Rock Candy Glitter
Distress Seasonal Mica Stains - Tree Lot (2021), Fresh Balsam
Distress Paint - Lumberjack Plaid


Monday, November 21, 2022

Layered Idea-ology Holiday Display

Hello again friends. It's Teri with Teris Mailbox. I had soooo much fun creating this fun holiday layered piece for The Funkie Junkie Boutique! You can win a $25.00 gift card by using Idea-ology Christmas Products and tagging The Funkie Junkie Boutique. We will choose one winner.


Look at all the layers on this fun decor tag!

I have a video here is you prefer to watch the process:


Link in case the video isn't appearing: https://youtu.be/D_A9hkLEBG4


Start by Creating the Pieces

I started with the Mini Etcetera Tag and the Etcetera Cathedral Window and Brackets. A good coat of white Gesso allows for the addition of the Holiday Collage Paper and Grit Paste Snowfall later on.

Once dry, I coated the tag with Collage Medium and applied a piece of the Christmas Noel Collage Paper to cover the base and set aside to dry.

This piece has many components all created separately. The Woodland Tree from the Woodland Tree Lot was sprayed with Rustic Wilderness Spray Stain and set aside to dry. Note I did trim the back section so it would lie closer to the background. Once dry I dabbed Collage Medium on assorted branches and applied Mica Flakes.

The Santa and Snowman was painted and colored with acrylic paint from my stash along with a few touches of Copic Markers. The deer was painted with acrylic paint from my stash.


After the first failure trying to paint the figures while holding them, I recoated with white Gesso, let dry and then attached them with hot glue to the tops of embossing powder jars. This allowed me to rotate the figures and coat with the paint. Once dry, I added a few touches of alcohol ink with my Copic Markers. A quick coat of Collage Medium and dusting with Glitter complete the look! Once they were dry, the figures popped right off the lids.

The cathedral window was also coated with Collage Medium and coated with Mica Flakes and Glitter.

Let's Assemble the Piece


Collage Medium is perfect for attaching all the various layers. I created a shelf with the Cathedral Window above using Collage Medium. I added Snowfall Grit Paste with a coat of glitter on the shelf top.


I removed the base from the tree and folded the wire up through the back. I created a hole through the base to thread the tiny lights through and wrapped the string around the tree. I used hot glue to attach the tree, snowman, deer and Santa to the shelf.

The Christmas Noel Label Stickers added small sentiment focal points. 

Last up is dying the Rayon Seam Binding to create the bow. I used the Tart Cranberry Mica Spray Stain.


You just can't avoid inky fingers in this process!


I've been collecting Tim Holtz Ephemera for years. I dug these pieces out of my stash. I coated the token with Picket Fence Crayon and rubbed it in. The star has drops of alcohol ink for shine. I threaded the jingle bells onto wire and threaded it through the bow. Last to be added is the pin with the star and token.

I created a holder for the tiny light control and hot glued it onto the back of the tag.

Products used:

I hope I have inspired you to create a fun holiday decor piece. Thanks so much for stopping by today! I'd love to have you follow/subscribe on my social media sites InstagramFacebookBlogger and You Tube.  Be well. Be creative!