Hi everyone and welcome to another Saturday Showcase, the Design Team's opportunity to share tutorials and shine a spotlight on products available from
The Funkie Junkie Boutique with you. Our current challenge is '
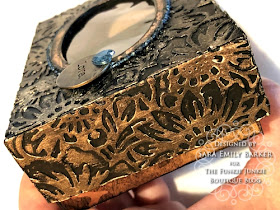
Repeat Performance', and my Design Team project is a candy box made with Tim Holtz Curio Box and featuring his new Chapter 1 Bouquet Thinlits dies and a couple of items I salvaged from the trash can! I fell in love with the Bouquet die from the the first cut I made with it!
Following is a tutorial showing the steps I took to make my candy box, but first I have a few close up shots to share. I don't show the assembly of the box in this tutorial, but it's pretty straight forward once you cut the pieces or you can watch
Tim's video for a demo.
If you read on to the end of this post, you'll see a few more ideas on how you can use what I call The Little Black Dress of dies.
Let's get started...
Click on any photo to enlarge.
With the Bouquet Thinlits die, cut some pieces of plain card stock that will fit the top and sides of the completed Curio Box. The pattern is intricate, so I find that it's best to use the Chrome Precision Plate and the wire brayer from Sizzix Mini Tool Kit to make fast work of getting all those little bits out. I purposefully left some of the smaller pieces in the flowers of the die cuts that would go on the side just for fun.
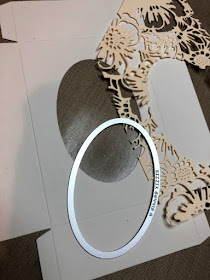
Having cut the Curio Box top, I used the larger oval Thinlit that comes with the Curio Box set to cut an aperture from the lid and the Bouquet die cut piece that will fit on top.
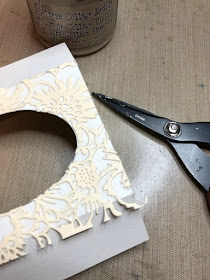
The Bouquet pieces were glued to the top (and sides of the lid -- not pictured) using Distress Collage Medium Matte. I brushed the collage medium on the box lid, stuck the intricate die cut down, and gave it another good coat of collage medium. Once fully dry, I trimmed the pieces with my scissors. I repeated with the edges.
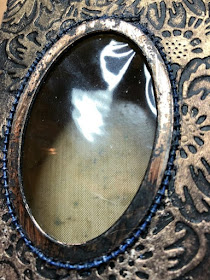
Our challenge calls for us to use something that we would normally throw in the trash on our projects, and I salvaged this wrapping from the extended plates my daughter just sent me for my birthday. Using another of the Thinlits dies from the Curio Box set, I cut a window for my box from the thin, but strong plastic film and stuck it on the inside of the lid with collage medium.
To give this more of a finished look, I cut another oval from a panel to fit the inside over the film. This also ensures the film won't move and makes the lid more sturdy.
Once the lid was covered with the Bouquet die cuts, assembled and the window was in place, I painted the exterior of the lid with black gesso, taking care to get good coverage. In retrospect, this would have been easier to do before adding the window film.
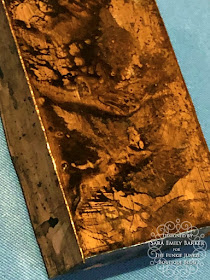
Next, out of Rose Gold Metallic 2 Kraft Stock, I cut an oval using the two oval dies that come with the Curio Box and the bottom of the box using the Biz die from the set. I sanded the pieces and applied Black Soot Distress paint, then sprayed with water, moving the paint around on the surface. I dried with a heat tool until most of the paint was dry and used a clean paper towel to blot up the remaining wet paint. I repeated this until I was happy with it, trying for an aged copper look.
Here is the bottom of the box when it was completed and assembled.
I cut a second oval from black fun foam, used collage medium to adhere it to the first, and then glued the stacked pair in the aperture on the lid. Before adhering the frame to the aperture, I used my finger to swipe the lid with Vintage Silk wax. (I forgot to take a photo before I glued the oval in place.)
These plastic ties were rescued from the kitchen trash can. After washing them and straightening them as best as I could with my heat tool and a static stretch, I gave them a good coat of black gesso. When dry, I dripped them with Celestial Alcohol Pearls. These were glued around the raised frame. One section just would not adhere, so this is where I placed the embellishments.
My simple embellishments include an Idea-ology Typed Token topped with an Idea-ology Mirrored Heart. The token was in my stash, already colored with Mushroom Alcohol ink. I swiped it with Black Soot paint and wiped it off the surface, leaving the paint to darken the recessed type.
A drop of alcohol pearl is all it took to color the Mirrored Heart.
That being finished, I made a couple of quick cards using the Bouquet Thinlits die.
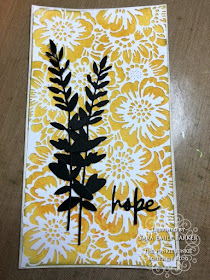
I had a tall skinny card in my stash with a background I made quite awhile ago. It's a yellow Distress Oxide background, but I'm not exactly sure of the color(s) I used. While Bouquet is designed to fit a standard card, it has no cutting blades on the ends, so you can make a continuous cut the length of your paper/card to fit a larger card or background. I trimmed white card stock to fit my existing card and made a pass in my die cut machine making an initial cut. After making the first cut, I lined up the bottom of the die to the top of the cut and made a second cut.
You can see the pattern is not continuous; I've marked the abutment with my scissors in the photo below. It's not terribly noticeable, but with some strategic placement of elements you can minimize it further.
While I auditioned a pair of Wildflower Stems and a portion of Christmas Circle Words Thinlits die, in the end, I decided to use one Tim's new Bunny Hop Thinlits die cuts along with a Metallic Quotations Sticker. I used another die from the Circle Words to complete my sentiment. See how nicely the sticker hides the change in pattern, even on close inspection?
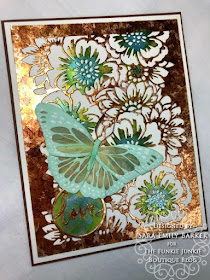
For my second card featuring Bouquet, I used more of the Rose Gold kraft stock and alcohol inks.
The butterfly wings are from my stash, and I gave them a new body (Flutter Framelits) and antennae made from a tiny shred of the metallic card (rescued from the trash, of course!). I made the embellishment using the Circle Words set again -- I love that this seasonal product can be used year round!
I had a great time playing with other Bouquet die cut samples, coloring them with Distress oxides, inks and crayons, but I think this post is long enough. The options are endless, and this is why I call this die The Little Black Dress of dies! If you can only afford one of Tim's wonderful new dies, I would suggest this one for it's versatility for card makers or mixed media makers.
So that wraps up another Saturday Showcase! I hope you've found some inspiration from my play with this wonderful die! There's still time to play along in our Repeat Performance challenge, and you can link up your project
HERE. Thanks for stopping by! Sara Emily
These products were used on these projects and can be purchased at
The Funkie Junkie Boutique:
Sizzix Chapter 1 Tim Holtz Thinlits Dies - Bouquet
Sizzix Chapter 1 Bigz XL Die w/Thinlits Die by Tim Holtz - Curio Box
Sizzix Chapter 1 Tim Holtz Thinlits Dies - Bunny Hop
Sizzix Chapter 3 Sizzix Thinlits Die Set - Circle Words, Christmas 664205 by Tim Holtz
Tim Holtz Sizzix Thinlits Die Set 5PK - Wildflower Stems #1 by Tim Holtz
Sizzix Framelits Die Set 20 PK - Flutter by Tim Holtz
Tim Holtz Idea-ology 8 x 8 Metallic 2 Kraft Stock
Dina Wakley Black Gesso
Prima Art Alchemy by Finnabair-Opal Magic Wax-Vintage Silk
Distress oxides
Distress inks -- Black Soot Cracked Pistachio
Distress paint Black Soot
Alcohol pearls -- Celestial Sublime Tranquil
Alcohol inks - Mushroom Teakwood
Tim Holtz Idea-ology Quotations Metallic Stickers
Tim Holtz Idea-ology Typed Tokens
Tim Holtz Idea-ology Mirrored Hearts
Sizzix Accessory - Chrome Precision Base Plate for Thinlits
Sizzix Sidekick Accessory - Mini Tool Kit












An exquisite piece, Sara Emily! A treasured piece of art. LOVE the blue and green metallic / AI - calling my Piscean name! xoxo
ReplyDeleteThree fabulous projects using this new die Sara Emily. Thank you for sharing how your gorgeous treat box came together - that two tone effect with the metallic touches gives such a great vintage feel. Seeing this with the contrast of the delicate card ideas really shows how versatile the die can be. I love how you added the colour drops to the centres of each flower. Definitely a little black dress die :)
ReplyDeleteWow! These three projects are absolutely stunning Sara Emily! Love how you used the same die on each of your pieces but with different colouring .. they all look amazing!
ReplyDeleteHow clever to use those ties on the box lid; I'd have never recognized those as salvageable! I purchased the Lace die in December, so I'm looking forward to using it like you've shown here. I've grown fond of trying to extend TH dies beyond the die's area & it's crazy what all can be done with them! Your box & cards are beyond AWESOME!!!
ReplyDeleteBeautiful! Love the detail in your gorgeous gift box! I have that die on order and can't wait for it to show up after seeing your clever inspiration!
ReplyDeleteWOWZERS! Awesome,utely love the Gorgeous creations, I absolutely love the treat box, thanks for the details of how it was made!!!!!
ReplyDeleteWow, such beautiful makes! I loved seeing how they all came together and those dies look amazing with all the details you added 😀. Thanks for the inspiration and happy weekend! Hugs, Jo x
ReplyDeleteyou make it look so easy, and that is the mark of a mixed media master. These are so gorgeous, and your use of color is truly inspired. I'm on a spending freeze right now, or I would run to the shop and purchase these great products. You make them very enticing indeed!
ReplyDeleteWhat a fantastic tutorial for the altered box, Sara Emily - the weathered metallic look you created is amazing. I love the cards too, especially that alcohol inky version of the flowers. You've certainly done a great job showing off this die.
ReplyDeleteAlison x
I was absolutely thrilled to come across this wonderful showcase of Tim Holtz bouquet designs on your blog! The intricate detailing and vibrant colors of his creations never fail to amaze me. Each piece truly seems like a work of art.
ReplyDeletehttps://www.frugalishness.com/bob-does-sports-discount-code/