It's time for more TFJB Inspiration Ave, and we've got some new items hot from Tim Holtz's new Everyday Collection for Sizzix here and they do not disappoint! It's Lyla here - taking the first turn on showing you what one of Tim Holtz's new die sets - Gentlemen - looks like. At the first glance, I fell in love with this clean cut, and easy to use set of 5 pieces! You'll notice these new sets are actually less small pieces since they are put together to help make easier matching of the pieces- a huge bonus in my opinion. Scroll down with me and let's take a look at what I did with my choice from the Everyday Collection, and what resulted from that.
GOODIES... from The Funkie Junkie Boutique!
These are the main items I wanted to use...
... along with some Mat Board, these were my choice pages from Tim Holtz.
(List given below.)
Click on the links below to help you find the items I used:
Tim's dies are always high quality, but it feels like he's gone well beyond even that!
These are so precise and easy to use- it's been a long time since we've had just simple,
but so detailed, fun shapes like this, and I thoroughly enjoyed these!
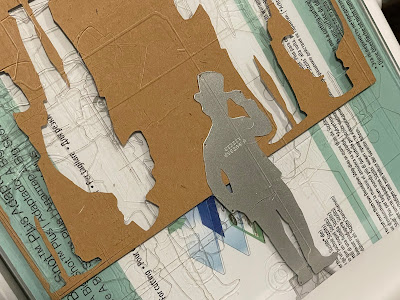
I cut all I needed for the first side of my Etcetera Mini Tag.
I still like to stack my shapes- especially if they are going to move.
The half man is explained next...
I noticed that the "Lefty" was touching his hat with his hand,
but "Righty" seemed to be touching his eyeglasses.
So, I turned my paper to the opposite side, and cut enough layers to make
a "Righty" arm and hat so they would both be tipping hats to each other.
I carefully trimmed away the unneeded arms on both guys,
since both arms would need to move.
TH IdeaOlogy Long Fasteners come in very handy here
since they are both long and skinny enough to fit the small arms.
Once all the pieces were moveable, I inked the edges and heat dried.
For the background: I took a sheet of Mat Board and traced the shape of the
Etcetera Mini Tag over it, cut it out, and then cut out a "T"-shaped area
where the arms would move back and forth in a sideways motion.
Another piece of Mat Board was needed to make a slightly thinner T shape
with a longer handle piece. The length would be trimmed as needed to fit.
The top of the T (or left side as shown sideways) in the hollowed-out area allows
the filler T to move back and forth, yet not come all the way out.
Then I traced and cut out the choice papers from the TH Backgrounds Vol. 1
for both front and back. The back could be put on right away, but
I needed to figure out where the arms would attach to the T board,
with the paper in between having only a slight slit opening for the
Long Fastener to fit through.
I gave both backgrounds a workup with Distress Oxides in Vintage Photo,
and Ground Espresso. I did some water spritzing, heat drying between, and finally.
stamping with some TH Vintage Photo Distress Glaze.
Here, I was covering up the trimmed pull handle- gluing it only to the handle,
but allowing it to slide over a bit of the background freely.
This is what the finished FRONT looks like before the final layer over the T.
This is what the BACK looks like before the covering up.
After the 2 guys are affixed to the background, both moveable,
I ran the TH Walnut Stain Distress Crayon over all the edges of the Tag.
Don't forget to heat dry after crayoning.
The same steps used for the BACK- cut all the die pieces needed
to stack up and make all three guys ("Middle Guy" wanted in on the fun).
Ink the edges and heat dry and they're ready to play!
Top hats and canes needed rose boutonnieres, in moho.
These were leftover stash ribbon roses from Princess Judith Rose's box.
And this is what I ended up with...
FRONT SIDE
BACKSIDE
And yes... on the FRONT SIDE...
they tip their hats to each other on the way in to work!
Thanks so much for joining me for the kickoff of the new Everyday Collection Dies!
Be sure to go to The Funkie Junkie Boutique and check out the
TONS OF NEW ITEMS!
And don't forget to come back here to Inspiration Ave,
for more inspirational makes from the rest of our talented and helpful
Funkie Junkie Boutique Design Team!
Until next time...
Stay Safe &
HAPPY BLOGGING!!


very good. love the interaction. thanks as always for sharing and all the inspiration.
ReplyDeleteGreat tutorial thanks!
ReplyDeleteAwesome fun tag. Hugz
ReplyDelete