Teri Wilson - TerisMailbox
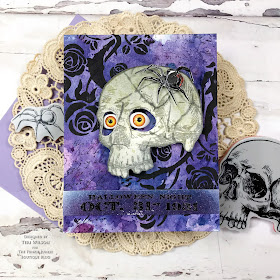
Check out this frightful Halloween Card. It's Teri with TerisMailbox posting for TheFunkieJunkie.
I have a video here (https://youtu.be/w9G7vLSQ6qw):
Start with the Background
Ink Smooshing in layers is the key to achieving the depth of color on this one! The background started with watercolor cardstock and distress inks. Uncharted Mariner, Chipped Sapphire and Seedless Preserves are the perfect combination for this very dark and spooky base. The key for this depth of color is dipping and drying multiple times between layers.
Use Stencil THS162 Thorned as the pattern to apply Black Opaque Texture Paste over the dried base. Place the stencil so the vine is on opposite sides. Let the paste dry.
Use the text stamp from Obscure to add text to the background randomly.
Create the Focal Point
The focus of this spooky tag is the skeleton from the Forbidding stamp set by Tim Holtz Stampers Anonymous. Stamp the partial skeleton using Hickory Smoke Archival Ink. Archival ink is great for ink smooshing and other wet techniques. Smoosh Antique Linen ink and add water before dipping and drying the skull.
The Fractured Stencil is perfect to add age lines to the skeleton using Hickory Smoke Distressed Ink. Ink blend Hickory Smoke Distress Ink over the top.
Fussy cut the skull plus another heavy cardstock to prop up the piece. Carefully cut the orbits out as well. Glue those together and add two layers of Black Fun Foam to allow space for the creepy eyes.
Heat emboss the large spider plus the October 31 sentiment on watercolor cardstock.
Ink blend Uncharted Mariner plus Seedless Preserves over the sentiment and trim.
Use Barn Door and Black Soot Watercolor Pencils to color the creepy spider.
Assemble the Card
Trim and attach the card base to an A2 card base. Glue the sentiment strip to the bottom of the card.
Glue the skull the card. Add a small circle of the Black Fun Foam to the spider and attach it to the skull.
Select two matching eye balls, insert and glue in the orbits to the card base. You may have to fiddle with the placement.
I hope you enjoyed seeing the steps to create this very spooky card. Check out The Funkie Junkie Boutique for great Tim Holtz products!
Products Used:


No comments:
Post a Comment