Showing posts with label Tim Holtz Layering Stencil. Show all posts

Wednesday, February 16, 2022

Guest Designer - Linda Coughlin

This is a big HELLO to friends near and far whom I haven’t been in touch with and who haven’t seen me crafting in several years. My craft room, tools and supplies have been gathering dust while I’ve been consumed with running The Funkie Junkie Boutique. From crafter to small business woman…it’s been a journey that hasn’t always been fun but has been interesting.


This week with our challenge blog needing a guest designer, my team has nudged and cajoled me to fill the guest designer gap by creating a piece of artwork. WHOA! That’s not as easy as you would think. First I had to knock down the cobwebs that smacked me in the face when I opened my craft room door (figuratively, but still the first mental hurdle), then to clean up all the junk that I’ve been shoving in here (out of sight…ya know?). I spent two days getting reacquainted with all my craft supplies and filling up three waste baskets as I opened dried out jars and bottles.

After cleaning and organizing, I plopped myself down at the craft table and…ugh, now what? What do I do, where do I go for inspiration? I watched a few YouTube videos and went to The Funkie Junkie Boutique to shop. I messed around and played at my craft table for a couple of evenings, made a couple of tags for fun but threw them in the trash. Finally I went back to my frilly vintage roots and came up with something.
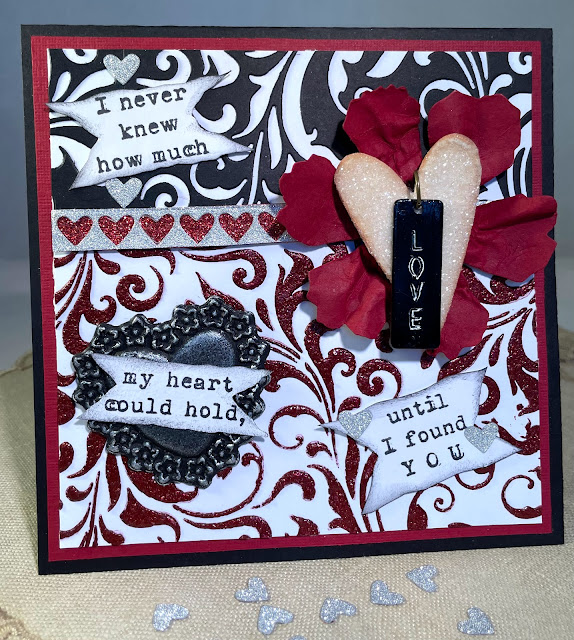

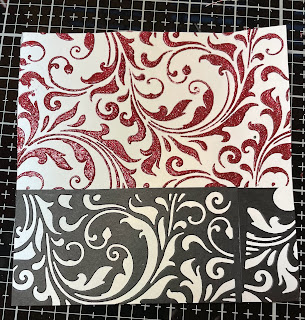
To start with, I wanted to use some sort of medium paste through a stencil. We just received a huge shipment from Prima Marketing with some great Jewel Effect glitter pastes. I wanted red for my Valentine’s make, chose Precious Rubies and used it with the Tim Holtz Layering Stencil THS032 Flourish. The paste is wonderful. It goes on smoothly and cleanly and dried in a couple of hours (even in the cold, rainy north Florida weather this week).
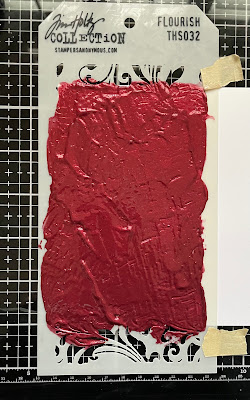

The stencil area only covered 2/3 of the area of my card’s panel, so I needed to fill in the rest. My mind was really trending toward red and black and I decided to coordinate the stenciling with a die cut. One of the great things about using Tim Holtz products is that many of the designs from product line to product line coordinate and work together. Tim’s Sizzix Thinlits Mixed Media #2 has a die that matches the stencil I used.
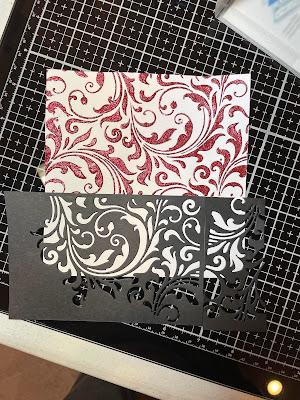

Using a piece of black card stock, I applied Sizzix Adhesive Sheets #656802 to the back and then ran it through my Big Shot. If you are not using this (or a similar product) when cutting your intricate dies, let me tell you, it is life changing. Being able to peel off the sticker backing and press down the die cut makes it not only effortless but allows for a perfect adherence. The die cut wasn't wide enough to fill the space so I had to piece it.

Now I needed a strip or ribbon to cover where the two panels joined. Searching my stash, I found just what I had in mind. Years ago, there was a Tim Holtz Idea-ology product called Deco Sheets and I found some left over glittery silver plus some glittery red from an unknown source. Pulling out my old Shape Strips Thinlits set 660226, I cut a strip of the silver and then backed it with the glittery red (bonus, a bunch of tiny silver glittery hearts). Digging through some set aside embellishments, I came across a flower that had been cut with the old Tattered Florals die plus a vintage looking sparkly heart that already had the attached “Love” charm in black! Why make something new when just the right thing jumps out and says “hey, give me some love too”?

Next, I needed a sentiment and riffled through all my old stamp sets. The one that really grabbed me was from Wendy Vecchi/Stampers Anonymous SCS131 A Passion For Art: "I never knew how much LOVE my heart could hold until I found YOU." It all seemed to come together with that sentiment.
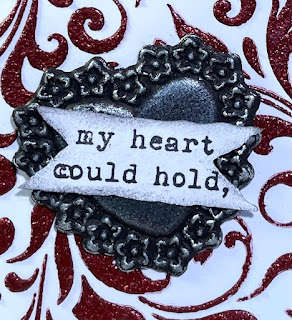

I felt the card needed one more element, and sticking with the black and red theme, I cut a black heart using the Sizzix Impresslit Lucky Love 665227 (we still have a couple of these discontinued Impresslits left in the shop!). I very lightly burnished it with Prima Metallique Wax in White Pearl to give it the tarnished antique silver look. I'm a huge fan of the Prima Metallique Waxes. I love the way the black cardstock now looks like a heavily tarnished silver piece.

Tim Holtz Layering Stencil - Flourish THS032
Prima Finnabair Art Extravagance Jewel Effect Texture Paste - Precious Rubies 969042
Sizzix Adhesive Sheets - 6" x 6", Permanent, 10 Sheets 656802
Wendy Vecchi "A Passion For Art" Stamp Set SCS131
Tim Holtz Idea-ology Kraft Stock, Black TH94145
Sizzix Impresslits Lucky Love
Prima Marketing Metallique Wax - White Pearl

I hope you have enjoyed my return to blogging. If so, I have this post over on my blog The Funkie Junkie, where it all started. You can stop by and say hi over there.

Saturday, May 9, 2020

Saturday Showcase - Prima Marketing Pretty Mosaic

Hi everyone and welcome to another Saturday Showcase, the Design Team's chance to share tutorials and products available from The Funkie Junkie Boutique with you. This time I've been combining the Prima Marketing 'Pretty Mosaic' Collection with a number of other ranges to create some ideas for pretty mixed media cards.


The base for each of the cards started with a piece of 12 x 12 inch card from the largest of the paper pads. This was altered by pressing it into a Gel Press plate to pick up the remains of some Dina Wakley Media Paint - you can see below how the addition of some shades of gold, red and orange gave the original sheet (shown underneath) a warmer glow. The card was then trimmed into four equal pieces each measuring 5 3/4 inches.


Here's the first of the cards;


The first base was embossed using the Tim Holtz 3D Embossing Folder 'Roses' and I painted over the raised areas with Buff and Gilt Paint from the Dina Wakley Media range.


There's a beautiful little silicone mould set in the Pretty Mosaic range that I used to create two paper clay butterflies. These were painted, first with diluted Fuchsia Paint then dry brushed with White Gesso to highlight the pattern. To give it a more vintage look I dripped a little Lemonade Alcohol Ink over the surface and dabbed it dry to remove any excess.


To make a base and plaque for the sentiment I cut a 6 inch piece from another sheet in the 'Pretty Mosaic' paper pad and edged it with Gilt Paint. The plaque was cut from a smaller piece of the same design using Eileen Hull's 'Gift Box' Die and was also edged with the Gilt Paint.


To enhance the embossed roses I added a stem of 'Susie' Pretty Mosaic flowers, twisting them into shape and gluing them in place. To secure them further I added some hand stitching with little beads.


To finish the card I stuck the smaller embossed layer to the larger Gilt edged piece, glued the butterflies in place and added the plaque, stamped with a sentiment from Wendy Vecchi's 'Funky Flower Art' stamp set. This was then mounted onto a 6 inch square white card blank.


Now for the second card;


I stencilled over the base using Tim Holtz 'Roses' Layering Stencil with Opaque Matte Texture Paste, painting over the top with Heather Paint.


More of the Heather Paint was used to colour seam binding that was then threaded through some Venise Lace from Linda's store. I stuck this to one side of the base using double sided adhesive tape on the reverse side.


To create the floral bouquet I stamped the roses from Wendy Vecchi's 'Rosy Art' stamp set with Plum Archival Ink twice, painting both sets with Heather and a mix of Evergreen and Eggplant Paint. This was also repeated on a coordinating Mat Mini. After cutting and shaping the leaves and flowers I layered them together, adding a little hot glue in between the leaves to give them more dimension and stability.


To contrast with the darker, smaller leaves in the bouquet I stamped spiky leaves from Wendy Vecchi's 'Funky Flower Art' repeatedly with Plum Archival Ink, painting them with a mix of Lime and Gilt Paint. Once cut out these were also shaped before being glued beneath the roses and smaller leaves.


To finish the card I stuck the stencilled smaller piece to a 6 inch piece of card taken from another of the designs in the 'Pretty Mosaic' paper pad. With the bouquet glued in place I added a bow of seam binding made with the offcut from the lace border and stamped a sentiment from Wendy Vecchi's 'Funky Flower Art' stamp set onto a small tag cut from another of the sheets in the paper pad. As for the first card I mounted the finished layers onto a 6 inch square white card blank.


And here's the third and final card;


As for the previous two I started by altering the base layer, this time by stamping and embossing into the centre Wendy Vecchi's 'Vintage Mesh' background stamp using gold embossing powder. Once heat set I cut a 3 1/4 inch square out of the centre.


Taking a 6 inch square piece from a coordinating sheet from the 'Pretty Mosaic' paper pad I cut a 4 inch square out of the centre. To disguise any unpatterned areas around the edges of each piece I stamped them with the lacy flower from Wendy Vecchi's 'Friends & Art' stamp set using Plum Archival Ink.


After sticking the two outer squares together I layered the smaller squares with pieces of scrap paper, a die cut piece of 'Crochet' lace and an offcut of paper from the 'Pretty Mosaic' paper pad.


To decorate the paper collage I stamped the lacy flower from Wendy Vecchi's 'Friends & Art' stamp set on to card twice. These were painted with a combination of Olive and Eggplant Paint and White Gesso before being cut out and layered together with hot glue. I also painted a flower head using a Mat Mini from the coordinating set, adding dots of Wendy Vecchi's 'Sunflower' Liquid Pearls onto the centre of each tiny flower.


To finish I added the flower to the centre of the paper collage, stamped a sentiment from Wendy Vecchi's 'Funky Floral Art' stamp set onto scraps of 'Pretty Mosaic' card and mounted it on top of the flower. As with the previous cards I adhered this to a 6 inch square white card blank.


Thanks for visiting to catch today's Saturday Showcase tutorial - I hope you've enjoyed seeing some ideas for using the 'Pretty Mosaic' Collection in combination with your other favourite art supplies.

There's still time to enter the current Funkie Junkie Boutique Blog challenge 'Sew Sweet' to be in with the chance of being a Guest Designer here. We look forward to seeing your amazing creations.

Jenny

Products used to create these cards are available from The Funkie Junkie Boutique and are listed/linked below.


Saturday, February 29, 2020

Saturday Showcase Featuring Texture Fades & Impresslits Embossing Folders

Happy Saturday, Maggi here to show you how this tag came together using Texture Fades, Impresslits Embossing Folders and some other great supplies from The Funkie Junkie Boutique.


The Details


To create the focal image, emboss a rose using Metallic Kraft cardstock (champagne) and a Texture Fades - Rose embossing folder from Tim Holtz. I love how sturdy this paper is and makes such a great embossed image. The 3-D Texture Fades embossing folders are so awesome as they make such a crisp and deep embossed image. Be sure to lightly mist your embossing folder before running through your machine as that helps to make a really deep impression and run it through your machine several times.

Also die-cut a Fanciful flourish with Tim Holtz's 3-D Impresslits Embossing Folder. These are great as the die cuts and embosses an image at the same time. Mist the two pieces with black mist such as Dylusions. Then lay a paper towel over the two pieces and let the paper towel soak up the excess mist.


Carefully remove the paper towel to reveal a pattern made by the texture of the paper towel. Dry the mist and then frame the piece with a Baseboard Frame or something similar. Set the flourish aside to use later.


Now take a piece of burlap around 9.5" long and 2.5" wide. Stencil on a design with black embossing paste and set aside to dry. I've used Tim Holtz's gingham stencil.


Now let's work on the tag. Cover the tag with design paper, I've used a page from Stamperia's Oriental Garden Collection. The Funkie Junkie Boutique has a great tool set, Ergo Metal Needle File Set - 10pc, that is perfect for sanding paper edges extending beyond the chipboard edge and it's very affordable too!

Then stencil on a additional patterns with Aged Mahogany and Iced Spruce Oxide Inks. I used the Burst and Dots stencils.

Now adhere the burlap along the left side and top with a piece of lace as shown in the photo below.


Now adhere the frame and hole reinforcer (painted black) to the tag. I used dimensional foam tape to pop up the frame. Notice that I cut the bottom left corner off the frame. I did that so that my flowers would sit better against the frame.


Let's "dress up" the metal filigree flowers by adding some embossing powder to the petals. Simpy dab a bit of embossing ink on the metal flowers, sprinkle with metallic embossing enamel and heat. CAUTION: The metal flowers will be VERY hot after heat embossing so allow them to cool before picking them up.

Add a small sentiment to the lower right corner of the frame. I used a Creative Embellishments word Create embossed with Stampendous Aged Ivory embossing enamel.


Finish the tag up by adhering the flourish over the hole and top with a pretty butterfly. Then add the flowers and a small sentiment from the Oriental Garden collection on the right side.


I think you're going to love these 3-D Texture Fades and Impresslits Embossing folders. You can make so many unique projects with them! Thanks so much for spending some of your time with me today!


Tim Holtz Idea-ology Layers & Baseboard Frames
Stampendous Aged Ivory Embossing Enamel
Creative Embellishments Chipboard Word Create
Little Birdie flowers

Saturday, September 24, 2016

Saturday Step By Step - Golden Leaves

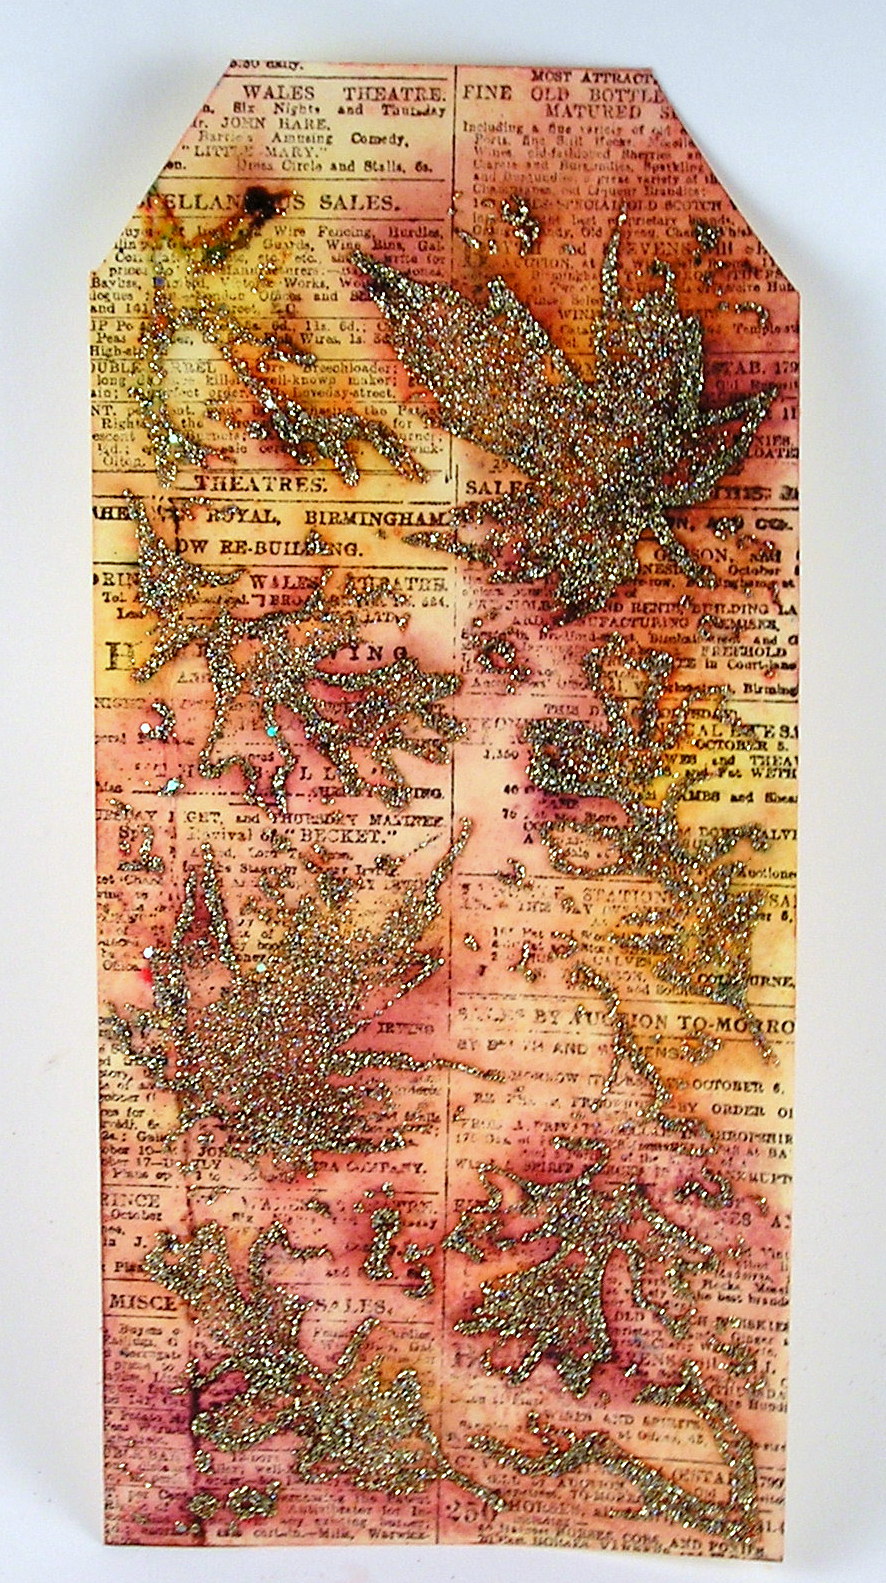
Welcome!  Suzz here.  I love fall and any opportunity to play with leaves and the warm autumnal colors is something I love to do.  I decided to play around and create a fall tag using stencil, glue stick color bursts and glitter.

1. Take a manila tag and stamp text in the background  using Archival blank ink.
(Don't worry about uneven or faded stamping it works very well as a background.)
Tip: I used a manila tag but this involves a lot of water. Watercolor paper or a mixed media paper would have worked better in absorbing the water.

2.  Place the leaf stencil  over the stamped tag. Rub on glue from a glue stick in the openings.  Repeat until entire tag is covered with leaves. Make sure to clean off your stencil thoroughly after you are finished with the glue stick.  Baby Wipes or warm water will clean it up quickly.


3. Squirt puffs of color randomly over the surface of the tag.  The colors on this tag are Merlot, Burnt Orange, and Yellow Ochre.
Tip: Do this in a box or contained space.  The color bursts are gift that keep on giving. I have picked up the tiniest speck of a color burst on other projects because I didn't get them all off my crafting mat.
4. Take a brush and spread the color burst powder over the stenciled images.  This doesn't need to be perfect as the colors will spread.


5. Shake of excess powder from tag into your container or garbage.

6. Spritz water over the entire tag.  Ensure that all the powder/crystals are activated.
Tip: Move to a craft sheet, piece of acetate, or something that you can wipe down after you are completed.

7.  Remove excess ink and water by dabbing up water with a paper towel. 

8. Repeat water and dabbing off excess ink until desired color is achieved.

10. Sprinkle tag with glitter. Shake off excess glitter.  


11. Optional:  Spray tag with glossy finish.  (This will seal the color and glitter.)

12. Die cut leaves and branches.  Sprinkle color bursts onto slick surface. (I used a cool whip container top). Spritz with water.  Die ribbon, leaves with various colors.  Apply glue stick to branches and dip in glitter.
Here is a second tag with a lighter mix of the same colors. Each time you do this process you will end up with a different look.

I hope you enjoyed the tutorial as much as I enjoyed playing with my toys.  The products are available in the store including the new leaf stencil and dies.  The Funkie Junkie Boutique

Have a lovely weekend!


Suzz

Products: