Wednesday, September 30, 2020

Fall Foliage

Hi everyone and welcome. Jenny with you to host the next of our challenges here at The Funkie Junkie Boutique Blog. I'm calling this one 'Fall Foliage'.

"According to most search engines the Fall season has officially begun so we should be starting to see the emergence of all those beautiful Autumnal colours, unless Mother Nature throws us a curve ball! Let's celebrate them anyway by creating a vintage or shabby chic project in traditional Fall shades that includes some form of foliage like leaves, berries and so on."

The winner will earn a chance to be a Guest Designer at a future date here at The Funkie Junkie Boutique blog, and everyone who enters and follows the rules will go into the draw for the chance to win a $25 spending spree at The Funkie Junkie Boutique. There are also Top 3 Badges for three additional outstanding entries, chosen by the Design Team.

The guidelines for entering are simple; create a new vintage or shabby chic project following the challenge theme, link it below to your post (not just your blog) and also include a link back to this challenge in your post. You can combine our challenge with up to 10 challenges (including this one) to be in with a chance of winning. If you are entering through a public forum (such as Instagram) you'll need to include the words 'Funkie Junkie Boutique Challenge'. Also, please be sure to turn off your Word Verification so our Design Team can leave comments on your blogs. Make sure you follow these rules as unfortunately, we have had to eliminate entrants from the prize draws in the past.

The Design Team have created some inspiration projects to get you started;

 Sara Emily Barker - sarascloset

Suzanne Czosek - Suzz's Stamping Spot 


Cec Wintonyk - CW Creations


Now it's over to you - we'd love to see your Fall projects for this one. Use the link below to enter them and be in with a chance of winning.

Thursday, September 24, 2020

Guest Designer - Birgit Johansson

Please say hello and give a warm welcome to our Guest Designer for our Staying in the Background challenge. Birgit Johansson of Cards R Fun was the Design Team's Top Pick for the Stencilmania challenge.


Hello there crafters! I am so delighted to feature in the guest designer post on The Funkie Junkie Boutique Blog - It is such an honor!

I live with my family in Sweden. I've loved paper ever since I was a kid, so it's no wonder I've made lots of cards over the years. My style and the materials I worked with have also changed over the years.


For the card I will show you today for the challenge" Stay In The Background" I have used a fairly simple embossing technique that works for almost all styles..


First I stamped leaves and clear embossed them on watercolor paper, then I sponged over Distress inks and stamped more leaves. I also added paint and water splatters.


I stamped the sentiment on vellum paper in black and clear embossed it too. If you are more interested in which products I have used, you are welcome to visit my blog Cards R Fun.

Thanks so much for the opportunity to be a guest designer together with the talented design team over at The Funkie Junkie Boutique Blog!

* * *
Go to Birgit's blog to check out all the details of her background and card. Once you have done that come on back and share your handmade backgrounds with us. The challenge can be found HERE and runs until 11:55 pm EDT on Tuesday, September 29th.

Monday, September 21, 2020

Challenge Winners - Birds

It is time to announce our winners for the 'Birds' challenge. Thank you to everyone who entered and played along with your beautiful bird projects.

(click on the image for a closer look)

The Design Team really enjoyed seeing all the entries and chose this wonderful mixed media card by #17 Wanda Hentges as the overall winner. There are so many wonderful layers to Wanda's 'eroded' background and we highly recommend you take the opportunity to see how she made it on her blog here.

Congratulations to Wanda on winning an opportunity to be a Guest Designer at a future date here at The Funkie Junkie Boutique Blog. You will be contacted shortly with all the details.

And now our picks of three additional outstanding entries for the The Funkie Junkie Boutique Blog Top 3 Badges. In numerical order they are #9 Stephanie Severin, #15 Marjeta, and #18 Lyla Larimore. Please email Linda at thefunkiejunkie@gmail.com for the codes for the Top 3 badges so that you can display them proudly on your blog.

And finally for the lucky randomly drawn winner for the $25 gift certificate to The Funkie Junkie Boutique; our congratulations go to #12 Fonda! Please email Linda at thefunkiejunkie@gmail.com for the gift certificate details.

Thank you again to everyone who took part in this challenge from all of us here at The Funkie Junkie Boutique Blog and congratulations to all our winners. The current challenge 'Staying in the Background' can be found HERE and runs through Tuesday, September 29th at 11:55 pm EST so we hope you will join us.

Saturday, September 19, 2020

Saturday Showcase - Tim Holtz Speckled Egg

It is Cec here and I am presenting the Saturday Showcase this time. I received some of the Speckled Egg distress products recently and thought I would show you a few ways to use them.

Note: When I ordered the products the actual ink pads for both the Distress Ink and the Oxide were out of stock so I have made do with just the Reinkers.
I created the background for this card by putting some Distress Texture Paste Crackle (Tim Holtz) through a Brick stencil and then inking over it when it was dry with Pumice Stone Distress Ink (Tim Holtz). It warped a bit so I spritzed the back with water and put it under a load of heavy books to dry, which helped but didn't totally flatten it so I distressed the edges to hide the leftover problem a bit.

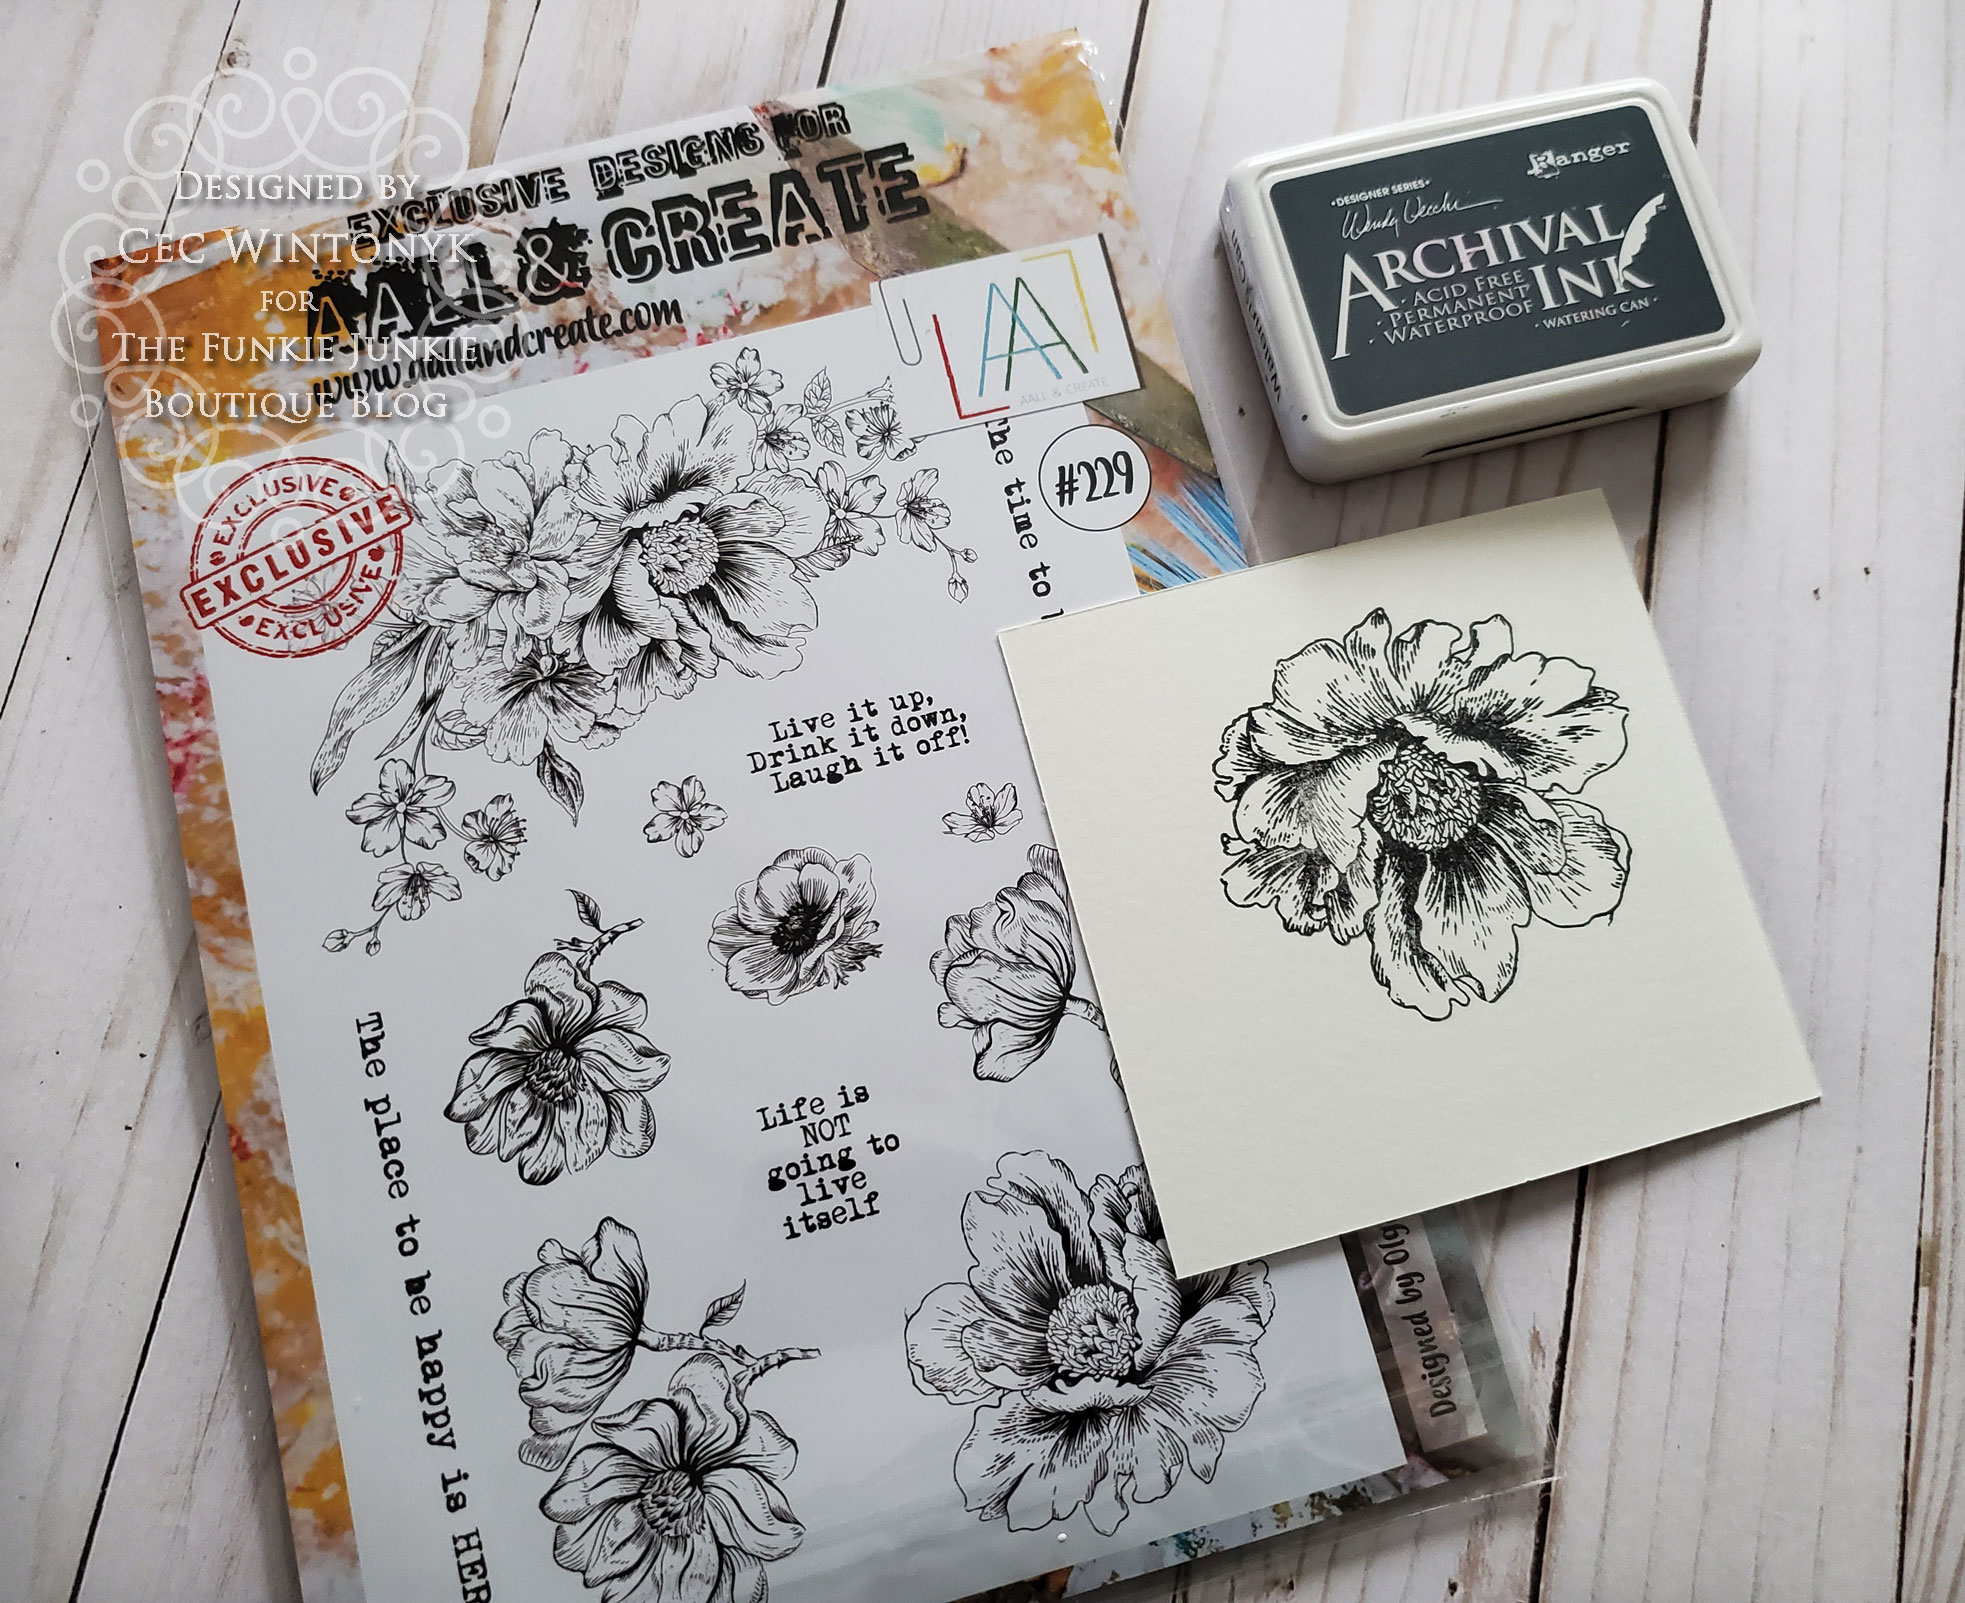
Next I stamped the large flower from the Blooming Field stamp set (AAll & Create) onto some white card stock twice using Watering Can Archival Ink (Wendy Vecchi).
The next step was to paint the flowers with Speckled Egg Reinker, which I treated like watercolours by dropping some on my kraft sheet and adding some water. The centres were painted with Gathered Twigs and Scattered Straw Distress Ink using a Water Brush (Tim Holtz). Once they were dry, I fussy cut them.
The leaves were also stamped with Watering Can Archival Ink using stamps from a Heartfelt Creations set called Open Leaf that was once available in Linda's shop. The leaves were fussy cut and painted with Shabby Shutters and Forest Moss Distress Ink using a Water Brush (Tim Holtz).

The sentiment is computer generated and inked with some Pumice Stone DI. The card was easily assembled in layers using Scor Tape.
This card was created for my husband's birthday, which happens to be today. I started with the background by putting some of the Speckled Egg Oxide Reinker, along with Vintage Photo and Ground Espresso Oxide (Tim Holtz) on my kraft sheet, spritzing them with water and dragging some white card stock through the puddles.
Using Watering Can Archival Ink I added some stamping with stamps from both The Professor and Dapper sets (Tim Holtz). I outlined the panel with some hand drawn lines using a Micron Pigma Pen.
For the smaller panel, I dragged the card stock through some Vintage Photo and Ground Espresso Oxide puddled on my kraft sheet. Once it was dry I added some stenciling with a Harlequin stencil (Tim Holtz) and Watering Can Archival Ink.
Next it was time to create the embellishments. I cut the large gear from cracker box material using a die set that was gifted to me by the lovely Jenny Marples. Then I added some glue randomly on the gear and sprinkled playground sand over the glue to add some texture. Finally I painted it with a mixture of Umber, Tangerine and Peacock Acrylic Paint (Dina Wakley).
I stamped the main image from the Dapper set using Jet Black Archival Ink (Ranger) and fussy cut it to separate the images. The hat band and bow tie were painted with Speckled Egg Distress Paint and both images were inked with some Vintage Photo Distress Ink (Tim Holtz).
The light bulb was stamped from The Professor set using Jet Black Archival Ink and then the bulb was inked with Wild Honey Distress Ink (Tim Holtz) before it was covered in Glossy Accents (Ranger). Once it was dry, the base of the bulb was coloured with a gold metallic Gelly Roll pen (Sakura).
To assemble the card I added the larger panel to a kraft card blank and topped it with the smaller panel. Brads were added to each corner and then I added the embellishments I prepared followed by a Big Chat sticker (Tim Holtz).

Finally I decided to make a very soft but structured collage on a canvas board.
I started by covering the canvas board with tissue paper (my go-to instant texture) and then added some Translucent Embossing Paste (Wendy Vecchi) through a Crossed stencil (Tim Holtz).
Next I added some watered-down Speckled Egg Distress Paint as a frame on the canvas. It seemed a bit dark so I used my ratty paint brush to pounce some White Gesso (Dina Wakley) over it to lighten it up.
The next step was to make the various elements. First I took a butterfly that my husband cut for me out of plain card stock and covered it with Distress Texture Paste Crackle (Tim Holtz) and then painted it with Speckled Egg Distress Paste to which I added a bit of Glazing Medium. Note: I put painters tape around my jars of medium to try and keep them from drying out and this time I accidentally ripped part of the label off the jar when I removed the tape - oops.


The body of the butterfly was created by coating a pen nib (Tim Holtz Idea-ology) with Espresso, Pitch Black and Copper Mixative Alcohol Ink (Tim Holtz).
The panel the butterfly sits on is a piece of card stock covered with a thick coat of White Gesso and before it completely dried I dragged a stylus through to create some texture. Once it was dry it was painted with Sand Acrylic Paint (Dina Wakley).
I made a couple stenciled pieces. The first was some tea dyed paper with Speckled Egg stenciling through a Patchwork Hex Layering Stencil (Tim Holtz).
The second was a piece of card stock painted with Speckled Egg Distress Paint and then stenciled with Vintage Photo Distress Ink through a Speckles stencil - how appropriate.
Some natural burlap was painted with Speckled Egg Distress Paint.
Then some seam binding was dyed with Speckled Egg Distress Reinker.
I created a few other elements - a strip of canvas with some stitching, a strip of Kraft Glassine with a rusted metal piece that was in my stash and another strip of Kraft Glassine with breads added to it. Finally I assembled the collage adding a strip of lace and also adding a button to the burlap. The Speckled Egg colour is soft and if I had used black or grey instead of the Vintage Photo shade, it would definitely have been reminiscent of robin eggs.

I hope you managed to stick with me for this super long post and I hope you got some inspiration along the way.

Supplies list:

Tim Holtz Speckled Egg Distress Inks and Paints
Tim Holtz Distress Inks - Shabby Shutters, Vintage Photo, Forest Moss, Wild Honey, Gathered Twigs, Scattered Straw, Pumice Stone
Tim Holtz Distress Oxides - Ground Espresso, Vintage Photo
AALL & Create A4 Stamp Set - Blooming Field #229
Tim Holtz Cling Stamps - The Professor
Stampers Anonymous Tim Holtz Stamp Set - Dapper CMS267
Tim Holtz Stencils - Crossed, Speckles, Patchwork Hex, Bricked, Harlequin
Tim Holtz Alcohol Inks - Pitch Black, Espresso, Copper Mixative
Ranger Tim Holtz Alcohol Blending Solution
Dina Wakley Acrylic Paint - Sand, Umber, Tangerine, Peacock
Ranger Wendy Vecchi Archival Ink Pad - Watering Can AID39006
Ranger Archival Ink Pad - Jet Black AIP31468
Studio 490 Wendy Vecchi Embossing Paste - Translucent WVPASTETRN
Tim Holtz Distress Texture Paste 3oz Crackle TDA71303
White Jute Mesh (Burlap)
Rayon Seam Binding
Ranger Inkssentials Glossy Accents GAC17042
Tim Holtz Idea-ology Big Chat Stickers TH93192
Scor Tape
Ranger Inkssentials Ink Blending Tool - With 2 Blending Foams IBT23616
Ranger Inkssentials Alcohol Ink Applicator With 10 Blending Felts TIM20745
Ranger Inkssentials Mini Ink Blending Tool - With 4 Blending Foams IBT40965
Tim Holtz Kraft Glassine
Tim Holtz Idea-ology Pen Nibs
Heartfelt Creations Open Leaf Stamp Set
Sakura Gold Metallic Gelly Roll Pen
Micron Black Pigma Pen
Liquitex Glazing Medium
Button, Brads, Lace,

Wednesday, September 16, 2020

Staying in the Background

It is Cec here and I am your hostess for the new challenge starting here today. I am calling this one 'Staying in the Background' and here is what I have to say about it:

My challenge to you is to create your own background and use it in a shabby chic or vintage project - no pre-printed patterned paper this time. You can create the background in any number of ways and it can be simple or intricate. Using embossing folders. stencils, dies, stamps, washi tape, paints, inks or a gel press are just a few ideas. Make sure you give a brief description of how you created your background in your post.

The Design Team will choose their top picks with the overall winner earning an opportunity to be a Guest Designer at a future date here at The Funkie Junkie Boutique challenge blog and there are also badges for three additional outstanding entries. Everyone who enters and follows the rules will go into the draw for the chance to win a $25 gift certificate to go shopping at The Funkie Junkie Boutique.

The guidelines for entering are simple; create a new vintage or shabby chic project following the challenge theme, link it below to your post (not just your blog) and also include a link back to this challenge in your post. You can combine our challenge with up to 10 challenges (including this one) to be in with a chance of winning. If you are entering through a public forum (such as Instagram) you'll need to include the words 'Funkie Junkie Boutique Challenge'. Also, please be sure to turn off your Word Verification so our Design Team can leave comments on your blogs. Make sure you follow these rules as unfortunately, we have had to eliminate entrants from the prize draws in the past.

The Design Team has created some wonderful inspiration for you. To get all the details of their projects, just click on their blog name and you will be taken directly there.

Cec Wintonyk - CW Creations 

Sara Emily Barker - sarascloset


Suzanne Czosek - Suzz's Stamping Spot 


Once you have checked out their creations, come on back and share your projects with handmade backgrounds. The challenge runs through 11:55 pm EDT on Tuesday, September 29th.


Monday, September 7, 2020

Challenge Winners - It's A Wrap

It is time to announce our winners for the 'It's A Wrap' challenge. Thank you to everyone who entered and played along with your beautiful projects featuring wrapping in one form or another.

(click on the image for a closer look)

The Design Team really enjoyed seeing the entries and chose this fabulous journal page by #10 Jo (Let's Art Journal) as the overall winner. We loved how Jo used various different surfaces including pieces of packaging and lots of techniques to create the individual panels that all work perfectly together. Make sure to check them out on her blog here.

Congratulations to Jo on winning an opportunity to be a Guest Designer at a future date here at The Funkie Junkie Boutique Blog. You will be contacted shortly with all the details.

And now our picks of three additional outstanding entries for the The Funkie Junkie Boutique Blog Top 3 Badges. In numerical order they are #1 Tracey (@Hotchpotchcreations) #3 Kleirrskreation and #6 Elly's Creaties. Please email Linda at thefunkiejunkie@gmail.com for the codes for the Top 3 badges so that you can display them proudly on your blog.

And finally for the lucky randomly drawn winner for the $25 gift certificate to The Funkie Junkie Boutique; our congratulations go to #7 Zoe (This Little Place)! Please email Linda at thefunkiejunkie@gmail.com for the gift certificate details.

Thank you again to everyone who took part in this challenge from all of us here at The Funkie Junkie Boutique Blog and congratulations to all our winners. The current challenge 'Birds' can be found HERE and runs through Tuesday, September 15th at 11:55 pm EST so we hope you will join us.

Saturday, September 5, 2020

Saturday Showcase Tim Holtz Idea-Ology & Sizzix Feathered Friends

Saturday Showcase time!  Suzz here.   I am continuing with our Birds theme this week and showcasing three cards using the lovely Tim Holtz Idea-Ology, Sizzix Feathered Friends and the Stampers Anonymous Mini Layering Stencil #21!

I think once you pull out a variety of supplies for one project you start to create bits and pieces that don't end up on just one  piece of art.  That leads you onto creating multiples with all the different ideas that are flying around in your head.  The Idea-Ology embellishments just lend them self to accenting and finishing off your designs.  I had pulled out all kinds of embellishments and used them to accent the cards!

This series of cards starting with an old book that I used to pull some pages out and create a variety of backgrounds.  

The backgrounds started with multiple pages torn from the old book. 

First I applied a crackle paste over the stencil on a page. 


I repeated twice to cover the background. 


I then repeated the process with a matte finish embossing paste. With this thin of paper the paste tends to cause the paper to curl up.

I had to let the past dry first.  When I added my sprays I used  my acrylic blocks to help let it dry flat.  (In my picture I just was displaying how I did it but it would have been soaked with water or sprays)


While I was waiting for those backgrounds to dry, I die cut a smattering of birds from the same papers and white cardstock. 

I then had an idea of creating a pleated background.  So I started folding a page purposely making the folds uneven and at angles. 

Here is what the finished pleat looked like:

I wanted an uneven edge so I used a ruler to tear the two edges. 

I ended up using both the main piece and the torn piece on my cards.

I decided to add color to my backgrounds.  I started with the antique linen on my darkest background.


I then used the excess from that to pick up on my other backgrounds. 


I then added Ground Espresso along the bottom edge: 


Quickly followed by spritzed water to allow it to bleed upwards: 

Then a splattering of gold across the page:

When it was all dry it ended up like this: 


The drier the background the more the gold will pop on the background.  I then used a strip from my folded background along the side. Other embellishments were dragged through the leftover ink on my craft mat. 

I will leave you with a few more photos of the finished backgrounds.


I hope this has you inspired to join in the Birds challenge! 

Suzz

Products: