Wednesday, April 27, 2022

Guest Designer - Sara Emily Barker

The Funkie Junkie Boutique is delighted to welcome Sara Emily Barker (sarascloset) as our Guest Designer this week. Her stunning layered tag was the Design Team's choice as winner of the "Industrial Grunge" challenge. Today she shares another amazing project as inspiration for our current "A Study In Contrasts" challenge.


Hi! It’s Sara Emily from sarascloset. I’m tickled pink to be here at The Funkie Junkie Boutique blog as this week’s Guest Designer. I enjoy all sorts of arts and crafts, but especially love to experiment with my mixed media supplies to find new ways combine and use them.


My canvas is inspired by the new leaves poking out from under last fall’s leaves rotting over the winter months in my own perennial beds and the fern fronds that are starting to unfurl in the wooded areas around my neighborhood. It all started with a piece of bark I found out in the back yard.


You’ll notice many contrasts in the details of my dimensional project. I’ve used lots of black and white to contrast with the brighter colors and the dark, decaying leaves and wood differ greatly from the fresh spring flowers and greenery.

If you would like to see more close ups of my project and learn about additional less obvious contrasts I’ve used, please head over to my blog. I’ve also got a quick and complete step by step on how my background came together. Thanks once again to Linda, Carol and the design team for inviting me to be their Guest Designer this week! And special thanks to Lisa for such a fun challenge theme!

Don't forget to share your projects for the 'A Study In Contrasts' challenge for your chance to become one of our winners. The challenge can be found HERE and runs through 11:55 pm EDT on Tuesday, May 3rd.

Monday, April 25, 2022

Challenge Winners - April Showers Bring May Flowers

The Funkie Junkie Boutique's Blog was festooned with floral entries for the "April Showers Bring May Flowers" challenge, and with so many beautiful entries, it was difficult for our Design Team to choose a winner. When the votes were counted, the overall winner was Susan Babcock's enchanting garden cottage surrounded by flowers, created using the Tim Holtz Paper Village die set.


We look forward to seeing Susan return as a Guest Designer at a future date here on The Funkie Junkie Boutique Blog. You'll be contacted shortly with all of the details. And now our picks of three additional outstanding entries for the The Funkie Junkie Boutique Blog Top 3 Badges. In numerical order they are #2 Esther Asbury, #3 Sara Emily Barker, and #12 Alice K. You'll be contacted shortly with the Top 3 badges so that you can display them proudly on your blog.

And finally for the lucky randomly drawn winner for the $25 gift certificate to The Funkie Junkie Boutique; our congratulations go to #13 Barb Turpin. Please email Linda at thefunkiejunkie@gmail.com for the gift certificate details.

Thank you again to everyone who took part in this challenge and congratulations to all our winners. The current challenge - 'A Study In Contrasts' - can be found HERE and runs through Tuesday, May 3rd at 11:55 pm EDT, so there's still plenty of time to link your projects. Please be sure to read the rules carefully before you submit your entry.

Saturday, April 23, 2022

Saturday Showcase - Stamperia Lady Vagabond Lifestyle

Good morning! Today I am showcasing a few products available at The Funkie Junkie Boutique, including papers from Stamperia's Lady Vagabond Lifestyle collection.


To create this layout:


1) Gather 3 papers from the Stamperia Lady Vagabond Lifestyle Backgrounds paper pad.


2) Trim your top sheet to 11" x 12" and distress the edges, creating a larger distressed area on the right side.

3) Prep your paper with clear gesso and allow to dry or heat set.


4) Distress your edges of your bottom sheet and adhere them as shown.


5) Use Tim Holtz Grit Paste CRYPT with the Dot Fade Layering Stencil, then add some Salvaged Patina Distress Spray Stain.


6) Pounce your Speckled Egg Distress Oxide Ink pad on your craft mat a few times, spray with water, then using a fan brush, splatter the ink on your stenciled surface.


7) Cut 2 photo mats at approximately 3.5" x 7" and distress the edges.


8) Get your Prima Finnabair Large Gears Mould, add some corn starch then paper clay.


9) Remove the gear from the mould and allow to dry.


10) Cover the paper clay pieces with clear gesso and let dry.


10) Start having some fun with mists and paints on the paper clay gears and flowers. I used Salvaged Patina Distress Spray Stain, Salvaged Patina Distress Paint, Jack O'Latern Distress Mica Stain, Crooked Broomstick Distress Mica Stain, and a brown from my stash.


11) Adhere everything together, add some art stones, gems and Stamperia Alchemy Clear Die Cuts.

Here are some more detail shots:


Thanks for stopping by!
~Laura

Supplies used:

Wednesday, April 20, 2022

A Study in Contrasts

Spring may not have arrived in full force in your part of the world, but there are signs of change everywhere. Lisa asks us to highlight those differences for our newest challenge. "The seasons are changing and the cold greys and browns of winter are giving way to the warm greens and colors of spring! For your challenge, highlight contrasts in your project. It could be themes, colors, textures or forms. We are looking forward to seeing your creative interpretations and juxtapositions of things that are contrasting!"

Lisa Hoel - Creative Juice

Teri Wilson - TerisMailbox

Suzanne Czosek - Suzz's Stamping Spot

Janna Ketchum - treasuresofthesea_jannak


Laura Gilhuly - AngelScraps

The overall winner will be offered the chance to be a Guest Designer at a future date here at The Funkie Junkie Boutique Blog, and everyone who enters and follows the rules will go into the drawing for the chance to win a $25.00 spending spree at The Funkie Junkie Boutique. There are also Top 3 Badges for three additional outstanding entries, chosen by the Design Team.

The guidelines for entering are simple: create a new vintage or shabby chic project following the challenge theme, link it to your post (not just your blog) and also include a link to this challenge in your post. You can combine our challenge with up to 10 challenges (including this one) to be in with a chance for winning. If you are entering through a public forum (such as Instagram) you'll need to include the words 'Funkie Junkie Boutique Challenge'. Also, please turn off your Word Verification so our Design Team can leave comments on your blogs. Make sure you follow these rules as unfortunately, we have had to eliminate entrants from the prize drawing in the past.

Whatever you create, enjoy the making! We look forward to seeing your projects! This challenge is open through 11:55pm Eastern Time on Tuesday, May 3rd, 2022.

Wednesday, April 13, 2022

Guest Designer - Jean Evans

The Funkie Junkie Boutique is delighted to welcome Jean Evans (Krafty Jean) as our Guest Designer this week. Our Design Team chose her beautiful journal, created with Stamperia's "Lady Vagabond" paper collection, as the winner of our "Rather Blustery Day" challenge, and she has shared a lovely Victorian Tussie-Mussie for our current "April Showers Bring May Flowers" challenge.


Hi! I'm Jean. I am 52 from Scotland. I have three grown up daughters and three cats! I started crafting 4 years ago, although I always loved upcycling and repurposing things! I am thrilled to be a Guest Designer on the Funkie Junkie Boutique Blog. It's such an honour to be chosen.


Historically a tussie-mussie was a small Victorian bridal bouquet. In the years that followed, this term also became synonymous with a small cone-shaped vessel to hold a single flower or treat. Tussie Mussies were popular during May Day celebrations and bridal events.


To create a Tussie Mussie, cut a circle shape using double sided paper (this saves decorating the inside). I used a dinner plate. Then curl both ends in (overlap one end) to make a cone shape; it can be a loose or tight cone. Secure with tape/glue. Then decorate as you wish! Lace, ribbon, trims, flowers. If you wish to make it a hanging tussie you punch two holes (on each side or at the back) and thread ribbon/string etc. This was my first tussie and I Loved making it. Lots of tutorials online if you want some inspiration!.

Make sure you check out Jean's blog (Krafty Jean) to see more of her work. And don't forget to share your flower-filled projects for the 'April Showers Bring May Flowers' challenge for your chance to become one of our winners. The challenge can be found HERE and runs through 11:55 pm EST on Tuesday, April 19th.

Monday, April 11, 2022

Challenge Winners - Industrial Grunge

Thanks to everyone who got "in gear" and created lots of luscious grunge for our "Industrial Grunge" challenge. The Design Team chose Sara Emily's multi-layered grungy tag as our overall winner. Her combination of colors, textures, and embellishments took our breath away!


We look forward to seeing Sara Emily's return as a Guest Designer at a future date here on The Funkie Junkie Boutique Blog. You'll be contacted shortly with all of the details. And now our picks of three additional outstanding entries for the The Funkie Junkie Boutique Blog Top 3 Badges. In numerical order they are #4 Helen Hollingert, #6 Jayne Frig Hoffman, and #7 Barb's Boys. You'll be contacted shortly with the Top 3 badges so that you can display them proudly on your blog.

And finally for the lucky randomly drawn winner for the $25 gift certificate to The Funkie Junkie Boutique; our congratulations go to #5 alice k.. Please email Linda at thefunkiejunkie@gmail.com for the gift certificate details.

Thank you again to everyone who took part in this challenge and congratulations to all our winners. The current challenge - 'April Showers Bring May Flowers' - can be found HERE and runs through Tuesday, April 19th at 11:55 pm EST, so there's still plenty of time to link your projects. Please be sure to read the rules carefully before you submit your entry.

Saturday, April 9, 2022

Saturday Showcase - Sizzix Tim Holtz Texture Fades Embossing Folders

Happy Saturday! Suzz here to share a Saturday Showcase featuring the lovely Sizzix Texture Fades Embossing Folders designed by Tim Holtz.


I started by pulling out all my Texture Fade Embossing Folders to play with.


I then pulled out many different leftover scraps of inky backgrounds, white cardstock, and patterned papers and started embossing!


The Texture Fade Embossing Folders take a patterned paper and add a whole new level of visual and physical texture.


This Idea-ology Backdrop looked like leather and the embossing folder added the quilting and hint of texture with some ink sponged over the texture after the paper was embossed.


I used the soft yellow Backdrop paper with the Typewriter embossing folder in the card above. I took the Distress Ink pad and dragged it lightly over the embossing to create a contrast.

Then I started playing with the embossing on white cardstock to create a different effect.

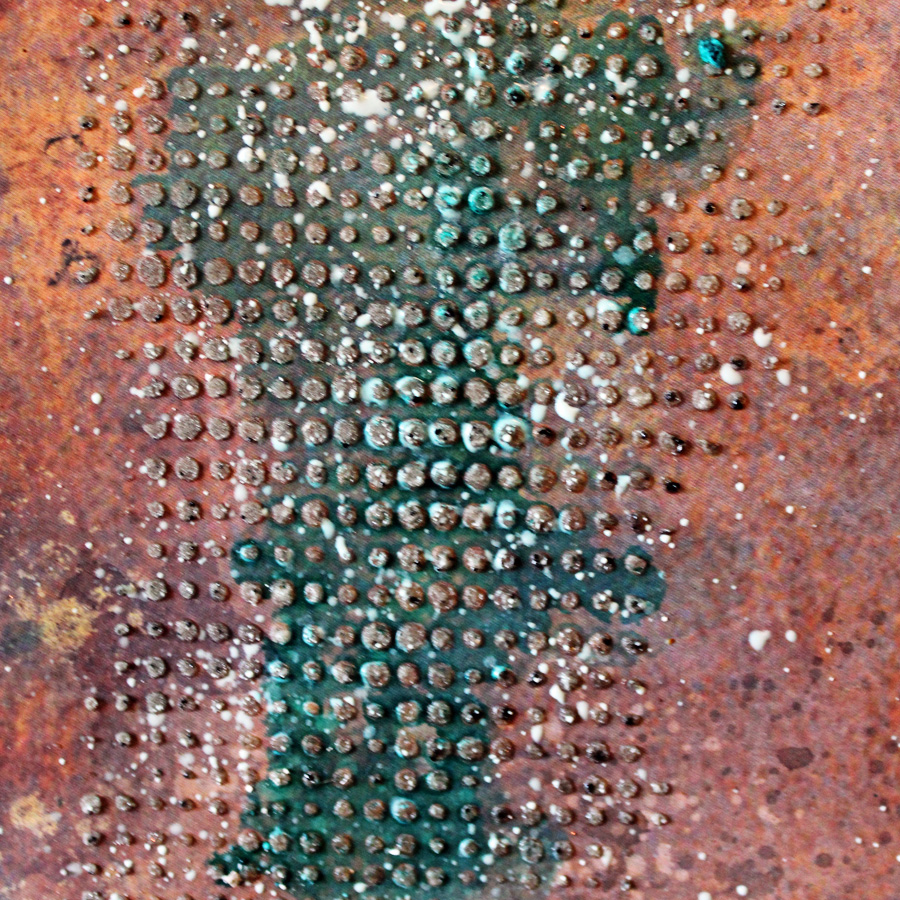
I sponged this background with Versamark Embossing Ink by dragging the ink pad face down over the raised texture. I sprinkled it with a gold embossing powder, shook off all the excess, and heated it with the heat gun.


Next I sponged with Antique Linen Distress Ink to age it. A little sprinkling of water and brown Distress Spray added a little bit more aging. The finished product became the background to my first card.


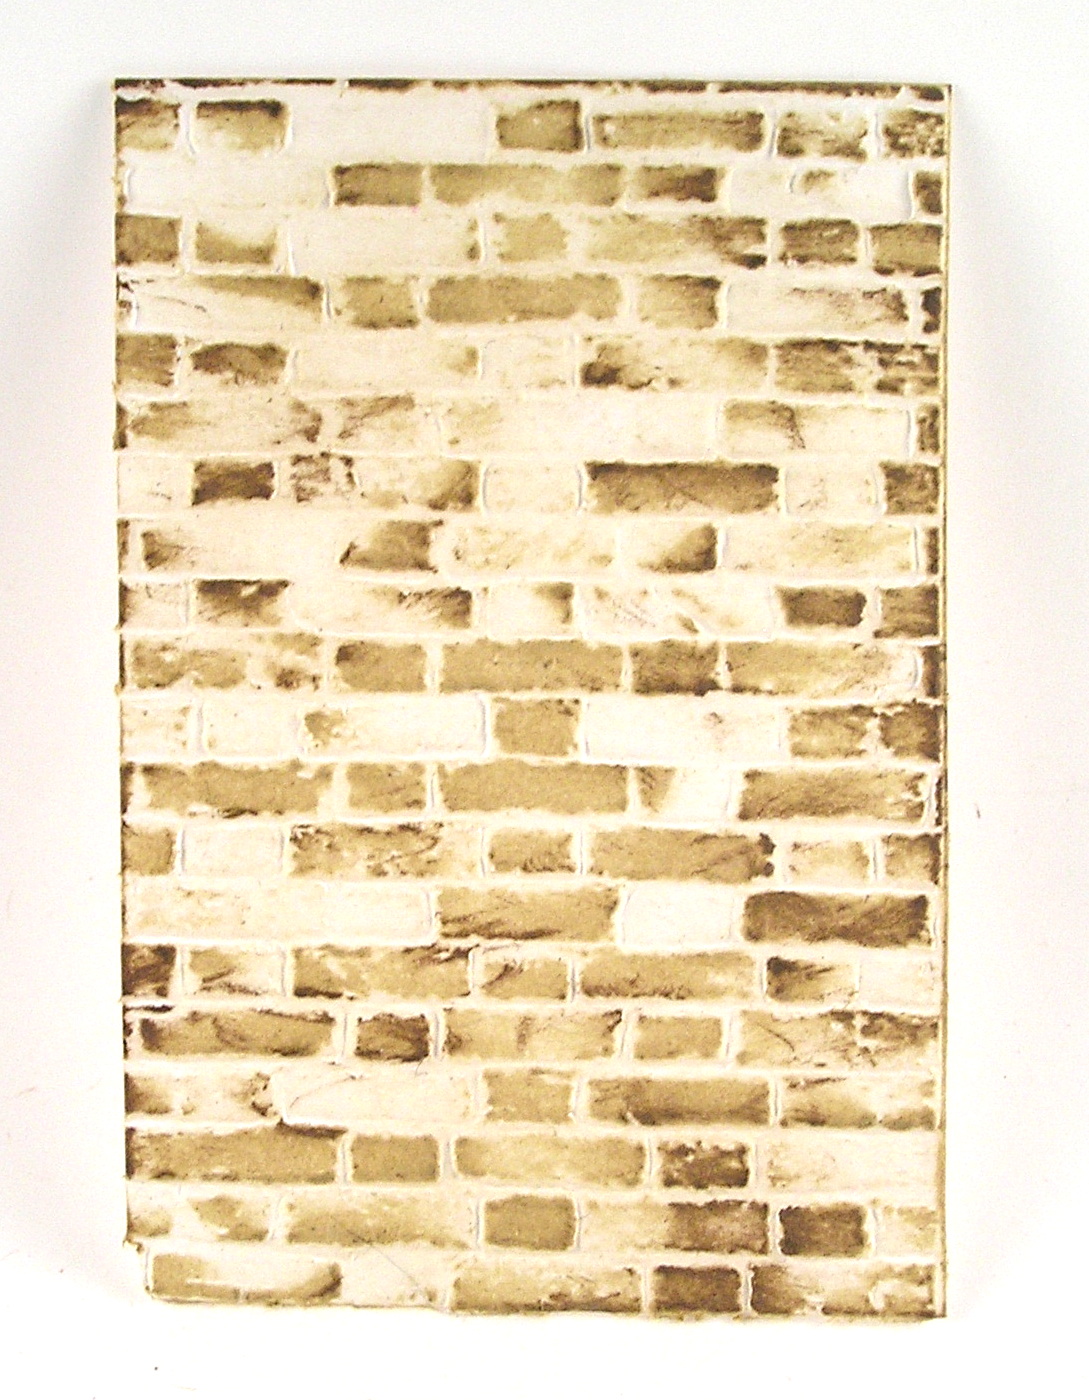
I loved how that turned out, and decided to play with some Mini 3D Texture Fades.


On the background embossed with Mini Brickwork, I dragged the Antique Linen pad across the surface multiple times. I then used a brown Distress Ink to add a hint of shading. I dragged the brown ink partially across the surface to only pick up some of the edges. I loved the effect, and repeated it with the Mini Cobblestone Embossing Folder.


For the cobblestone, I started with the Antique Linen Distress Ink, dragging it across the embossed paper. I then came back with the Hickory Smoke Distress Ink and added another layer of ink by dragging it across the embossed surface. It is quite addicting!

Then I decided to try spraying on the Doily Embossing Folder with Distress Ink Sprays, and then embossing white cardstock.


I thought that was too much ink, so I decided to ink up the embossing folder. I wiped it down from the previous experiment, and after it dried I took the ink pad and dragged the ink directly across the raised portion of the embossing folder.


I also spritzed the inked up embossing folder with water to loosen up the ink and give a stronger impression on the paper. I took the inked up embossing folder and opened it up completely on my craft mat. I laid the paper onto the open folder. I used a brayer to roll over the surface and pick up the ink. For my next example, I used blue dye ink.


This print was created using the same process, but with more water spritzed. The more water, the softer the effect. After all the spritzing, I wondered how it would look without adding any water and only dragging the ink across the surface.


I used a brown ink and you can see because the ink beads up on the plastic surface you get a stipple effect

For the last one, I spritzed the paper as well as the folder.


I decided to pull out some other inky backgrounds previously made as well as using spray to add color to white cardstock. I started with white cardstock and embossed it using the Damask Texture Fade.


After the embossing was complete, I pulled out a beautiful silvery Distress Stain Spray and spritzed the surface, allowing pooling of the ink and then heat setting the ink.

I found this gorgeous painted gold background in my leftover pile and embossed it using the Typewriter folder.


After I pulled it out of the embossing folder, I decided to splatter it with some white paint and hit it with some shimmery inky spray.

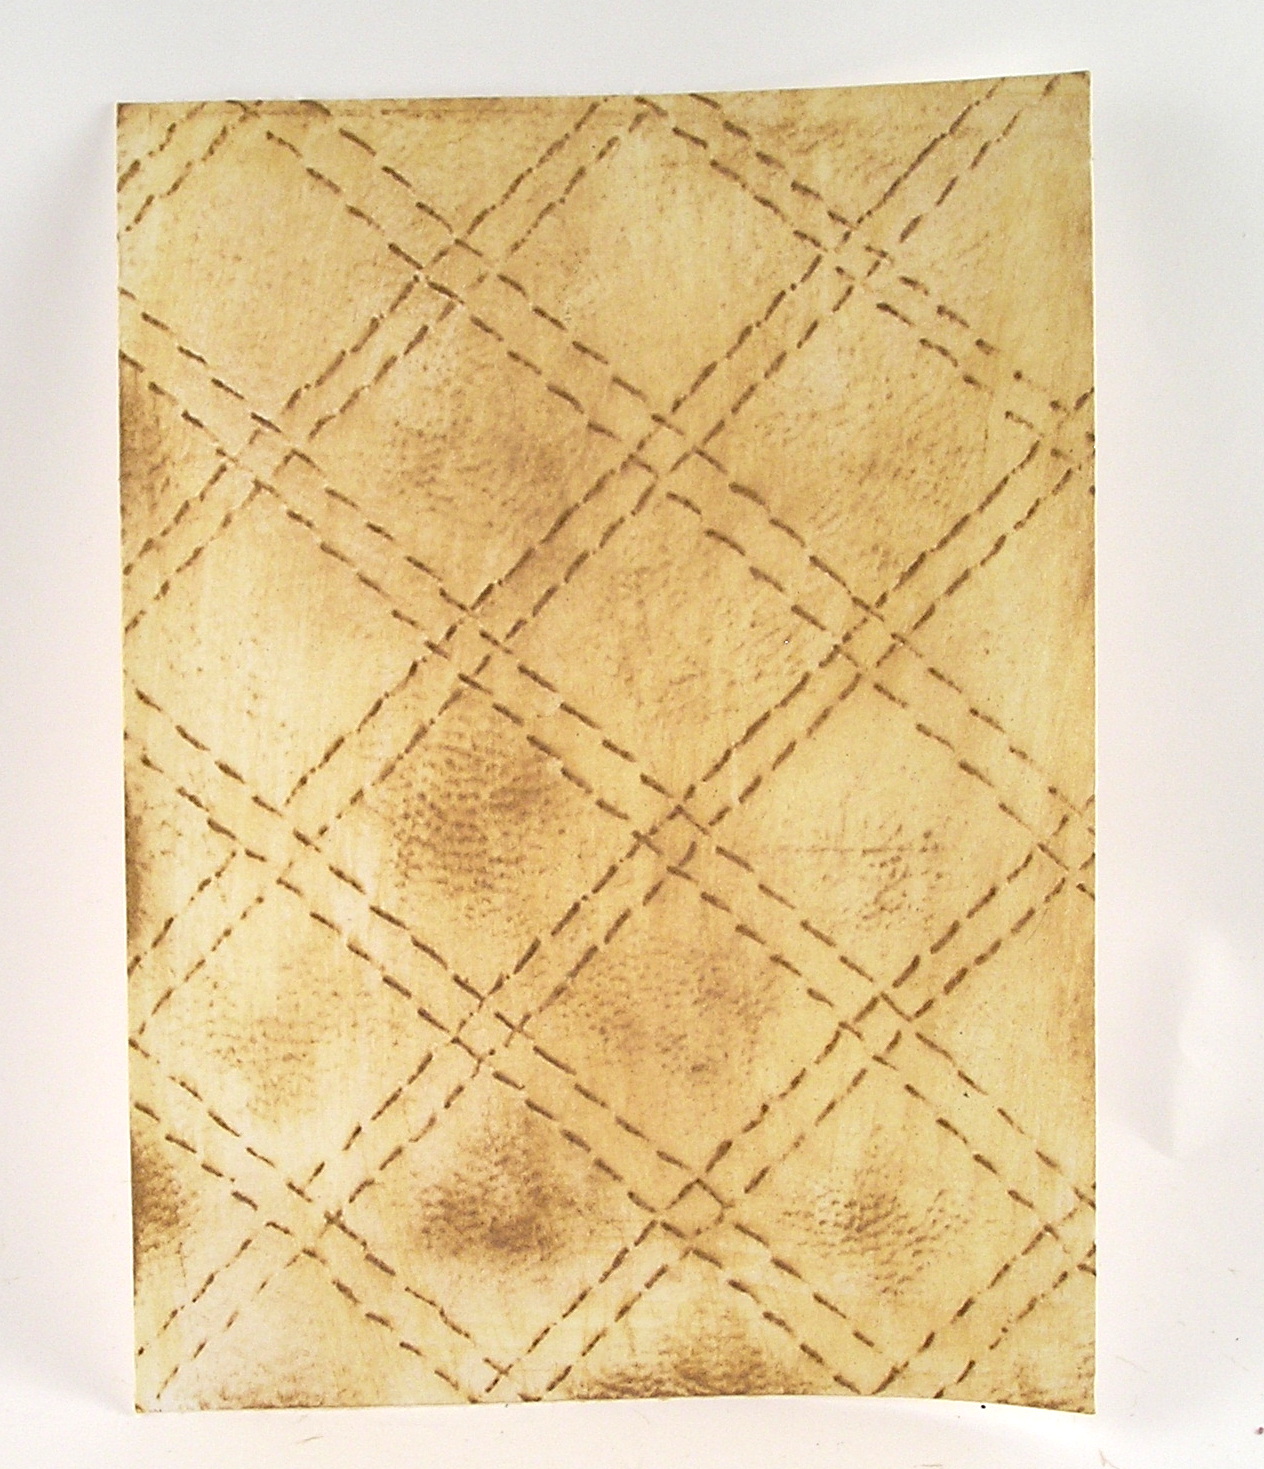
Next up, I tried to create a leather-inspired piece with the Quilted folder. I embossed the quilting on white cardstock. After I embossed the paper, I used an ivory dye ink and a brown dye ink to create this soft effect.


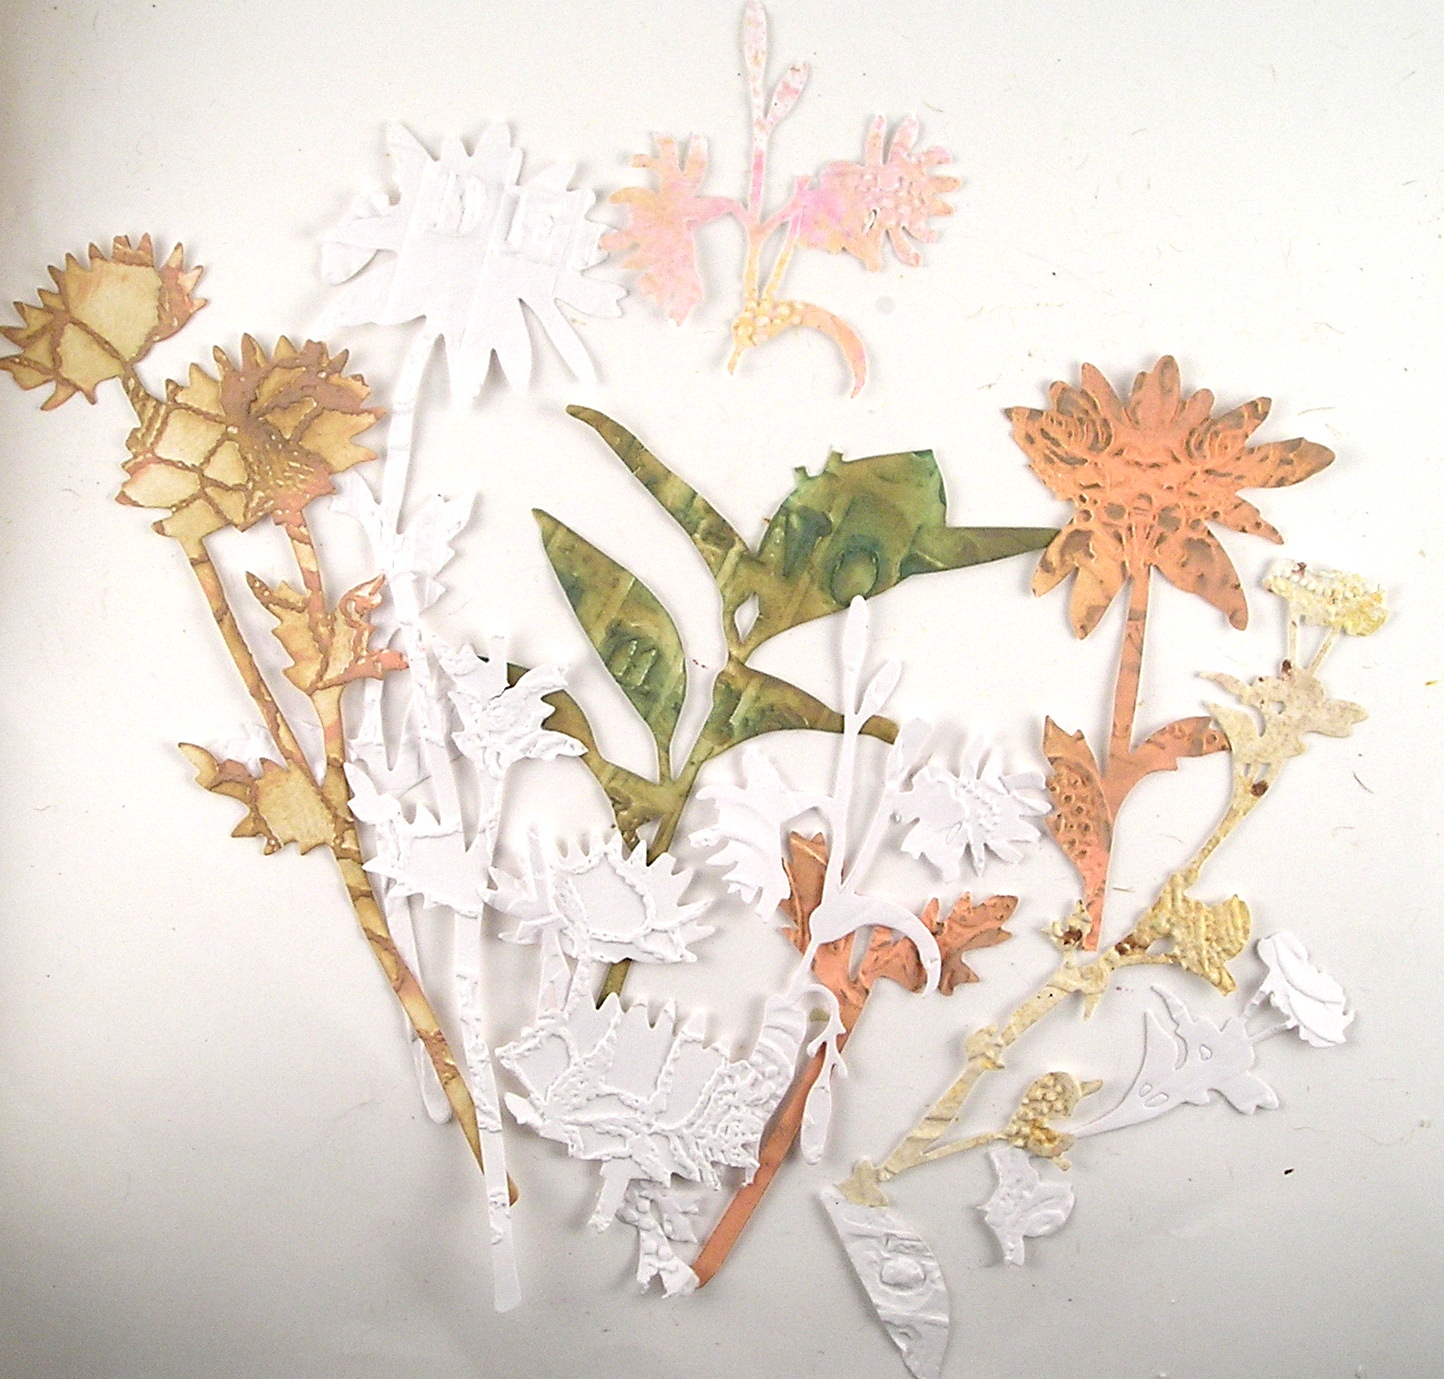
Finally, I decided to try cutting some die cut flowers from embossed backgrounds.


After I die cut them, I sponged a few of the different flowers. Hint: The 3D Embossing Folders will impress deeply, and you can see that some of my flower stems broke off. (Easily fixed as you can put them on the card back together.)

A few more pictures on how effective the embossed background shows up on different art.


In this clean and simple card, the Doily embossing folder speaks volumes with no color, just its beautiful texture.

In these pages from a mini book I created, I pulled pieces embossed with the Damask folder as a layer of texture and interest.


I love the Damask, as it is elegant and can look well in a rustic project.


I hope this Saturday Showcase has inspired you to check out the Texture Fades Embossing Folders.
Suzz

Products Used

Ranger Distress Oxide Inks - Vintage Photo, Hickory Smoke, Saltwater Taffy
Ranger Distress Ink - Antique Linen, Ground Espresso, Hickory Smoke
Tim Holtz Idea-ology - Transparent Wings TH93785
Ranger Distress Sprays - Saltwater Taffy, Silver, Gold