Monday, June 17, 2024

Teri's Acohol Ink Technique - Using Stencils

 Teri Wilson - TerisMailbox

Hello friends. It is Teri with TerisMailbox posting this rainbow decor project for The Funkie Junkie Boutique's Inspiration Ave.


I love rainbows and Ranger Alcohol Inks make it so easy to create a bright and fun decor piece!

I do have a YouTube Video HERE:


Start with an alcohol ink white panel. Use THS181 Deco Leaf and Snowfall Grit Paste. I love the sparkle you get with the paste! Apply with a pallet knife over a portion of the board in a portrait orientation. Allow to dry.


Holding the board so the texture paste is at the top, apply Alcohol Blending Solution followed by a rainbow of alcohol inks and allow them to run across the board. I love the way the ink colored the grit paste and ran down the board! Colors used: Purple Twilight, Turquoise, Mojito, Sunshine Yello, Sunset Orange and Flamingo.


Stamp the images from CMS 479 Abstract Florals onto White CardStock using black pigment ink. Add Clear embossing powder and heat set. Fussy cut the flowers. Use large glue dots to attach the blooms to the base while gluing the stems.

Select a quote chip and apply a rainbow of embossing glaze by dabbing with and Embossing Dauber and applying Embossing Glazes. Colors used are Spiced Marmalade, Fossilized Amber, Wilted Violet, Salty Ocean, Kitch Flamingo and Twisted Citron. Heat set after applying each glaze color.

All of my channel and affiliate links are listed in the Profile on Instagram. I would love to count you as a subbie friend. I appreciate your support. By using my links, I earn a small commission at no cost to you.

Thanks so much for stopping by today! I'd love to have you follow/subscribe on my social media sites InstagramFacebookBlogger and YouTube all named TerisMailbox. Be well. Be creative!

Products Used:

Friday, June 14, 2024

Janna's Brightly Shining Alcohol Ink Card

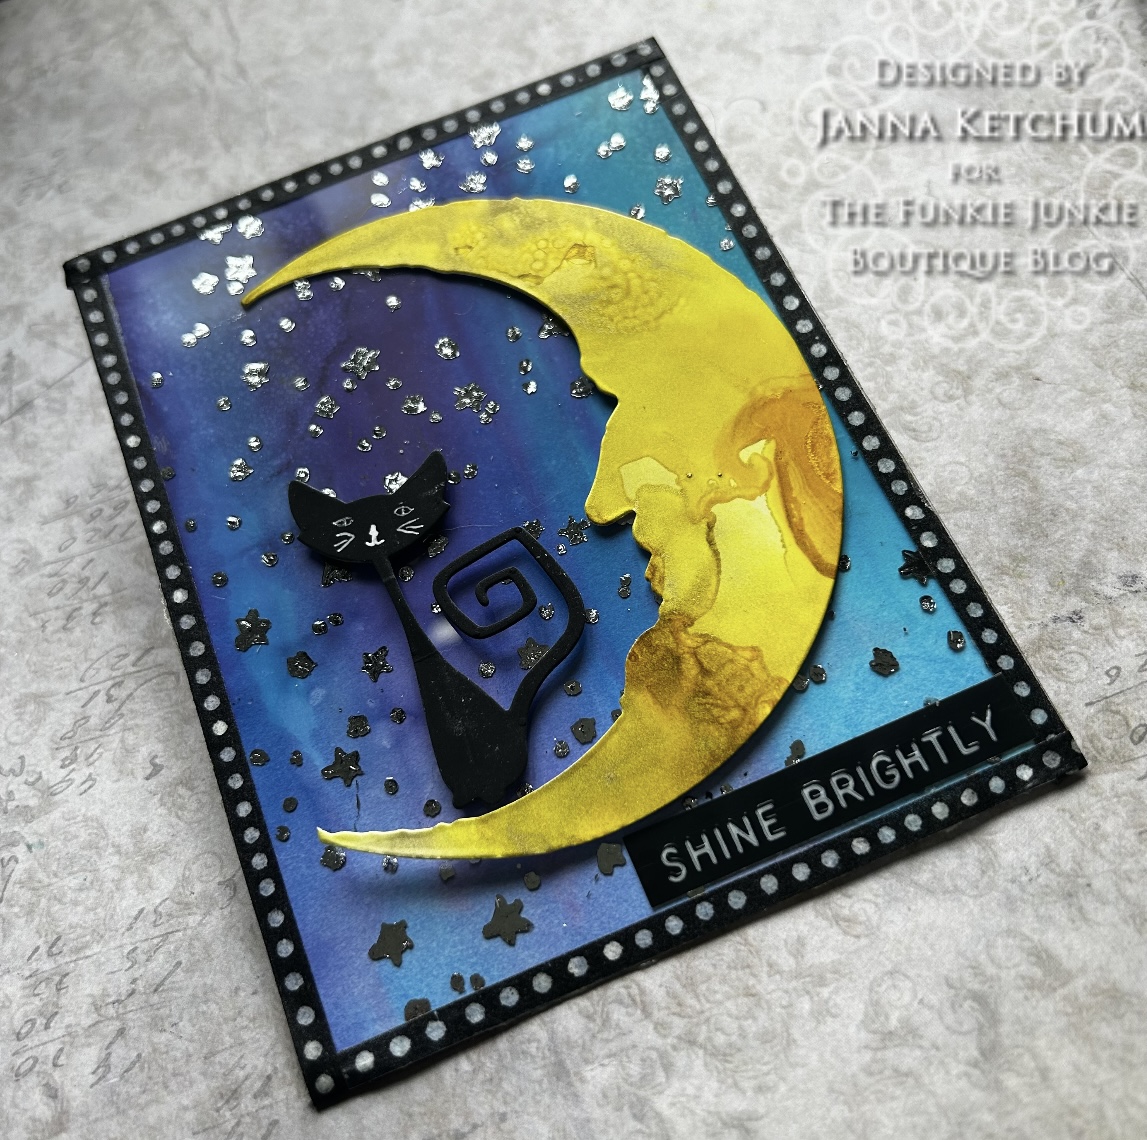
 Hello and welcome to this week’s TFJ Inspiration Avenue blog. This week we are creating to the theme of “All About Alcohol”. Since we are featuring inks I decided I wanted to go with a cosmic vibe for this theme. We are going to create a celestial inspired card with alcohol inks.

For full video click here.


Alcohol ink Glacier, Laguna, Dandelion, Alloy Gilded, Cobalt, Vineyard, Boysenberry, Ranger Alcohol Ink Duralar, Ranger Yupo Paper, Sizzix Mischievous, Sizzix Crescent Moon and Stars, Holly Jolly CMS 474, Mink ink, Deco Foil, foam squares, Tiny Attacher, Idea-ology Decorative Tape, Isopropyl 90%.


To start today’s card we will be creating an alcohol inked yupo base. The colors we are using today include Laguna, Vineyard, Glacier, and Cobalt.


To create our background we will be using the drippy Ink technique. First I drizzled the alcohol inks at the top of the yupo paper and then set it up against a bottle to prop it up to let the ink start dripping downwards.


Next I spritzed heavily with isopropyl to get the ink to flow down the yupo.


Below is the completed alcohol ink background.


Next we will be making a second background to die cut a moon out of. For colors we will be using Dandelion and alloy alcohol ink Gilded along with some Blending Solution.


To move the ink around I used the TH Ranger ink blowing tool. I spread out a base of Dandelion first the. I added the Blending Solution. Once the Blending Solution was applied I added about six drops of alloy to the yupo surface. Again I moved the ink around with the ink blowing tool. After I die cut a moon from the background using the Sizzix Bigz die Crescent Moon and Stars.


Next I pulled out a favourite holiday stamp set CMS474 Jolly Holiday to stamp stars with.


To stamp I decided to stamp with Mink Ink on duralar. Duralar is a heat stable transparent substrate. Using a scrap piece of plastic I dripped some Mink ink onto scrap plastic surface. Then I used a brayer (Ranger TH) to spread the ink out. Then I brayered the ink onto the star stamp and stamped onto the duralar.


I lightly applied the ink with the brayer rolling 2 - 3 times. If minc ink is over worked it tends to peel off the stamp. After covering the whole surface in with stamped stars I cleaned off the stamp with some Ranger Archival ink cleaner.


Below is the finished stamped background. With the minc ink stamped we can now add foil for some sparkling stars.


To add the foil I pulled out the minc mini machine. I set the mini minc to 4 and then made a sandwich of the foil and substrate to feed through the machine.


Below are the foiled stars.


Then I attached the layer of duralar to the alcohol inked background using the Tim Holtz Idea-ology Tiny Attacher stapler.


To hide the staples I added a layer of decorative Idea-ology washi tape.


For finishing touches I used foam squares to add in the moon and an adorable black cate from the Sizzix die set mischievous. For the sentiment I used an Idea-ology label sticker.


Thank you so much for joining me here today for TFJB Inspiration Ave. Until next time, happy crafting!

Janna~ 💕🎨💕

I can also be found on :
Instagram: @treasuresofthesea_jannak

YouTube: The Crafty Corner with Janna


Supplies used:  

Ranger Alcohol Inks:

Glacier 

Ranger Yupo Paper 

Alloy Gilded

Laguna

Dandelion

Cobalt

Vineyard

Boysenberry

Ranger Alcohol Ink Duralar

Wednesday, June 12, 2024

Lyla's Patriotic Inspired Alcohol Ink Tags

It's time for another new theme over at TFJB Inspiration Ave! Lyla here; taking you for another journey of inspiring makes for the next two weeks, and this one is something that most everyone enjoys getting messy with: "All About Alcohol"! Owner of The Funkie Junkie Boutique, Linda Coughlin, has been extremely busy setting up CLEARANCE SALES and you can find just about anything you need at a rediculously low price right now, so take advantage of the sales and enjoy and bit of peaceful summer with the bright colors of Alcohol Inks!

Take a load off and I'll show you what I came up with! 


I dug up some of that (retired) Tim Holtz Kraft Core Seasonal stack to use for this project. I chose an Etcetera Tag and a No. 8 Ranger Tag also.

Here's your List of LINKS:


I began just experimenting a bit. It's been a while since I've played with Alcohol Inks.


Grandson Cole is very interested in the Distress Inks and this was his first time seeing me get out the Alcohol Inks, so I showed him a bit of how-to.


Mine didn't turn out very great looking. Bleah! 


In fact, this wasn't how I remembered it at all. So I went to Tim's Blog and looked up some of my favorite ever "The 12 Tags of  (Year): July" Tutorials in his Blog Archives. Just looking at the phots brought back the memories of How-To, for myself anyway.


Here's where the Alcohol Ink was used, so I took this idea...


... and the stars idea from this Tag...


...and the tearing, sewing, and stamping from this Tag.


First off; re-creating a better AI background with YUPO. Remember Tim yelling out "Helllo, YUPO!" when he first introduced it?!


I started with Crimson and Sail Boat Blue- just like back then, but added a new-since-then Mixative of Gunmetal. I popped a few drops onto one side of my overlapped 2 sheets of YUPO, then used my old Distress Marker blower and puffed on the AI till it ran across the page's width.  I liked it, but needed a brownish tone too...


... So I popped a few drops of Sepia onto the Gunmetal Mixative area. Then puffed it across with the blower.


I still didn't think I had all the color tones I wanted, so I picked up some Antique Linen Distress Oxide ReInker and blew a few drops of that across as well. Since the Antique Linen is DO, it needed to be heat dried. Looking at my new AI creation, I was hit with several thoughts:
1) I should tear it - to match up with my idea for the backside of the Tag, and 
2) I should turn it upside down so the blue is on the top, which led me to think;
3) I should add 3 Adornment Stars onto that blue area.


So I tore it, then I found some (retired) TH sticky-back canvas cloth substrate sheets. (These were REEEEALLY retired, folks!) I spaced out the AI pieces and then sewed each to the substrate, with the sticky-back still on.  Now, it looked like it was taking on the shape of the idea in my mind!


My next move was to use my sets of (retired) fave TH Stamp Sets onto some Clear Dura Lar sheets. I used Jet Black Archival Ink, but I kind of wavered on it before deciding to go ahead.


I carefully trimmed away only what I needed: I LOVE this old TH paperie and hoard it! My TH Rotary Trimmer is a DREAM to use - it came in handy for making these edges clean.


I did quite a bit of sanding down the TH Seasonal Kraft Core. Then gave it some Distress Oxide Vintage Photo inking- the Tag got some, too. 


I had another linen-colored TH sticky-back Canvas substrate, so I sewed these to match the front side of the Tag.


Distressing some Idea-ology... my fave details!


I also got out that roll of wired paper Americana ribbon I've used sparingly on my fave projects. I added in some more of the trim to the back of cut down TH Collage Strips made a cute little mini-Tag to tuck inside the ribbon Tag.


Here's the Set of 3 Tags
In plenty of time for an ALL-AMERICAN JULY 4TH!


FRONT of Tag Set
I switched it around because of the middle Tag's star. I didn't get a closeup of the Americana Ribbon Tag's little add-on: it's a piece of the Filmstrip Ribbon's packaging sample they gromet to the outside of the pkg.
I added in a "1941" airplane Remnant Rubs (retired Correspondence??).

Closeups of FRONTS... 


The TH Tiny Attacher came in handy for the TH Filmstrip Ribbon.


Here are the BACKSIDES to each Tag:


And some Closeups of the BACKS...


Stacked together.


That's ALL ABOUT ALCOHOL for ya!
Thanks! so very much for joining me for another new theme kickoff! Oh, but wait; there's more to come from the rest of the amazing TFJB Design Team! Check back every few days for more Inspiration Ave with Alcohol Ink fun! Grab some paper and AI and get a little messy with us these coming days.

Be sure to head over to 
The Funkie Junkie Boutique for Clearance deals you won't see again; at these prices, they'll go FAST!

Until next time...

Stay Safe &
HAPPY BLOGGING!!