Wednesday, September 28, 2022

Guest Designer Celebrate Friendship Challenge - Katy Dragos

The Funkie Junkie Boutique welcomes back Katy Dragos as our guest designer for our Celebrate Friendship challenge.

Hi! I'm Katy.  I love all the stuff-from making cards to mixed media projects and everything in between.  My crafty journey started with scrapbooking-but then I learned all about distressing paper and Tim Holtz and my crafty world was forever changed. :)  My blog is I Like to Cut and Paste and I am on Instagram and Facebook

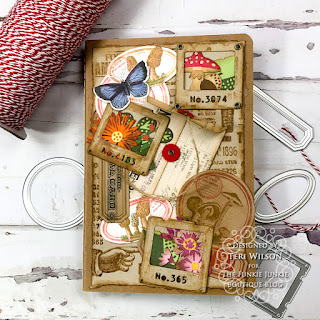
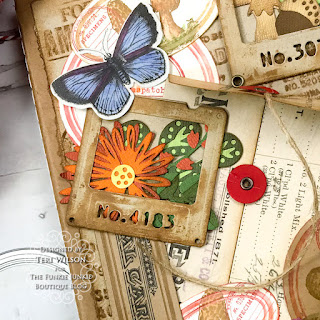
I am honored to be the Guest Designer this week. When I learned about Friendship being the theme, my wheels started turning. Which friend could I make something for? My husband and sister get things all the time LOL so I altered an Altoids tin to give to my friend who lives down the street from me.  We go on adventures, and she can always make me laugh :)


For my tin I used light modeling paste to smooth the front. Then I used a Tim Holtz star stencil and Tim's matte texture paste to make the stars. I used different spray stains on the stars and some peacock Finnabair wax to highlight a few of them. Then I cut some leaves from Tim's Garden Greens die out of some paper that had spray stain on it. I used a flair button and a Tim Holtz flashcard to finish the front.  I used a paper from Tim's Backdrop Volume 1 for the right hand side of the tin. And I painted the left side and inside of the right with Finnabair's spark paint Unicorn Hair. The moon is from a Finnabair clay mold sprayed with Harvest Moon Mica Spray. The stars are last year's Christmas Ideology, and the rest is Ideoogy- Paperdoll, flowers, clipping stickers, and a thimble. And I filled in the bottom space with craft moss.

Thanks so much, Katy, for this wonderful inspiration.  We are looking forward to all the entries to our Celebrate Friendship challenge!

Monday, September 26, 2022

Challenge Winner - Back to School


Another challenge has closed and the Design Team has voted for their favorites.  For this challenge, Teri had asked us to create something that connects us with school.  The Design Team has chosen Meghan from Made by Meghan as our overall winner. Thank you, Meghan, for sharing this creation with us.  Your bold and bright crayon card took us right back to elementary school!  Congratulations on being our overall winner.  We would love to have you join us for an upcoming challenge.  We will be in touch soon with the guest designer details.  

Our Top Three winners in order are Barb, Carrie and Carrie.  The random winner of the $25 shopping spree at The Funkie Junkie Boutique is Carrie entry #6.  Congratulations to all our winners!  Please email Linda at thefunkiejunkie@gmail.com for your winner's badge or other prize details.

Thank you to everyone who joined in our challenge.  We hope everyone will come back and play in our current challenge Celebrate Friendship.

Saturday, September 24, 2022

Saturday Showcase - Halloween Journal Cover

Hello Funkie Junkie fans, Lisa Hoel here with another Halloween themed Saturday Showcase tutorial for you! I've created a journal cover packed full of Tim Holtz Halloween goodness (stay tuned for the 'innards').

Lots of 'how-to' to share so keep scrolling…

back cover

inside

Tutorial time!
1) I cut the journal covers out of mat board using Eileen Hull's Sizzix Full Size Journal Die. I spritzed the inside covers with the new Halloween Distress Mica Stains and Spiced Marmalade Distress Spray Stain. I love the shimmer the Mica Stains give!


I reinforced the spine with cloth book tape and covered the edges that would show with Tim Holtz Idea-ology Halloween Design Tape.


2) I used one of my favorite double stamping techniques to decorate the inside covers. First you need a stamp platform. Stamp once with archival ink on your substrate and leave it and your stamp in place on the platform.


Paint the stamped design with your desired colors. Don't worry about covering the stamped details – we will fix that in the next step!


When the paint is dry, re-ink your stamp and stamp over the top of the painted areas. (Told you we'd fix it!) Perfect! 

3) After finishing the stamping on the inside covers, I could move on to adding lumpy, bumpy parts to the outside. I used the Dylusions Large Stencil Behave with Crypt Halloween Grit Paste for a base layer.


I also stenciled and stamped/embossed on the back cover.

4) I wanted Arthur the owl (Tim Holtz Colorize Die 664730) to be the star of the front cover. I played around again with the coloring technique I just used on the Otis Colorize Die (see our current challenge). The new Distress Watercolor Pencils play an important part. ;-)


The base layer I cut from some marbled paper from my stash. I cut other layers from white paper and colored them with the pencils. I added shading and texture, blending out with water and a paint brush.


I also used Distress Embossing Glaze to add some extra texture and shine to him. I lightly dabbed the areas with the Embossing Dabber and sprinkled on Villainous Potion and Hickory Smoke Distress Embossing Glaze.


All done! Arthur is one of my favorite Colorize Die Sets.


5) Time to assemble the cover! I'm planning on making this a big fat journal so I didn't overlap the spine parts. I'm going to max out this cover thickness! To do that, I cut a separate piece of scrap mat board to fit the spine section. Before gluing that in place inside the cover, I did some decorative stitching through the holes in the spine.


Extra spine support board glued into place! Cover is ready to go.


Thanks for paying us a visit and I hope you are inspired to go get crafty! Join us for our current challenge, Celebrate Friendship.

Stampers Anonymous Tim Holtz Stamp Set - Unraveled CMS452
Stampers Anonymous Tim Holtz Stamp Set - Bold Frights CMS438
Stampers Anonymous Tim Holtz Stamp Set - Snarky Cat Halloween CMS407
Stampers Anonymous Tim Holtz Layering Stencil - Markings THS160
Stampers Anonymous Tim Holtz Layering Stencil - Falling Stars THS115
Ranger Dylusions Large Stencil - Behave, LG DYS77985
Halloween 2022 Tim Holtz Idea-ology Remnant Rubs TH94268
Halloween 2022 Tim Holtz Idea-ology Design Tape TH94259
Halloween 2022 Tim Holtz Idea-ology Layers TH94264
Ranger Tim Holtz Distress Paints - Pumice Stone, Picket Fence TDF53170, Twisted Citron TDF50216
Ranger Tim Holtz Distress Halloween Grit Paste - Crypt TSHK81081
Ranger Tim Holtz Distress Embossing Glaze - Villainous Potion TDE78876, Hickory Smoke TDE70993
Ranger Tim Holtz Halloween 2022 Mica Stains - Set #3 TSHK81098, Set #4 TSHK81104


Wednesday, September 21, 2022

Celebrate Friendship

The Design Team from The Funkie Junkie Boutique is back with another bi-weekly challenge. For this challenge, Laura wants us to celebrate friendship.  We hope you will join us by sharing your creation that reflects and celebrates any kind of friendship.  Here is the inspiration that our designers are offering for your inspiration.  

Laura Gilhuly - AngelScraps 


Lisa Hoel - Creative Juice


Suzanne Czosek - Suzz's Stamping Spot


Teri Wilson - TerisMailbox


The overall winner will be offered the chance to be a Guest Designer at a future date here at The Funkie Junkie Boutique Blog, and everyone who enters and follows the rules will go into the drawing for the chance to win a $25.00 spending spree at The Funkie Junkie Boutique. There are also Top 3 Badges for three additional outstanding entries, chosen by the Design Team.

The guidelines for entering are simple: create a new vintage or shabby chic project following the challenge theme, link it to your post (not just your blog) and also include a link to this challenge in your post. You can combine our challenge with up to 10 challenges (including this one) to be in with a chance for winning. If you are entering through a public forum (such as Instagram) you'll need to include the words 'Funkie Junkie Boutique Challenge'. Also, please turn off your Word Verification so our Design Team can leave comments on your blogs. Make sure you follow these rules as unfortunately, we have had to eliminate entrants from the prize drawing in the past.

Whatever you create, enjoy the making! We look forward to seeing your projects! This challenge is open through 11:55pm Eastern Time on Tuesday, October 4, 2022.

Wednesday, September 14, 2022

Guest Designer - Elle/Empire of the Cat

The Funkie Junkie Boutique Blog is delighted to welcome back Elle from Empire of the Cat!  Elle was our overall winner for the recent 


Hi there!  It's Elle again from Empire of the Cat.  I'm so excited to be Guest Designer at The Funkie Junkie Boutique Blog for the second time! I really enjoy the variety of the Funkie Junkie challenges and great DT inspiration so it's very exciting to be the featured Guest Designer again. I love to make things, all kinds of things, and I have always been that way.  My main forms of creating at the moment are art journaling, writing, sewing, and practicing my drawing and painting.  I try to draw or paint every day, even if it is just something tiny.  I feel better if I do and worse if I don't so it's worth making the effort.  There is a long story behind the name of my website but you can probably tell that I love cats and I have been blogging there since 2005.   My blog is where I share my arty experiments and feature my little cat family. I hope that you will feel inspired to drop by and say hello! 


Project Info:  As I was thinking about the challenge brief, the idea of "an apple for the teacher" kept running through my head, and as I thought about the time of year, it being September, etc., the idea of a pumpkin instead of an apple popped into my head.  From there, the idea to make some kind of 3D or pop-up card took off and I decided to use book paper to make it.  

I used a Sizzix/Tim Holtz oval die to cut all my pumpkin pieces because I couldn't trust myself to do a good job of cutting them accurately by hand and they do need to be accurate.  I'm sure you will be able to tell what Book I am using but don't worry, it was a very old battered copy from a charity shop.  I coloured a few pages using Distress Ink but then changed my mind and chose to keep them uncolored as all those pumpkin colours were reading as Halloween and not Back to School.  I assembled my pumpkin pieces and the darkened the edges with Archival ink in dark brown, then I made my card base and used another page from the book to cover the front.  The page I used is actually about the hero traveling to his very famous school.  I added some white gesso to the page to tone down the print then attached my 3D pumpkin to the bottom of the card.  I drew on the pumpkin leaves and vines and then added some small word stickers to read "A pumpkin for the teacher."  The pumpkin "book" is made of pages involving a back to school feast in the great hall and the recipient could flick through the pumpkin pages to read little snippets from the goings-on at the school.  There are more photos and details on my blog.  


Thank you, Elle, for giving us such a great piece of inspiration.  We hope it will inspire many more entries into our current Back to School challenge!


Monday, September 12, 2022

Challenge Winner - Stamped With Love

We are back again with the challenge winners for the recent Stamped With Love challenge.  Teri asked us to show our favorite Tim Holtz stamps.  The Design Team has voted and chosen Katy from I Love to Cut and Paste as our overall winner.  We loved the wonky feel of Katy's partying skeleton.  We will be delighted to have Katy join us as a guest designer for an upcoming challenge.  Congratulations Katy! We will be in touch soon with the guest designer details. 

Our Top Three winners in order are Barb and Morena.  The random winner of the $25 shopping spree at The Funkie Junkie Boutique is Barb, entry #3.  Congratulations to all our winners!  Please email Linda at thefunkiejunkie@!gmail.com for your winner's badge or other prize details.

Wednesday, September 7, 2022

Back to School

Hello and welcome back to our bi-weekly challenge.  This time we want you to show us your make that has a back to school vibe.  The summer is over and it's time to hit the books again.  We would like to see your creations with books, alphabets or anything that reminds you of learning!  To inspire you, here is what our design team has to get you started.

Teri Wilson - TerisMailbox


Suzanne Czosek - Suzz's Stamping Spot 


Lisa Hoel - Creative Juice


Laura Gilhuly - AngelScraps


 Lyla Larimore - A Chief's Wife's Heart's A' Fire

 
The overall winner will be offered the chance to be a Guest Designer at a future date here at The Funkie Junkie Boutique Blog, and everyone who enters and follows the rules will go into the drawing for the chance to win a $25.00 spending spree at The Funkie Junkie Boutique. There are also Top 3 Badges for three additional outstanding entries, chosen by the Design Team.

The guidelines for entering are simple: create a new vintage or shabby chic project following the challenge theme, link it to your post (not just your blog) and also include a link to this challenge in your post. You can combine our challenge with up to 10 challenges (including this one) to be in with a chance for winning. If you are entering through a public forum (such as Instagram) you'll need to include the words 'Funkie Junkie Boutique Challenge'. Also, please turn off your Word Verification so our Design Team can leave comments on your blogs. Make sure you follow these rules as unfortunately, we have had to eliminate entrants from the prize drawing in the past.

Whatever you create, enjoy the making! We look forward to seeing your projects! This challenge is open through 11:55pm Eastern Time on Tuesday, September 20, 2022.

Saturday, September 3, 2022

Make Your Own Ephemera!

Hello friends,

It's Teri with TerisMailbox and I'm posting for The Funkie Junkie Boutique today. This Saturday Spotlight post is all about creating your own Ephemera using some of the new Sizzix dies including Vintage Labels, Collector and Specimen sets. In the end I created a journal cover, and I will walk you along creating the collection of ephemera pieces.


Check all the fun layers of Vintage Goodness here! 

I have a video on my YouTube Channel if you prefer to follow the process. Link: https://youtu.be/c_XEkzMzivc


I started with the Vintage Label set. I love ephemera and layering tags etc. on my projects! This set gives the user so many opportunities to be creative!


I read on one of the FaceBook pages (Tim Holtz Addicts?) that if you coated the dies with embossing ink prior to adding the Archival ink that you would get better coverage. The top label was my first attempt without the embossing ink. Look at the difference with the embossing ink on the bottom label. I'm sold on this idea! Archival inks used include Barn Door, Peeled Paint, Faded Jeans and Walnut Stain.

The other thing I did was attach the dies onto a sticky sheet so I could ink and cut multiples at once. I am a fan of going for it once I have all the supplies out!


Check out all the labels I was able to create in one sitting, by stamping with Field Notes CMS496, Tiny Toadstools CMS 377 and Holiday Things CMS 441.

The next project was creating the specimen slides using the Sizzix Specimen Dies, Foliage Die and Funky Florals - large.


Here is one of the three slides I created. After cutting them out from Neenah Desert Storm cardstock, I inked the edges with Tea Die Distress Inks and dipped them in a puddle of the same ink to age them.

I had a bag of flowers and mushrooms from a prior crafting time that I simply pulled out and used in the slides. It makes crafting so much easier when you have pieces and parts saved!

I created the envelop using a panel from Backdrops Volume 3, cut with the large envelope die from Sizzix Collector Die Set.


You can see the envelope under all the labels. I cut the fasteners from red cardstock, added the eyelets and twine!

The background is another piece of Neenah Desert Storm stamped and inked using the Ecclectic CMS 448 stamp and Tea Die Ink. I did not remove the stamps from the backing and used the entire stamp!

I assembled all the pieces onto a Kraft Covered Folio my husband brought home. It promptly went to my craft room as I knew it would be perfect for a project!