Friday, October 16, 2015

Friday Focus - Distress Paints

Hello and welcome everyone. It's Jenny here, it's Friday and it's time for a brand new Friday Focus! This our opportunity to share with you ideas, tips and techniques for using a specific product or range currently available at The Funkie Junkie Boutique. And even better news, that product then has an extra 15% discount added for the coming two weeks!

In the spotlight this time are Distress Paints and I'm sharing a step by step tutorial for the latest card created for our current challenge 'Autumn Splendor!' So let's get going...

Grab a brayer and begin rolling through a small puddle of Distress Paint on your craft mat. Roll the paint loaded brayer in a random fashion across a large piece of plain card (A4 size in the UK which equates to roughly 8.27 × 11.69 inches). I started with Peeled Paint and then added a layer of Vintage Photo in different areas. Don't worry if you get uneven patches like me - it'll all look good in the end!


Continue layering with Crushed Olive, Barn Door and Fossilized Amber until it looks something like this...


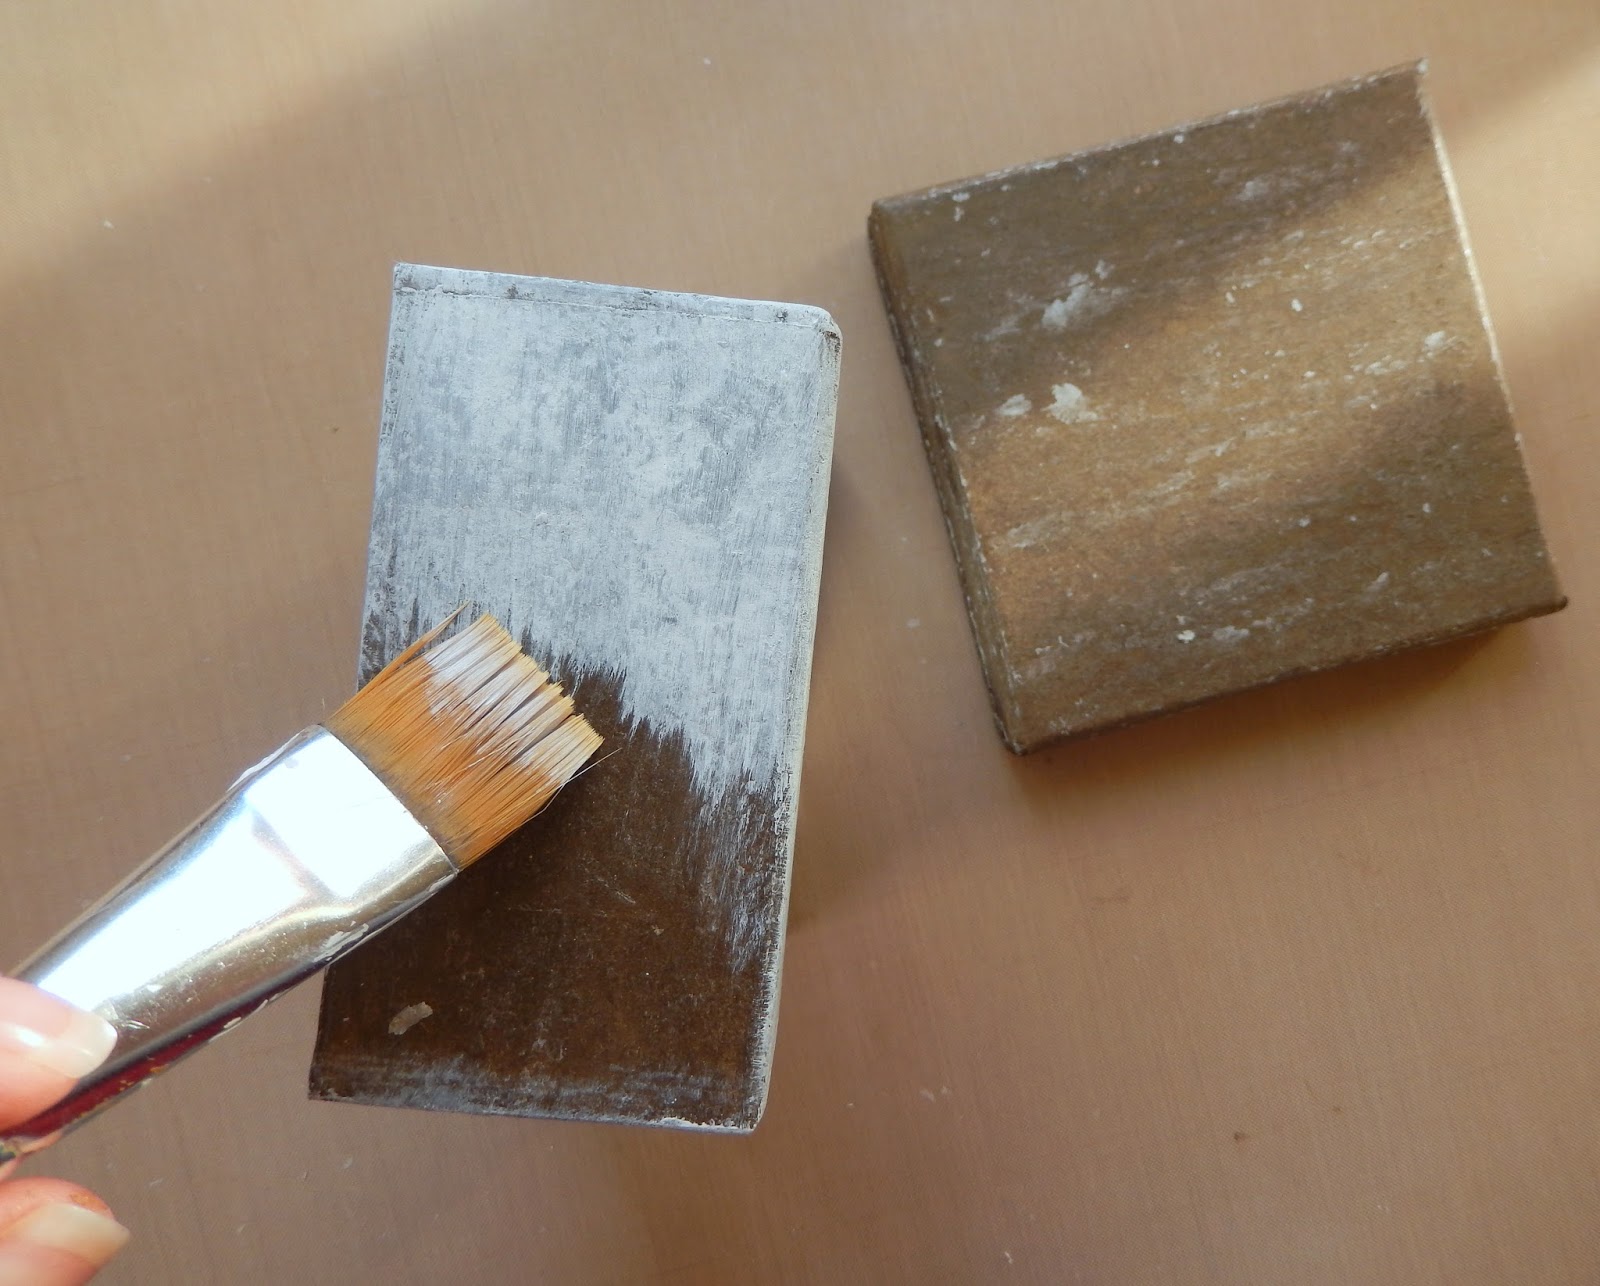
To remove the white bits mix Vintage Photo paint with lots of water and brush over the dry brayered layers. Use a large flat brush to get this bit over and done with quickly, then let it all dry.


I chopped up my card into three distinct pieces - the base (to fit my card blank with a decent margin) a second smaller layer, and a remaining chunk from which I die cut my leaves using the Fall Foliage Thinlets set.


Use your brayer to apply some white gesso over the smaller second layer.


Once you've die cut all the leaves (don't discard the waste!) you need make sure you run your die cuts through with the corresponding dies using whichever Impressions Pad and Silicone Rubber Pad are applicable to your machine. This ensures the veins are embossed into the leaves.


Use a small amount of the same paints to brayer over your leaves - I chose to add Barn Door to the maple leaves, Crushed Olive on the oak leaves, Peeled Paint on the beech leaves and Fossilized Amber on the wheat stalks. I also blended a little Vintage Photo Distress Ink around the edges of each leaf.


Use the leftover waste from your die cuts as a stencil and apply the same paints through it onto the whitewashed second layer of card. By stencilling the larger leaves first, then layering over the smaller ones you can create your basic design and ensure you know where to put each leaf.


Now it's just a case of gluing those leaves in place over the stencilling (offsetting them a little as you go) before winding round some Tim Holtz' Jute String or similar around the centre. I added a filigree metal flower and gumdrop on top of that but you could also use one of the other filigree metal embellishments Linda has in stock at The Funkie Junkie Boutique (like the dragonfly or butterfly or even a charm or two!)

And to finish I used some Tim Holtz Remnant Rubs and Chit Chat Stickers (distressed at the edges with a nail file) with a splatter or two of Picket Fence and Black Soot Distress Paint over the leaves. Having used a paper distressing tool along the edges, layer it all up on to some coordinating card and your card base for a beautiful Autumnal card.


I hope you've enjoyed this tutorial and give the ideas a go. Remember, with an extra 15% discount applied to Distress Paints for the next two weeks at The Funkie Junkie Boutique so it makes sense to stock up now.

And of course there's still time to link your own Autumnal creations to the current 'Autumn Splendor!' challenge for a chance to win.

For now I hope you have a wonderful weekend and, whatever you're up to, take care of yourselves.
Jenny xxx

Wednesday, October 14, 2015

Autumn Splendor!

Hello and welcome! It's Nancy here, and I'm hosting our newest challenge here at The Frilly and Funkie Blog!

Our theme this time around is Autumn Splendor! Simply create a vintage or shabby chic project using the rich colors of autumn, and remember to include an autumn leaf somewhere in your project.

At the end of the challenge the team will choose their top four picks. Our first place winner will be invited to join us in a Guest DT spot here at Frilly and Funkie. Three additional talented participants will receive badges to display on their blogs. Everyone who enters and adheres to the challenge guidelines will be entered into a drawing to win a $25 spending spree at The Funkie Junkie Boutique!

The guidelines for entering are simple; create a new vintage or shabby chic project following the challenge theme, link it below to your post (not just your blog) and include a link back to this challenge in your post. You can combine our challenge with up to 10 challenges (including this one) to be in with a chance of winning. Make sure you follow the guidelines, as unfortunately we have had to eliminate entrants from the prize draws in the past when they have entered too many other challenges. If you are entering through a public forum please use keyword F&F. Also, please be sure to turn off your Word Verification so our design team can leave comments on your blogs.

Here's some inspiration from the Funkie team  (click on each one for a closer look):

Jenny Marples - Pushing The Right Buttons

Zoe Hillman - iGirlZoe

Shelly Hickox - Stamptramp

Linda Coughlin - The Funkie Junkie

****************************************************

And here's some more inspiration from the Frilly team:

Cec Wintonyk - CW Card Creations

Georgie Connelly - Little Blue Craft Box

Nancy Dynes - Tattered Treasures

We'll be back on Friday with a new Focus product and tutorial so make sure you stop by for that.

Each and every one of you is important to us. We truly enjoy seeing your beautiful creations, so please plan on joining in. Now pull out those seasonal supplies and get a jump on your fall crafting!


Hugs,


Monday, October 12, 2015

Challenge Winners - Chalk It Up

Can you believe it's already mid October! Where does time fly? Today we announce the winners of the 'Chalk It Up!' challenge. Thank you so much to everyone who took the time to enter with some beautiful projects with a special mention to the lovely Carol who went to the trouble of putting into practice Cec's fantastic tutorial. The Design Team cast their votes and this time our winner is #9 Suzan Von Essen.


We loved the strong pop of red against that clever chalk brick background. Congratulations Suzan on being our favourite for the 'Chalk It Up!' challenge and winning the opportunity to be a Guest Designer here at Frilly and Funkie for a future challenge.

And now for the next three winners of our Frilly and Funkie Top 3 Badges. In numerical order they are... #3 Julie Lavalette, #4 papercrafter45 and #5 Terry!!! Please email Linda at thefunkiejunkie@gmail.com for the codes for the Top 3 badges so that you can display them proudly on your blog.


And finally Random.org has chosen a winner for our $25 gift certificate to The Funkie Junkie Boutique. Our congratulations this time go to #1 Maya!

A huge thanks from the Frilly and Funkie team to everyone who took part in this challenge and congratulations again to our winners. Please email Linda at thefunkiejunkie@gmail.com for the codes for the winner's badge and to give us your email address for the Guest Designer details (Suzan) for the Top 3 badges (Julie, papercrafter45 and Terry) and for the gift certificate details (Maya).

Our current challenge, 'Autumn Splendor!' runs through Tuesday, October 20th. We hope to see you entering this time around so that you too can be in with a chance to win. And please make sure you follow our rules as sadly we've had to discount entries from previous challenges; you can enter up to 10 challenges including ours, and a maximum of 3 entries per person to our challenge. Please remember to link back to our challenge in your entry and mention in your post that you are entering this Frilly and Funkie challenge.

Have a great week everyone!

Saturday, October 10, 2015

Saturday Step by Step - Old Ledger Box

Hi everyone and welcome to the latest edition of our Saturday Step by Step tutorial posts here at Frilly and Funkie. I'll be honest, with so many projects on the go recently I was completely at a loss with what to do for this, but then I read Paula Cheney's recent posts on Facebook about her 'hauls' from trips to antique yards, including some fabulous old, worn boxes. And then there's an image I saved some time ago (I'm pretty sure it came from Savvy City Farmer)...


The cogs started to whir, I reached for some Distress Paints and Tim Holtz' Ledger Script stamp set, and came up with this...


So how did I do it? Start with a cheap box (I got a papier-mâché one from a craft shop). Cover it in an initial layer of Ground Espresso Distress Paint.


Add Industrious Frames strips to the edge of the lid and cover with more of the paint allowing it to dry.


Rub a wax candle over every surface, working in one direction (apply plenty of wax).


Paint a light coat of white gesso over every surface and allow to dry naturally - don't use a heat tool as you will disturb the wax.


Rub over the dry gesso with a paper towel to remove some of the white layer, paying particular attention to the edges. You can use a sanding block to remove more if you want to.


Add more wax before dry brushing a little Walnut Stain Distress Paint over random parts and allow it to dry naturally again.


Once again rub over the surface to remove some of the fresh paint.


Use the Ledger Script stamps with black archival ink to apply some random stamping to the surfaces of the box.


Apply Ground Espresso Distress Paint to the brass clasp and allow it to dry.


Rub over the clasp with the wax candle again before applying a coat of Weathered Wood Distress Paint.


When dry, rub over the clasp with a paper towel to remove some of the paint layers, then stamp with the Ledger Script stamp as before.


Finally splash some Picket Fence Distress Paint over the sides of the box and the clasp. When dry attach the clasp to the side of the box and lid with Long Fasteners.


And it's done!!! Here's a couple of close ups so you can see more of the finished look...


Now you've got something special to give a gift in (or to keep for yourself!) Hope you'll give it a try.

That's it for this weekend. We'll be back on Monday with our latest challenge winners and on Wednesday you'll get to see more projects from the Funkie side of the team for our current challenge 'Autumn Splendor!' Hope you can join us for those and in the meantime have a great weekend.

Jenny x

Thursday, October 8, 2015

Welcome to today's Guest Designer, Suzanne!

Today we are welcoming Suzanne C of 'Suzz's Stamping Spot' as our Guest Desginer. Suzanne was chosen by the DT as the winner of the 'Touch of Gold' challenge. So, without further ado let's move on to hear from Suzanne.


Hi! I am thrilled to be guest designing with the talented Frilly and Funkie Design team. I love playing with my inks, stamps and crafty tools. Every day I try to spend a little time creating mostly in the early morning before anyone is up and about. I am constantly inspired by new stamps, products, other artists or challenges.

Fall is my favorite time of the year because of the glorious leaves and colors. I was so happy to have a chance to pull out my leafy dies and create a fun Halloween inspired project.


I had been thinking about creating a mini tree with a few leaves left dangling after the winds have chased away all the other leaves. 
 

I wanted my leaves to be specifically cut to highlight individuals. I had fun picking out who would be cut out and what remnants to rub on beneath their pictures. 

I used a branch that has already blown down by our house as my tree base and used a sturdy wooden spool as my base.


Decorating the base of the tree was almost as fun as creating my leaves. I used a few pieces of pattern paper and some cut out sentiments along with a sign stuck in the grown of my tree base to finish the scene.

Wishing you all a spooktacular Halloween.
Suzz

I'm sure you'll all agree that Suzanne's mini tree is amazingly imaginative and will have given you lots of ideas for your own Halloween home decor projects! Thank you so much for joining us as a Guest Designer Suzanne.

If you would like to be in with the chance to join us as Guest Designer all you need to do is join in with the current challenge 'Autumn Splendor!'

Friday, October 2, 2015

Friday Focus on Spellbinders!


Hello crafty friends! Nancy here, and I'm thrilled to be hosting this week's Friday Focus on Spellbinders!

I'm a long time fan of Spellbinders Dies. They're gorgeous, reasonably priced, and easy to use with almost any die cutting system. Spellbinders allow you to cut, emboss, and stencil with a single die template. The variety of shapes and designs are seemingly endless. You can't ask for more than that!

And now for the frosting on the cake... for the next two weeks Linda is offering and additional 15% off all Spellbinders products at The Funkie Junkie Boutique!

I've created a few 'thank you' tags and cards to showcase the versatility of these dies. Since not everyone owns numerous dies I thought I would demonstrate a variety of combinations that are possible from just a few sets. My die collection is minimal. I used only four sets to create the pieces for this project.

I started with a base tag created with a Tim Holtz die. The beautiful Maja Design papers are distressed, layered, and stitched. The tag below is embellished using Spellbinders Romantic Rose and Spiral Blossom One dies. The Spiral Blossom die is one of my all time favorites. I love flowers and put them on everything. If you're a flower lover just starting your collection this die should be among the first you purchase. I would also recommend adding at least one each of some type of circular, oval, rectangular, and square shape for the greatest diversity. 

All of my die cuts are popped up with foam tape to add dimension.  


The second tag is also embellished using Spellbinders Romantic Rose and Spiral Blossom One dies. The difference with this tag is the layering of two different designs from the Romantic Rose set. You'll notice the size of my die cuts look different from the photos on the die packages. That's because I like to cut them down and adapt them to smaller projects. I'm always finding ways to use them in bits and pieces. 


A sentiment, liquid pearls, and ivory twine give everything a sweet and shabby finish. 


The circle cards are cut and layered with two dies from Spellbinders Triple Tear set, then finished off in a similar method as the tags. 


I geared this for beginners who are new to Spellbinders. These are just a few simple examples of the countless ways to use these elegant dies. When I was first introduced to Spellbinders I found the selection to be almost overwhelming. You don't need to own every single die to begin designing with them (though it would be great fun to own them all)!   

Thanks so much for joining me today. Don't forget to visit The Funkie Junkie Boutique to take advantage of the additional 15% discount on Spellbinders products. Also, remember to take a peek at our latest challenge here at the Frilly and Funkie Challenge Blog. If you haven't had a chance to join in yet it's time to head to your craft space and start creating!

Hugs,