Monday, June 15, 2020

Challenge Winners - Tickled Pink!

It is time to announce our winners for the 'Tickled Pink!' challenge. Thank you to everyone who entered and played along with your wonderful pink projects. The Design Team really enjoyed seeing them all.


We had lots of favourites but after much deliberation the team chose this fantastic card by #12 Amelia B (Stamped for the Occasion) as the overall winner. We loved how Amelia used up some scraps and combined them with beautiful embellishments, even going as far as decorating the inside too - you can see more on her blog here.

Congratulations to Amelia on winning an opportunity to be a Guest Designer at a future date here at The Funkie Junkie Boutique Blog. You will be contacted shortly with all the details.

And now our picks of three additional outstanding entries for the The Funkie Junkie Boutique Blog Top 3 Badges. In numerical order they are #5 Erika N (BioArtGal) #9 Jo (Let's Art Journal) and #13 Jolanda.

Please email Linda at thefunkiejunkie@gmail.com for the codes for the Top 3 badges so that you can display them proudly on your blog.


And finally we have a randomly chosen lucky winner for the $25 gift certificate to The Funkie Junkie Boutique. Our congratulations this time go to #6 Vicki R! Please email Linda at thefunkiejunkie@gmail.com for the gift certificate details.

Thank you again to everyone who took part in this challenge from all of us here at The Funkie Junkie Boutique Blog  and congratulations to all our winners.

The current challenge 'Positively Pensive' can be found HERE and runs through Tuesday, June 23rd at 11:55 pm EST so we hope you will join us.

Saturday, June 13, 2020

Saturday Showcase - Junk Journal featuring Wendy Vecchi Studio 490 Stamps and Stencils

Hi everyone and welcome to another Saturday Showcase, the Design Team's chance to share tutorials and products available from The Funkie Junkie Boutique with you. As part of the current 'Positively Pensive' challenge I put together a junk journal featuring the designs of Wendy Vecchi and some ways of using ballpoint pens to decorate the pages.


If you just want to take a look at the junk journal in more detail here's a short flip through video to show the pages inside - for those who want to know how it all came together I've added a tutorial below;


The Tutorial


As mentioned in my challenge post I took to YouTube to find a way of decorating stamped images with ballpoint pens and found a brilliant tutorial by Alphonso Dunn HERE. Armed with this new found knowledge I stamped and coloured a heap of Wendy Vecchi designed flowers.


To show you this stage in more detail here's just one of the flowers from one of Wendy's older stamp sets, stamped with a couple of coordinating Archival Inks and shaded at different stages with the coordinating ballpoint pens. It's worth checking out the range of Archival Ink colours that Linda has in stock as it's a great alternative to the black ink I am sure we all reach for instinctively.


And here's a close up of some of those flowers, trimmed and inked around the edges with Walnut Stain Distress Oxide Ink.


Next up I used blue, pink and green Dina Wakley Media Acrylic Paints with my gel plate to create a bunch of coloured papers ready for use on the tea stained pages. As well as using regular copier paper I also pulled prints on some of the white tissue and brown paper that our orders come lovingly wrapped in. It's also well worthwhile looking through some of those scrapbook papers you may have in your stash - I found a couple in mine that worked well once tea stained.


And so now it's on to creating the junk journal - I began by cutting two Pocket Notebook cover pieces from regular cardstock using Eileen Hull's Sizzix Scoreboards Die. After gluing them together along the spine I covered the outside with one of the gel plate prints. To add extra decoration I stamped the beautiful lacy flower from Wendy Vecchi's stamp set 'Friends & Art' randomly across the back and front. To strengthen the inside I covered it with fabric, frayed around the edges, before stitching along the edge of the cover. Since at this stage the coloured paper on the outside was already starting to tear a little along the scorelines I embraced that and used a pair of scissors to scuff the paper along those lines.


Below you'll see how I layered a few of the painted papers beneath one of the stamped flowers. Adding a little fabric and some stitching is really effective, as is stamping onto some of the painted tissue before applying it over the flower with Distress Collage Medium Matte. I'm definitely going to be doing this a lot more in future.


Eileen's 'Pocket Notebook' Die has a section for cutting basic pages so I made a few from tea stained copier paper, stamping them with lines ready for someone to journal on. Use the Archival Inks that have been used for the flowers and you get a coordinated look throughout your journal. I would also mention at this stage that if you are not a fan of tea staining paper and card you may prefer to use Seth Apter's 'Tea' Izink Dye Spray. To make more sturdy pages I used a couple of long envelopes, glued together at the top and trimmed to fit as shown below.


Pockets need things to go in them so I stamped the flower images onto the edges of tea stained index cards and postcards with 'Acorn' Archival Ink. Since there was no margin line on the index cards I added one to each of them with the pink ballpoint pen.


Below you'll see how I attached punched strips of patterned paper to the outside of the envelope pages to create pockets. These can be decorated with a mix of the coloured paper/tissue, design tape and lines drawn with ballpoint pens.


Turning to the inside of the envelope pages I added gel printed paper to one side, adding a smaller pocket and part of a stamped flower image. On the other side I stuck down a medium glassine bag from Linda's store and stamped a Wendy flower and phrase onto it with Archival Ink. Since the bag is translucent you can see the tag that's been added inside.


More interactive pages were created using an A4 sized piece of tea stained graph paper; I folded it up to fit inside the cover and then folded it roughly in half. After cutting down the fold line on the folded up piece I glued down one side to create a large pocket for a tag (the page on the left hand side). I left the piece on the right hand side so that it could be folded down to reveal a hidden panel. The right hand flap was stamped with Wendy Vecchi's 'Tiled' Background stamp whilst the pocket on the left hand side was trimmed with a piece of book paper. Flowers were added to both along with more paper, design tape and ballpoint pen lines.


And here's how I decorated one of those hidden flaps with gel plate printed paper, a flower and ballpoint pen marks made by using a stencil from Wendy Vecchi's 'Thank You' Stamp/Die/Stencil set.


All those pockets need filling so I made a bunch of tags, adding gel printed papers, stamping with the 'Tiled' background and design tape to them.


And just a final idea for another pocket to be added to the back of one of the graph paper pages - I found these brown wage packets ages back and decided to decorate a few in the same way as before with papers, tape and hand drawn ballpoint pen lines. I also added a checkerboard pattern to one of the tags using the stencil in Wendy Vecchi's 'Flower Pot' Stamp/Die/Stencil set.


Now here's a reminder of how just a couple of the pages looked when assembled;


Thanks for visiting to catch today's Saturday Showcase tutorial - I hope you've enjoyed seeing some ideas for using Wendy Vecchi's gorgeous designs in combination with ballpoint pens.

There's still time to enter the current Funkie Junkie Boutique Blog challenge 'Positively Pensive' to be in with the chance of being a Guest Designer here. We look forward to seeing your amazing creations.

Jenny

Products used to create this junk journal are available from The Funkie Junkie Boutique and are listed/linked below.

Wendy Vecchi Studio 490 Stampers Anonymous Stamp Set - Friends & Art
Wendy Vecchi Studio 490 Stampers Anonymous Stamp Set - Funky Flower Art

Thursday, June 11, 2020

Guest Designer - Samra Leshinski

Say hello and give a warm welcome to our Guest Designer for the Positively Pensive challenge.  Samra Leshinski of Paper Talk with Samra was the Top Pick from the Sew Sweet challenge.


Hello, my name is Samra Leshinski and I live in Las Vegas, NV. I work full time and card making is my pastime addiction. I ventured into actual blogging and participating in challenges since April of 2014.

If I had to pick my favorite style that would definitely be shabby chic, but I try to have variety in my work. I also base my creation on a person that will be receiving my card; what are their interests, style and favorite colors. It makes me so happy to see big smile on someone’s face when they receive my handmade card. I make my own flowers for card embellishing, from daisies to roses and am still learning a lot about all the different ways to create textures and details on a project.

I know that my card making is not going to change the world, but spreading a little joy here and there is one small step that I can make.


I created the base with texture paste, harlequin stencil, pink acrylic paint and gesso.


I outlined parts of the diamonds and the corners with ballpoint pen. Hand made flowers were also covered with gesso to give them that rustic look. I outlined the oval die cut with ballpoint pen and added a resin mannequin embellishment. The shabby chic bow was made using a light pink seam binding ribbon. You can find the rest of the process on my blog. Hope to see you there.

* * *
Once you have checked out all the details for Samra's very pretty and shabby card, come on back and share your Positively Pensive creation with us. The challenge can be found HERE and runs through 11:55 pm EDT on Tuesday, June 23rd.

Wednesday, June 10, 2020

Positively Pensive

Hi! Suzz here. I am back with a new challenge today called 'Positively Pensive'. Why are we pensive? Because.... Today is Ballpoint Pen day!

The challenge is to thoughtfully use a ballpoint pen on your project. You can doodle, journal, sketch or trace an outline using any color ballpoint pen on your art. Create a vintage or shabby chic project with some form of ink from a ballpoint pen and if it isn't obvious how it was used make sure to tell us in your post!

The winner will earn a chance to be a Guest Designer at a future date here at The Funkie Junkie Boutique Challenge blog, and everyone who enters and follows the rules will go into the draw for the chance to win a $25 spending spree at The Funkie Junkie Boutique. There are also Top 3 Badges for three additional outstanding entries, chosen by the Design Team.

The guidelines for entering are simple; create a new vintage or shabby chic project following the challenge theme, link it below to your post (not just your blog) and also include a link back to this challenge in your post. You can combine our challenge with up to 10 challenges (including this one) to be in with a chance of winning. If you are entering through a public forum (such as Instagram) you'll need to include the words 'Funkie Junkie Boutique Challenge'. Also, please be sure to turn off your Word Verification so our Design Team can leave comments on your blogs. Make sure you follow these rules as unfortunately, we have had to eliminate entrants from the prize draws in the past.

Here is some fabulous art from the design team which will hopefully will inspire you  to get your inky pens out of the drawers and onto your crafty space:

Maggi Harding - Scrap, Travel & Bark!


Sara Emily Barker - sarascloset


Cec Wintonyk - CW Creations


Jenny Marples - Pushing The Right Buttons


Suzanne Czosek - Suzz's Stamping Spot


Now go ahead and grab your ballpoint pen and ink it up! We can't wait to see your pensive projects! Use the link below to enter the challenge.

Suzz


Saturday, June 6, 2020

Saturday Showcase - Seth Apter Izink Pigment and Izink Ice

It is Cec here with the Saturday Showcase this week and I am featuring a couple of the new Seth Apter products - Izink Pigment and Izink Ice.

I created a very tiny accordion book and used both products on each page but first I will show you a couple of panels I made when I was playing.


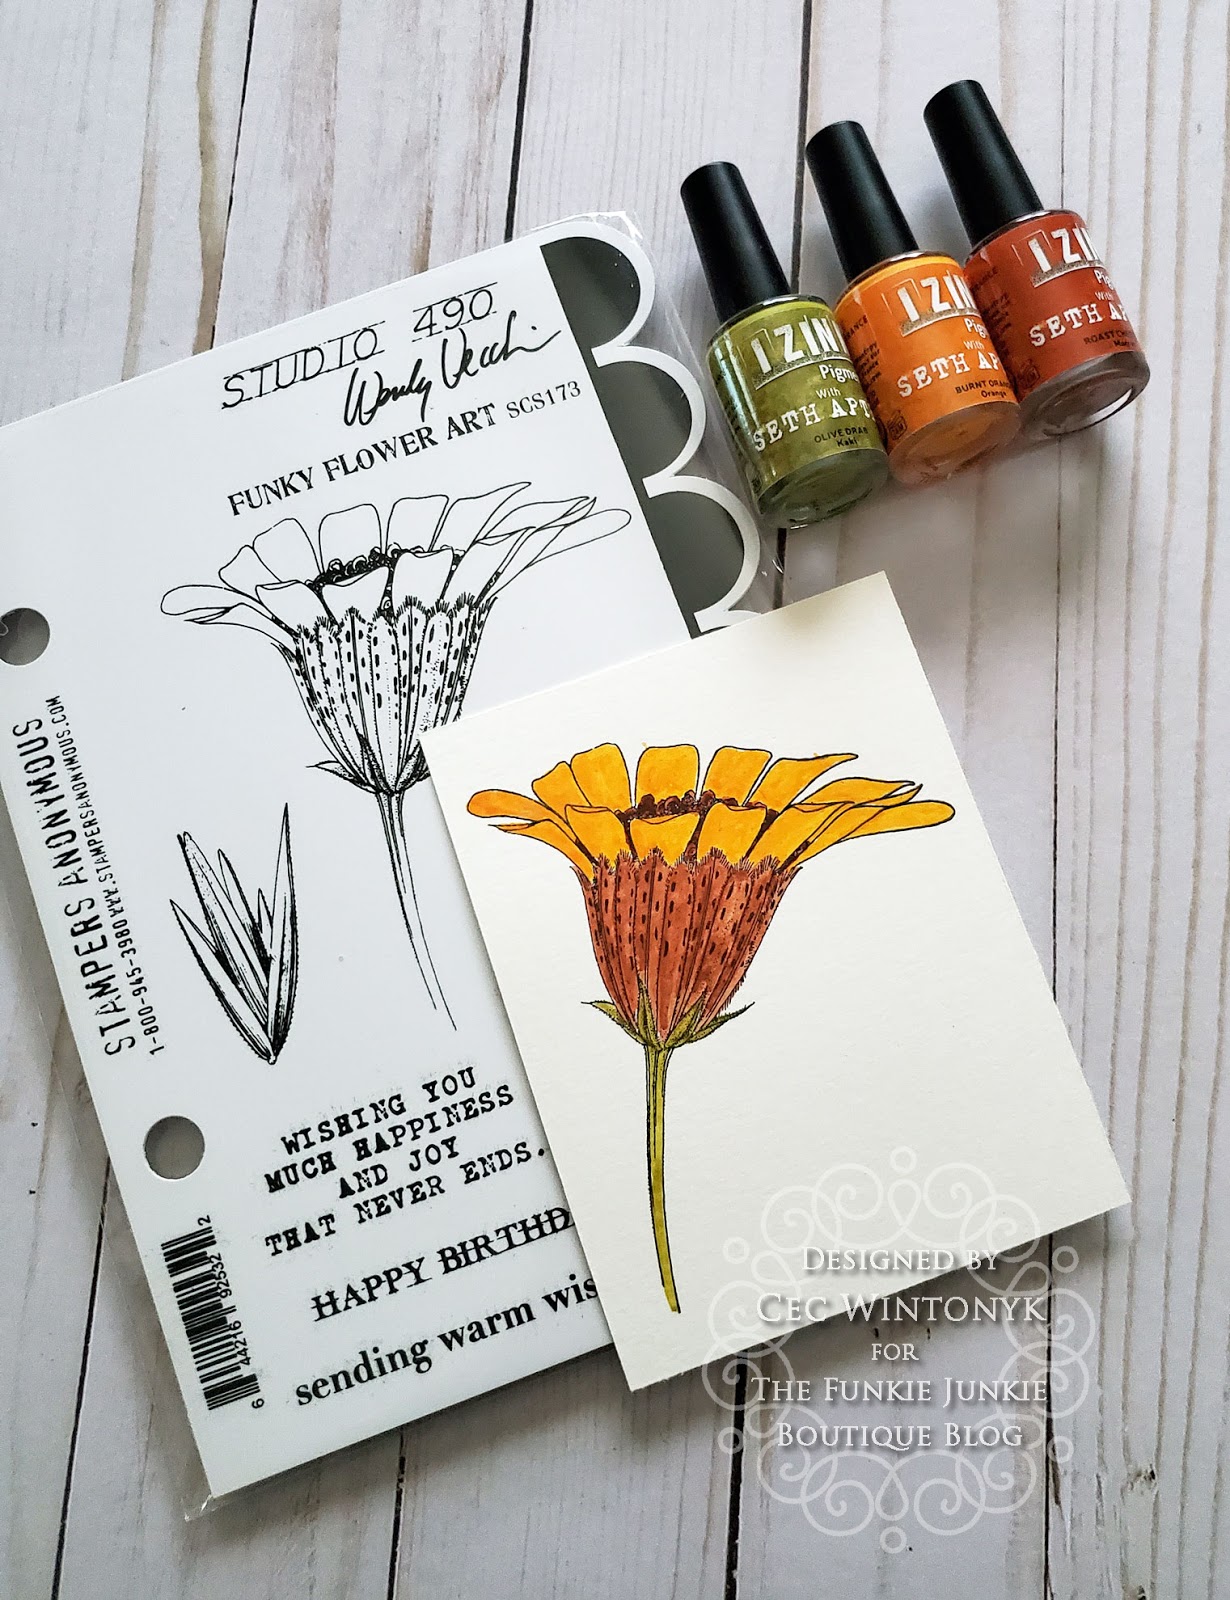
Using Jet Black Archival Ink (Ranger), I stamped the big flower from the Funky Floral Art set (Wendy Vecchi) onto a piece of water colour card stock.  Then I painted the flower with three shades of the Izink Pigment - Olive Drab, Roast Chestnut and Burnt Orange.  To paint, I dabbed the little brush that comes in each bottle onto my kraft sheet and then dipped a paint brush in a bit of water, tapped some of the water off so the brush was not soaked and then the pigment before I started to paint.  It behaves very much like water colours.


For the second panel, I randomly dry brushed some Heather and then Magenta Acrylic Paint (Dina Wakley) on a piece of watercolour card stock and then sponged on some Elephant Acrylic Paint (Dina Wakley).  Next I added some stamping with Watering Can Archival Ink (Wendy Vecchi) and some stamps from an old Tim Holtz set #THMM101.


Using a palette knife I scraped some Freezia and Arctic Grape Izink Ice randomly over the panel.  When that was dry I used the palette knife with the Arctic Grape Ice through a Bubble stencil (Tim Holtz) to get some bright markings.  This will make a great background for some mixed media project in the future.


And now the little book.  I started by cutting one piece of water colour card stock 3 1/2" x 10 1/2" and a second piece 3 1/2" x 10".  Both pieces were scored every 2 1/2" on the long side and folded accordion style.  The leftover 1/2" strip on the longer piece was clipped to angle the ends and then adhered to one side of the shorter piece to make a continual accordion.

Fourteen pages were cut from water colour card stock.  Originally I was going to adhere them to a mat before I added them to the page so I cut them 2 1/4" x 3 1/4" but then I changed my mind about the mat so without a mat, I wish I had cut them 2 3/8" x 3 3/8".

I also cut two pieces for the covers that measured 2 5/8" x 3 5/8".


The next step was to dry brush Lemon, Tangerine and Sedona Acrylic Paint (Dina Wakley) on one side of each page and cover.  I use the cheap, almost ratty  paintbrushes that Seth likes to use (you know the kind that have a wooden handle, bristles that tend to shed and you can buy in a dollar store) because you get rough coverage, which is a look I love.


Once the paint was dry I splattered Olive Drab, Burnt Orange and Roast Chestnut Izink Pigment one at a time on each page, let it sit for a few seconds, spritzed it with water and then moved the pages around to let it run.  I dried the pages between each colour.  I also found that the longer I let it sit, the more it absorbed into the card stock and left darker spots of colour.  The water makes it quite translucent.


The next step was to do a lot of stamping with Jet Black Archival Ink using stamps from Ultimate Grunge, Leaf Prints, Nature's Wonder and the old set marked #THMM101 (Tim Holtz).  I found the stamping too harsh so I sponged over it very lightly with a mixture of White Gesso and Squeezed Orange Acrylic Paint (Dylusions).


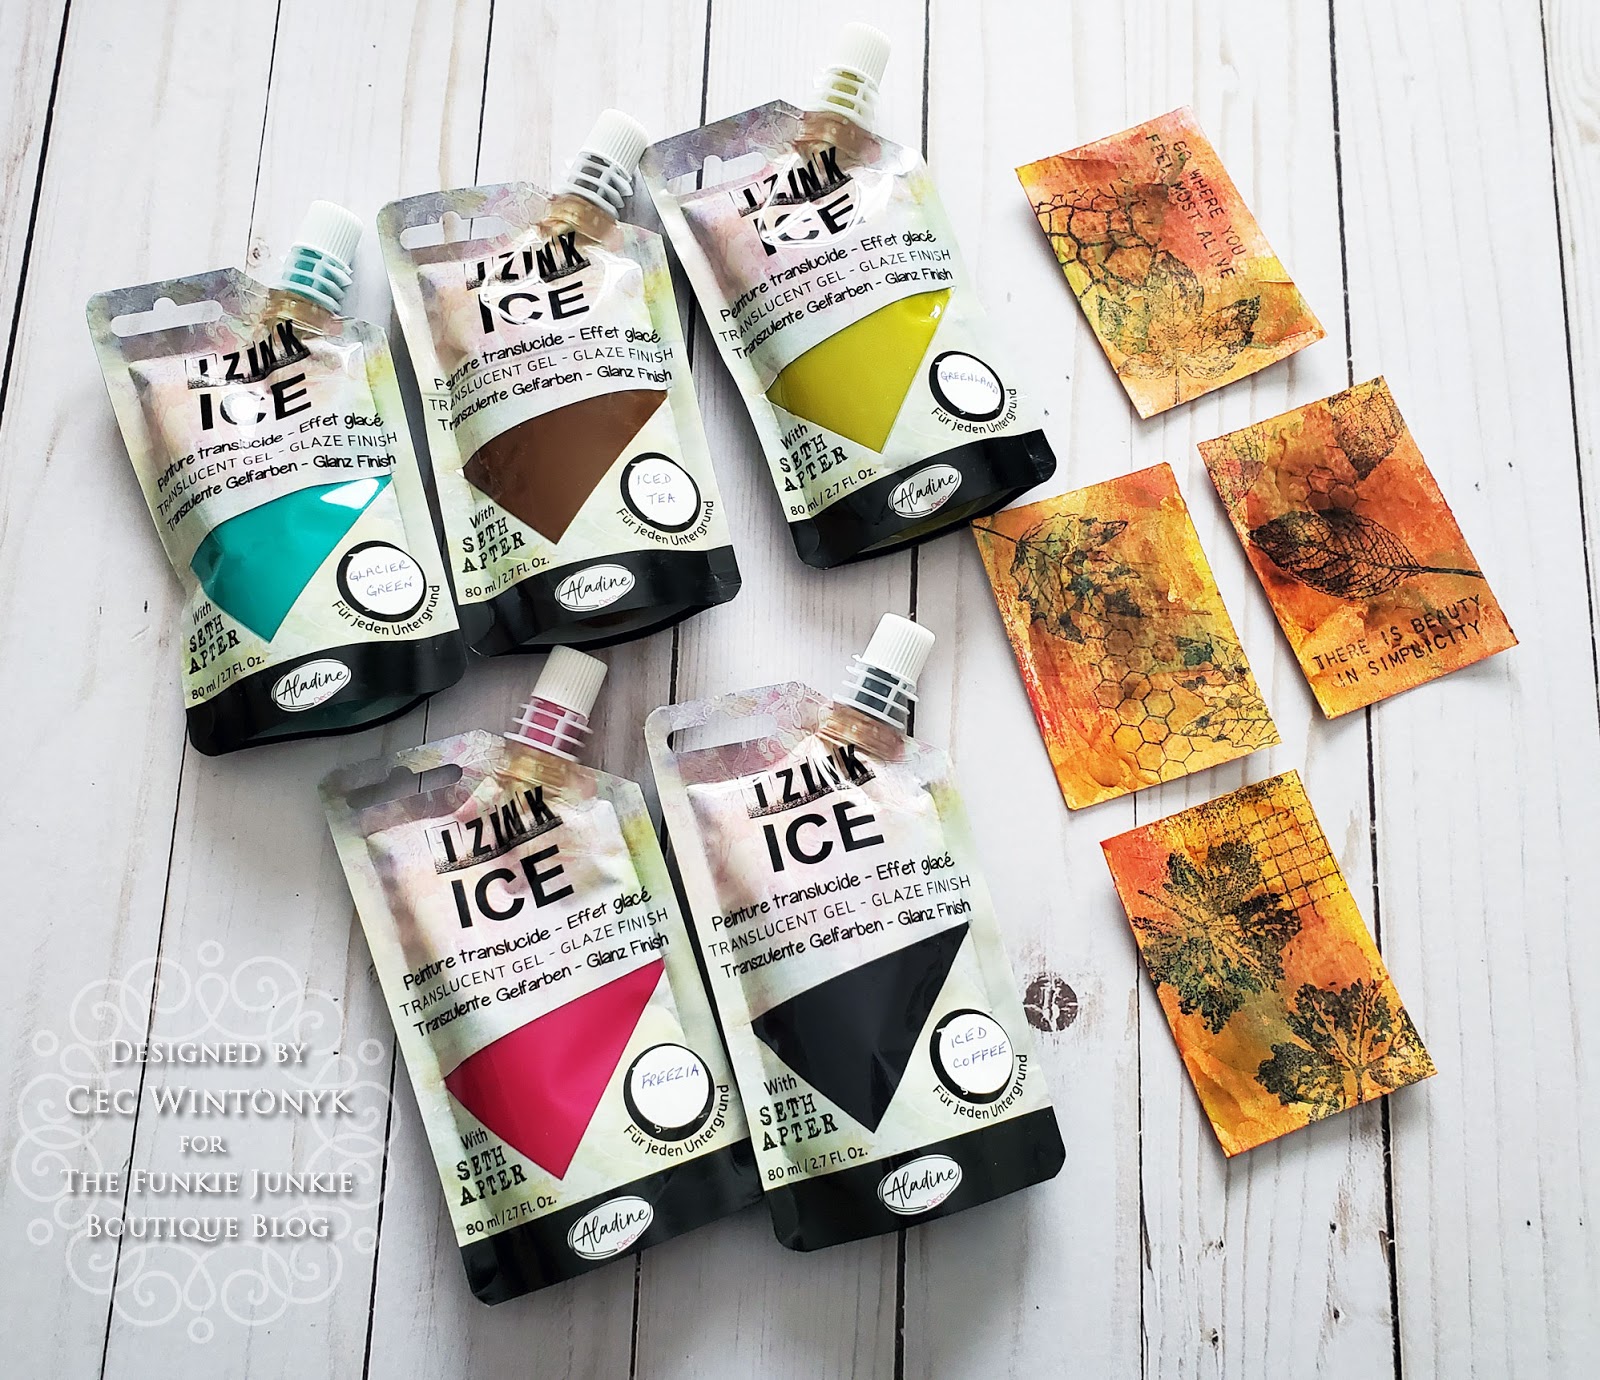
The last step in decorating the pages was to scrape Izink Ice over each page and cover using a variety of colours (Freezia, Glacier Green, Greenland, Iced Tea and Iced Coffee) drying between each colour.  It is really difficult to see in the photos but the Ice gives a lovely sheen to the pages and because it is so translucent you can see what is beneath it.


If you add it to an unpainted surface, the colours pop and you can see where I overlapped the colours, you get interesting looks.  If you look closely at the piece on the right, the Iced Tea looks brown and even orange where it overlaps the Glacier Green but it looks mostly orange on the edges.  Even over all the paint and pigment on the books pages that I laid down first, the addition of the ICE provides some really interesting colour variety.

While I didn't do this you can use tools to make marks in the ICE while it is still wet to provide more texture to your project.


Now that everything was decorated and dry, it was time to make the book.  First I inked the edges of the long accordion strip with Vintage Photo Distress Ink (Tim Holtz) as well as the edges of each individual folded section on both sides.  I dyed a piece of seam binding with some Rusty Hinge Distress Ink (Tim Holtz) and glued it to the back of one cover.  The edges of the covers and pages were inked with Vintage Photo DI.  Both covers were added to the end sections of the long strip and then the individual pages were mounted on the remaining sections.


A bronze leaf charm was tied to the end of one of the ties and then the ties were wound around the book and tied to create a closure for the book.

I hope you enjoyed this look at these two wonderful new products and will take a stab at trying them out.  By the way, if you are wondering why I chose this colour palette and the leaf stamps, it is because I am not enjoying 2020 and thought I would go back to the fall and maybe it would kick off a different outcome.  I know it is wishful thinking but I had to try 😂.

Supplies list with links to The Funkie Junkie Boutique:

Seth Apter Izink Pigments
Seth Apter Izink ICE
Dina Wakley Acrylic Paint
DYLUSIONS PAINTS, SQUEEZED ORANGE DYP46035
Ranger Archival Ink Pad - Jet Black AIP31468
Ranger Tim Holtz Distress Ink Pad - Vintage Photo TIM19527
Ranger Tim Holtz Distress Ink Pad - Rusty Hinge TIM27157
Ryon Seam Binding
Stampers Anonymous Tim Holtz Rubber Stamps - Nature's Wonder
Stampers Anonymous Studio 490 Wendy Vecchi Stamp Set - Funky Flower Art SCS173
Tim Holtz Leaf Prints Stamp Set
Tim Holtz Ultimate Grunge Stamp Set
Tim Holtz Clear Stamp Set #THMM101
Stampers Anonymous Tim Holtz Layering Stencils - Bubble THS002
Scor Tape
Leaf Charms
Bronze Jump Ring Set

Monday, June 1, 2020

Challenge Winners - Oh Man!

It is time to announce our winners for the 'Oh Man!' challenge. Thank you to everyone who entered and played along with your wonderful projects. The Design Team really enjoyed seeing them all.


We had so many favourites but after much deliberation the team chose this fantastic card by #6 Ann Chuang as the overall winner. We loved how Ann used the Distress Glazes to create the background - you can see more on her blog here.

Congratulations to Ann on winning an opportunity to be a Guest Designer at a future date here at The Funkie Junkie Boutique Blog. You will be contacted shortly with all the details.

And now our picks for the three winners of the The Funkie Junkie Boutique Blog Top 3 Badges for this challenge. In numerical order they are #6 Elly (Elly's Creaties) #14 Lyla Larimore (A Chief's Wife's Heart's 'aFire) and #19 Elle (Empire of the Cat).

Please email Linda at thefunkiejunkie@gmail.com for the codes for the Top 3 badges so that you can display them proudly on your blog.


And finally we have a randomly chosen lucky winner for the $25 gift certificate to The Funkie Junkie Boutique. Our congratulations this time go to #4 Alica! Please email Linda at thefunkiejunkie@gmail.com for the gift certificate details.

Thank you again to everyone who took part in this challenge from all of us here at The Funkie Junkie Boutique Blog  and congratulations to all our winners.

The current challenge 'Tickled Pink!' can be found HERE and runs through Tuesday, June 9th at 11:55 pm EST so we hope you will join us.

Saturday, May 30, 2020

Saturday Showcase - Stampers Anonymous Flower Shop + Seth Apter Izink Dye Spray + Ranger Distress Texture Paste

Hi! Suzz here. Welcome back for another Saturday Showcase. This week I am featuring the Stampers Anonymous Flower Shop, Ranger Distress Texture Paste and the Seth Apter Izink Dye Spray.  

I tried to use varying shades of pink when making this wall hanging and to make it cohesive I needed to repeat colors, texture, and similar images. 


Where to start? I will take you through the various pieces of the wall hanging and how the different key products took part in the overall process.
Steps for the wall hanging background:

1.  Cut linen cloth to size desired.
2.  Put white gesso on craft mat and spray with ink.
3.  Mix gesso with ink to desired pinkness. :)
4.  Paint front let dry and paint back. This gave it a nice firmness.
5.  Cut up old ruler into pieces. My husband drilled holes for me based on my general instructions.
6.  Paint ruler with same paint and wipe off excess.
7.  After dry add screws and fasteners. (The piece of twine was on my old ruler and I liked it and left it there. I just painted it with everything else)

After that I worked on my textured pieces and die cuts.  They all followed the same process:


1. Cut pieces of white cardstock for panels or dies.


2. Place stencil over cardstock and smear on texture paste.


3.  Scrape off excess.


4.  Scrape up any excess and put back into the jar. :)
5.  Let dry. (I am not good at this. I usually will try to heat with the heat gun and keep the heat indirect to try to keep it from bubbling up.)
6.  Spray along the edge the darker inky spray.


7. Then spray the next lighter color on the other side.


8.  Add water to the ink to mix and blend.


9. I then sprayed the entire surface with the new Izink Dye Spray called Antique Pearl. It adds this beautiful shimmer.

I created two panels  using the Ranger Tim Holtz Layering Stencils, Ranger Distress texture Paste - crackle and Ranger Distress Oxide Worn Lipstick, Ground Espresso and the Seth Apter Izink Dye Spray - Antique Pearl. 


I then used some pretty butterflies and followed the same process with a different stencil.


I repeated the process with the Ranger Distress Texture Paste - Matte finish to show the difference between the two texture pastes.


Here are the finished panels:


And the top half of the wall hanging:


My next step was to create a few stamped panels.

Steps:
1.  Stamp images using pink and gray inks.
2.  Splatter with Antique Pearl spray.
3.  Distress edges of panel.


The bottom panel used a different mix of stamps and was paired with a trio of butterflies.


In the middle I decided to create some design tape to layer under the big butterfly. To create the design tape I followed these steps:


1. Paint the strips of tape with the same paint mixture used on the cloth background.
2. Let dry.
3. Stamp flourishes using Versamark onto tape.
4. Emboss with a mix of embossing powders (clear, distress, white)
5. Heat set the embossing powder.
6. Sponge over embossing with different inks.


I provided which combinations of inks and embossing powders used on my different design tapes.

When I had all these strips I played with different ways of using them.  I decided to create a collage.


 I added the buttons, butterfly and stamped sentiment as an accent.

That explains the wall hanging and how it was created but I had one more experiment. I decided to emboss paste on a scrap from my wall hanging.


Apply the crackle embossing paste stenciled across the painted cloth background.


Then spray with a mix of dye ink sprays.


 Finish with a shimmer spray if desired.


The end result was pretty and can be used on a card front in the future.

I hope this has you inspired to join us in the Tickled Pink challenge! The challenge runs until June 9th 11:59 EST.

Suzz

Products:
Stampers Anonymous Flower Shop
Seth Apter Izink Dye Spray - Antique Pearl 
Seth Apter Izink Dye Spray - Grenadine
Ranger Distress Texture Paste - Crackle, Matte 
Ranger Distress Oxide Worn Lipstick, Aged Mahogany, Victorian Velvet
Ranger Distress Oxide Spray Worn Lipstick, Ground Espresso
Ranger Distress Ink - Worn Lipstick, Aged Mahogany,
Idea-Ology - Fastener
Idea-Ology - Hangers
Prima Art Basics Heavy White Gesso
Ranger Layering Nordic
Ranger Layering Stencil - Boquet
Sizzix Tattered Butterfly
Sizzix Thinlits Mini Butterflies
Sizzix Chapter 2 Crochet
Stampers Anonymous Tiny Text 
Stampers Anonymous Urban Elements
Stampers Anonymous Field Notes 
Versamark Embossing Ink
Ranger Clear Embossing Powder
Ranger White Embossing Powder 
Ranger Distress Embossing Powder
Ranger Archival - Watering Can