
Monday, December 18, 2023

Janna's Holiday Homecoming

Hello and welcome! This week at TFJB Inspiration Ave we are creating to the theme of “Home for the Holidays”. I was inspired by some childhood memories of making gingerbread houses and wanted to create a vintage style one with the Sizzix village collection die set. 

If you would like to see more in-depth details click video link here.


Materials used: Sizzix Village Collection die set, Ranger Opaque Grit Paste, Opaque Texture Paste, Snowfall Grit Paste, Distress Glitter, Distress paint Picket Fence, Squeezed Lemonade, Kitsch Flamingo, Tumbled Glass, Cracked Pstachio and Gathered Twigs, Distress Crayon Walnut Stain, kraft stock, Idea-ology Confections, Collage Medium, hot glue, and silicone frosting applicator.


To start our gingerbread project I am first creasing all of the tabs on the house. I like to use the edge of something solid to help with making the crease. I have also found the Idea-ology remnant rub tool to be useful when folding and creasing.


Next we will assemble the basic structure of the house. For glue I am using hot glue. There are definitely other glues that could be used, but I like how quickly the hot glue sets up and gives me a quick solid foundation to work on.


Next to give the house a gingerbread texture I am adding some opaque grit paste to the outside of the building. Here I am scraping the texture paste onto the building using a Ranger pallet knife. This will take about 15-20 minutes to dry.


While we wait for the grit paste to dry we can assemble the base. The base is a set of four tabs that tuck into the sides to form a small platform. Again I have used hot glue to hold everything together. Next I painted the base white with some picket fence distress paint.


After the paint dried I then added a layer of distress snowfall girt paste. This will give our base an icy cold look.


While waiting for the base to dry I painted the outside of the house with some Gathered Twigs distress paint. You could also substitute Vintage Photo distress paint for a similar look.


When the layer of paint was dry I then went over the exterior of the house with some Walnut Stain distress crayon to add some depth to the gingerbread exterior.. After dragging the crayon over the textured surface I then smudged the crayon with my finger.


With the exterior completely colored I then added some acetate to the windows on the inside of the house. I cut down the plastic and outlined it with glue before sticking it to the inside of the building.


Next I added the window frames and some detail to the door. I added a generous amount of collage medium and then stuck down the window and door frames.


Now onto one of my favourite parts of the project. Here I am painting the roof shingles with distress paints in pastel colors. The paints I used include: Kitsch Flamingo, Squeezed Lemonade, Cracked Pistachio and Tumbled Glass. If Tumbled Glass is not available then Speckled Egg makes a great substitute. I randomly painted each individual shingle with a different color to get a candy colored look to the roof pieces.
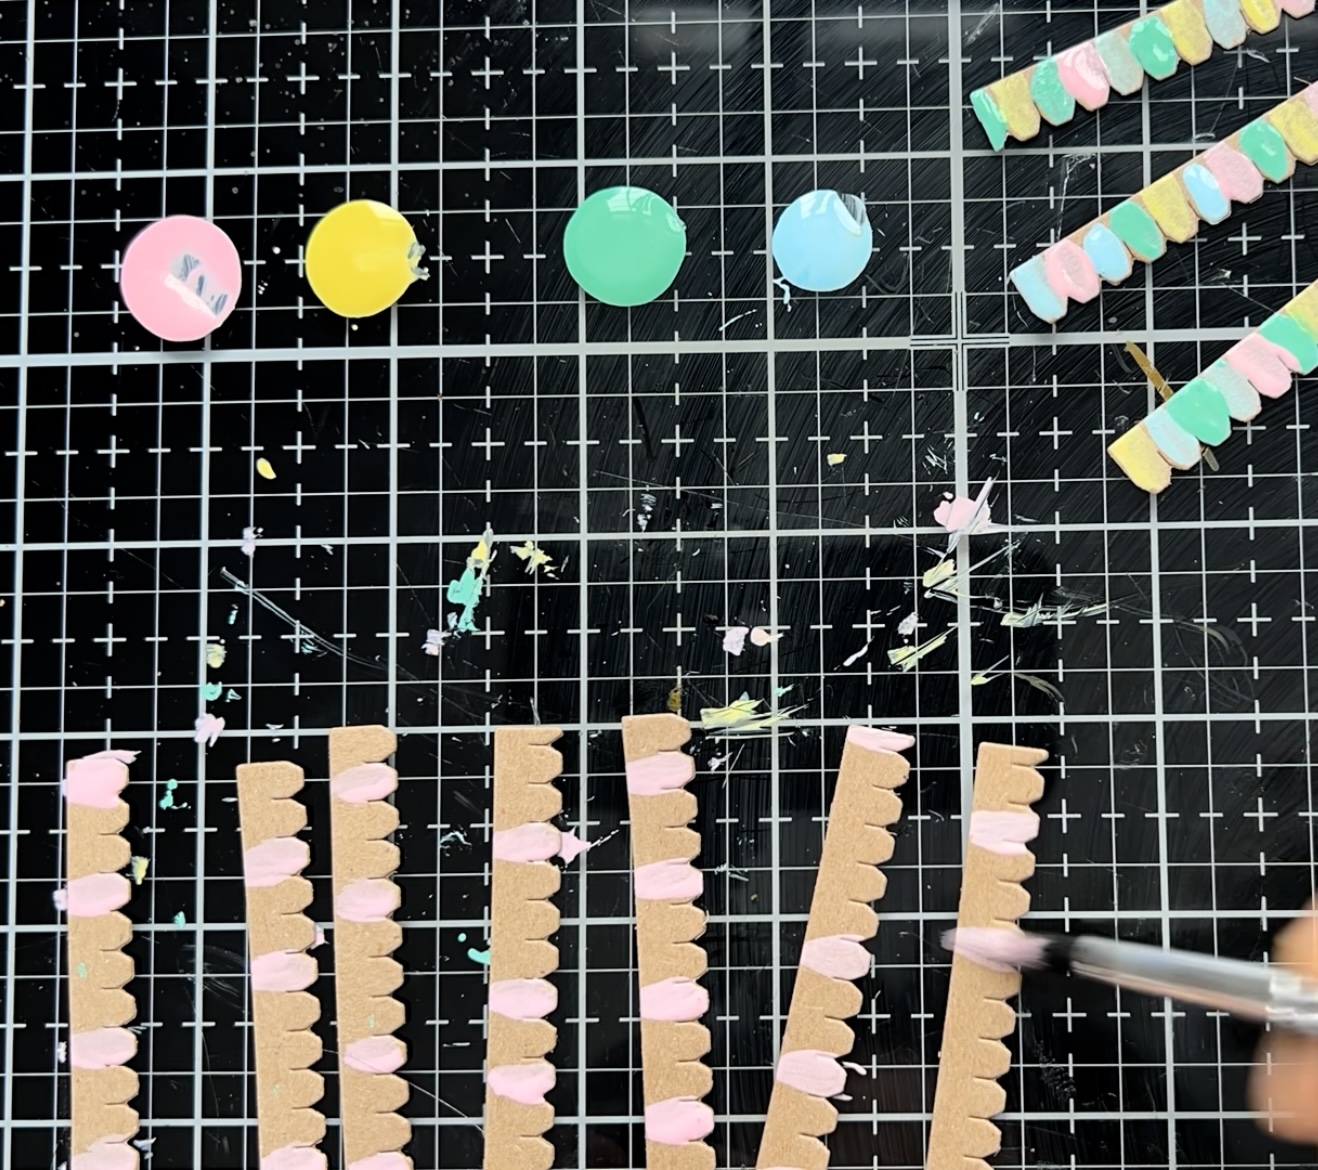

Once the painting was complete I used some hot glue to attache them to the roof. These pieces are cut at a slight off set from one another and I alternated pieces to get a staggered look on the roof by overlapping each piece. It took seven pieces per side of the roof.


To get more of a candied look I painted the roof with Collage Medium and then sprinkled Distress Glitter over the top. I absolutely love the shine and sparkle this has added to the roof.


Now onto the decorating portion of the project. To get a frosted look on the gingerbread house I added Opaque Texture paste into a silicone frosting dispenser. I used a pallet knife to scrape the texture paste into the silicone tube before gently tapping it down with the blue plunger. It is possible to find this frosting dispenser on amazon in cake decorating kits.


By applying steady pressure to the silicone barrel and slowly pushing down the plunger I was able to  achieve a frosted look on all of the joints of the gingerbread house. I also hot glued the house to the base with some more hot glue. I was then able to use the Texture Paste to conceal the areas where the house was joined to the base.


Once all the texture paste was piped I then went back and added confections as some delicious candy accents. By the door I added some candy canes and a boarder of peppermints around the base. Then across the very top of the roof I also added some longer peppermint sticks. 


Below is the completed gingerbread house. Making this definitely brings back lots of wonderful childhood memories for me.


Thank you so much for joining me here today for TFJB Inspiration Ave. Until next time, happy crafting!

Janna~ 💕🎨💕

I can also be found on :
Instagram: dunhamtreasuresofthesea_jannak

YouTube: The Crafty Corner with Janna


Used:


Teri's Holiday Homecoming

 Teri Wilson - TerisMailbox

 It's Teri with TerisMailbox posting for The Funkie Junkie Inspiration Blog. The theme is Holiday Homecoming: Celebrate with Family and Food. Today I present my candy shop home decor piece. My favorite food is candy!

This was such a fun project! I have a video if you prefer to watch the process.

Gather and Complete the Components

It started with this Vintage lunchbox I have been hoarding for a couple of years waiting for just the right project!

Cut a few pieces of Styrofoam to build up the interior or the box so you can create a scene on top with the lid open.

Use a large Etcetera Rectangle to form the base.

Paint the large Salvaged Figures with Distress Paints. Both the Santa and the Soldier found a home on the display. Add Collage Medium and Rock Candy Glitter to the figures for sparkle.


Spray two of the Woodland Trees with Rustic Wilderness Distress Spray. Add blobs of Collage Medium and Mica Flakes to the tips.

Assemble the Candy Shop: 


Use the green window plus the transparency sheet from Baseboards and Transparencies. Create the sides using chipboard cut to 2 inches b y6.5 inches and the top using chipboard 2 inches by 5.5 inches. Score one of the long edges at 1/4 inch and use a scoring tool to sharpen the angle. Score the two short ends plus one long end of the top piece. Trim the corner square, fold and use the bone folder to sharpen. Cut matching green cardstock and glue to the sides and the tops. Use a hot glue gun to attach the pieces to form the shop box.


Add icicles to the top of the shop. The shelves are small boxes from my stash hot glued inside the left of the shop. Prior to gluing, I created a few candy jars using small bottles and confections from Ideology. I filled with bottles with clay candy pieces.

Use Distress Crayons to color one of the paper dolls. 

Brick Walkway: Ink smoosh watercolor cardstock with Fired Brick Distress Ink then emboss with the Brickwork Texture Fade folder. Use a white gel pen to draw in the cement lines and splatter with Black Soot Distress Paint.


Trim to create a curved walkway in front of the shop.

Assemble the Scene

 Begin by identifying the placement of all the components. This is important to determined where the tiny lights come through the base.

Cut a piece of polyester quilt batting to form the snow layer. Trim to provide space for the brick walkway. Attach to the etcetera base with hot glue around the edges. Add the brick walkway.

Poke a hole in the base to the right of where the shop is. Feed Tiny Lights through the hole and bend the wire so one light goes through bottom of the Lantern and use hot glue to embed in the snow just in front of the shop.

Poke a hole in the lower right side of the shop and feed the Tiny Lights through. Wrap the light strand around the second tree and attach so it is on the right side of the shop.

Hot glue the shop so the left side matches up with the left side of the base.

Finish Decorating the Scene


Hot glue the additional outside pieces to the scene. The sled is a Christmas ornament from my stash topped off with a 1inch square foam box. The snowballs are Baubles glued in place.

Use Festive Berries Distress Paint to color the front of the Festive Marquee Sign and attach to the top center of the shop.

What's a winter scene without snow? Use Snowfall Grit Paste to add snow to various places in the scene including the snowballs and the top of the shop.


I hope you enjoyed my project today.  Be sure to check out all the fun items at The Funkie Junkie Boutique. 


Happy Holidays to you and yours. I'd love to have you follow/subscribe on my social media sites InstagramFacebookBlogger and YouTube all named TerisMailbox. Be well. Be creative!

Products used: 
Brickwork Texture Fade folder
Tiny Lights
Baubles
Festive Berries Distress Paint 
Festive Marquee Sign

Wednesday, December 13, 2023

Lyla's Holiday Homecoming


It's beginning to look a lot like Christmas, indeed! Especially over at The Funkie Junkie Boutique where the Tim Holtz Christmas products are on SALE! Lyla here once again, introducing the latest theme going on for the next two weeks where the Design Team will be sharing makes on "Holiday Homecoming" featuring Tim Holtz's newest stamp sets by Stampers Anonymous... get 'em while they last, folks! I was so taken by one set, that I went back in and ordered another- at a HUGE BARGAIN during TFJB's awesome deals going on, and it's like getting total freebies! I have so many ideas for these sets!
Come with! Grab a snack and scroll on...


The Happy Mail from my second order for another set of Tim stamps! Linda's gone bananas with these deals- in a GOOD way, lol!!


Here's a list of LINKS- but don't forget to come back after you shop, hehe!!


I began with using the Etcetra Mini Tag and Bracket Trims, again this time. I can't get enough of these! I did my fave thing: adhering and sanding all the edges.


Then I edged the Etc Mini Tag and Brackets with the latest  Tim Distress Crayons from the Pearlescent Set #3. I got out my new package of TH Baseboards and Transparentcies for a window to use...


...to make sure the window would fit the Mini Tag with room to spare for the Trims.


Then I started getting out some Idea-ology- some from 2021. 2022 and 2023- for good measure.


Here come the TH Stamp Sets and the detailing is just sooo cool!! But I had a problem... as I do quite a few days this year, *sigh*... I had forgotten to pack any of my stamp blocks! After an hour of looking around for something, I spotted my TH 3D Folders (which I forgot to bring LAST year) and wondered if one would work as a "block" in a pinch?? YES; it did!! (Who knew?!)


Again; the detail of the pine cones and wording is just so exquisite!


And this Santa was so sweet in that he's able to be colored in!


So I used my Pearlescent Set again.


And now I am glad I tossed a bunch of things from stash into my bags... these leftover little beads were just the things I needed to add to my TH Pinecone Adornments from several years ago. I wasn't able to get the newest set, but these still matched nicely!


 After successful stamping, I decided "why not?" and made use of the Cracked 3D Embossing Folder which I happened to grab, and put some scrap Vol. 4 paper to use!


I added some DO Squeezed Lemonade to make it more Pine-shaded wood.


The Baseboards and Transparencies are better than ever: I love the way Tim's adding more larger windows and doors- the printed plastics are bonus! I decided Santa was going to be seen inside the window, so I needed to use my Dura-Lar (a must-have item, I think). 


I used my Picket Fence Distress Crayon to color over the same areas as the frame lines of the window. I placed the tissue (from the pack of Dura-Lar) underneath the window frame, the topped the window frame with the Dura-Lar. I used my finger to swipe and run at the Crayon and repeated until I had a good set of lines.


This shows you how smudged the lines looked. Any bits of the Crayon got left also. Then I heat dried each time to see the total effect between repeats till I was happy. I did add another sheet of Dura-Lar so the Crayon was in the middle of the 2 sheets. I adhered both together by using Glossy Accents only all around the edges of the plastics after it was cut to the window's size. Then I adhered it with the GA to the window frame. The result is really COOL- a store front window during a cold & snowy day!


An older TH Thinlits Die ( Christmastime) was used to make the light pole with a few green plastic mistletoe beads taken from the table setting of our Church Ladies' Christmas Party last weekend. I used a bit of leftover tissue paper and DO Squeezed Lemonade for the lantern of the light pole. After heat-drying it the pole, I used the GA onto the top of the tissue- the result is a "glass" lamp. Miniature Christmas trim edges the window.


Just look at how snowy and icy that Tim Holtz Distress Snowfall Grit Paste is!!

And here's what I ended up with...


FRONT of Tag
The brightly decorated storefronts of our Home Away From Home (DeFuniak Springs, Florida) is shown in the background.  (Closeups Following)


Here's the BACK of the Tag...


Chipley Park surrounds the only naturally perfectly round lake in the USA; Lake DeFuniak is totally lit up with lights on nearly every Pine, Palm, and Magnolia tree in the entire park. I walk this 1 mile around as many days a week as possible while here for the winter months. The TH Winter Woodlands Stamp Set was perfect for showing off the Pines here!


The Stamps can be used on your other Idea-ology items as well!


That's it from me for now, but keep your browser open to Inspiration Ave so you can come back in every couple of days to see what the rest of our talented Design Team has created for your Christmas crafting inspiration!

We've got 2 more weeks beyond this theme, as well, so that means there's yet another theme to come before Christmas!! That'll give you more reasons to shop The Funkie Junkie Boutique!!

Till next time...

Stay Safe &
HAPPY BLOGGING!!