Saturday, July 28, 2018

Saturday Showcase - Emerald Creek and Seth Apter Embossing Powders

Hi everyone and welcome! Jenny here with the latest tutorial in our Frilly and Funkie 'Saturday Showcase' series. This is where a member of the Design Team gets the chance to shine a spotlight on a product or range currently stocked by The Funkie Junkie Boutique. This week's featured range comes from Emerald Creek Crafts who, amongst many other things, create gorgeous blended embossing powders. They also collaborate with other designers to create bespoke embossing lines including the Baked Texture range by Seth Apter.

I began this whole creative process by making a swatch card of the Emerald Creek embossing powders currently in my possession and quickly realised that the mix of greens, browns, golds, rusts and black coppers were very reminiscent of the beach. This fits rather well with the current Frilly and Funkie challenge which has a travel theme (details HERE). Some are original Emerald Creek ones and some are Seth's delicious Baked Texture powders and they work together effortlessly. I thought back to trips to the seaside where souvenir stores would sell weathered wooden nick-nacks covered in semi-precious stones, multi-coloured sands and other beachcomber things. And so I set about making a 'semi-precious' trinket box to show off the beauty of these gorgeous embossing powders (click on each image for a closer look);


The 'How To' Tutorial


Now I bet that looks super complicated right? But actually it's just a pile of heat embossed die cuts arranged on a weather worn look trinket box. I used Eileen Hull's Trinket Box by Sizzix but you could do this on anything from a wooden spoon to a card or even a piece of driftwood! Let's show you how.

I used the dies from Tim Holtz 'Funky Floral' sets #1 and #3 and ran each one through my Sizzix Sidekick for speed. I also recommend using Ranger's Emboss It Dabber to deliver lots of embossing ink and Ranger's Heat Tool (initially from a distance) because it is less forceful and allows the larger granules to melt into the smaller ones rather than move around.


For the largest flower use kraft card and apply two layers of Chunky Rust Baked Texture Embossing Powder. Having embossed the first layer use the dabber over the flower again and just apply a second layer of powder. The 'floss' element to this powder give the flower a beautiful fluffy textured finish.


The centre of the flower is also cut from kraft card and embossed with Emerald Creek's Oil Rubbed Bronze Embossing Powder. Only one coat is needed and once set it can be glued onto the centre of the flower.


Cut the long leaf stems from white card (though this powder is opaque when melted so you could use kraft card if preferred). Emboss with Seth Apter's Patina Oxide Baked Texture Embossing Powder.


The grass fronds definitely need cutting from white card because one coat of Seth Apter's Deep Sea Baked Texture Embossing Powder is semi-translucent and you get a gorgeous mottled deep green effect when melted.


One of my all time favourite powders, Emerald Creek's Fractured Ice Embossing Powder works amazingly over dark coloured inks, but for these branches apply onto white card to get that pale turquoise mottled effect.


Seth Apter's Ancient Amber Baked Texture Embossing Powder is also a semi-translucent powder and over kraft card produces a beautiful golden shimmer with just one coat.


Emerald Creek's Charred Gold Embossing Powder is another of my all time favourites. This is also an opaque powder and has multiple colours included (in fact it has a look of rough sand when in it's un-melted state) so cut the seed head flower from either white or kraft card and emboss with one coat of powder.


The final flower head can be cut from kraft or white card (I went with kraft) and is covered with Emerald Creek's Burnt Copper Leaves Embossing Powder which has a delicious mix of copper and gold tones.


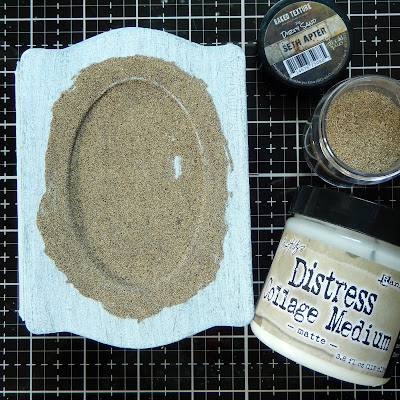
Finally cover the base of your chosen project, be it box lid, card, spoon or driftwood etc with a coat of Matte Distress Collage Medium and sprinkle with Seth Apter's Dirty Sand Baked Texture Embossing Powder. It will stick firm in place without the need for heat setting so you can achieve that matte multi-toned look of real sand.

To finish layer up the various embossed flowers and foliage. I began with the largest flowers mounted on black foam tape and added in the other elements underneath overlapping them as I went. I also added Emerald Creek Quartz Gemstones into the centre of the large flowers.

The Close Ups


I took a bunch of close ups to let you see in more detail the beauty of these gorgeous embossing powders. Remember you can click on each one for a closer look;


I'm sure you'll agree these Emerald Creek and Seth Apter Embossing Powders create wonderful effects in both their heated and un-heated states. Check out the full range available at The Funkie Junkie Boutique HERE. And I've added a full list of ingredients for this project below.

Thanks for joining me here today. Have a great weekend and remember to get creative!
Jenny xxx


Wednesday, July 25, 2018

Planes, Trains and Automobiles Challenge

Hello, Friends! It's Kathy here, and it's my honor to be hosting this Planes, Trains, and Automobiles Challenge. Summer is a great time to travel. For this challenge, create a vintage or shabby chic travel themed project. Think folded maps, cruise ships, road signs, compasses, passports, trains, planes or automobiles. As long as your project features a travel theme, you're headed in the right direction.

The winner will earn the chance of a Guest Designer spot here at Frilly and Funkie, and everyone who enters and follows the rules will go into the draw for the chance to win a $25 spending spree at The Funkie Junkie Boutique. In addition, the Design Team will select three further outstanding entries and those creators will receive a Top Pick badge to display on their blogs!

The guidelines for entering are simple; create a new vintage or shabby chic project following the challenge theme, link it below to your post (not just your blog) and also include a link back to this challenge in your post. You can combine our challenge with up to 10 challenges (including this one) to be in with a chance of winning. If you are entering through a public forum (such as Instagram) you'll need to include the words Frilly and Funkie Challenge. Also, please be sure to turn off your Word Verification so our Design Team can leave comments on your blogs. Make sure you follow these rules as unfortunately we have had to eliminate entrants from the prize draws in the past.

As always our fabulous designers have created some inspiration for you. This week the gals on the Funkie side of the Design Team are sharing these amazing creations (click on each image for a closer look).

Sara Emily Barker - sarascloset

Suzanne Czosek - Suzz's Stamping Spot

Zoe Hillman - iGirlZoe

Jenny Marples - Pushing The Right Buttons


*************************************************
WEEK ONE

This week the gals on the Frilly side of the Design Team are sharing these wonderful creations (click on each image for a closer look).

Kathy Clement - Kathy by Design
Hot Air Balloon Embellishment Tutorial

Maggi Harding - Scrap Travel & Bark
Card with hidden tag, Funkie Junkie Boutique

Cec Wintonyk - CW Creations

We can't wait to see what you create for this challenge so simply use the link below to share your vintage or shabby chic travel themed projects with us. 

Tomorrow we will be presenting a post from our Guest Designer for this challenge so make sure to check that out. Then be sure to come back next week when the Funkie side of the Design Team will be here to share even more inspiration with you.


Monday, July 23, 2018

Challenge Winners - "B" Happy

Hi everyone! Today we announce our top picks from the recent "B" Happy challenge. We were delighted to see so many gorgeous projects featuring birds, bees and butterflies. Thank you to all of those who took the time to join in the fun.


The Design Team faced a tough choice and it was almost impossible to split our winners, but in the end we did and are happy to announce that our overall winner as #34 Zowie Dixon (Crafts from the Fairy Den) who shared this delightful project. We loved the way the layers, butterflies and flowers framed the butterfly dancer. Congratulations Zowie on being our favourite and winning the opportunity to be a Guest Designer here at Frilly and Funkie for a future challenge. You will be contacted with all the details.

And now for the three winners of our Frilly and Funkie Top 3 Badges for this challenge; the choices this time were, in numerical order; #3 Rox Boyce, #13 Angela Radford and # 30 Jess Madaglia. Please email Linda at thefunkiejunkie@gmail.com for the codes for the Top 3 badges so that you can display them proudly on your blog.


And finally we have a randomly chosen lucky winner for the $25 gift certificate to The Funkie Junkie Boutique. Our congratulations this time go to #33 Susie Bentz! Please email Linda at thefunkiejunkie@gmail.com for the gift certificate details.

A big thank you again from the Frilly and Funkie team to everyone who took part in this challenge and congratulations to all our winners. The current challenge, 'Planes, Trains and Automobiles' runs through Tuesday, July 31st and the Funkie side of the Design Team will be back here on Wednesday July 25th with some more inspiration for you. We hope to see you entering this time around so that you too can be in with a chance to win.

Have a great week everyone!

Saturday, July 21, 2018

Saturday Showcase Tim Holtz Alcohol Lift-ink

Hello and welcome, Zoe here hosting this weeks Saturday Showcase. This week I am showcasing the new Tim Holtz Alcohol Lift-ink.


I was amazed at how simple it is to use, yet how effective the results. Here’s my first play with it...

  • I put a few drops of alcohol ink onto the glass section of my glass media mat. Added a few drops of blending solution and dragged a piece of white yupo heavystock through.

  • Once the background was dry I inked up my stamp with lift-ink and stamped.

  • I used the travel stamp platform so I had the option to stamp a second time if necessary, (it wasn’t). 

  • I dabbed away the lift-ink with kitchen paper and finally buffed the image to expose the negative.

  • I love how clear even tiny detailed stamps are when using the lift-ink.

  • I stamped a second time into distress mixed media heavystock. LOVE the faded print I got.

  • Using the non stick mat portion of the glass media mat, I spritzed several distress spray stains and misted with water. The ink really beads on the mat, which is exactly what you want.

  • I dragged my piece if heavystock through and dried with a heat tool. I swiped the edges through vintage photo distress spray stain and let them wick a little before drying with a heat tool.

  • I blended a little iced spruce distress ink though a mini stencil.

  • Stitched the edges with my sewing machine and mounted onto classic and metallic kraft stock.

  • I added a die cut number and gear, as well as an adornment arrow with a fuse wrapped around it.

  • Finally I added a little vintage cord to the side of the card.
The second card is definitely the one I prefer and I even had enough ink left on the stamp for second print. I’m so impressed with the lift-ink, it’s given me a new appreciation for alcohol inks and it’s a technique I plan to play with further. 

I hope you have enjoyed this Saturday showcase and take a look at the current Planes, Trains & Automobiles challenge. All the products I used are available from The Funkie Junkie Boutique.

I hope you have a great and creative weekend.
Zoe