Monday, October 30, 2023

Suzz's Tiny Mixed Mediums

The inspiration theme for the Funkie Junkie Inspiration Ave this time is Mixed Media Madness.  I was curious what the internet said about mixed media and did a search and captured a few pieces of the results to share. The simple definition of mixed media  "the use of a variety of media in an entertainment or work of art."  Google Dictionary results from oxford languages  Right below that was a few other questions and answers about mixed media which I found interesting as well:  "Mixed media is a type of visual art that combines more than one medium or material. This can take many forms, but the three most common are collages, assemblages, and sculptures. Many mixed media artworks feature different materials such as paint, fabric, paper, and found objects."  - The institute for Arts Integration and Steam

I decided to try to mix up my textures and mediums on my art and go small with my designs. 

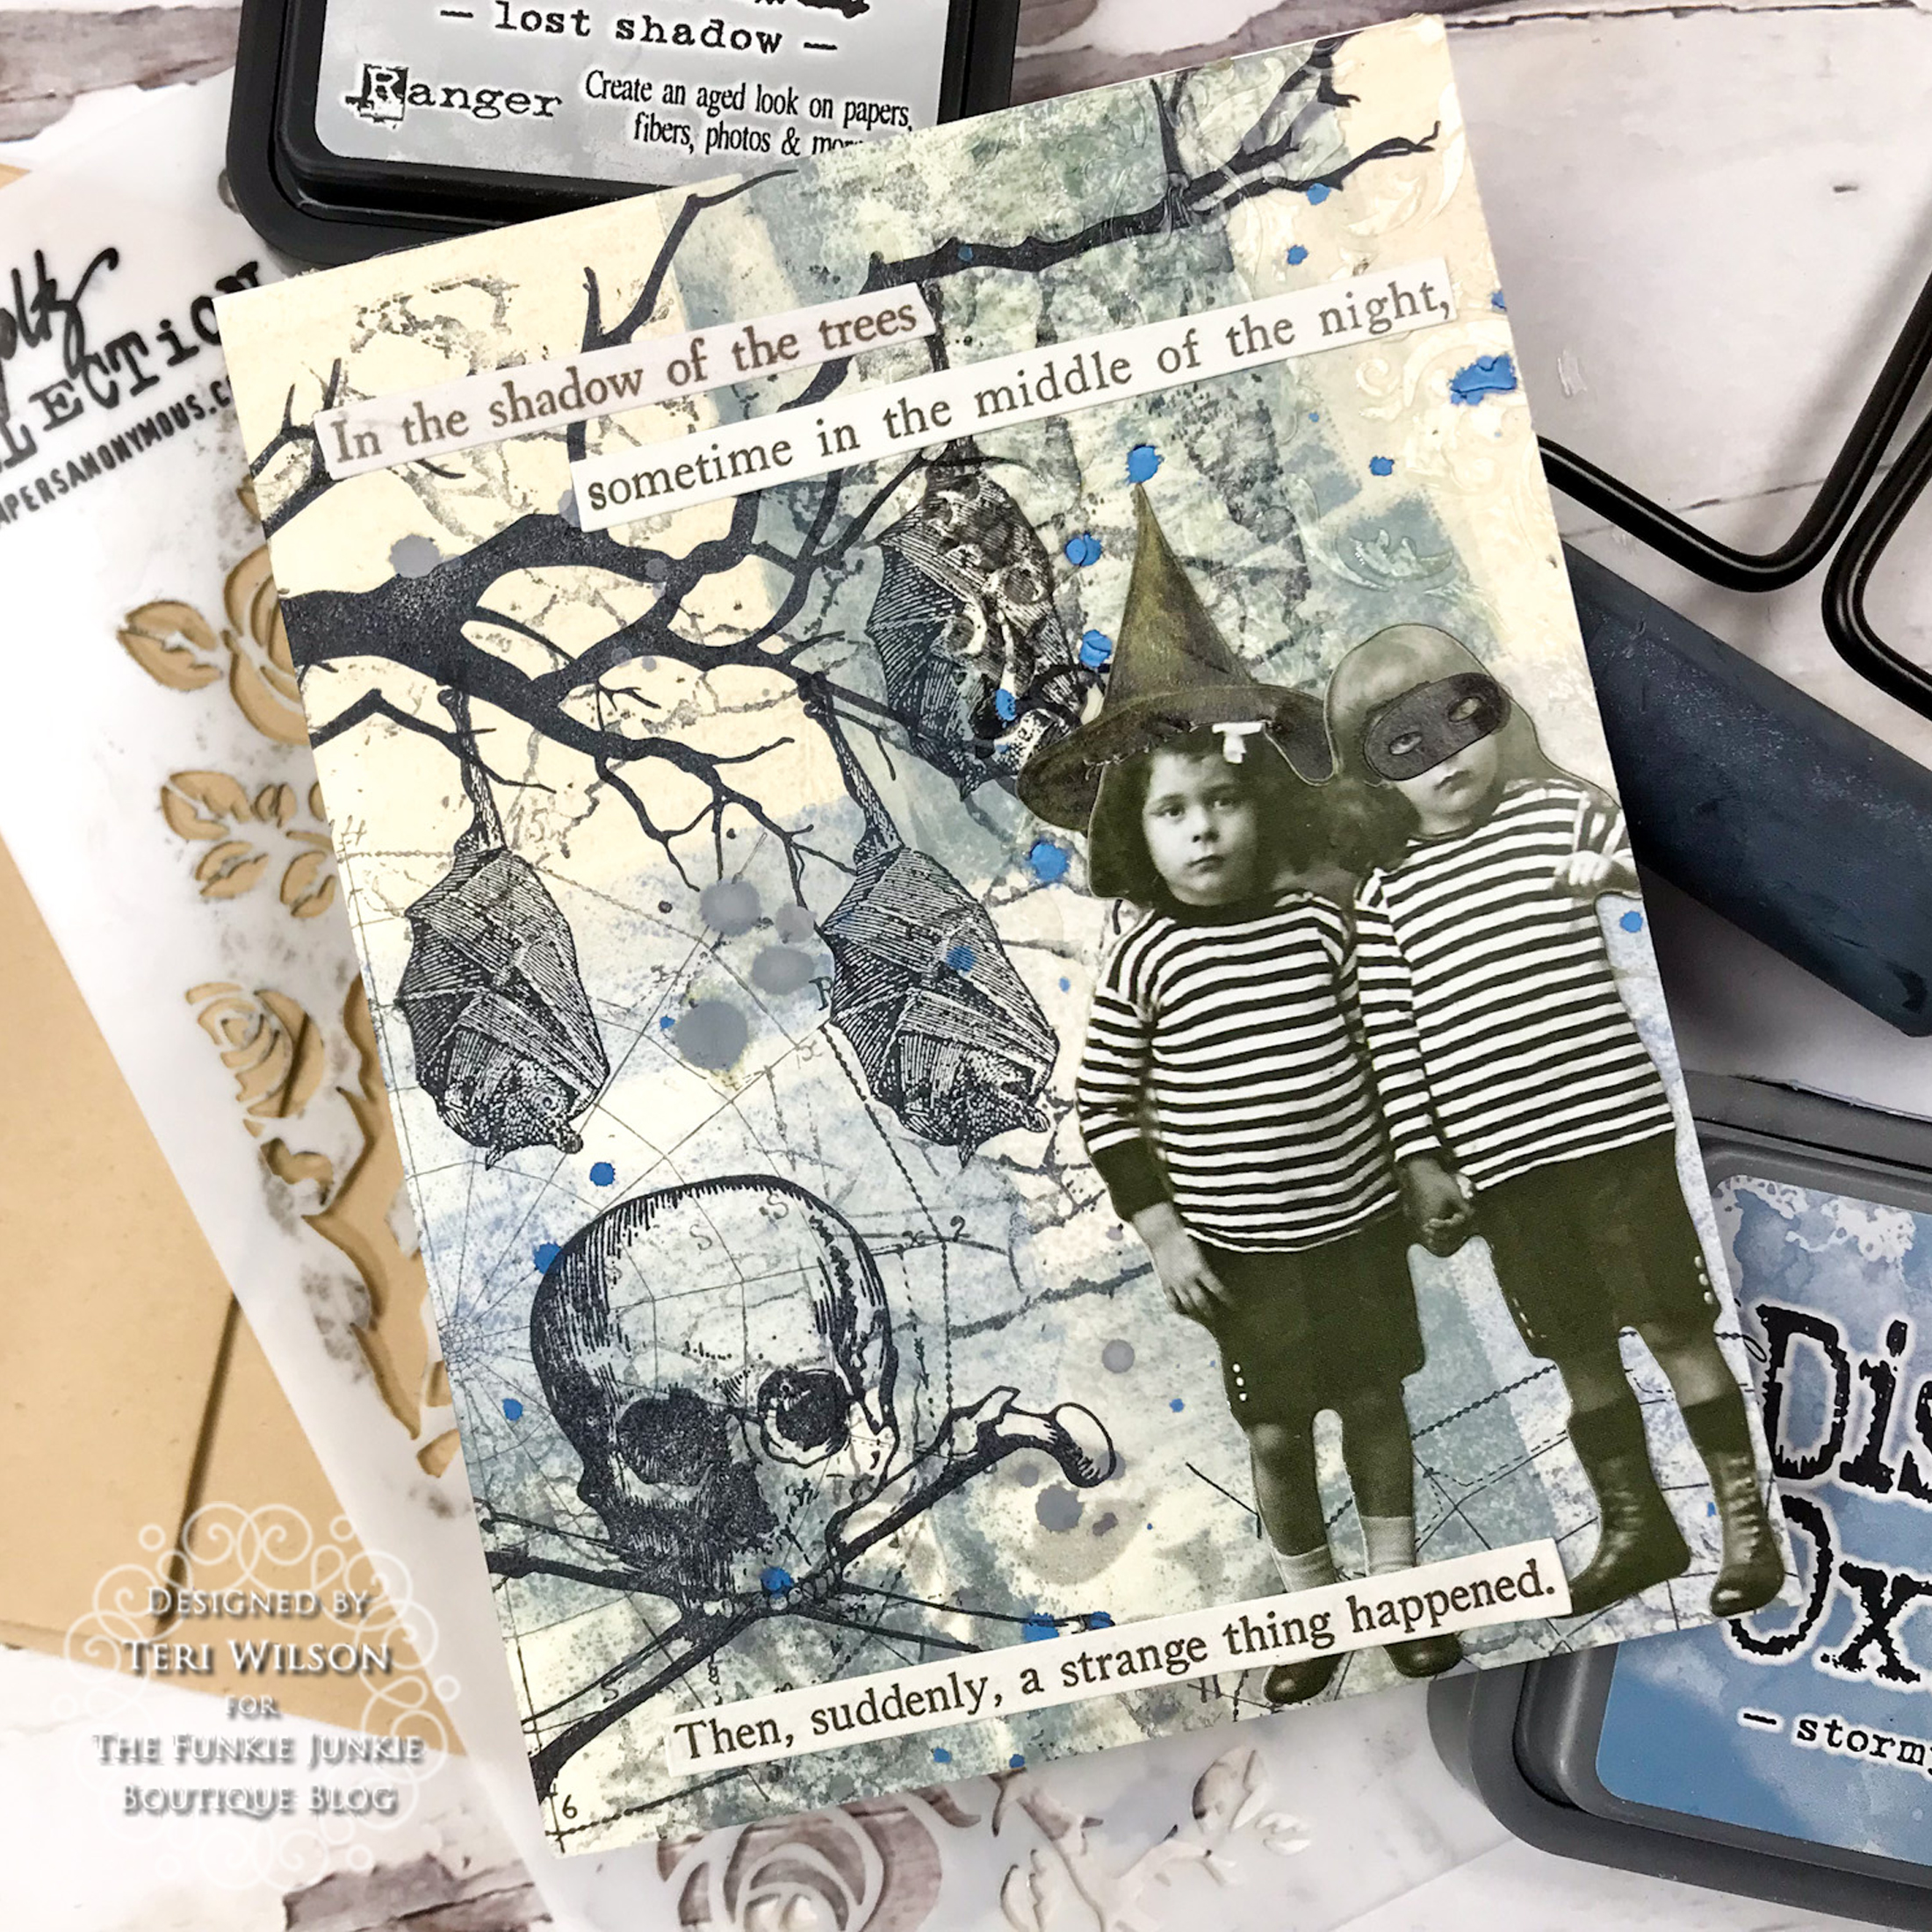
I started with leftover backgrounds from an inky mix of mica stain sprays on white cardstock.

On that base of inky backgrounds I layered in tissue tape across the bottom of the atc.  Then stamped over the surface and embossed with embossing powder to make the image pop. 

Then some small dragonflies punched out from an embossed background were added to add a layer of texture.  


Then using the same background the floral trims were stamped and embossed onto that background.  Then watercolor pencils were used to add a hint of color to the flowers and leaves. 

The bottom  have of the atc was painted in brown acrylics and embossed with brown embossing powder.  There were multiple layers embossed to make it thick enough to stamp into.  The script stamp was inked in versamark and stamped into the warm embossing powder to create a reverse image. 

I repeated the effect with different colors and a different embossed background on the bottom. 

After I did my first series I thought about using other bits and pieces to create more texture and different effects.


I again pulled a leftover inky background to start a few of my different pieces.  I had a shimmery metallic silver form the mica stain sprays and cut it up into pieces where I liked the effect of the spray. 

Then I used those pieces by pulling out pieces of different embellishments to layer and create an effect. 

I had fun trying different embossing and stamping techniques with different mediums.  The background for the in the summer was created with a smeared brown paint with script stamped using a white ink.  To preserve the effect it was clear embossed.   The reset was layered tissue tape with a punched butterfly removed and placed above. 


The background on this was stamped using mica stain spray as the ink and then layered over an embossed gold background.   


For my final piece of tiny art I added some mica stain spray smeared on with a paint brush on the top and bottom.  The feather was in my leftover bin and already had the gold tip.  The heart received a touch of gilded wax to turn it from clear resin to a golden heart. 

I hope this has you inspired to mix your mediums! 

Suzz

Products: 

Wednesday, October 25, 2023

Lisa's Mixed Media Halloween Canvas

Hello Funkie Junkie fans, Lisa Hoel here! Our theme this time is "Mixed Media Madness" and I gave my project a Halloween twist with childhood memories.

Lisa Hoel for The Funkie Junkie Boutique  #halloween #creativejuicefreshsqueezed  #mymakingstory #tim_holtz #thefunkiejunkieboutique #sizzix

There is a photo of little four year old me dressed up as a witch! My mom would always sew the best costumes for my brother and I so I wanted to pay homage to those memories (and my Mom's crafty skills!)

Step 1 – I started by decoupaging pieces of old sewing pattern tissue onto a blank canvas.


Step 2 – I added some Distress Black Opaque Texture Paste through the new Spellbound Layering Stencil. When it was dry, I spritzed it with Distress Mica Spray.


Because I had decoupaged the pattern pieces onto the canvas, it was basically "sealed". The Mica Stains work best on porous surfaces so I had to spray it all with a coat of workable fixative to keep the stain from rubbing off. The fixative worked great!

Step 3 – I scanned the front of a vintage sewing pattern package from my collection. After printing it out, I assembled bits of Tim Holtz Halloween fabric and stitched them together


Step 4 – More layers! I added some more Texure Paste and Mica Spray over the pattern layer.

Thanks for stopping by. Keep an eye here on the Funkie Junkie Boutique Blog because you are now getting regular doses of expanded (and inspiring) content each week. Don't miss it…

Supplies used:  

Tim Holtz Die Set - Big Frights
Tim Holtz Die Set - Edison
Tim Holtz Layering Stencil - Spellbound

Distress Mica Spray - Bubbling Cauldron, Flickering Candle, Jack-o-lantern
Distress Texture Paste - Black Opaque
Distress Woodgrain Cardstock - Black

Tim Holtz Halloween fabric
Tonic Deckle Torn Edge Trimmer
Tim Holtz Idea-ology Halloween 2022 Label Stickers
workable fixative


Monday, October 23, 2023

Teri's Mixed Media Madness Quick Cards

Teri Wilson - TerisMailbox 

Too much fun with multiple layers! It's Teri with TerisMailbox posting for the Funkie Junkie Boutique. Check out how I started with a blank Distress Heavyweight Cardstock and added multi-media layers of color and spooky fun!

I have a video HERE if you prefer to watch the process:


Create the Base Panel

Start with an 8.5 x 11 Distress Heavyweight Cardstock. Using a brayer and Distress Oxide Inks, ink the brayer and roll small areas of the inks, alternating colors to cover the panel. Colors used on this panel are Pumice Stone, Stormy Sky, Lost Shadow and Weathered Wood Distress Oxides. Set the panel aside to dry.

Stamp the tree branch from CMS 345 Mr. Bones in the upper left corner of the panel. 


Randomly stamp the circular web from The Obscure starting with one in the panel center. Ink the Shattered stamp and add portions of the image by holding the stamp and pressing only sections of the stamp down.

Add floral images from the Thorned stencil adding a layer of Translucent Texture Paste in a few areas.
Use the Gothic stencil and Crypt Paste to add texture in the lower left section of the panel. Last step for the panel is to add splatters using the Faded Jeans and Hickory Smoke Oxide Sprays.

Cut the panel into 4 A2 card bases.

Create the Cards


Select your mixed media base. Attach transparent bat wings to the two figures for the Halloween Paper Dolls and attach to the base, allowing room for the Casket Co stamp. Googly eyes on the Halloween Ephemera Skeleton add a bit of fun!


Stamp the Casket Co. on the bottom of the panel. Add an Action Wobbler to the skeleton so he jiggles on the card front. 


Using the panel with the add a few bats for the Obscure stamp set, and the skull from Regions Beyond using Black Soot Archival Ink.


Add a witches hat from the Halloween Sticker Book to the girl on the left from the Halloween Paper Dolls and attach to the panel.

Select a few quote strips from the same Sticker Book to create a story.


The next card features the gypsy girls in full costume!


Use the panel with the Obscure Web in the upper left section. Add the Fortune Card from the older Halloween Ephemera Pack. Select a word from the card pack and ink blend with Black Soot Distress ink. 


Add the black cat from an older Halloween Ephemera set. I love how easy it is to create Halloween cards using the great Ephemera Packs.

The final card features the lady with the umbrella.


Use the panel with the Crypt Paste and orient the card so the paste is in the upper left corner. Stamp the spooky house from Regions Beyond in Black Soot Archival Ink. Attach the label with the eyeball and the spooky moon.


Add the woman with the umbrella and orient so she appears to be sitting on the eyeball label. Add a bat from the Halloween Ticket Book to the upper left side. 


Use Glossy Accents to coat the eyeball pupils on the label and the moon. Set aside to dry.


Once the Glossy Accents is dry, attach the Mixed Media panels to A2 card bases.

I hope you have enjoyed seeing how to create a quick mixed Media panel that can make four spooky cards at once.

Be sure to check out The Funkie Junkie Boutique! They carry so many wonderful Tim Holtz products.

Thanks so much for stopping by today! I'd love to have you follow/subscribe on my social media sites InstagramFacebookBlogger and YouTube all named TerisMailbox. Be well. Be creative!

Friday, October 20, 2023

Janna's Spell Book

This week over at the TFJB Inspiration Ave we are creating to the theme of “Mixed Media Madness”. For this prompt I am going to dive into a Halloween themed journal. We are going to be exploring Distress medias such as inks, distress mica sprays, and oxide sprays. Then we will use a variety of Halloween Idea-ology elements to add in some spooky fun details.


If you would like more in-depth details click here.

Supplies used: Dina Wakely Mixed Media Journal, Idea-ology Layers, Halloween Sticker Book, ephemera, Distress Texture Paste Translucent, Distress Archival Black Soot, Distress Crayons Walnut Stain Crayon, Distress Inks, Distress Spray Stains Vintage Photo and Old Paper, Distress Oxide Spray Brushed Corduroy, Distress Mica Spray Stains Ominous Twilight, Wicked Elixir, Flickering Candle, and Yuletide, Distress Glaze Squeezed Lemonade, and Ranger Fine Gold Embossing Powder.


Today we will be diving into some mixed media fun and art journaling. For the art journal I am working out of and adorned with Texture Paste stars with Unraveled Distress Crayon.


For this mixed media spread I decided to give it a Halloween twist and create a page of mystery and spellcraft. To start I spritzed the pages with water from theDistress Mister. Next I spritzed with some Vintage Photo and Old Paper.


Next I spritzed more water, dried the pages, and then added a layer of Brushed Corduroy Distress Oxide Spray. Dripped and dried at least three more times to get a vintage water damaged page out of an old spell book. 


After the foundation was laid, I stamped with stamp set CMS241 Ledger Script and Black Soot Archival Ink. I stamped on both sides of the spread.


For some added texture I stenciled some stars with the stencil THS170 with Distress Translucent Texture Paste. Then I sprinkled some Distress Squeezed Lemonade Glaze and Ranger Gold Embossing Powder. I let the Texture Paste dry for about 30 minutes before embossing the stars. 


Next I am creating some faux parchment paper. First I took a piece of computer paper and crumpled it up and then smoothed it out. Side note, distress products react very differently on printer paper than on mixed media and distress watercolor substrates.


I spritzed the copy paper with water and then added a layer of  Vintage Photo Distress Spray Stain. Then I dried it and dabbed up some on the water splotches. As you can see below the stain has a very different pattern spread than the mixed media journal, but I like this splotchy look for a spell book page.


For finishing touches crumpled the paper again before I brushed some Distress Archival Ground Espresso across the raised crumple lines.


With the paper successfully altered, I then ripped it and then stamped on it with stamp set Tiny Frights CMS47.


After stamping the cauldron and the potion bottles, I colored the images with some Distress Mica Spray Stains. The colors I used included ominous Twilight, Wicked Elixir, Flickering Candle, and Yuletide. I colored the images with a Fine Tip Water Brush and then dried the pages with the Ranger heat tool. After I glued the pages into the book. I also sealed down the edges with some Collage Medium.


Now for some Idea-ology fun. I dug through my Halloween TH stash of ephemera and added pieces around the pages with some Collage Medium.


With all the ephemera in place it is now time to add some Halloween Idea-ology stickers to create some “spells’.

The last thing I want to do is add some grunge to the stickers to help them blend into the page. To do this I will be pulling in some Walnut Stain Distress Crayon. Here I underlined each word sticker with Distress Crayon and then smudged it in with my finger and a little water.

Now let’s take a closer look at the finished spell craft pages. The text on the page reads as follows: “In the dead of night, double double toil and trouble, lizards leg and howlets wing, bubbling and churning, skull and crossbones, a wicked thing, wool of bat and tongue of dog, something wicked this way comes.”


Page two reads: “in the dead of night written in the skies, a storm still raged, a lost revenge, take the dead dry bones, by the door of the tomb, as when the howling of the wolf is heard, when in a single knot you tie, something dreadfully wicked.”


Thank you so much for joining me here today for TFJB Inspiration Ave. Until next time, happy crafting!

Janna~ 💕🎨💕

I can also be found on :
Instagram: dunhamtreasuresofthesea_jannak

YouTube: The Crafty Corner with Janna

Supplies used: 


Wednesday, October 18, 2023

Lyla's Mixed Media Madness Journal


T
he next two weeks has The Funkie Junkie Boutique's DT on another new assignment to bring you some Inspiration Ave "Mixed Media Madness"! Pushing through this project was actually rougher than I expected it to be. I've actually been carting this around with me in all of my travels since July, and never seeming to get the downtime to take my time with it. So here it is, the week it's due and life tosses everything it can into my path to this finish line. I've pressed on- simply because it was so FUN to make! I've chosen to use Tim Holtz's Fabric Journal and fill it to bursting with lots of mixed Idea-ology items. My Craft Room was a disaster area while this was being made, but it was worth all the effort! This is going to be a different kind of posting for me, since I'll be showing a lot of finished photos with a few secret tips mixed in. I'm including as many of the Idea-ology items as possible, so be sure to check out the LINKS List.  Ready, set... let's go!


Tim's Fabric Journal has been in my stash since January. I got the urge to finally use it when all the new TH materials started making news. I did get out my old set of fat quarters- jic- but didn't end up using any of it. The journal has a lot of pages in it and it gave me a lot of ideas!


First up was to alter the journal itself for a "background" to add everything to.


The journal comes with its own tie/wrap and I inked it up and heat-dried it the same way as the journal - page by page until it was all distressed.


I spread each page back out and dried it again, while flattening it back out again.


After it was fully dried, and I left it with some heavy books on top for a few hours, I was able to trim off the excess threads to neaten up the edges.

This is where my normal layout changes: in making this journal, it's basically all the same techniques of choosing a piece, cutting it to fit, inking with Distress Inks and Oxides, and then taping/gluing it to the journal pages. I also used my mini sewing machine to add stitches here and there. The harder baseboard Idea-ology items were distressed with various TH Distress Crayons and I've also used a few of the Distress Paints. I basically used for neutral colors: Antique Linen, Black Soot and Ground Espresso.  Glossy Accents was my glue of choice. The rest of the items will be listed at the end. 


Closeup of the FRONT of my Fabric Journal


Tip: I used a half 12x12 sheet of Tim's stack from Correspondence to make this foldout.


Tip: Again - using a full sheet from the Backdrops Vol 4, made a foldout.


Dura Lar clear sheets helped make these "dials" look realistic!


Tip: When you need to allow an insert (the standing tag) to easily slide without catching onto Large Fasteners - use some clear packing tape to keep the ends flat and smooth.


Tip: I used some retired Grungepaper to cut some Hardware Findings hinges. I folded them in half to get a double-sided hinge from the top piece on the (retired) die.


Tip: I used this old Circles Frames Die to cut some edges for my "dials" on the boats.


With TH Spinners or without - the Dials look pretty authentic!


BACK

List of LINKS for Products used:


Thanks for joining me on another craft journey on Inspiration AveDon't forget to come back every couple of days, so you won't miss out on more awesome makes from the rest of the Design Team!

Be sure to stop by The Funkie Junkie Boutique for the latest in Halloween and Christmas Tim Holtz products. These are the best prices you'll find (and your browser will tell you so)!

Until next time...

Stay Safe &
HAPPY BLOGGING!!