Friday, July 5, 2024

Suzz's Planetary Paint & Paste Inspiration

Hi!  Suzz here!  I was inspired by the paints and paste challenge to create a fun mixed media page for a special birthday boy turning 4 who loves planets! 

The background started with stenciling stars randomly using distress texture grit paste. Then a splatter of watered down white acrylic paint was applied randomly over the surface.  After the paint dried the next step was to spritz a variety of sprays over the surface.  Water was applied to blend the sprays and allow pooling of colors around the stars.   

After the background was complete, the planets were cut out using various die cuts.  I did some research on the various sizes of the planets and colors inspired form some online images.

The planets were all painted with various distress paints with a base coat of color and then different patterns were applied with coordinating colors. 


I then applied the planets on the background and mixed in a few different sentiments to inspire the birthday boy! 

Happy inking! 

Suzz

Products: 

Wednesday, July 3, 2024

Lisa's Paints & Pastes Notebook

Hello, Lisa Hoel here! Our current Funkie Junkie Focus is all about Paints and Pastes. These are media supplies you will definitely want to have in your art stash. You can do so many things with them! I decided to create a whimsical Notebook journal featuring both.

Lisa Hoel for The Funkie Junkie Boutique  #creativejuicefreshsqueezed   #tim_holtz #thefunkiejunkieboutique

I used Distress Paint and Black Opaque Texture Paste on the outside of the notebook cover.

On the inside of the cover I added Sparkle Texture Paste over patterned paper (Backdrops Vol. 5).

Lisa Hoel for The Funkie Junkie Boutique  #creativejuicefreshsqueezed   #tim_holtz #thefunkiejunkieboutique

The signatures are little premade notebooks I have that I covered to match the theme.

Here are the how to steps:

1) I created the base layer of painty background on the mat board I used for the cover.


2) On the inside, I applied the Sparkle Texture Paste through a stencil to add texture and shine. That paste is one of my favorites!


3) After applying the Black Opaque Texture Paste, I lightly sprinkled on embossing powder while the paste was wet. Once it was completely dry, I heat embossed the powder.


4) I used elastic to create the binding. 


Thanks for stopping by. Keep an eye here on the Funkie Junkie Boutique Blog, Inspiration Ave. to see all the inspiring content!

Supplies used:

Eileen Hull Classic Die - Notebook
Tim Holtz Die Set - Vault Picture Show
Tim Holtz Die Set - Mischievous

Tim Holtz Stamp Sets - Eccentric, Documented
Tim Holtz Layering Stencils - Mini Set #59Gradient Dot

Ranger Distress Archival Ink - Basics 4 Pk.
Ranger 
Distress Paint - Uncharted Mariner, Speckled Egg, Peacock Feathers, Mermaid Lagoon
Ranger Distress Sparkle Texture Paste
Tim Holtz Idea-ology Backdrops Vol. 5


Tuesday, July 2, 2024

Teri's Fun with Paints & Pastes

 Hello friends. Too much fun playing with a Gelli Plate, stencils and Distress Paints. What a combination. It's Teri with TerisMailbox posting these for The Funkie Junkie Boutique.


Check out these fun prints! I have a video HERE.


When I started this project, I was not sure of Distress Paints would work with a Gelli Plate. I was pleased with the outcome despite the beading that occurred.


Create the Bases

Gather your tools - Gelli Plate, Ink Brayer and Paints. Lay the Gelli Plate on your craft mat. Add a few drops of the Distress Paints onto the plate and use the brayer to spread evenly. I used Wilted Violet and Picked Raspberry.

Lay the stencil of choice on top, followed by cardstock. I chose THS 182 Deco Floral. I used 5.5 x 8.5 inches to give me some wiggle room. Smooth the top of the paper to pick up the imprint. Peel the cardstock and set aside to dry.

Quickly, remove the stencil and add another piece of white cardstock and smooth to get the image.

Immediately, take the stencil, brayer and Gelli Plate to the sink and wash. Once dry trim to fit an A2 base with a border.


Use double sided adhesive sheets to attach a piece of Halloween Collage paper onto an A2 card base. You can choose any of the Collage Papers.

Create the Embellishments

Use CMS 482 Curiosity Shop to stamp typewriter and letter using Black Soot Archival Ink. Fussy cut or use the coordinating dies available from Simon Says Stamps.


Assemble the Cards

To soften the stark white background, use Antique Linen Distress Ink and blend over the entire top of the painted base, the typewriter and the letter.

Attach the stenciled base, followed by the typewriter and the letter.

Add Cello Tape as a fun accent!


This is Card number 2. 


If you look closely, you can see where the paint beaded up slightly. This was the unexpected result of the Distress Paints on the Gelli Plate.

All of my channel and affiliate links are listed in the Profile on Instagram. I would love to count you as a subbie friend. I appreciate your support. By using my links, I earn a small commission at no cost to you.

Thanks so much for stopping by today! I'd love to have you follow/subscribe on my social media sites InstagramFacebookBlogger and YouTube all named TerisMailbox. Be well. Be creative!

Products Used:
Black Soot Archival Ink
Halloween Collage Paper
THS Stencil 182 Deco Floral
Cello Tape

Friday, June 21, 2024

Suzz's Alcohol Ink Gift Bag

 Hi! Suzz here! I am sharing a gift bag created with an  alcohol ink colored image. 

I used the beautiful Tim Holtz Idea-Ology Collage paper print and used a mix of Alcohol Blending Solution with the Purple Twilight alcohol ink to color the flower petals.  I layered the color into the petals by mixing on my craft mat the blending solution with the purple ink. 

For the leaves I repeated the process using a green alcohol ink along with a hint of brown.  After the ink was dry, a splattering of white acrylic paint added a highlight over the image.  

The edges were torn and sponged with distress ink and a stamping of a script was added across the background.

The image was larger than what would fit onto a card face so I embraced the image and found a white gift bag to use as the backdrop.  I layered another tissue collage print in the back with a layer of white card stock behind the main image.  All the different layers and bag received a soft distressed edge with brown distress ink.

I pulled out some additional embellishments to add a focal point with the sweet birthday sentiment.
I enjoyed using the alcohol inks to color the images and have ideas floating on how to use them on different surfaces with stamped images. 

Suzz

Products: 

Wednesday, June 19, 2024

Lisa's Alcohol Ink Tecnique - Beautiful Backgrounds

Hello, Lisa Hoel here. Our current Funkie Junkie Focus is on Ranger's Alcohol Inks. They really are a lot of fun to play with! (Check out the demo videos Tim Holtz has done for lots of great techniques.) I first made several backgrounds on Ranger Yupo White Cardstock using the inks (pearl and regular).

Lisa Hoel for The Funkie Junkie Boutique  #creativejuicefreshsqueezed   #tim_holtz #thefunkiejunkieboutique

I die cut through the alcohol inked backgrounds to reveal the card base color. (Tip: using the metal Precision Plate in my Sizzix Big Shot helped the Thinlit dies to cut through the Yupo paper)

Lisa Hoel for The Funkie Junkie Boutique  #creativejuicefreshsqueezed   #tim_holtz #thefunkiejunkieboutique

I also used Alcohol Lift Ink and the new Paint By Number stamp set to add a number to each card.

Lisa Hoel for The Funkie Junkie Boutique  #creativejuicefreshsqueezed   #tim_holtz #thefunkiejunkieboutique

When stamping over alcohol ink, Archival Inks work best! I also added some abstract die cut shapes to embellish the cards.

Here are a few of the "in process" photos:

The inks work so well on the Yupo paper! You can really get it to move around.


Finished backgrounds!

Thanks for stopping by. Keep an eye here on the Funkie Junkie Boutique Blog, Inspiration Ave. to see all the inspiring content each week. Don't miss it…

Supplies used:

Tim Holtz Die Set - Specimen
Tim Holtz Die Set - Mixed Media #2
Tim Holtz Die Set - Mixed Media #3
Tim Holtz Die Set - Mixed Media #6
Tim Holtz Die Set - Abstract Elements
Tim Holtz Die Set - Media Marks
Tim Holtz Die Set - Abstract Faces

Tim Holtz Stamp Sets - Paint By Number, Faded Type, Halftone & Rings, Grunged, Psychedelic Grunge, Slight Alterations, #Hashtags

Ranger Distress Archival Ink - Basics 4 Pk.
Ranger Archival Ink - various colors


Monday, June 17, 2024

Teri's Acohol Ink Technique - Using Stencils

 Teri Wilson - TerisMailbox

Hello friends. It is Teri with TerisMailbox posting this rainbow decor project for The Funkie Junkie Boutique's Inspiration Ave.


I love rainbows and Ranger Alcohol Inks make it so easy to create a bright and fun decor piece!

I do have a YouTube Video HERE:


Start with an alcohol ink white panel. Use THS181 Deco Leaf and Snowfall Grit Paste. I love the sparkle you get with the paste! Apply with a pallet knife over a portion of the board in a portrait orientation. Allow to dry.


Holding the board so the texture paste is at the top, apply Alcohol Blending Solution followed by a rainbow of alcohol inks and allow them to run across the board. I love the way the ink colored the grit paste and ran down the board! Colors used: Purple Twilight, Turquoise, Mojito, Sunshine Yello, Sunset Orange and Flamingo.


Stamp the images from CMS 479 Abstract Florals onto White CardStock using black pigment ink. Add Clear embossing powder and heat set. Fussy cut the flowers. Use large glue dots to attach the blooms to the base while gluing the stems.

Select a quote chip and apply a rainbow of embossing glaze by dabbing with and Embossing Dauber and applying Embossing Glazes. Colors used are Spiced Marmalade, Fossilized Amber, Wilted Violet, Salty Ocean, Kitch Flamingo and Twisted Citron. Heat set after applying each glaze color.

All of my channel and affiliate links are listed in the Profile on Instagram. I would love to count you as a subbie friend. I appreciate your support. By using my links, I earn a small commission at no cost to you.

Thanks so much for stopping by today! I'd love to have you follow/subscribe on my social media sites InstagramFacebookBlogger and YouTube all named TerisMailbox. Be well. Be creative!

Products Used:

Friday, June 14, 2024

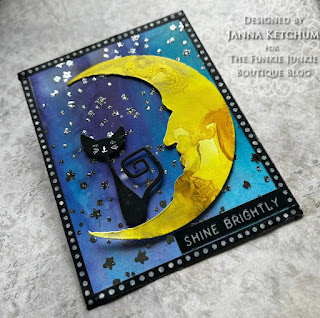
Janna's Brightly Shining Alcohol Ink Card

 Hello and welcome to this week’s TFJ Inspiration Avenue blog. This week we are creating to the theme of “All About Alcohol”. Since we are featuring inks I decided I wanted to go with a cosmic vibe for this theme. We are going to create a celestial inspired card with alcohol inks.

For full video click here.


Alcohol ink Glacier, Laguna, Dandelion, Alloy Gilded, Cobalt, Vineyard, Boysenberry, Ranger Alcohol Ink Duralar, Ranger Yupo Paper, Sizzix Mischievous, Sizzix Crescent Moon and Stars, Holly Jolly CMS 474, Mink ink, Deco Foil, foam squares, Tiny Attacher, Idea-ology Decorative Tape, Isopropyl 90%.


To start today’s card we will be creating an alcohol inked yupo base. The colors we are using today include Laguna, Vineyard, Glacier, and Cobalt.


To create our background we will be using the drippy Ink technique. First I drizzled the alcohol inks at the top of the yupo paper and then set it up against a bottle to prop it up to let the ink start dripping downwards.


Next I spritzed heavily with isopropyl to get the ink to flow down the yupo.


Below is the completed alcohol ink background.


Next we will be making a second background to die cut a moon out of. For colors we will be using Dandelion and alloy alcohol ink Gilded along with some Blending Solution.


To move the ink around I used the TH Ranger ink blowing tool. I spread out a base of Dandelion first the. I added the Blending Solution. Once the Blending Solution was applied I added about six drops of alloy to the yupo surface. Again I moved the ink around with the ink blowing tool. After I die cut a moon from the background using the Sizzix Bigz die Crescent Moon and Stars.


Next I pulled out a favourite holiday stamp set CMS474 Jolly Holiday to stamp stars with.


To stamp I decided to stamp with Mink Ink on duralar. Duralar is a heat stable transparent substrate. Using a scrap piece of plastic I dripped some Mink ink onto scrap plastic surface. Then I used a brayer (Ranger TH) to spread the ink out. Then I brayered the ink onto the star stamp and stamped onto the duralar.


I lightly applied the ink with the brayer rolling 2 - 3 times. If minc ink is over worked it tends to peel off the stamp. After covering the whole surface in with stamped stars I cleaned off the stamp with some Ranger Archival ink cleaner.


Below is the finished stamped background. With the minc ink stamped we can now add foil for some sparkling stars.


To add the foil I pulled out the minc mini machine. I set the mini minc to 4 and then made a sandwich of the foil and substrate to feed through the machine.


Below are the foiled stars.


Then I attached the layer of duralar to the alcohol inked background using the Tim Holtz Idea-ology Tiny Attacher stapler.


To hide the staples I added a layer of decorative Idea-ology washi tape.


For finishing touches I used foam squares to add in the moon and an adorable black cate from the Sizzix die set mischievous. For the sentiment I used an Idea-ology label sticker.


Thank you so much for joining me here today for TFJB Inspiration Ave. Until next time, happy crafting!

Janna~ 💕🎨💕

I can also be found on :
Instagram: @treasuresofthesea_jannak

YouTube: The Crafty Corner with Janna


Supplies used:  

Ranger Alcohol Inks:

Glacier 

Ranger Yupo Paper 

Alloy Gilded

Laguna

Dandelion

Cobalt

Vineyard

Boysenberry

Ranger Alcohol Ink Duralar