Monday, February 29, 2016

Challenge Winners - Love is in the Air!

Welcome to the beginning of a new week and our latest winners here at Frilly and Funkie! Thank you so much to everyone who took the time to enter our 'Love is in the Air!' challenge; there were a huge number of wonderfully romantic projects to choose from and the Design Team loved seeing all your fabulous entries. After much deliberation we chose our winner, #38 Polly (Polly's Paper Studio).


We loved the layering, the elegant damask and dramatic colours on this beautiful creation. Congratulations Polly on being our favourite for the 'Love is in the Air!' challenge and winning the opportunity to be a Guest Designer here at Frilly and Funkie for a future challenge.

And now for the next three winners of our Frilly and Funkie Top 3 Badges. In numerical order they are... #12 Karen H #20 Magic Attic Maria and #25 Kavitha!!! Please email Linda at thefunkiejunkie@gmail.com for the codes for the Top 3 badges so that you can display them proudly on your blog.


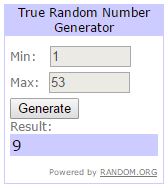
And finally Random.org has chosen a lucky winner for the $25 gift certificate to The Funkie Junkie Boutique. Our congratulations this time go to #9 Lee-Anne!

A huge thanks from the Frilly and Funkie team to everyone who took part in this challenge and congratulations again to our winners. Please email Linda at thefunkiejunkie@gmail.com for the codes for the winner's badge and to give us your email address for the Guest Designer details (Polly) for the Top 3 badges (Karen H, Maria and Kavitha) and for the gift certificate details (Lee-Anne).

Our current challenge, ''Layer It Up" runs through Tuesday, March 8th . We hope to see you entering this time around so that you too can be in with a chance to win.

Have a great week everyone!

Saturday, February 27, 2016

Saturday Step by Step: Altered Shabby Keys


Hello and welcome to the Frilly and Funkie Blog! It's Nancy here, and I'm honored to be hosting the Saturday Step by Step this week. 

I created a set of altered wooden keys using Kaisercraft's Wood Flourishes from Linda's shop. Usually when I alter keys I go for a faux metal technique, but this time I wanted to give them a breath of spring air. 
          

I adore everything about paper crafting. The supplies look pretty all by themselves!  


I forgot to photograph the first step, but started by giving the wooden keys and tiny metal padlocks a coat of gesso. Once dry, I added a coat of Wendy Vecchi Crackle Texture Paste to the keys.  


After drying overnight, a lovely crackle finish formed over the keys. I aged them up with Vintage Photo Distress ink. 


The little padlocks received the same treatment.  


I cut the leaves from Maja Design paper using Heartfelt Creation's Classic Leaf die. This is a new item at the Funkie Junkie Boutique that I'm really excited about. I used the tool below to give them added shape and dimension. The miniature roses are hand-crafted from Maja Design paper using this blooming rose tutorial  


Once the keys are dry it's time to embellish! I started by adhering the leaves and roses to each key in a similar fashion. 


Next, a bit of frayed cheesecloth is applied for a soft touch. 


The Prima bird nests are cut in half to fit the size of the project, then adhered to the keys.  


The last step is the addition of a twine bow and the altered metal padlock. 


Below are some close ups of the completed keys: 


Thank you so much for joining us at the Frilly and Funkie Blog. May your day be filled with sunshine and crafty happiness! Don't forget to check out our newest challenge 'Layer it Up'. You still have plenty of time to play along.   

Hugs,


Thursday, February 25, 2016

Our Current Guest Designer - Autumn Clark

It is time to introduce our Guest Designer for the current challenge.  Please say hello to Autumn Clark of Sew, Paper, Paint and make her feel welcome.  Autumn was the DT favourite from the Sing, Sing, Sing challenge.


"I am married to an amazing man, and my biggest supporter. We have four children, yes four! I work full time as a church secretary. I have been stamping for over 15 years. Creativity is my outlet, passion and purpose. I define my style as grunge meets elegance. 

Though I love to distress everything, I like to balance my work with a touch of pretty and neat. In addition to stamping, I love to draw and paint and have found that mixed media allows me to blend these skills and create rich artwork, filled with depth and texture. 

 I am thrilled to be joining the amazing talent at Frilly & Funkie for this challenge. This design team never ceases to inspire me."


"With my project, I hope to inspire you to create layers of detail and texture in your journal and altered book projects, without excess bulk. For this page in my altered board game book, I layered papers, watercolor, Perfect Pearls, and stamping. I added thin metal elements as my final detail. Details on my process can be found on my blog."

* * *

I know you will all agree that Autumn's altered page is fabulous and will want to check out all the details of how she created it.  One you have been to visit her blog come on back and share your layered project with us.  You have lots of time and can get all the challenge details here.

Friday, February 19, 2016

Friday Focus - KAISERCRAFT

Click on the photo to enlarge it.

Hi there, it is Cec here and I am presenting the Friday Focus today on the line of KAISERCRAFT products that Linda carries in the shop.  There are a variety of wooden laser cuts and some very pretty pearls so I used both of those in my first-ever scrapbook layout.

I am calling this Made With Love for a variety of reasons.  First and foremost, the little girl in the photo is my daughter when she was about 7 or 8 years old and of course she was made with love.  Secondly the smocked dress that she is wearing was made with love by my late Mother and I still have it.  Sadly, my Granddaughter doesn't think it is cool and will not wear it.  She also thinks her Mommy looks like a boy in this photo - LOL.

I started by taking a piece of lightweight chipboard and cutting it down a bit before I coated it in Gesso.


Next I painted it with Fresco Finish Blush using a baby wipe and not worrying too much if some of the Gesso showed through.


I changed my mind after it was painted and decided to add some corrugated cardboard inserts.
One had a length of zipper added to it and then I repainted these inserts.


Next I added some stenciling with a Prima Crackle stencil and some Tree Branch Archival Ink and the Wendy Vecchi Checkmate stencil and some Coffee Archival Ink.


I used a Dylusions stencil called Dotted Flowers to add some texture paste in a couple of corners.  Finally I spritzed some Tim Holtz Milled Lavender Distress Spray on - sorry no photo.  The edges were distressed and the sheet was mounted on a piece of Bazzill card stock for extra stability.


I took one of the KAISERCRAFT flourishes and cut it with an X-Acto knife to create two pieces.


Next I coated the flourish pieces and my text with Gesso and then painted all the pieces with some Deco Art French Mauve acrylic paint.


I made a trio of flowers with some punches and Maja Designs paper from the Coffee in the Arbour and Vintage Spring Basics pads.  They were inked with Gathered Twigs Distress Ink, shaped and glued together.  The centres are Card Candy that I have had in my stash for years.

I mounted the photo on a piece of Maja paper and also used the Maja papers to make some narrow tags that I added to the back.  A little crochet cotton was added to a couple of the tags.

The next step was to glue everything down.  I added a Prima zipper pull to the zipper, some venise lace, additional flowers from Wild Orchid Crafts, some floral buttons, a little stamped heart leftover from a recent project and finally some of the KAISERCRAFT pearls in a colour called Blush.

Making this layout was fun and I plan to go digging through the old photos and see what else I can come up with.  I am hoping I can find a couple of my daughter when she was competing as a synchronized swimmer because my Granddaughter is now doing the same and it sure would be fun to make matching layouts of my two fish.

For the next two weeks, Linda will have some specials in the Friday Focus section of the shop so check them out and start shopping.