

Hello and welcome! Nancy here, and I'm honored to be presenting the Saturday Step by Step on this lovely day. I've shared a couple of flower tutorials in the past and I hope you won't mind if I share just one more. This blooming rose is a flower I use often in my projects and I've had a few special requests for a tutorial on my blog. I started making flowers in 1980 and this technique is a bit of a throwback to the way we created flowers way back then.

The supplies from the 80's are no longer on the market so I've adjusted my technique over the years, all for the better! Back then paper crafting wasn't the industry that it is today. Options were limited as there were none of the wonderful papers or dies that we use today. We made flowers with pre-made silk rose petals and with one item I really miss; shaped cotton buds on wire stems. I've looked for them everywhere to no avail, hence my own technique to replicate the same style. For this flower I like to use Tim's Tattered Florals die, a star punch, floral wire, and a small wooden craft bead that can be found at any craft store.
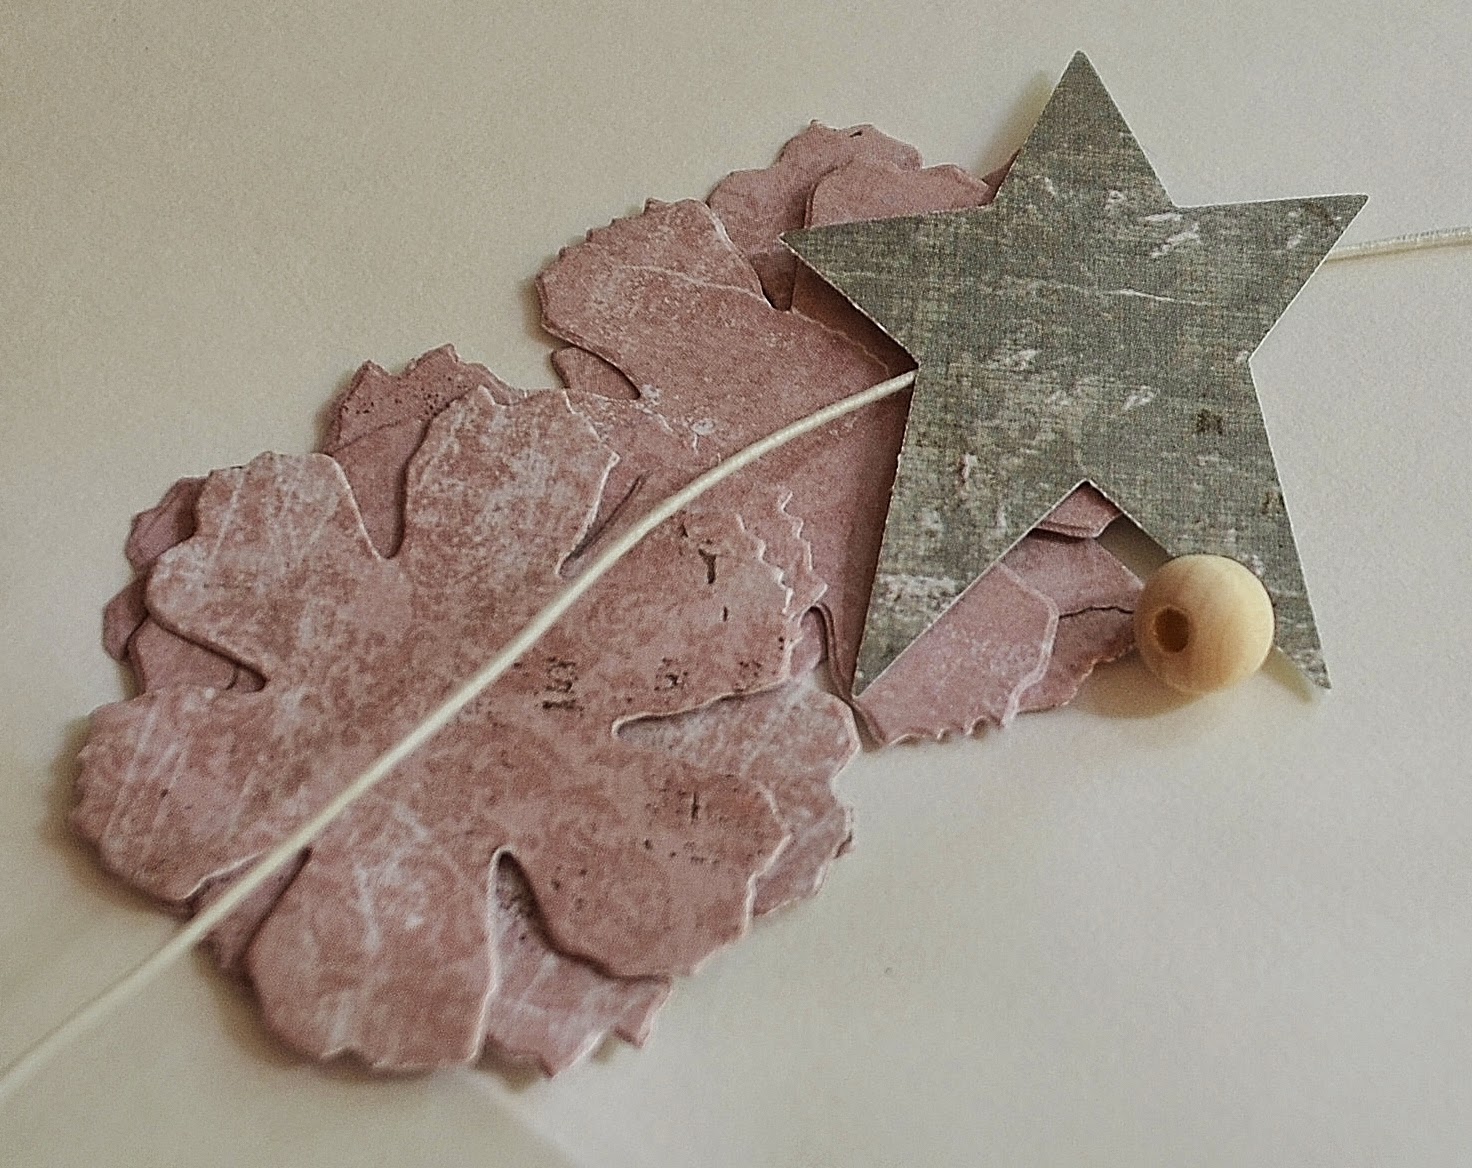
Begin by cutting 5 flower petals and punching one star. I've used my favorite Maja papers; Vintage Summer Basics and Vintage Autumn Basics. Pierce a hole in the center of each petal and the star.

Take one petal and cut it into six separate pieces.

Lightly moisten each piece by spraying with a water mister then begin shaping each petal. I use shaping tools that have different sized balls on the ends. I used the two smallest tools for these tiny petals. I begin by rubbing the petal with the larger ball tool, gently breaking down the fibers in the paper and adding texture. Next I create a cavity in the side of the paper that I want to use for the inside of the flower by gently pressing into the center with the smaller tool.

The second petal remains whole, but is shaped in exactly the same method.


For petals 3 through 5 use a similar process, starting with the side that will be the back of the flower. Continue to moisten, gently rub, and shape each petal.

Once you've completed the shaping on the back side of the paper, turn it over and press firmly down in the center of what will become the front side of the flower.

Proceed in exactly the same manner with the star punch.


Below are all the shaped petals you'll need to assemble your flower.

Thread the floral wire through the little wooden craft bead. This will become the center of your flower and provide the base for a perfectly shaped bud. The floral wire stem makes it easy to add the petals and form your flower.

Begin with the tiny separate petals and use glue to adhere them to the base of the wooden bead one by one. Squeeze the tops of the first four petals and adhere them so they completely cover the top of the bead. The next two petals can be applied a bit more loosely, adhering at just the base and a little way up the side. The photo below is what it will look like when you're finished with the layer of separate petals.

Next adhere the second petal to the base of your bud. Apply a little adhesive to the sides and loosely form them around your first layer of petals to give the flower the appearance of a gently opening rose.

Now for the easiest step. Adhere petals 3 through 5 to the base of your bud in an open position, remembering to stagger each layer as you go.

The last step is to adhere the star punch to the base of your rose to give it a finished look.

I adore creating secret gardens. The photo below is an example of how I've used some of these roses in a past project. Having the wire stem gives you the option of attaching the roses to design your own floral sprays. If you don't wish to use the wire you can easily snip it off with your craft scissors.

Thanks so much for visiting us at the Frilly and Funkie. I wish you a day filled with blessings and joy! I hope you'll have fun creating a garden full of blooming roses in your own craft room!
Hugs,

 |  |  |  |  |
 |

Oh Nancy I love this tutorial. So easy to follow, I feel some fancy blooms coming on! Thank you so much for sharing. Jenny x
ReplyDeleteNancy this is such a brilliant tutorial!! I love this novel way of creating flowers, the idea of the bead is soooo clever and really does make for a fantastic looking bud! I am such a fan of your work, and your clock is just out of this world too! Thank you for some great inspiration!!
ReplyDeleteBrilliant tutorial! Saw it first on Nancy's blog. So clever to use the bead and the secret garden is amazing!
ReplyDeleteThanks Nancy for this tutorial! It's very well explained and I'm going to try!
ReplyDeleteYour flowers are just stunning Nancy, I loved seeing how you created the beautiful rose like flowers - thanks so much for sharing the tutorial. The altered clock is fabulous. Anne x
ReplyDeleteLOVE LOVE it!
ReplyDeleteThank you so much for sharing this, I absolutely love your roses. I'm going to give it a try but I'm sure mine won't look as awesome as yours! Blessings
ReplyDeleteNancy this is stunning! Thanks for the tutorial. Love it!!!!! -- Mary Elizabeth
ReplyDeleteFabulous flowers Nancy - I love them! Oh so clever to form the bud around the wooden bead. I will certainly be giving them a go when I get home. Thank you for such a great tutorial x
ReplyDeleteI meant also to say that your clock is stunning!!!!!
ReplyDeleteWOW Gorgeous, stunning. Love the tutorial. Great inspiration.
ReplyDeleteFantastic tutorial Nancy and I remember your secret garden so well. Stunning.
ReplyDeleteJulie x
Beautiful roses, thanks for the tutorial. I really love you clock too, I have just bought one and am inspired to get moving on it.
ReplyDeleteWhat a great tutorial, thank you so much for sharing your technique Nancy!
ReplyDeleteI adore this tutorial, thank you so much xx
ReplyDeleteSandie x
This is a stunningly beautiful rose and the paper you used is fantastic! I am just getting into flower making and will need to start with some paper and tools. I hope that I can do as well as you did. Thank you for sharing your talent.
ReplyDeleteI've just found your tutorial via pinterest and had to leave a comment. Your flower is lovely!
ReplyDeleteI love to make my own flowers too (when my hands allow) but I'd never of thought to use a bead...what a fantastic aid that is.
As to the old cotton bud on wire, have you ever thought of making your own by creating a 'felted' ball on the end of a piece of floral wire? It's not hard to do I promise and you can easily find tutorials on the internet or Pinterest. They are also great for the center of open flowers as you can make them any size you want and you can squash them down a little before drying too make them flatter on one side or more oval if needed.
Thanks for a great tutorial Linda x
I've just found your tutorial via pinterest and had to leave a comment. Your flower is lovely!
ReplyDeleteI love to make my own flowers too (when my hands allow) but I'd never of thought to use a bead...what a fantastic aid that is.
As to the old cotton bud on wire, have you ever thought of making your own by creating a 'felted' ball on the end of a piece of floral wire? It's not hard to do I promise and you can easily find tutorials on the internet or Pinterest. They are also great for the center of open flowers as you can make them any size you want and you can squash them down a little before drying too make them flatter on one side or more oval if needed.
Thanks for a great tutorial Linda x
Great Tutorial Nancy, i have pinned it so i can keep looking and learning, thanks for all you do . Elaine H X
ReplyDeleteThank you for such a lovely tutorial. I want to try this one soon.
ReplyDeleteThank you for such a lovely tutorial. I want to try this one soon.
ReplyDeleteLoved it. Beautifully done. I will try soon. Thank you
ReplyDelete