Thursday, January 31, 2019

Guest Designer - Lucyna Marynowska

It is time to introduce our Guest Designer for the Winter Blues challenge.  Please say hello to Lucyna (a.k.a. Lula) Marynowska who was the Top Pick from the In The Kitchen challenge.  Lula can be found on her blog At Lula's.


Hi Everyone! My name is Lucyna Marynowska aka Lula. Let me tell you all at Frilly and Funky I am absolutely delighted and honoured to be a guest designer here, this is such a talented design team!

A little about me:

I come from the north of Poland. Sixty, retired widow, mum of two grown up boys and a happy grandma. I started my crafting journey 7 years ago as a card maker and immediately became an addicted paper-lover. After my husband's death it was crafting what helped me to conquer the pain. I enjoy creating anything from cards to altered art and love to experiment with various types of mediums. I am keen on colour and texture and I always try to find new ways to express myself. I love challenges to spark my creativity and making crafty friends all over the world makes me very happy.


For the current theme "Winter Blues" I have prepared a wall hanger. I was inspired by the look of my bedroom window in frosty winter time. I have used lots of mixed media stuff to make this piece and emphasized its texture. Starting from various shades of blue paints, inks and mists, through shiny waxes to sparkling gems. With a little help of chipboards, die cut and resin pieces I was able to recreate the moody, cold winter scene.

You can follow the steps I am sharing on my blog. Hope you like my project!

With Best Regards

Lula xx

* * *

As Lula mentioned, she has all the details about her fabulous wall hanging on her blog, so pop on over there to take a look and while you are there don't forget to browse around to see all her other fantastic projects.  When you have finished come on back and share your Winter Blues creation with us.  The challenge can be found HERE and runs through 11:55 pm EST on February 12th.

One of your designers will be here on Saturday with another Saturday Showcase and then next Wednesday the gals on the funkie side of the Design Team will be here with more Winter Blues inspiration for you so please check in often with us because there is lots happening here.

Saturday, January 26, 2019

Saturday Showcase - Tim Holtz Sizzix Chapter 1 Collection

Hello and welcome to Frilly and Funkie's Saturday Showcase feature. It's Sara Emily here shining the spotlight on five dies from Tim Holtz' 2019 Sizzix Chapter 1 Collection. I don't think I've ever been so excited about ALL of his new dies like I am with this release. The ones I'm focusing on in this post are just five of my favorites. They are so detailed, and the designs pair up so easily with one another.

Sara Emily Barker Tim Holtz Sizzix Geo Springtime Card Saturday Showcase Tutorial https://frillyandfunkie.blogspot.com/2019/01/saturday-showcase-tim-holtz-sizzix.html  1

I decided to make cards, each featuring one of the three dies included in the Geo Springtime Thinlits set with supporting roles from four other newly released Thinlits sets. Wow! The possibilities are endless, and my head was spinning with ideas. In fact, at the same time I made a couple or so more projects using these dies, but this post would be way too long to include them all.

Butterfly Mosaic Card

I do love butterflies, and this one is so unique that I just had to add it to my collection. (It didn't hurt that the set has a hummer and a bunny, too!) When I first saw this die, I thought 'inlay', but I had no idea where it would end up. This is just a card, but I could picture these die cuts used on a canvas (Well, the butterfly already IS on a canvas, but that's for another day.) or even on an assemblage project. I love it when a product can be this inspiring! Let's get started!

 **Remember to click on any photo to zoom in.**

Sara Emily Barker Tim Holtz Sizzix Geo Springtime Card Saturday Showcase Tutorial https://frillyandfunkie.blogspot.com/2019/01/saturday-showcase-tim-holtz-sizzix.html 2

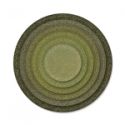
Cut the largest of the circles from Tim Holtz Stitched Circles Thinlits and sand it lightly. Using the Geo Springtime butterfly, cut one from the circle. Adhere Stitched Circle to black card panel. Cut a second butterfly from black card.

 I saved all the bits from the metallic butterfly in a plastic bag, thinking I would use them as the inlay with the black butterfly being the outline. Then it occurred to me how beautiful it would be if it were two toned (or even three!).

Sara Emily Barker Tim Holtz Sizzix Geo Springtime Card Saturday Showcase Tutorial https://frillyandfunkie.blogspot.com/2019/01/saturday-showcase-tim-holtz-sizzix.html 3

I found these two panels in my stash. The one on the left is a failed alcohol lift technique (done on the old alcohol ink card), but I knew it would be great for die cuts eventually. I've already cut something from the panel for another upcoming project, but I had just enough left to cut a left and a right wing. The masterboard on the right started out as a mop up from other projects, and it's a combination of Distress Oxides and inks.

Sara Emily Barker Tim Holtz Sizzix Geo Springtime Card Saturday Showcase Tutorial https://frillyandfunkie.blogspot.com/2019/01/saturday-showcase-tim-holtz-sizzix.html 4

Cut a right wing and a left wing from each panel. I did this out of necessity, because my scraps were small. But it also serves to keep track of which pieces go in the right or left wing when it comes time to inlay.  Place all pieces including the actual die cut into a baggie and set aside. By including the die cut, it helps identify if the bits go in the right or left wing.

Sara Emily Barker Tim Holtz Sizzix Geo Springtime Card Saturday Showcase Tutorial https://frillyandfunkie.blogspot.com/2019/01/saturday-showcase-tim-holtz-sizzix.html 5

Turn the black die cut face down and apply Distress Collage Medium Matte with a brush. Adhere the butterfly in the aperture left in the Stitched Circle, taking care to make sure all surfaces come in contact with the back panel. Blot away excess glue with a paper towel.

I don't have any photos of the last step, which is inlaying all those little pieces, but I did snap one at the half way point. It was a much needed break from all that concentration!

Sara Emily Barker Tim Holtz Sizzix Geo Springtime Card Saturday Showcase Tutorial https://frillyandfunkie.blogspot.com/2019/01/saturday-showcase-tim-holtz-sizzix.html 6

 I added an Ideaology Quotations Metallic Sticker and backed the panel with more of the masterboard and called it done.

Sara Emily Barker Tim Holtz Sizzix Geo Springtime Card Saturday Showcase Tutorial https://frillyandfunkie.blogspot.com/2019/01/saturday-showcase-tim-holtz-sizzix.html 7

The alcohol ink paper is a bit thicker than the masterboard on mixed media paper making for an interesting texture when you run your hand over this mosaic.

Sara Emily Barker Tim Holtz Sizzix Geo Springtime Card Saturday Showcase Tutorial https://frillyandfunkie.blogspot.com/2019/01/saturday-showcase-tim-holtz-sizzix.html 8

Here Comes Peter Cottontail

Sara Emily Barker Tim Holtz Sizzix Geo Springtime Card Saturday Showcase Tutorial https://frillyandfunkie.blogspot.com/2019/01/saturday-showcase-tim-holtz-sizzix.html 9

Cut a rabbit from the Geo Springtime set from a panel inked with Distress Oxides and one from a scrap of metallic card. Set the pink die cut aside for another use. I decided later to ink the card with Frayed Burlap to give it a vintage look.

Sara Emily Barker Tim Holtz Sizzix Geo Springtime Card Saturday Showcase Tutorial https://frillyandfunkie.blogspot.com/2019/01/saturday-showcase-tim-holtz-sizzix.html 10

Flip the die cut panel over and adhere a small panel of yellow vellum with collage medium. Flip the card face up and adhere the bunny die cut in accordance with the butterfly above. Blot away any excess collage medium with a paper towel.

Sara Emily Barker Tim Holtz Sizzix Geo Springtime Card Saturday Showcase Tutorial https://frillyandfunkie.blogspot.com/2019/01/saturday-showcase-tim-holtz-sizzix.html 11

Cut one of the flowers from Wildflower Stems #2 Thinlits set from watercolor paper. Cut off the flower, so that you are left with what looks like a tuft of grass.

Sara Emily Barker Tim Holtz Sizzix Geo Springtime Card Saturday Showcase Tutorial https://frillyandfunkie.blogspot.com/2019/01/saturday-showcase-tim-holtz-sizzix.html 12

Cut another flower from the same set (there are 5 in the set!) from watercolor paper. Cut two flowers from a scrap of the yellow vellum. Vellum can be a little tricky to cut, but the intricate stamens just needed a little prodding from my pokey tool. The details these dies cut are amazing!

Sara Emily Barker Tim Holtz Sizzix Geo Springtime Card Saturday Showcase Tutorial https://frillyandfunkie.blogspot.com/2019/01/saturday-showcase-tim-holtz-sizzix.html 13

Sara Emily Barker Tim Holtz Sizzix Geo Springtime Card Saturday Showcase Tutorial https://frillyandfunkie.blogspot.com/2019/01/saturday-showcase-tim-holtz-sizzix.html14

Blend a Small Talk Sticker with Frayed Burlap ink. The little ball was going to be Peter's tail, but I ended up using a flower cut from the new Organic Thinlits die cut instead, inking it with Antique Linen Oxide and popping it with a foam dot. Use the leftover negative panel of metallic card from Butterfly Mosaic card to make a frame. Sand in a crisscross fashion.

Layer the frame over the pink panel, and layer that over a card blank cut from watercolor paper .

Sara Emily Barker Tim Holtz Sizzix Geo Springtime Card Saturday Showcase Tutorial https://frillyandfunkie.blogspot.com/2019/01/saturday-showcase-tim-holtz-sizzix.html 15

I was inspired by Autumn's layered leaf card and layered the lily. I got a little too vigorous with my sanding and wrinkled the frame. LOL.

Sara Emily Barker Tim Holtz Sizzix Geo Springtime Card Saturday Showcase Tutorial https://frillyandfunkie.blogspot.com/2019/01/saturday-showcase-tim-holtz-sizzix.html 16

For those wondering why my sentiment is at the top, I initially was planning to make a square card, and cut the aperture according to that plan. Then, I got the idea to add the tail, and had to use the sticker to go with it. In spite of my poor planning and lack of time for a do-over, I still think it works, don't you?

Hello There

Sara Emily Barker Tim Holtz Sizzix Geo Springtime Card Saturday Showcase Tutorial https://frillyandfunkie.blogspot.com/2019/01/saturday-showcase-tim-holtz-sizzix.html 17

I didn't take many process shots for this one, but I started off with another panel from my stash. This one is painted with gesso, and then I inked either with Distress Spray Stains or oxide inks.  I really wasn't planning on making a card with this, just trying out Tim's new Retro Repeat Thinlits die. You can see that the die is shorter than the border I cut into the panel. Tim explains how this works in his video. The innovative die design makes it quite simple to repeat the pattern either vertically, like I did, or horizontally. It's so easy, I got it right on the first try, and I just had to make this into a card.

Sara Emily Barker Tim Holtz Sizzix Geo Springtime Card Saturday Showcase Tutorial https://frillyandfunkie.blogspot.com/2019/01/saturday-showcase-tim-holtz-sizzix.html 18

Die cut just the head of one of the flowers from Wildflower Stems #1 from a scrap of Metallic Kraft Stock. Cut a second flower head and a hummingbird from black card. Cut just the wingtip  from  a scrap of metallic card . Not shown, cut 'hello' (Friendship Words, Script) from black and metallic card.

Sara Emily Barker Tim Holtz Sizzix Geo Springtime Card Saturday Showcase Tutorial https://frillyandfunkie.blogspot.com/2019/01/saturday-showcase-tim-holtz-sizzix.html 19

Layer the metallic and black flower, offsetting just a bit for a shadow. Do the same with 'hello' but reverse the order. Adhere the hummingbird die cut and inset the wingtip pieces. Add a metallic sticker to complete the sentiment. Layer over a black panel, a metallic panel, sanded and edged with Black Soot crayon, and another black panel.

Sara Emily Barker Tim Holtz Sizzix Geo Springtime Card Saturday Showcase Tutorial https://frillyandfunkie.blogspot.com/2019/01/saturday-showcase-tim-holtz-sizzix.html 20

I hope you've enjoyed seeing these simple ideas on how you can use these wonderful new dies. I've also enjoyed playing with Faceted Heart along with Organic Thinlits dies HERE.

 A list of the products I've used on these cards is listed below, all available from The Funkie Junkie Boutique.  The new Tim Holtz dies are in stock in the shop and ready to ship.  And you can get them for 20% off MSRP by using the coupon code 'diediscount'. I can't wait to see what YOU will create using these great new dies!  And remember you still have a few more days to enter our current  Frilly and Funkie challenge HERE.

Happy crafting!
Sara Emily

Tim Holtz Sizzix Thinlits Die Set - Geo Springtime
Tim Holtz Sizzix Thinlits Die Set - Retro Repeat
Tim Holtz Sizzix Thinlits Die Set- Wildflower Stems #1
Tim Holtz Sizzix Thinlits Die Set- Wildflower Stems #2
Tim Holtz Sizzix Thinlits Die - Organic


Wednesday, January 23, 2019

Vintage Valentines

Hi, Maggi here and welcome to the latest Frilly and Funkie challenge.

It's sweetheart time and what could be more fun than creating Valentine's for our loved ones? For this challenge we want to see vintage valentines in vintage colors like pinks, blues, purples. No bright red please. Show us your vintage side with vintage colors and images. If you need some inspiration, click here to link to a great vintage color palette.

The winner will earn the chance of a Guest Designer spot here at Frilly and Funkie, and everyone who enters and follows the rules will go into the draw for the chance to win a $25 spending spree at The Funkie Junkie Boutique. In addition, the Design Team will select three further outstanding entries and those creators will receive a Top Pick badge to display on their blogs!

The guidelines for entering are simple; create a new vintage or shabby chic project following the challenge theme, link it below to your post (not just your blog) and also include a link back to this challenge in your postYou can combine our challenge with up to 10 challenges (including this one) to be in with a chance of winning. If you are entering through a public forum (such as Instagram) you'll need to include the words Frilly and Funkie Challenge. Also, please be sure to turn off your Word Verification so our Design Team can leave comments on your blogs. Make sure you follow these rules as unfortunately we have had to eliminate entrants from the prize draws in the past.

It's time now for the Funkie side of the Design Team to share their vintage creations;

Jenny Marples - Pushing The Right Buttons

Sara Emily - sarascloset

Suzanne Czosek - Suzz's Stamping Spot
Tim Holtz Paper Dolls Tim Holtz Wallpaper Ranger Distress Ink Worn Lipstick For The Funkie Junkie Boutique


************************************************
WEEK ONE

First up, the Frilly side of the Design Team shares their vintage creations;

Maggi Harding - Scrap, Travel & Bark


Kathy Clement - Kathy by Design
https://wp.me/p34lmI-4qC

Cec Wintonyk - CW Creations

Now it's your turn to share your Valentines projects here at Frilly and Funkie! Enter them using the link below and remember to come back tomorrow to see what our latest Guest Designer has in store for us. There will be even more inspiration from the Funkie gals next week too so make sure you look out for those.


Monday, January 21, 2019

Challenge Winners - Inspired By

It is time to announce the Design Team's top picks from the Inspired By challenge.  Thanks to everyone that played along in our first challenge for 2019 and for sharing what inspires you.


After some deliberation, the team has chosen #9 Tracey as the overall winner.  Her gorgeous tag with its wonderful combination of textiles and paper definitely gives the feeling of the angel that inspired her.  Congratulations to Tracey for being our favourite and winning the opportunity to be a Guest Designer here at Frilly and Funkie for a future challenge.  You will be contacted shortly with details.

In numerical order, the three winners of our Frilly and Funkie Top 3 badges for this challenge are #4 Plony, #8 She is Crafty and #10 Toni. Please email Linda at thefunkiejunkie@gmail.com for the codes for the Top 3 badges so that you can display them proudly on your blog.


Finally, we have randomly chosen one lucky winner for the $25 gift certificate to The Funkie Junkie Boutique.  Congratulation this time go to #6 Olivia!  Please email Linda at thefunkiejunkie@gmail.com for the gift certificate details.

A huge thank you again from the Frilly and Funkie team to everyone who participated and congratulations to all our winners.

The current challenge, 'Vintage Valentines' runs through Tuesday, January 29th and the gals on the funkie side of the Design Team will be back here this Wednesday January 23rd with some more inspiration for you. We hope you will be entering this time around so that we can see what you create and so that you too can have a chance to win.

 Have a great week everyone!

Saturday, January 19, 2019

Saturday Showcase - Making Backgrounds with 3D Texture Fades

Happy Saturday, here we are in 2019!  I am thrilled once again to be part of the Frilly and Funkie DT and to have the chance to share my favorite products from The Funkie Junkie Boutique.

You all inspire me with your stamping, inking and card making techniques.  I'm more of a paper artist, just give me some glue, scissors and paper and I can snip up a great project in no time.  But give me ink, stamps and paint, well that sends me to the corner to scratch my brow and wonder what to do with it all!  We all have our comfort zones, don't we?

Well for me, it's all about stepping out and doing something different, so today I want to share with you my little journey with Tim Holtz's 3-D Texture Fades Embossing Folders.  I love the deep impressions you get with these folders.

Something Frilly!
So let's start with a frilly card where I used the Kaleidoscope 3-D folder.  I used Core'dinations cardstock and cut a piece to fit the folder. I lightly misted the card stock on both sides so that the impressions would really pop.  Then I ran it through my Vagabond 3 times; that ensures maximum embossed dimension. (Caution:  the sandwich for these embossing folders is different than the "normal" embossing folders so do be careful!  With the Vagabond you use ONLY one cutting pad.)

After running through my Vagabond, I simply applied some white paint to my brayer and brayered lightly over the surface of the paper.  I love how the white paint really highlights the raised impression.  Finally I gave the paper a light spritz with Lindy's Creme Brulee Cream Mist.  Unfortunately, you can't really see the effect of the misty sparkle, but trust me, it looks great, give it a try!


From there it was easy to cut the embossed paper to size and use as a background on this pretty card I made with Graphic 45's Garden Goddess.  It's simply layered with design paper and a scalloped border sticker, topped with flowers and a butterfly.  Now the card is truely worthy of a garden goddess with that fabulous embossed design!


Now Let's Get Funky!
I used the Mechanics 3-D Texture Fades embossing folder to create this next background.  Here's where I crawled out of my comfort zone!

First I embossed my card stock.  I used tan card stock and misted on both sides before embossing and ran it throug my Vagabond, 3 times, remember that.


Time to create some interest on that background. So, I grabbed a fan brush and Dylusions paint in Slate Grey, Vanilla Custard and Ground Coffee.  


 I used a fan brush because the bristles will clump together like you see in this photo and when you run the brush over the paper you'll get streaks rather than solid color. I took care not to put too much paint on my brush so that I'd get streaks.  But then I spritzed the paint to spread it out a bit, makigng the custard color more of a background than a streak.


After applying the custard color, I followed with slate grey and then ground coffee.

I also discovered that you will get a different effect if you have to smoother surface of the paper face up than the textured side up.  The one on the left is the smoother side.  When the textured side is up, the paint highlights the paper texture as well as the embossed textures.


Now it's a masculine card!
It was really easy to turn this into a masculine card.   I think I'll give it to my husband for Valentines, he'll like this a lot better than a hearts and roses card! I cut a card base from Tim Holtz's Memoranda pad and added my embossed panel.  For embellishments I "dirtied" up a piece of measuring tape, added some gears and a word band.  And of course, I rubbed on just a wee bit of vintage gold Prima wax just because I wanted to give the card a few highlights!

 Prima rust paste system is 3 different colors of paste that when used together will give a really rusty corroded look. I start by painting on the brown rust and then I add some gold rust.  Next I dab on some red rust.  You want to blend the colors a bit so that it looks like rust.  There's really no wrong way to do it.


A strategically placed word band finishes off my card nicely.  I used copper Prima Metallic Wax to highlight the words.


And finally, something in between:

This time I embossed with a piece of silver metallic using the Foundry 3-D Embossing Folder.


After embossing, I painted it over with Dylusions Slate Grey and then quickly rubbed most of the paint off.  This served to dull the bright shine of the metallic paper.


Then I misted with black mist letting the mist pool around the raised areas.  Before the mist dries, use a paper towl to dab off much of the mist, being sure to leave mist in the crevices and around the "plates and rivets."  Let the mist dry throughly before procedding to the next step.


Lastly, I lightly rubbed areas with Prima's Rich Copper Metallic Wax and Distress Oxide Frayed Burlap to give a weathered worn loo.

Now you're all set to add this panel to a card and look what a vintage looking card it makes when paired with Stamperia's Precious collection.  I cut a 6" card base and fitted the panel to the left side.


 At the upper right, I added a fussy cut image from the Precious collection and topped that with some pretty blooms.


I added a bride and groom to turn this into a wedding card and a love word token at the bottom to set the mood.


I hope you've enjoyed my journey with the 3-D embossing folders.  I think you'll find lots of ways to use them as they are quite versatile.  Stop by The Funkie Junkie Boutique where you can find the products I've used.