Saturday, March 28, 2020

Saturday Showcase - Graphic 45 Le Romantique Bride's Folio

It is Cec here with the Saturday Showcase for this week.  I seem to be on a roll lately making little folios and albums with some gorgeous papers from The Funkie Junkie Boutique.


This time I used the Le Romantique paper collection from Graphic 45 and made a simple folio that I thought could be used for a bride as she plans her wedding.


Here is the paper collection and it has lots of gorgeous double-sided papers along with some sticker sheets and chipboard punch-outs.  I have had it for a while but I see on the store site that it is temporarily out of stock so if you want to purchase it, be sure to click on the text that says "Email me when back in stock".

I am going to walk you through the folio and how it came together but there are no process photos because I made this really late thanks to a stupid move on my part.

PUBLIC SERVICE ANNOUNCEMENT:  If you are going to move the blade on your paper trimmer, make sure you keep your fingers out of the way.

I didn't get mine out of the way and sliced two fingers rather badly so this project had to wait until I healed and since one should probably have had stitches, it took longer than I was hoping.  One bright spot in all this was that since I am home on lock down as so many others are, I was able to use up the Dora The Explorer bandages that I had from when my Grandchildren, now 11 and 13 were toddlers.  I was so cute and didn't have to hide my fingers from strangers. 😂


Now on to the folio:

  • Cut one piece of heavy black card stock for the front cover measuring 5 1/2" x 7" and score at 5" on the short side
  • Cut one piece of heavy black card stock for the back cover and pocket measuring 9 7/8" x 7" and score on the long side at 1/2", 5 1/2", 5 5/8" and 8 5/8" Note:  This will give you a 3" flip out that has a 1 1/4" pocket and the extra 1/8" score will help the flip out fold inward more easily
  • Glue the 1/2" strips together to create the spine making sure not to go over the score lines
  • Cut patterned paper to fit all surfaces except the inside of the pocket in the flip out, distress the edges and ink with Vintage Photo Distress Ink
  • Adhere all the paper using your preferred adhesive
  • Cut two gussets for the pocket measuring 1" x 1 1/8", score at 1/2" on the short side and fold in half
  • Clip one end of each gusset on an angle and then adhere to the inside of the pocket making sure to align the fold against the edge of the pocket
  • Adhere the pocket to the flip out
  • Make a pocket for the inside front cover using patterned paper and die cut a half oval to make a large thumb notch
  • Glue the pocket on both sides and the bottom making sure that the glue line is very fine and right next to the edges
  • Cut another pocket from patterned paper for the bottom of the inside front cover adding 1/2" on each side and the bottom to fold in for gussets
  • Create a vertical pocket for the inside back cover in the same manner as the preceding step
  • Decorate the pockets, the flip out, the back cover and finally the front cover
  • Create inserts for the pockets using fussy cut images from the paper collection


Here is the inside with the flip out closed.  The left pocket has been decorated with three borders from the sticker sheet.  The vertical pocket on the inside back cover has been decorated with a strip of stamps from one of the patterned papers and the flip out has a fussy cut image and a little sticker.


This view shows the flip out opened up.


The bottom pocket on the inside front cover has two little tent style "booklets" that can be used for journaling of photos.


The top pocket contains two large photo mounts.


The centre pocket has two folded "booklets".


The flip out pocket has two more folded "booklets".


The back cover has a sticker and the front cover features a fussy cut image of a bride with a crochet die cut border, elements from the sticker pages, chipboard punch outs and fussy cut images from the paper.  Leaves were die cut with the Garden Greens die and tucked under a number of paper flowers.  The large flower was white and I dyed it with a blend of Antique Linen, Gathered Twigs and Dried Marigold Distress Ink Reinker mixed in water.

This is very quick to put together - even quicker if you don't injure yourself like I did.  Since most of us are staying home to help flatten the curve on this virus, now is the time to play in your creative space and once you have shopped your stash you will need to replace products so check out The Funkie Junkie Boutique.

Supplies list:

Graphic 45 - Le Romantique Deluxe Collector's Edition 4501952
Ranger Tim Holtz Distress Ink Pad - Vintage Photo TIM19527
Ranger Tim Holtz Distress Ink Reinker Antique Linen TIM19435
Ranger Tim Holtz Distress Ink Reinker Dried Marigold TIM21551
Ranger Tim Holtz Distress Reinker Gathered Twigs TXR35138
Sizzix Chapter 2 Tim Holtz Thinlits Crochet 664178
Scor-Pal Scor-Tape 1/8" x 27 Yards
Scor-Pal Scor-Tape 1/4" x 27 Yards
Scor-Pal Scor-Tape 3/8" x 27 Yards #SP214
Ranger Inkssentials Mini Ink Blending Tool - With 4 Blending Foams IBT40965
Tim Holtz Garden Greens Thinlets
Paper Flowers (my stash)

Monday, March 23, 2020

Challenge Winners - Aquamarine

It is time to announce our winners for the 'Aquamarine' challenge. Thank you to all who entered and played along. We were spoiled for choice with all the beautiful projects featuring variations on this colour theme.


The team has chosen this fabulous ATC by #15 Cassandra (aka Scrap Savvy) as the overall winner. The multiple layers of texture and various shades of Aquamarine truly are a feast for the artistic senses - make sure to check it out in more detail on her blog here.

Congratulations to Cassandra on winning an opportunity to be a Guest Designer at a future date here at The Funkie Junkie Boutique Blog. You will be contacted shortly with all the details.

And now our picks for the three winners of the The Funkie Junkie Boutique Blog Top 3 Badges for this challenge. In numerical order they are #4 Esther (Shoregirl's Creations) #11 Jo (Let's Art Journal) and #14 Elle (Empire of the Cat).

Please email Linda at thefunkiejunkie@gmail.com for the codes for the Top 3 badges so that you can display them proudly on your blog.


And finally we have a randomly chosen lucky winner for the $25 gift certificate to The Funkie Junkie Boutique. Our congratulations this time go to #9 Drea Slee! Please email Linda at thefunkiejunkie@gmail.com for the gift certificate details.

Thank you again to everyone who took part in this challenge from all of us here at The Funkie Junkie Boutique Blog  and congratulations to all our winners.

The current challenge 'Little Things' can be found HERE and runs through Tuesday, March 31st at 11:55 pm EST so we hope you will join us.

Saturday, March 21, 2020

Saturday Showcase - Ranger Mini Layering Stencils Tim Holtz #47

Welcome to the latest Saturday Showcase.   Suzz here, to share a few projects using the Mini Layering Stencil Tim Holtz #47.

Ranger Mini Layering Stencil 47 Stampers Anonymous Baroque Stampers Anonymous Urban Elements For The Funkie Junkie Boutique
 I recently received a lovely package from The Funkie Junkie and was thrilled because I had many of the new products that just arrived.  I pulled out the mini stencils to start playing!

I had leftover on my desk a couple of inky background from our Aquamarine challenge and decided to use them to create a series of inchies and ATC's.

Here is what one of the backgrounds looked like:

This background was created with shaving cream and a mix of Ranger Distress Sprays and Distress Oxide Sprays.  I put the shaving cream down on a sheet of acetate.  Spritzed random blue inky sprays over in different areas.  Put my cardstock onto the inky shaving cream pulled it up and shaved off the excess shaving cream. 

It gives the inky background a soft velvety feel and smells good too! :)

After that I cut the background into inchies (1" x 1")  and ATC sizes (2 1/2" x 3 1/2").

Next step was to use white embossing paste and the stencils to add the texture.

Ranger Mini Layering Stencil #47 Ranger Distress Ink Sprays

I left some of the backgrounds with just the pretty blues but then expanded to added some additional spritzed on inks after everything dried.

Ranger Mini Layering Stencil #47 Ranger Distress Ink Sprays

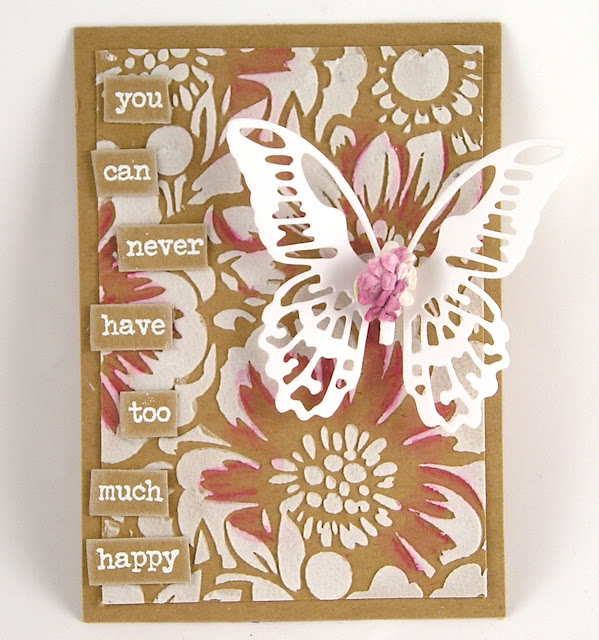
And then I tried matting one on kraft cardstock and decided to stencil with white embossing paste on the kraft cardstock.
Ranger Mini Layering Stencil #47 Ranger Distress Ink Sprays

To add a pop of color I added a bit of watercolor pencil and water to soften the effect.

Here are the finished versions of some of my backgrounds:

Ranger Mini Layering Stencil #47 Ranger Distress Ink Sprays

A little touch of a butterfly and sentiment stamped in versamark and heat embossed with white embossing powder to coordinate.

Ranger Mini Layering Stencil #47 Ranger Distress Ink Sprays

For this one I mixed Abandoned Coral with the pretty blues and used a few spare die cut flowers as a contrast.
Ranger Mini Layering Stencil #47 Ranger Distress Ink Sprays

 For the blue background I mixed in a butterfly stamped with the pretty baroque flourish in a coordinating blue ink.


Ranger Mini Layering Stencil #47 Ranger Distress Ink Sprays

I then stamped the flower on tissue paper and collaged it over the embossed surface.  I added a few highlights with the watercolor pencil.  The butterflies were glazed with the new embossing glaze. 

There is still time to play along in our Little Things challenge.  

Please be safe and stay healthy.

Suzz

Products:
Ranger Mini-Layering Stencils #47
Wendy Vecchi White Embossing Paste
Stampers Anonymous - Baroque
Stampers Anonymous - Urban Elements
Stampers Anonymous - Tiny Text 
Stampers Anonymous - Field Notes
Stampers Anonymous -  Flower Shop
Ranger Distress Embossing Glaze - Weathered Wood
Versamark Watermark Ink
Ranger Archival Ink - Jet Black, Aquamarine,
Ranger Distress Spray - Abandoned Coral,  Blue Print SketchTwisted Citron, Faded Blue Jeans, Weathered Wood
Ranger Distress Oxide Spray - Tumbled GlassChipped Sapphire,  Weathered Wood
Idea-Ology - Mirrored Hearts
Idea-Ology - Clipping Sticker Book
Idea-Ology Tim Holtz Tiny Attacher
Ranger Distress Ink - Weathered Wood 
Sizzix Large Stems Tim Holtz
Idea-Ology Ephemera Snippets Field Notes
Idea-Ology Game Spinners 
Sizzix Detailed Butterflies

Thursday, March 19, 2020

Guest Designer - Tracey Fairgrieve

Please welcome out Guest Designer for the Little Things challenge.  Tracey Fairgrieve of New Beginning . . Creating in my Corner was the overall winner from the Love Is All Around Us challenge.


Hello everyone, it's Tracey here and i'm so pleased to have been invited to be a Guest Designer for the second time over at The Funkie Junkie Boutique Challenge.

A little about me...I love nothing more than to create, i've been doing it for as long as I can remember. As a child i'd use scraps of fabric to create new outfits for my dolls, make jewellery from salvaged buttons and draw the portraits of my family and friends, i'd rarely be seen without my felt tips, pencils and leftover rolls of wallpaper. My love for mixed media has never faded with me always looking for new ways to mix it up and share how it all came to be...

When I found out that Jenny's theme for this challenge was *Little Things* I could not have been more excited. Indeed it can be the smallest of things that mean the most and with my love for attention to detail, those little things are always in the forefront of my mind...

Onto a 4" x 3" mini frame I've stamped then glued down tiny found objects, paper cuts & lacy scraps, coating it all with a layer of white gesso.


The aperture displays the remainder of the image with an embossed acetate overlay which adds dimension.


A whisper of gilding wax brings out the best of those little things, giving us so much more to look at than a picture within a frame.


I'm so looking forward to seeing everyone else's take on this precious *Little Things* theme xx

* * *
Pop on over to Tracey's Blog to get more details on the gorgeous textured frame and then come on back an share a Little Things creation with us. The challenge can be found HERE and runs through 11:55 pm EST on Tuesday, March 31, 2020.

Wednesday, March 18, 2020

Little Things

Hi everyone and welcome. Jenny with you to host the next of our challenges here at The Funkie Junkie Boutique Blog. I'm calling this one 'Little Things'. Sometimes it can be the littlest of things that can mean the most. For this challenge create a small vintage or shabby chic project (or if you're feeling adventurous even a set!) It could be an Artist Trading Card/Coin, a tag or a little card for example, or you may have something else in mind - we can't wait to see them.

The winner will earn a chance to be a Guest Designer at a future date here at The Funkie Junkie Boutique blog, and everyone who enters and follows the rules will go into the draw for the chance to win a $25 spending spree at The Funkie Junkie Boutique. There are also Top 3 Badges for three additional outstanding entries, chosen by the Design Team.

The guidelines for entering are simple; create a new vintage or shabby chic project following the challenge theme, link it below to your post (not just your blog) and also include a link back to this challenge in your post. You can combine our challenge with up to 10 challenges (including this one) to be in with a chance of winning. If you are entering through a public forum (such as Instagram) you'll need to include the words 'Funkie Junkie Boutique Challenge'. Also, please be sure to turn off your Word Verification so our Design Team can leave comments on your blogs. Make sure you follow these rules as unfortunately, we have had to eliminate entrants from the prize draws in the past.

Take a look at all the fabulous inspiration our designers have created for you. To get all the details of their projects, just click on their blog name and you will be taken directly to their blog.

Maggi Harding - Scrap, Travel & Bark


Cec Wintonyk - CW Creations


Sara Emily Barker - sarascloset


Suzanne Czosek - Suzz's Stamping Spot 


Jenny Marples - Pushing The Right Buttons


Now it's your turn to get creating - we'd love to see what 'Little Things' you come up with for this one. Use the link below to enter them and be in with a chance of winning.


Saturday, March 14, 2020

Saturday Showcase - Eileen Hull Designs Gift Box with AALL & Create Blossomed Numbers

Hi everyone and welcome to another Saturday Showcase, the Design Team's chance to share tutorials and products available from The Funkie Junkie Boutique with you. With our current challenge focusing on the various shades of 'Aquamarine' I've got a quick tutorial for you today that features it as the primary colour and was inspired by Cec's recent Saturday Showcase post here. Here's the finished floral gift box.


Here's how it came together;


Start by die cutting the box and scalloped lid closure using Eileen Hull Designs Sizzix Scoreboards XL Die 'Gift Box'. I used mount board which had a black surface on one side, cut it so the black side was face up when running it through the machine (to colour the inside of the box with no effort) and painted the outside edges with Black Gesso. Glue together with either strong tape or wet glue and allow to dry completely.


Cut six pieces of paper or card into 3 3/4 inch squares (I used some offcuts of textured wallpaper for this because it's flexible and doesn't tear). Use a brayer to apply uneven layers of Peacock, Marine, Turquoise and Ocean Dina Wakley Media Acrylic Paint.


Stamp the larger flower and circles section from the AALL & Create A4 stamp 'Blossomed Numbers' by Tracy Evans in permanent black ink onto two pieces of tissue. Paint the flower and circles with White Dina Wakley Media Acrylic Paint on the reverse side.


Use washi tape to temporarily join four of the painted squares together in a line. Tear around the stamped image sections and stick them onto the squares with Distress Collage Medium Matte (be generous with this to make the tissue edges blend into the surfaces). I also applied un-stamped tissue to the remaining two painted squares to match up the look of the finished squares and also applied a thin layer of Clear Gesso to all six squares to unify them.


To finish the panels add hand stitching and apply Opaque Matte Texture Paste through the Tim Holtz 'Bubble' Layering Stencil. When dry stick the four patterned panels to the sides of the box. Stick the un-patterned squares to the top and bottom of the box. I cut a small strip away from the square used on the top so that I could more easily cover both the lid and the top of the raised scalloped lid opening.


To finish the top of the box paint a sheet of paper with White Gesso before stamping the flowers with permanent black ink. I found it useful to use a Stamp Platform so that I could ensure the images were completely transferred onto the painted surface. Cut around the flowers, shape them with a ball tool and stack them on top of each other in a staggered fashion using dimensional tape or hot glue before then sticking the finished flower to the lid.


Thanks for visiting to catch today's Saturday Showcase tutorial - I hope you've found it helpful. There's still time to enter the current Funkie Junkie Boutique Blog challenge 'Aquamarine' to be in with the chance of being a Guest Designer here. We look forward to seeing your amazing creations.

Jenny

Products used to create this Blossomed Numbers Gift Box are available from The Funkie Junkie Boutique and are listed/linked below.

Sizzix Chapter 1 Scoreboards Bigz XL Die - Gift Box w/Scalloped Edge by Eileen Hull
AALL & Create A4 Stamp Set 'Blossomed Numbers'
Dina Wakley Media Acrylic Paints and Gessos

Monday, March 9, 2020

Challenge Winners - Leap into the Odd

It is time to announce our winners for the 'Leap into the Odd' challenge. Thank you to all who entered and played along. There were so many wonderful 'odd' projects and the team had great fun finding out what all those odd ideas and techniques were.


The team has chosen this incredible piece of 'twisted art' by #11 Cathy Frailey (It's Oddly Appealing) as the overall winner. You will never guess from the picture of her finished piece what it was created from - make sure to check out how it started life on her blog here.

Congratulations to Cathy on winning an opportunity to be a Guest Designer at a future date here at The Funkie Junkie Boutique Blog. You will be contacted shortly with all the details.

And now our picks for the three winners of the The Funkie Junkie Boutique Blog Top 3 Badges for this challenge. In numerical order they are #7 Gail (ionabunny) #19 Repolainen and #20 Lagene.

Please email Linda at thefunkiejunkie@gmail.com for the codes for the Top 3 badges so that you can display them proudly on your blog.


And finally we have a randomly chosen lucky winner for the $25 gift certificate to The Funkie Junkie Boutique. Our congratulations this time go to #10 Katy D (I like to cut and paste)! Please email Linda at thefunkiejunkie@gmail.com for the gift certificate details.

Thank you again to everyone who took part in this challenge from all of us here at The Funkie Junkie Boutique Blog  and congratulations to all our winners.

The current challenge 'Aquamarine' can be found HERE and runs through Tuesday, March 17th at 11:55 pm EST so we hope you will join us.

Saturday, March 7, 2020

Saturday Showcase - Envelope Journal Using Ciao Bella - Sicilia Papers

Hi everyone, it's Sara Emily here for today's Saturday Showcase! Today, I'm sharing an Envelope Flip Journal featuring the some of the new beautiful papers from Ciao Bella that Linda carries in The Funkie Junkie Boutique. I've used the 6x6 Sicilia paper pack, which will be back in stock shortly. The A4 size of the same design is currently available, along with many other designer paper collections by Ciao Bella. I've listed links to the products I've used below, as well as links to the entire Ciao Bella line and the A4 pad. Always check back at the shop, and don't be shy about using the 'e-mail me when back in stock' button, as Linda replenishes her offerings quite frequently.


***Click on any photo to enlarge***


Journal opened with left flap opened.


Journal with both left and right flap opened.


After shuffling through the generous pack of 24 double sided papers with designs reminiscent of the Island of Sicily and viewing Kathy Clement's You Tube videos Envelope Flip Book Tutorial and Shaker Folio Tutorial, I was inspired to step out of my mixed media comfort zone and create this 4.25 x 5.75 inch album for my daughter complete with a shaker on the cover and lots of pockets and such inside. The bunny image is what stole my heart when I first saw this collection, since Lauren is a proud pet-Mom of a lop eared rabbit named Nugget. Having visited Italy last semester, I thought this little journal would be a great place for her to record the events and photos of her trip.

I want to send out a big thank you to Kathy, who so graciously gave me permission to use her design for my journal.

Let's get started!

The base: 

1. Make base for the album following Kathy's steps. My envelope measures 4.25 x 5.75 inches, and I trimmed a panel of Bristol board measuring 11.5 x 5.75 inches to form my album's base. After inserting the Bristol board into the envelope and gluing the envelope flap down, I scored at 4.25, 4.75, 9 and 9.5 inches, leaving me with an inch flap at the end. I demonstrated on a scrap of waste paper in the photo below.


2. Crease on score lines, burnish and blend all edges that will show with Frayed Burlap Distress ink.

3. Blend spines with  Squeezed Lemonade Distress Oxide and adhere Design Tape with Collage Medium.  (My tape is pretty old, and I wanted to be sure it stayed down.) Allow to dry.


The pages, pockets and inserts:

 It's easier to decorate the inside first so the decorations on the cover don't get messed up while you are working. Here are the steps I took:

***Notes: All papers were blended with Frayed Burlap Distress ink before adhering. Please excuse my phone's shadow photo bombing in almost every process photo.

1. Like Kathy, I used an oval die to cut the oval from double sided two toned blue card stock (stash) and this gorgeous Ranunculus design from the pack to make the pocket out of the opening of the envelope.


2. Line interior portion of pocket that shows with a scrap from the collection.


3. Trim the pack's cover page to make a little journaling wallet to tuck in the pocket. I used a corner rounder to trim the corners.


View of outside of wallet when opened.


4. Dip opposite side  of the trimmed cover page and a sheet of thin drawing paper (stash) into green Distress Oxide sprays thinned with water and dry. I believe this is Shabby Shutters or Crushed Olive, or maybe both -- I use my over sprayed Oxide palette sheets, (see my tips for using Oxide sprays) and I don't know what exactly colors are on them.

5. Accordion fold the colored drawing paper and adhere to front inside of wallet.


6. Cover this adhered flap with a scrap and one of the cut aparts included in the pack. Lauren loves doing calligraphy and bullet journaling, and this pull out feature offers her lots of space to do that front and back.

7. I used the oval portion from the pocket matting and some scraps to make the pull for the accordion folded pages.


8. To make the thumb tab for the cover, cut a scrap using a small oval die as shown below.


9. Having completed the first page (left flap), I moved onto the central panel. I lined it with one of the more subdued papers from the collection and made a horizontal band from a scrap to hold a removable flap page.


10. On the front, a tiny blue/white scrap hides the join line of the two panels used to make the elongated page.


11. Now I move onto the remaining right side 1 inch flap.  Adhere one of the designer papers trimmed to just under 4.25 inches wide x 5.75 inches long to the 1 inch flap to make an additional page that will fit when the album is closed. In hindsight, I should have made this panel no more than 4 inches wide. The fit is a little more snug than I would have liked. Just like my jeans.


12. Score both narrow ends of a dainty floral and script scrap from the collection and adhere a tiny scrap to either end making tabs at the bottom and top. Adhere just the tabs to the right page; this allows room under the strip to slip in a couple of journal cards made from the papers. I hope the side angle close up shot below better explains this.


13. On the opposite side of the last page, I made another pocket similar to the one on the left , adhering this cute bunny image to the page on just three sides.  The lemon paper you see peeking out is the reverse side of the paper used on the previous page.


14. I made a pull tab using three remaining oval scraps layered together and sandwiched it between two tags.


The following photos show the front and back view of the completed tag removed from the pocket.


The cover:

1. Measure out a length of seam binding ribbon that will wrap around the closed book and allow for a fluffy bow to keep the book securely closed when not in use.

2. Dye the ribbon with Oxide sprays as shown.  Dry.


3. Mark down half way on spine, front and back covers, and lay a strip of super sticky double sided tape around the back, spine and front of the album using these guidelines. Adhere ribbon.

4. Trim and adhere this gorgeous lemon design paper to the back cover over the ribbon.


5. Trim and tear a panel to adhere to the front. At first I fussy cut the flowers from the lower left, but later decided to take a different route, so it may look a little funny. It will be covered later, so no need to worry about this goof.


6. I made a shaker following Kathy's video, but chose to use adhesive weather stripping to line my frame and hold the shaker contents in place. I just picked up the yellow sequins at an estate sale this weekend -- they are a perfect match and work nicely with some micro beads from my stash!


7. In addition to flowers and gauze bandages from my stash, and die cuts from Tim Holtz Funky Foliage, Wildflowers and Wildflowers #2 Thinlits die sets, I used a Tim Holtz Transparent Wings butterfly to decorate the Lace Baseboard frame. I tapped the back of the wings with Picket Fence paint and heated the wings with my heat tool to shape them.


And guess what? I still have all this paper and then some left over to play with! The weight of this paper lends itself perfectly to a project like this -- not too heavy, but not at all flimsy. Now I can't wait to make some cards!


So that wraps up this week's Saturday Showcase! I hope you've found some inspiration from my play with these stunning Ciao Bella papers! There's still time to play along in our Aquamarine challenge, and you can link up your project HERE. Thanks for stopping by! Sara Emily


These products were used and can be purchased at The Funkie Junkie Boutique:
Ciao Bella Paper
Ciao Bella - Sicilia A4 Paper Pad
Ciao Bella - Sicilia 6x6 Paper Pad
Sizzix Thinlits Funky Foliage by Tim Holtz
Sizzix Thinlits Wildflowers by Tim Holtz
Tim Holtz Idea-ology Transparent Wings - Clear & Color
Tim Holtz Idea-ology Baseboard Frames Lace
Ranger Tim Holtz Distress Oxide Pad - Squeezed Lemonade
Distress Oxide Sprays -  Shabby Shutters, Crushed Olive, Squeezed Lemonade, Mustard Seed
Ranger Tim Holtz Distress Ink Pad - Frayed Burlap
Tim Holtz Ranger Distress Paint - Picket Fence
Ranger Tim Holtz Distress Collage Medium Matte
Seam Binding Ribbon
Tim Holtz Idea-ology Design Ruler Clear 12 Inch