Monday, October 31, 2022

The Haunted Mansion – Tim Holtz Village Die Set for Halloween

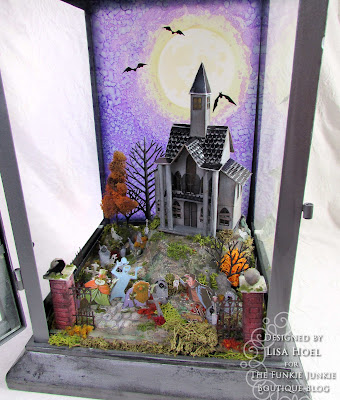
Happy Halloween! Lisa Hoel here and I have one last project for the season to share with you. It's been awhile since I created village scene in a lantern so I made this one as a birthday gift for some friends of ours.

Lisa Hoel for The Funkie Junkie Blog - Halloween Journal #creativejuicefreshsqueezed #tim_holtz #sizzix #mysizzixstory #mymakingstory #thefunkiejunkie #thefunkiejunkieboutique #frillyandfunkie

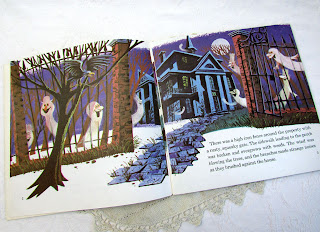
I based the design on the Disney Haunted Mansion book/ride. (Our friends are classic Disney fans.)


The house itself is loosely based on the illustration in the book:

Lisa Hoel for The Funkie Junkie Blog - Halloween Journal #creativejuicefreshsqueezed #tim_holtz #sizzix #mysizzixstory #mymakingstory #thefunkiejunkie #thefunkiejunkieboutique #frillyandfunkie

Last fall Tim Holtz released an 87 piece Thinlits die set, Christmas Village, that was based on his wildly popular (and retired) steel rule Village die collection. This new set has much more flexibility with mix and match doors, windows, additions etc. so you can cobble together your own versions of mini houses. Check out Tim's excellent video where he explains his thoughts on this set and all the ins and outs. (More on how I constructed my mansion below.)
https://www.youtube.com/watch?v=GstjNChz7zo&t=963s

The background is alcohol ink on a large sheet of translucent Yupo.

https://www.youtube.com/watch?v=GstjNChz7zo&t=963s

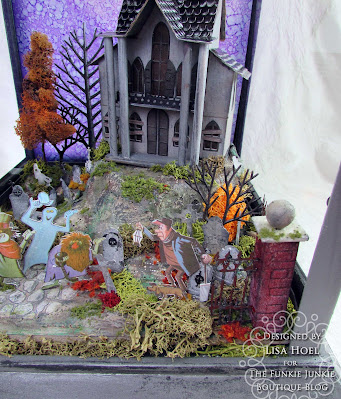
The mansion grounds are filled with gravestones, ghosts and the frightened caretaker.

https://www.youtube.com/watch?v=GstjNChz7zo&t=963s
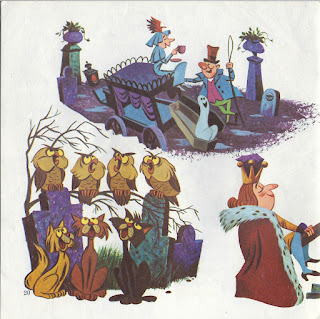
I scanned and printed pages from the book to fussy cut out the figures.

Of course there are also Halloween Tiny Lights as part of the scene.

https://www.youtube.com/watch?v=GstjNChz7zo&t=963s

The vignette on the top of the lantern echoes details from the story (and a delightfully detailed Idea-ology Tombstone).

https://www.thefunkiejunkie.com/ProductDetails.asp?ProductCode=TH94173
Arthur the owl and the Mischievous cats are stars.


Let's take a look at some of the how-to:
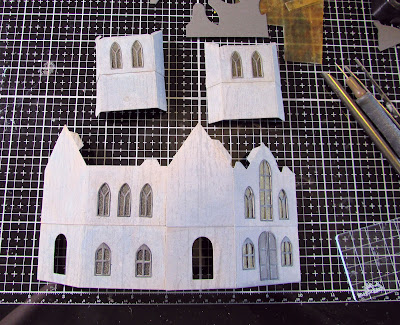
1) First off the bat was making the house. I cut the pieces out of Kraft Heavystock paper and inked them with Distress Oxide Pumice Stone and Hickory Smoke ink. I stacked the sides to make a multi-story structure.


2) The background is a large piece of Yupo paper I alcohol inked as a night sky. (You can get large sheets of Yupo at art stores. Ranger sells smaller sheets of Yupo cardstock packs that are perfect for card making etc. I also used the Moon Masks set to mask the moon while making the background and then adding the moon shadow details on the face of it.


3)  To add the tiny lights, I left a hole in the base of the house and hot glued several loops of lights onto the landscape platform. I then ran the wire with the rest of the lights around the front and tacked it into position with hot glue. I disguised the wire with paint and placed the bulbs behind bushes and gravestones.


4) The gravestones were die cut out of heavy cardstock coated with grit paste and painted. I used the Halloween 2022 Remant Rubs to add details.


5) The structure the top vignette is built on is an Etcetera Trims piece I hot glued onto the lantern.


Thanks for stopping by and Happy Halloween!! Time to pivot to Christmas LOL.

Supplies used:
Tim Holtz die set - Christmas Village
Tim Holtz die set - Mischievous
Tim Holtz die set - Vault Series Halloween 2021 #665563
Tim Holtz die set - Decorative Trims
Tim Holtz die set - Ghost Town #2 #665560
Tim Holtz die set - Arthur, Colorize #664730
Tim Holtz die - Branches #663138
Tim Holtz 3D Embossing Folder - Lumber
Tim Holtz 3D Embossing Folder - Mini Brickwork
Tim Holtz 3D Embossing Folder - Mini Cobblestone
Tim Holtz Layering Mask Set - Moon Masks

Ranger Archival Inks - Hickory Smoke
Distress Oxide Ink - Pumice Stone, Hickory Smoke
Distress Grit Paste - Crypt
Idea-ology Tombstones
Stampers Anonymous Etcetera Trims, Bracket

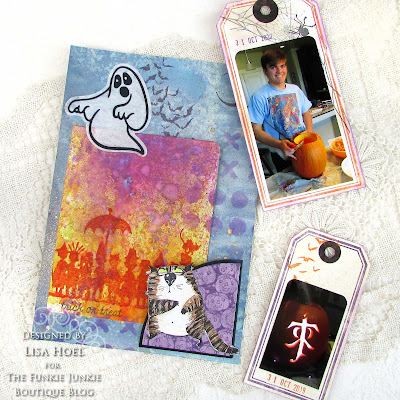
Father & Son - Inspiration Ave!

 Hi!  Laura here.  I am next up on the inspiration train highlighting the Sizzix Chapter 4 release.

I LOVE tags...they are the perfect embellishment to any page or card!  I used the Sizzix Chapter 4 Tim Holtz Thinlits Dies - Framed Tags.


I started by tearing, distressing and layering the beautiful Stamperia Desire Background papers


I then used the tag dies to cut 5 tags and layer under my photo....tags make the perfect mat and draw the eye to the photo
 

Here are a few more details;


Thanks so much for stopping b y

~Laura

Friday, October 28, 2022

Inspiration Ave - Sizzix Chapter 4 - Tree Rings

Hi! Suzz here.  I am next up on the inspiration train highlighting the Sizzix Chapter 4 release.  I knew right away I wanted to feature the beautiful Sizzix Tree Rings Texture Fade folder.

I love that the rings of the tree highlight the longevity of a tree.  When I saw this new texture fade folder I knew it was one that I needed to add to my collection.

I embossed many different backgrounds using the tree rings folder and ended up highlighting two of them. The backgrounds both started as white cardstock that were embossed using the texture fade folder.

The next step was to take that embossed background and add color.  I had all the beautiful Distress Mica Stain sprays from the fall and winter releases sitting on my desk and decided to use them on my cards.

For my first background I used the Antique Bronze spray and spritzed the background completely.  After it dried I decided to tear the edges to create a rough effect.  I spritzed some of the edges to blend in.

After I had that beautiful background ready it was easy enough to die cut a variety of leaves and spray them with a mix of the mica stain sprays and layer them into a wreath.  

I finished the wreath off with a sweet bird and a little message across the wreath. 


Up next was a card highlighting the tree rings but carving out a piece of the center. 

On my next card the background started again from a white piece of cardstock.  I embossed the cardstock using the texture fade tree rings.  The background was spritzed with a mix of mica stains starting with the pretty Harvest Moon.  While that was still wet I mixed in some of the Decayed colors and spritzed on water to move the colors and blend them together.  

After it had dried completely, I used a layer of clear embossing powder to highlight the colors and add a shine.  I die cut the center of the tree rings (to be used in the future).  I used a remnant of an inky background to pop behind the tree rings. 

I die cut some feathers and another bird to use as accents.  The feathers were cut from the same inky background.  I added a hint of stamping to the bird and feathers.  

The rest was just layering up the embellishments to the card and adding a sentiment. 

Thanks for stopping by!

Suzz


Wednesday, October 26, 2022

Hello Funkie Junkie fans, Lisa Hoel here and we have a new product inspiration theme for you – a look at the Sizzix Chapter 4 release.  

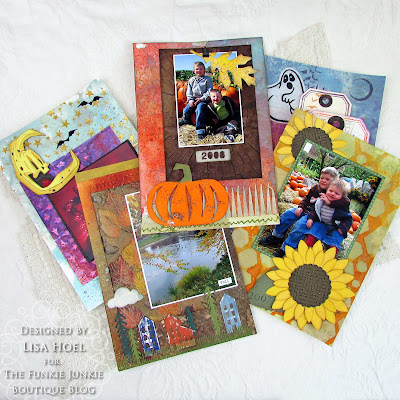
For a past Saturday Showcase, I shared the cover (and how-to) of a Halloween journal project I was working on. I continuing the project with the Inky in October product focus by creating delightfully inky pages to go inside!  (See that post here.) This go round I have the rest of the journal pages that I made for it that feature Chapter 4 dies and embossing folders!

FYI, we will no longer be having bi-weekly challenges on the Funkie Junkie blog but there is still a chance to win a $25 gift certificate at the Funkie Junkie Boutique! Just create a project using the products from each product showcase cycle, share it on social media and tag us at #thefunkiejunkie. You can read all about it here.

Lisa Hoel for The Funkie Junkie Blog - Halloween Journal #creativejuicefreshsqueezed #eileenhull #tim_holtz #sizzix #mysizzixstory #mymakingstory #thefunkiejunkie #thefunkiejunkieboutique #frillyandfunkie

Let's take a look at each page in detail. Get comfy, there is a lot to see!

Page 1

This is one of my favorite photos of my boys. This page features the new Eileen Hull Sunflower Die and a background monoprinted using a Dina Wakley stencil and seasonal Distress Mica Stains.

Lisa Hoel for The Funkie Junkie Blog - Halloween Journal #creativejuicefreshsqueezed #eileenhull #tim_holtz #sizzix #mysizzixstory #mymakingstory #thefunkiejunkie #thefunkiejunkieboutique #frillyandfunkie

Lisa Hoel for The Funkie Junkie Blog - Halloween Journal #creativejuicefreshsqueezed #eileenhull #tim_holtz #sizzix #mysizzixstory #mymakingstory #thefunkiejunkie #thefunkiejunkieboutique #frillyandfunkie
The lower flower flips open to reveal a photo!

The sunflowers are cut out of yellow cardstock that I sprayed with Harvest Moon Mica Stain. The centers are cut out of brown paper that I embossed using the Woven Leather 3-D Embossing Folder (great texture!)


Page 2

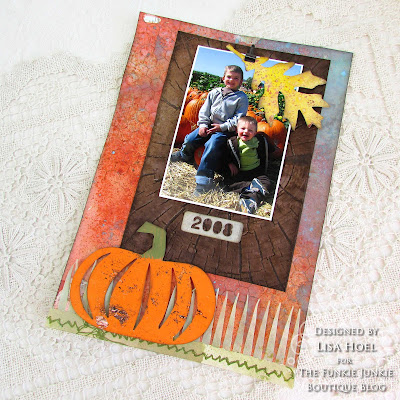
Another photo from the pumpkin patch! The photo is mounted on cardstock embossed with the new Tim Holtz Chapter 4 Tree Rings 3-D Embossing Folder (a new favorite!)

Lisa Hoel for The Funkie Junkie Blog - Halloween Journal #creativejuicefreshsqueezed #eileenhull #tim_holtz #sizzix #mysizzixstory #mymakingstory #thefunkiejunkie #thefunkiejunkieboutique #frillyandfunkie

The detail in this folder is AMAZING! I started out with Mixed Media Heavystock paper colored with Distress Spray Stains. 


I used a favorite (and simple) technique for embossing the background. All you have to do is rub the front half of the folder with Archival ink and then emboss! The ink transfers from the folder to the debossed areas of the paper and really makes the embossing detail pop. 


Page 3

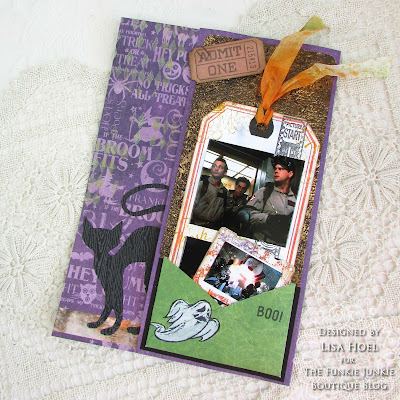
In 2014 we started a new tradition of watching a special 'Halloween movie' instead of going out trick or treating. Our first movie was Ghost Busters! It was a big hit. 

Lisa Hoel for The Funkie Junkie Blog - Halloween Journal #creativejuicefreshsqueezed #eileenhull #tim_holtz #sizzix #mysizzixstory #mymakingstory #thefunkiejunkie #thefunkiejunkieboutique #frillyandfunkie

The new Tim Holtz Chapter 4 Framed Tags Die Set made a great page pull out tag and I tucked it into a holder made using the Postale Thinlits Die Set. You will also spy a slide mount made using the Specimen Set.

Lisa Hoel for The Funkie Junkie Blog - Halloween Journal #creativejuicefreshsqueezed #eileenhull #tim_holtz #sizzix #mysizzixstory #mymakingstory #thefunkiejunkie #thefunkiejunkieboutique #frillyandfunkie

Outer flap has a layer embossed using the Industrious 3-D Embossing Folder. (love it!) Papers used are the Halloween Distress Woodgrain (cat die cut) and background papers are from the Graphic 45 Charmed collection.

Lisa Hoel for The Funkie Junkie Blog - Halloween Journal #creativejuicefreshsqueezed #eileenhull #tim_holtz #sizzix #mysizzixstory #mymakingstory #thefunkiejunkie #thefunkiejunkieboutique #frillyandfunkie

I used the inking techniques shared by Tim Holtz to ink the colored border as I cut the tag.


Page 4

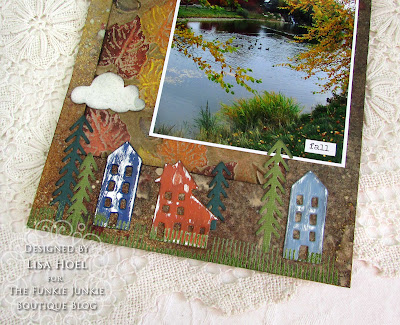
This page shows some fall views from around our new neighborhood in Idaho. There is real fall here! The Chapter 3 Acorns 3-D Embossing Folder pairs wonderfully with the new Tim Holtz Chapter 4 Christmas Cutouts Die Set (see, not just for Christmas!)

Lisa Hoel for The Funkie Junkie Blog - Halloween Journal #creativejuicefreshsqueezed #eileenhull #tim_holtz #sizzix #mysizzixstory #mymakingstory #thefunkiejunkie #thefunkiejunkieboutique #frillyandfunkie

Lisa Hoel for The Funkie Junkie Blog - Halloween Journal #creativejuicefreshsqueezed #eileenhull #tim_holtz #sizzix #mysizzixstory #mymakingstory #thefunkiejunkie #thefunkiejunkieboutique #frillyandfunkie
The houses are cut out of cardstock covered with foil tape,
painted with Distress Paint, and then sanded.

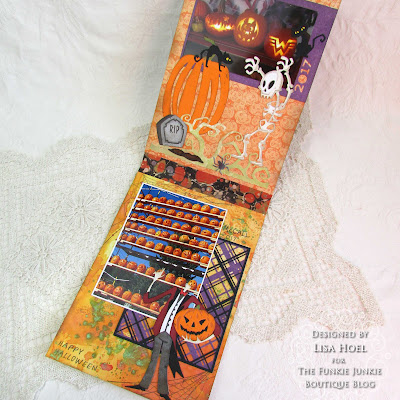
This page flips up to reveal more Halloween fun!

Lisa Hoel for The Funkie Junkie Blog - Halloween Journal #creativejuicefreshsqueezed #eileenhull #tim_holtz #sizzix #mysizzixstory #mymakingstory #thefunkiejunkie #thefunkiejunkieboutique #frillyandfunkie

Lisa Hoel for The Funkie Junkie Blog - Halloween Journal #creativejuicefreshsqueezed #eileenhull #tim_holtz #sizzix #mysizzixstory #mymakingstory #thefunkiejunkie #thefunkiejunkieboutique #frillyandfunkie

Lisa Hoel for The Funkie Junkie Blog - Halloween Journal #creativejuicefreshsqueezed #eileenhull #tim_holtz #sizzix #mysizzixstory #mymakingstory #thefunkiejunkie #thefunkiejunkieboutique #frillyandfunkie

The Tim Holtz Chapter 4 die set Layered Plaid isn't just for Christmas either. You'll see it's great for this Halloween page.

I used regular and Halloween Distress Crayons (from 2021 and 2022) to add color to the embossed leaves and acorns. It blended beautifully and the pearl shimmer is awesome.


Page 5

A single layer of the Layered Plaid makes a nice accent too. Otis is up there in the corner looking fab as well. Don't forget the Mischievous Cats too!

Lisa Hoel for The Funkie Junkie Blog - Halloween Journal #creativejuicefreshsqueezed #eileenhull #tim_holtz #sizzix #mysizzixstory #mymakingstory #thefunkiejunkie #thefunkiejunkieboutique #frillyandfunkie

Page 6

Last page! More Framed Tags and a little ghostie made using Retro Halloween Die Set.

Lisa Hoel for The Funkie Junkie Blog - Halloween Journal #creativejuicefreshsqueezed #eileenhull #tim_holtz #sizzix #mysizzixstory #mymakingstory #thefunkiejunkie #thefunkiejunkieboutique #frillyandfunkie

Lisa Hoel for The Funkie Junkie Blog - Halloween Journal #creativejuicefreshsqueezed #eileenhull #tim_holtz #sizzix #mysizzixstory #mymakingstory #thefunkiejunkie #thefunkiejunkieboutique #frillyandfunkie

Whew! You made it to the end! Thanks for reading and keep an eye on the Funkie Junkie Inspiration Ave blog for loads of eye candy and techniques.


Monday, October 24, 2022

Pumpkins Everywhere!

 Hello Friends. Posting a very Fall Tag for The Funkie Junkie Boutique today. I love Fall colors of Teal and Orange so when the Designer Challenge was announced, I knew just what I was going to do!


Check out this gorgeous fall-colored tags with the Pumpkin Duo Die and the Acorn 3D Embossing Folder!

The YouTube Video is here: https://youtu.be/Ni4w_WmkL-8


Please take a moment and subscribe to my channel.

It all started with that wonderful Acorn Embossing folder embossed onto Ranger Water-color  cardstock. Prior to embossing, ink the flat side of the folder up with Salvaged Patina Distress Ink and lightly spritzed with water.


You can see the inked and colored background behind the pumpkins and tags. Use a variety of Distress Fall color crayons to ink up the leaves and acorns. Color directly on the images to get the most vibrant colors. Use a water brush or small brush dipped in water to smooth out the colors. You can always add more layers to deepen the colors.


Cut the Pumpkin Duo Colorize die layers using a variety of green, orange and teal cardstocks. The layers go together fairly quickly. Glue the pieces together and set aside to dry. Once dry, swipe the pieces with Vintage Photo ink using a blending foam

Tip: I generally cut and create multiples to be used on other projects. Check out my Instagram Account for cards using the pumpkins.


Ink the edges of a Mini Etcetera Tag with Vintage Photo Distress Ink. Use Collage Medium and the Collage Brush to attach the watercolor piece to the tag. Turn the tag over and add an acrylic block to weigh the tag down to dry.

Stamp and Heat Emboss the sentiments. I used a stamping platform to keep the tags in the same place so I could stamp one layer with Vintage Photo, followed by a layer of Embossing ink plus clear embossing powder.


Trim the sentiments from Noteworthy and use the Tag Collection die to cut the sentiment from the Good Thoughts set.

Assemble the images on the tag front using Collage Medium. It is ok to have the tag and even parts of the pumpkins overlap the sides.


Be sure to check out the great selection of Tim Holtz items from The Funkie Junkie Boutique! Thanks so much for stopping by today! I'd love to have you follow/subscribe on my social media sites InstagramFacebookBlogger and You Tube.  Be well. Be creative!

Products Used:
Tim Holtz Sizzix Tag Collection Die
Good Thoughts CMS 085


Saturday, October 22, 2022

Christmas Card Featuring Sizzix Tim Holtz Modern Festive and Layered Plaid


We are back today with a beautiful Christmas card by Design Team member Janna.  Janna created her challenge using our Mood Board and also Sizzix Tim Holtz Chapter 4 dies. In Janna's own words, here is her project.

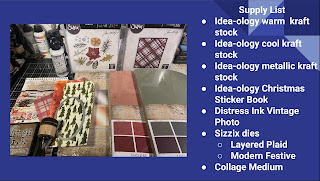
Today I am creating with the Sizzix Tim Holtz die sets Modern Festive and Layered Plaid. Click here for instructional video.
Used: warm kraft stock, cool kraft stock, distress heavy white cardstock, Sizzix Layered Plaid, Modern Festive die set, collage medium, Idea-ology Christmas sticker book, and Vintage Photo distress ink.
To start the layered plaid card I chose a combination of green, red, and gold kraft stock. I also set aside a base of brown craft stock and some distress white heavy stock to build the card on. Each of these layers I then back with some double-sided adhesive tape.
For diecutting I decided to use the Tim Holtz Vagabond. To die cut the Layered Plaid I used the following: base plate, thinlit plate adaptor, chrome plate, paper die, and cutting plate. I cut down each section of craft stock to measure at 5 1/4 x 4“.
Layered Plaid has many die cut pieces to it so I used the Sizzix die pick to help pop out some of the pieces.
Here is the first layer of our plaid.
Now it's time to start layering up our plaid pieces. I centered the red section on top of the white foundation and then carefully lined up the gold section with the red section. The neat thing about this plaid pattern is that you can change how the pattern looks depending on which direction you layer each of your papers.
This green piece is the final layer of our plaid design. I absolutely love the intricacy of the stye and how versatile it is when constructing different plot patterns.
Next I die cut an oval from a tag created with a Distress Mika spray stains and a Tim Holtz stencil. For the base of the focal point you could choose any stencil that you like to act as a background anchor. Using Distress spray stain is a quick way to create a repeating pattern.
Once an oval was cut I edged the oval with some Distress Vintage Photo ink.
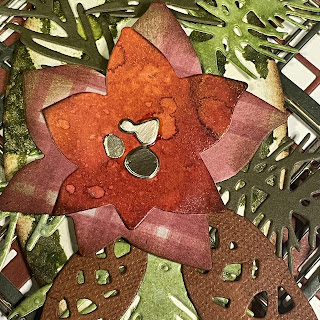
Now for the main focal point. Here I decided to use the die set Modern Festive to create a poinsettia and leafy branch arrangement.
Below is my rough arrangement of the leafy greens and poinsettia for my card layout.
I then secured each of the leafy branches with collage medium and added a couple of golden accents to the poinsettia.
The last step on this card was to add a sentiment sticker from an Idea-ology Christmas sticker book.
Next are a few close-up pictures of this card.
Thank you so much for joining me here today for this quick card tutorial featuring Layered Plaid and Modern Festive die cuts.
Thank you so much for joining me here at The Funkie Junkie Boutique's Inspiration Ave.  Until next time, happy crafting!


Thank you to Janna for such a detailed tutorial.  Here are some of the products used in this card.  All available at The Funkie Junkie Boutique.  

If you post a project on FaceBook or Instagram using any of these products, please tag us to be entered into our monthly drawing for a $25 gift certificate to shop at The Funkie Junkie Boutique