Thursday, July 31, 2014

Welcome to today's Guest Designer, Bonnie!

Today we welcome Bonnie McLain of Love, Light and Peace as our Guest Designer. Bonnie was chosen by the DT as the winner of the Summer Heat challenge. Let's move on to find out more about Bonnie and see her fantastic project!


I am so very honored to be a guest designer for Frilly and Funkie…

So very nice… Thanks again…

I have been creating art since a small child of about 6-7 when I started to design booklets for my paper dolls.. .LOL… do you remember all those days… actually very vintage now… would like to have some of those paper dolls back here in my hands now… For quite a few years, I have been teaching, healing with art (art therapist for 7 years) and doing professional art of all kinds since I was 16 years young… Creating has always been a huge pleasure… paper arts, painting, designing fabrics and fashions in NYC… drawing, knitting, spinning, sewing, making jewelry, hand crafted items for our own business of country gifts. So many things and each one I love more than the next. Multi media has really given me many wonderful hours of playing and creating… and even though it is at the present time my very favorite, I am always open to a new ART ADVENTURE.…

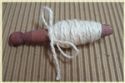
Thanks again for asking me to share with you something that I hope you will enjoy… this is one of the classes I have taught in the past… and each persons suitcase comes out so very different… and when I was told VINTAGE TRAVEL… I instantly thought of making a vintage suitcase… SO MUCH FUN!!!!

Okay… so which one do I do… male, female, unisex, child’s, fun, funkie, wild…. And the lists goes on and on… So here is the Manly Man Vintage Traveler... when you go to my blog, you will see many more…hope you enjoy… Love, Light and Peace… Bonnie


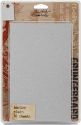
This little suitcase is really easy to make... I start off with two pieces of chipboard/cardboard and if I want the suitcase to be 4X5 inches... I cut a piece that is 6x7 and score one inch in all the way around... and cut the corners out... now you have the top and you should make the bottom the same.


Cover these two pieces and then make inserts that are about 1/2 inch taller to fit inside the bottom of the box... this will give you the side panels to hold the top in place... so very easy...
Hope you all understand that.


Then you have to add embellishments... a handle, also something to hinge the back and then pack for a trip... LOL..

I'm sure you'll agree that Bonnie's suitcase is absolutely fantastic! If you'd like to join us as a Guest Designer all you need to do is join in with the current challenge, 'Vintage Travel'.

Friday, July 25, 2014

Friday Focus - Pion Design

Hello everyone and welcome. Rebecca here. Today I am presenting a Friday Focus that uses Pion Design papers. I truly love these patterned papers made in Sweden with the sweetest, prettiest papers and accessory papers with coordinating tags, flags, postcards, ticket and borders. I've made an exploding box using papers from a beautiful new collection called, 'My Precious Daughter'...

RebeccaDeeprose F&F1
This sweet little box measures 2-3/4" in every dimension. I designed it to use only 8-1/2 x 11" card stock papers for the bases. I used the 6 x 6" collection of 'My Precious Daughter', but there is also a 12 x 12" version for larger projects and scrapbooking. Since this one fits in the palm of your hand, the reduced images found on the 6 x 6" version, were perfect. The die cut doily used on the lit of this box used one of the subtle damask patterned papers...

IMG_1659
The rim of the lid is wrapped with some lacy trim and a thin band of ribbon. The die cut on each of the sides of the box was also cut from the same damask paper and accented with colored rhinestones...

IMG_1660
You can see the beautiful damask paper used for the doily and topped with a narrow velvet bow that sits on two velvety, millinery leaves and topped with a paper rose that I colored to work for this project...

RebeccaDeeprose F&F4
When the lid is removed, the layers folded inside open up, revealing a dimensional mound of flowers and a flutterby...

RebeccaDeeprose F&F5
For the center of the box, I adhered some die cut flourishes, then a die cut doily and a half of a 1-1/2" styrofoam ball covered it with velvety violets, die cut leaves and a butterfly. I used patterned papers for each inside panel. There are also some small tags that are supplied on the embellishment sheets in the Pion Design paper collection. They are just so enchanting!

IMG_1662
The largest, outer layer of the box walls use some more patterned paper, punched butterflies, die cut leaf vines and paper flowers. There is one inner section that I left blank to hold a personal sentiment. Here are the dimensions for each layer of the box and the lid. You can use all three layers as I originally thought I would, or just two as I did for this box. Because the center embellishment takes up space and I edged each side of the smallest layer with lace and the next layer with dimensional flowers… I ran out of room! Perhaps you will choose less exuberant embellishments and use all three layers! I used 4 sheets of 8-1/2 x 11" card stock and assorted sheets of the Pion paper collection for embellishing. The card stock is cut as follows;

  • 7-1/2" square (to be divided into 9, 2-1/2" sections)
  • 7-7/8" square (to be divided into 9, 2-5/8"sections)
  • 8-1/4" square (to be divided into 9, 2-3/4" sections)
  • 4-1/8" square (for lid)
  1. Cut out (remove) a section of the size specified above, from each corner of the (first) 3 squares.
  2. Score along the edges of the center square.
  3. Use a 1/4" corner rounder to shape the outside corners.
  4. Cut 4 panels of each of the following sizes (2-1/4", 2-5/8" and 2-1/2") to mat the four 'walls' of each layer. I have stacked the 4 panels on the base of each size for the photo below.
IMG_1672
Here is what the squares will look like after you do that. Make sure you don't adhere the layers yet. It's easier to embellish each layer separately and then assemble them. Here is what a single layer might look like before the layers are assembled (it's the layer I made for this project, but didn't include ;))...

IMG_1676
To make the lid, cut a square 4-1/8".  Score 5/8" from each edge...

IMG_1665
Cut along a single side of each corner square, stopping the cut when you reach another score line. Keep all of these cut lines going in the same direction. For display purposes, I am showing the cuts shown vertically. After you make these 4 small cuts, make another snip, towards the outside of first snip to create a small triangle...

IMG_1667
Fold along each scored line and then apply Wonder Tape to each of the X'd corners...

IMG_1668
Peel off the protective film from the tape and carefully tuck that corner to the inside of the lid, burnishing from the inside with your finger or a bone folder. This tape is the strongest, quickest adhesive I have found for creating 3-D projects such as this...

IMG_1673
Now it's time to flip the lid over and decorate!!  I hope you will give this little 3-D carrier of good wishes and enjoy another way to send your love.

And as this is a Friday Focus post it means that all Pion Design papers will be discounted by 15% at The Funkie Junkie Boutique through Thursday, August 7th. With the 'A Day in May' and 'Shoreline Treasures' collections also in stock it's a great time to grab a bargain.

Sending you blessings and ((hugs)),


Wednesday, July 23, 2014

Cool Water...

Hello dear blog friends and welcome back to the second week of the latest Frilly and Funkie challenge that I've named 'Cool Water'. For this challenge use an image of water in your creation. It can be anything from a droplet to the ocean. You probably know by now that I am a bit water and beach obsessed this summer! It's been more than 4 months since we've had rain here in the Valley of the Sun, so you can understand where it comes from! Keep yourself cool, just thinking of water as you create!...

Remember, to enter you must create a new vintage style project, link it below and make sure you add a link in your post back to this challenge. You can combine our challenge with up to 10 challenges (including this one) to qualify. You could be chosen as our winner and be the next Guest Designer here at Frilly and Funkie. There is also the chance to win a $25 shopping spree at The Funkie Junkie Boutique for one lucky entrant chosen at random.

This week we are so excited to have Amy Bowerman joining the Funkie team as our Special Guest Designer. You have to see Amy's blog, Plucking Daisies, to believe it - there are quite literally no limits to this clever lady's imagination and creativity! She produces tutorials for so many unique projects and loves to try new products and techniques. And of course many of you will know Amy from her collaborations with Eileen Hull including setting up The Artists on the Block, an international team celebrating the possibilities for using Artist Trading Blocks.

Here's what Amy and the Funkie team have come up with (just click on each image to get a closer view);

Amy Bowerman - Guest Designer - Plucking Daisies

Sue Carrington - Stamping Sue Style

Jenny Marples - Pushing The Right Buttons

Linda Coughlin - The Funkie Junkie


***********************************************
WEEK ONE

Hello dear blog friends and welcome. I am happy to be hosting the latest Frilly and Funkie challenge that I've named 'Cool Water'. For this challenge use an image of water in your creation. It can be anything from a droplet to the ocean. You probably know by now that I am a bit water and beach obsessed this summer! It's been more than 4 months since we've had rain here in the Valley of the Sun, so you can understand where it comes from! Keep yourself cool, just thinking of water as you create!...

Remember, to enter you must create a new vintage style project, link it below and make sure you add a link in your post back to this challenge. You can combine our challenge with up to 10 challenges (including this one) to qualify. You could be chosen as our winner and be the next Guest Designer here at Frilly and Funkie. There is also the chance to win a $25 shopping spree at The Funkie Junkie Boutique for one lucky entrant chosen at random.

To start the first week of this challenge here's what the Frilly team have come up with (just click on each image to get a closer view);

Rebecca Deeprose ~ Paper Primrose

Cec Wintonyk - CW Card Creations

Nancy Dynes ~ Tattered Treasures 

Whether you are a Frilly or Funkie crafter we hope you will join us for this challenge because we would love to see what you can create. You may upload your project at any time in the next fortnight. If you are using a public forum please use keyword F&F. Don't forget to provide a link back to our challenge in your post and please be sure to turn off your Word Verification so our Design Team can leave comments on your blogs.

Please join us for a fun summer challenge!

Sending you warm summer wishes and ((hugs)),


Monday, July 21, 2014

Challenge Winners - Summer Heat!

Welcome back to the Frilly and Funkie challenge blog for the start of a new week. It's time to announce the winners of the 'Summer Heat!' challenge. We would like to thank you all of those who took the time to enter with some truly wonderful summer inspired creations. You all really raised the bar with the standard of entries for this and made it difficult to judge. Finally the team picked these superb entries by #9 Bonnie McLain (oh yes, she made two!)


We loved so much about these tags including the vibrant summer colours, the fantastic use of so many techniques and of course those beautiful blooms. Congratulations Bonnie on being our favourite for the 'Summer Heat!' challenge and winning the opportunity to be a Guest Designer here at Frilly and Funkie for a future challenge.


And Random.org has chosen a winner for our $25 gift certificate to The Funkie Junkie Boutique. Our congratulations go to #10 Pawsitively Creative.

A huge thanks from the Frilly and Funkie team to everyone who took part in this challenge and congratulations again to our winners. Please email Linda at thefunkiejunkie@gmail.com for the codes for the winner's badge and to give us your email address for the Guest Designer details (Bonnie) and for the gift certificate details (Pawsitively Creative).

Our current challenge, 'Cool Water' runs through Tuesday, July 29th. We hope to see you entering this time around so that you too can be in with a chance to win. And remember, you can enter up to 10 challenges including ours, and a maximum of 3 entries per person to our challenge. Please remember to link back to our challenge in your entry and mention in your post that you are entering this Frilly and Funkie challenge.

Have a great week!

Saturday, July 19, 2014

A Shabby Layered Tag Tutorial


Hello and welcome! It's Nancy here and I'm excited to be presenting the Saturday Step by Step this week. Today I have a layered, shabby tag tutorial to share with you.  


I started out by die cutting a Tim Holtz large tag from grunge board and Prima Cartographer paper. I also die cut a large Tim Holtz Movers and Shapers oval from grunge board and Cartographer paper, along with a smaller oval in Prima's Cartographer.  


I hand crafted two large roses and painted some additional flowers from my stash to coordinate with my color scheme. You can find a tutorial for the roses HERE. I also die cut several leaves from Maja Vintage Summer Basics paper. 


For my layers I cut 3 pieces of Prima Stationer's Desk paper. The larger size is 5 1/2 by 3 1/4 inches.The two smaller pieces are 5 by 3 1/4 inches. After cutting my papers I distressed all the edges with a Tim Holtz distress tool. 


I misted the two smaller pieces with water and crinkled them a bit, setting them aside to dry. 


I used the grunge board as the base for my tag, covering it in a neutral design paper. 


I applied the larger strip of patterned paper over the first layer. 


Next I staggered my smaller, crinkled layers and adhered them to the tag.   


I covered the large grunge board oval with design paper then centered my small oval with the stamped sentiment onto it.  


Next I adhered my finished oval about half way onto the tag. 


I added an eyelet die cut that is part of the Tim Holtz large tag set.  


Now for the fun part! Arrange your flowers and leaves until you are pleased with the lay out.  


Finally I added a jute string bow and topper, and a couple more leaves.  


Thank you so much for joining us today at the Frilly and Funkie Challenge Blog! It's an honor to be here with you! I hope you'll have as much fun creating your own shabby tags as I did this one.

Hugs,

Nancy