Wednesday, June 29, 2022

Stencil Mania

Teri's challenging us to get our stencils out and go a little crazy for this challenge. Use them with inks, paints, glazes, mediums, or whatever else you wish, but use at least three different stencils in your project. Are you ready for some stencil fun? Let's get started!

Teri Wilson - TerisMailbox

Janna Ketchum - treasuresofthesea_jannak

Lisa Hoel - Creative Juice


Laura Gilhuly - AngelScraps


The overall winner will be offered the chance to be a Guest Designer at a future date here at The Funkie Junkie Boutique Blog, and everyone who enters and follows the rules will go into the drawing for the chance to win a $25.00 spending spree at The Funkie Junkie Boutique. There are also Top 3 Badges for three additional outstanding entries, chosen by the Design Team.

The guidelines for entering are simple: create a new vintage or shabby chic project following the challenge theme, link it to your post (not just your blog) and also include a link to this challenge in your post. You can combine our challenge with up to 10 challenges (including this one) to be in with a chance for winning. If you are entering through a public forum (such as Instagram) you'll need to include the words 'Funkie Junkie Boutique Challenge'. Also, please turn off your Word Verification so our Design Team can leave comments on your blogs. Make sure you follow these rules as unfortunately, we have had to eliminate entrants from the prize drawing in the past.

Whatever you create, enjoy the making! We look forward to seeing your projects! This challenge is open through 11:55pm Eastern Time on Tuesday, July 12th, 2022.

Wednesday, June 22, 2022

Guest Designer - Linda Coughlin

Hello! Linda Coughlin aka The Funkie Junkie back again as a guest designer for the Stuck In the Middle challenge. We had a gap in our guest designer line up that gave me an opportunity to get back into my craft room. I'm happy to be able to get my fingers messy again.


For my Stuck in the Middle theme, I found a great tutorial on Splitcoast Stampers for a 3-D Frame Display. I made mine larger than the tutorial, using 8.5x11" Distress White Heavystock to give it a nice stiff body. After watching the latest Tim Holtz Stampers Anonymous release, I was inspired to use the Floral Elements CMS445 set, but we have sold out our first delivery so I looked around the shop for something similar and found the AALL & Create set Just Grow #270 which has a similar feel to it. I used the Tim Holtz set Field Notes to stamp the background with Hickory Smoke Archival Ink and then stamped the floral stamps in Black Soot Archival Ink over it.


I also had fun using some of the new Tim Holtz Distress Crackle Paste Opaque and the Gilded Foundry Wax. The flowers were cut with the old Tattered Florals die and inked with Saltwater Taffy Distress Spray.


Thanks so much for stopping by today. We hope you will play along with our challenges!

Monday, June 20, 2022

Challenge Winner - The Music of Life

Laura challenged us to create a project with a musical theme for The Funkie Junkie Boutique's The Music of Life challenge. Our Design Team choose the card that Stephanie Severin created as our winner. She impressed everyone with her use of Distress Oxide and Dina Wakley Gloss Sprays in her mixed media card.


We look forward to seeing Stephanie return as a Guest Designer at a future date here on The Funkie Junkie Boutique Blog. You'll be contacted shortly with all of the details.

The other entry was the lucky randomly drawn winner for the $25 gift certificate to The Funkie Junkie Boutique; our congratulations go to #2 Helene Huber. Please email Linda at thefunkiejunkie@gmail.com for the gift certificate details.

The current challenge - 'Stuck in the Middle' - can be found HERE and runs through Tuesday, June 28th at 11:55 pm EDT, so there's still plenty of time to link your projects. Please be sure to read the rules carefully before you submit your entry.

Saturday, June 18, 2022

Saturday Showcase - Stamperia's Romantic Garden House


Good morning! Laura here, back to share a tutorial for a layout I created using MANY items from the Funkie Junkie Boutique: Stamperia's Romantic Garden House collection, I hope it inspires you to create!


To begin, gather all your supplies. You will need 4 coordinatng papers, mist, stencil, clear gesso, flowers, a title, mica powder, cardboard and texture paste


Cover your top paper with clear gesso, then do some tearing in random areas. Then do some tearing in random areas.  I used the beautiful Romantic Garden House papers from Stamperia. Keep a piece of the torn paper so you can tuck it in in later steps. Also fussy cut some leaves from one of the papers.


Distress the edges.


Use a stencil (I used the Tim Holtz Dot Fade Stencil THS006) to apply Grit Paste. Heat set or allow to air dry.


Add Prima Mica Powder to the stenciled areas, then spritz with water.


Heat set the colored areas.


If you do not have cardboard that is already showing the corrugated inside then tear a cover off.


Tear the cardboard making sure there are no straight edges.


Dry brush the cardboard with white paint or white gesso then set aside


Take a set of 3 of the Wild Orchid small flowers and straighten the stems.


Twist the stems onto the stem of the next flower to create a chain of flowers.


Spray some flowers to match your project. I used the mica spray I made in an earlier post and Tim Holtz Hickory Smoke Distress Oxide Spray. Heat set or allow to dry. Ink or pant your chipboard title piece (I forgot to take a photo of that step).


Cut two pieces of paper: one at 2.5" x 11", and one at 2" x 11".


Distress the edges of all your papers, then layer your top sheet onto your background paper and tuck the ripped paper from earlier in.


Add the cardboard you distressed earlier.


Layer the two smaller pieces of paper you cut on top of the distressed cardboard.


Add your title and other elements.

Here are some detail shots:


Thanks for stopping by and I hope I have inspired you!
~Laura


Products Used:

Wednesday, June 15, 2022

Stuck in the Middle

For the Stuck in the Middle challenge, Suzz wants us to showcase something in the middle. It can be a pop-up card with a surprise in the middle; it can be a mini journal with pages inside; it can be anything that highlights the middle of something! So get creative and share the results with us here on The Funkie Junkie Boutique Challenge Blog! We can't wait to see what you come up with.

Suzanne Czosek - Suzz's Stamping Spot


Teri Wilson - TerisMailbox

Janna Ketchum - treasuresofthesea_jannak

Laura Gilhuly - AngelScraps

Lisa Hoel - Creative Juice

The overall winner will be offered the chance to be a Guest Designer at a future date here at The Funkie Junkie Boutique Blog, and everyone who enters and follows the rules will go into the drawing for the chance to win a $25.00 spending spree at The Funkie Junkie Boutique. There are also Top 3 Badges for three additional outstanding entries, chosen by the Design Team.

The guidelines for entering are simple: create a new vintage or shabby chic project following the challenge theme, link it to your post (not just your blog) and also include a link to this challenge in your post. You can combine our challenge with up to 10 challenges (including this one) to be in with a chance for winning. If you are entering through a public forum (such as Instagram) you'll need to include the words 'Funkie Junkie Boutique Challenge'. Also, please turn off your Word Verification so our Design Team can leave comments on your blogs. Make sure you follow these rules as unfortunately, we have had to eliminate entrants from the prize drawing in the past.

Whatever you create, enjoy the making! We look forward to seeing your projects! This challenge is open through 11:55pm Eastern Time on Tuesday, June 28th, 2022.

Wednesday, June 8, 2022

Guest Designer - Carol Franklin

Our challenge winner was unable to be a Guest Designer at this time, so instead of going without, we offered Carol Franklin of Customer Service a chance to share a project.


Hello. I'm Carol Franklin, and I've been working at The Funkie Junkie Boutique for quite a while. Like most of you, I've been crafting all my life, and I wish I had the time to create all of the projects that I imagine when when I see the amazing creations from our talented Design Team as new products arrive. I'm honored to share this card I made to go with the current challenge theme: "The Music of Life."


While I'm not much of a frilly girl, I do love paper engineering and getting inky with Distress Inks. I especially love to make 3-D cards, like this Z-fold, and sharing them with friends. As they say, "No one prints an email and puts it on the mantle!"


All 25 pieces of the jukebox were colored with Distress products. I inked various pieces with Walnut Stain, Vintage Photo, Candied Apple, Prize Ribbon, and Scattered Straw. The feet were embossed with plain old black embossing powder, but I was excited to finally try my collection of Distress Embossing Glazes. I used Prize Ribbon for the window and Antique Linen for the arches. With a little courage from watching our Design Team's work, I tried using the new Sterling Foundry Wax to turn the trim pieces into shiny silver. It was a breeze, and I can hardly wait to play with them again.

Don't forget to share your project for 'The Music of Life' challenge with us. The challenge can be found HERE and runs through 11:55 pm EST on Tuesday, June 14th.

Monday, June 6, 2022

Challenge Winners - Reuse & Upcycle

Lisa challenged us to try using something that would end up in the trash as part of our creative projects for the Reuse & Upcycle challenge, and it was exciting to see how clever you all were with your creations. Once the votes were counted, our Design Team choose the acordion folder that Sara Emily Barker created out of waste packaging as their favorite. Be sure to visit her blog to see the amazing transformation.


We look forward to seeing Sara Emily return as a Guest Designer at a future date here on The Funkie Junkie Boutique Blog. You'll be contacted shortly with all of the details. And now our picks of three additional outstanding entries for the The Funkie Junkie Boutique Blog Top 3 Badges. In numerical order they are #1 Sara Emily's other entry, #4 Esther Asbury, and #6 Senna. You'll be contacted shortly with the Top 3 badges so that you can display them proudly on your blog.

And finally for the lucky randomly drawn winner for the $25 gift certificate to The Funkie Junkie Boutique; our congratulations go to #2 Alicia O'Bryant. Please email Linda at thefunkiejunkie@gmail.com for the gift certificate details.

Thank you again to everyone who took part in this challenge and congratulations to all our winners. The current challenge - 'The Music of Life' - can be found HERE and runs through Tuesday, June 14th at 11:55 pm EDT, so there's still plenty of time to link your projects. Please be sure to read the rules carefully before you submit your entry.

Saturday, June 4, 2022

Saturday Showcase - Prima Charms and Flowers


Happy Saturday to everyone! It's Lyla, here for another Showcase on some pretty cool things that are just about 'staples' when it comes to crafting...charms and flowers! But these aren't just any old charms and flowers, they happen to be Prima Marketing's Peach Tea Charms and Watercolor Flowers from the Painted Floral line. The splash they each brought to this project is just...WOW! I've never been much of a "flower" person when it comes to paper crafts; just looking through my blogposts can testify to that. I prefer real flowers growing outside, but from my first time working with Prima Marketing flowers during my first Saturday Showcase I was quickly hooked on these! And then there are the charms from the Prima Marketing Peach Tea line... I'll just have to show you! Let's get started.


While everyone else has been going full throttle with Tim Holtz's Gladys, Colorize and Simple Plaid Thinlits Dies, I just got started with them. So I decided to use them both as my "vehicle" for the flowers and charms.


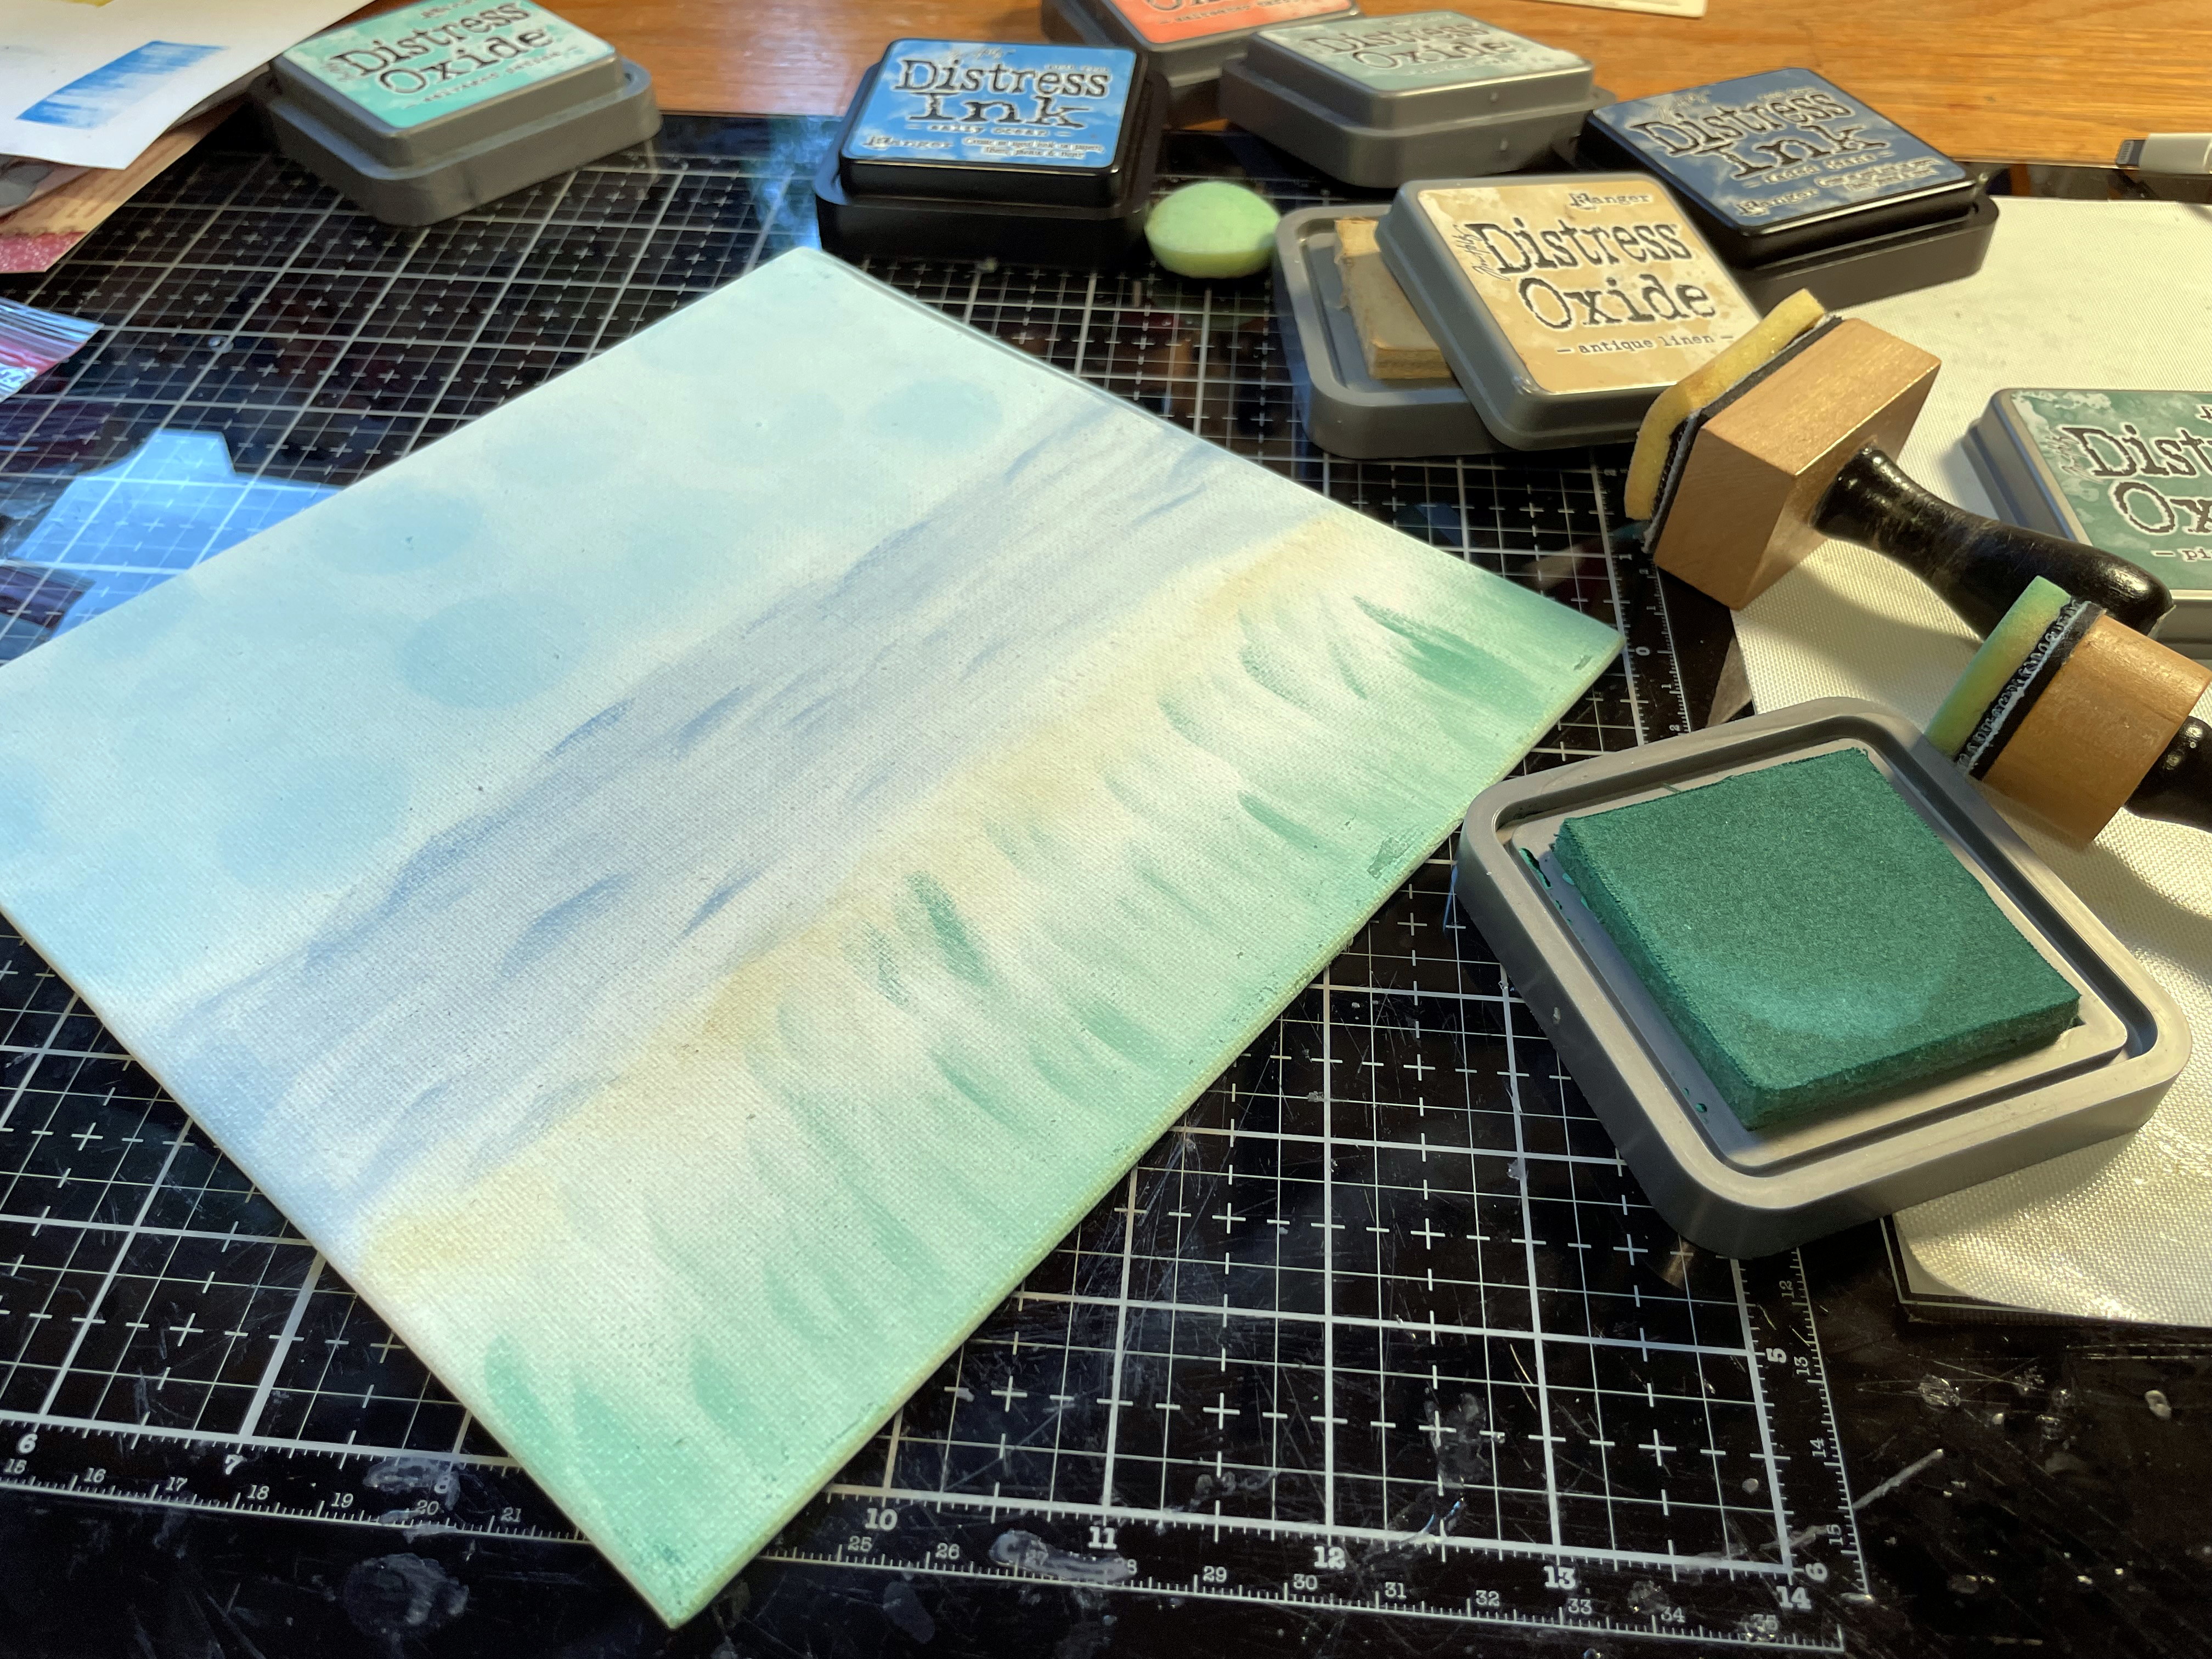
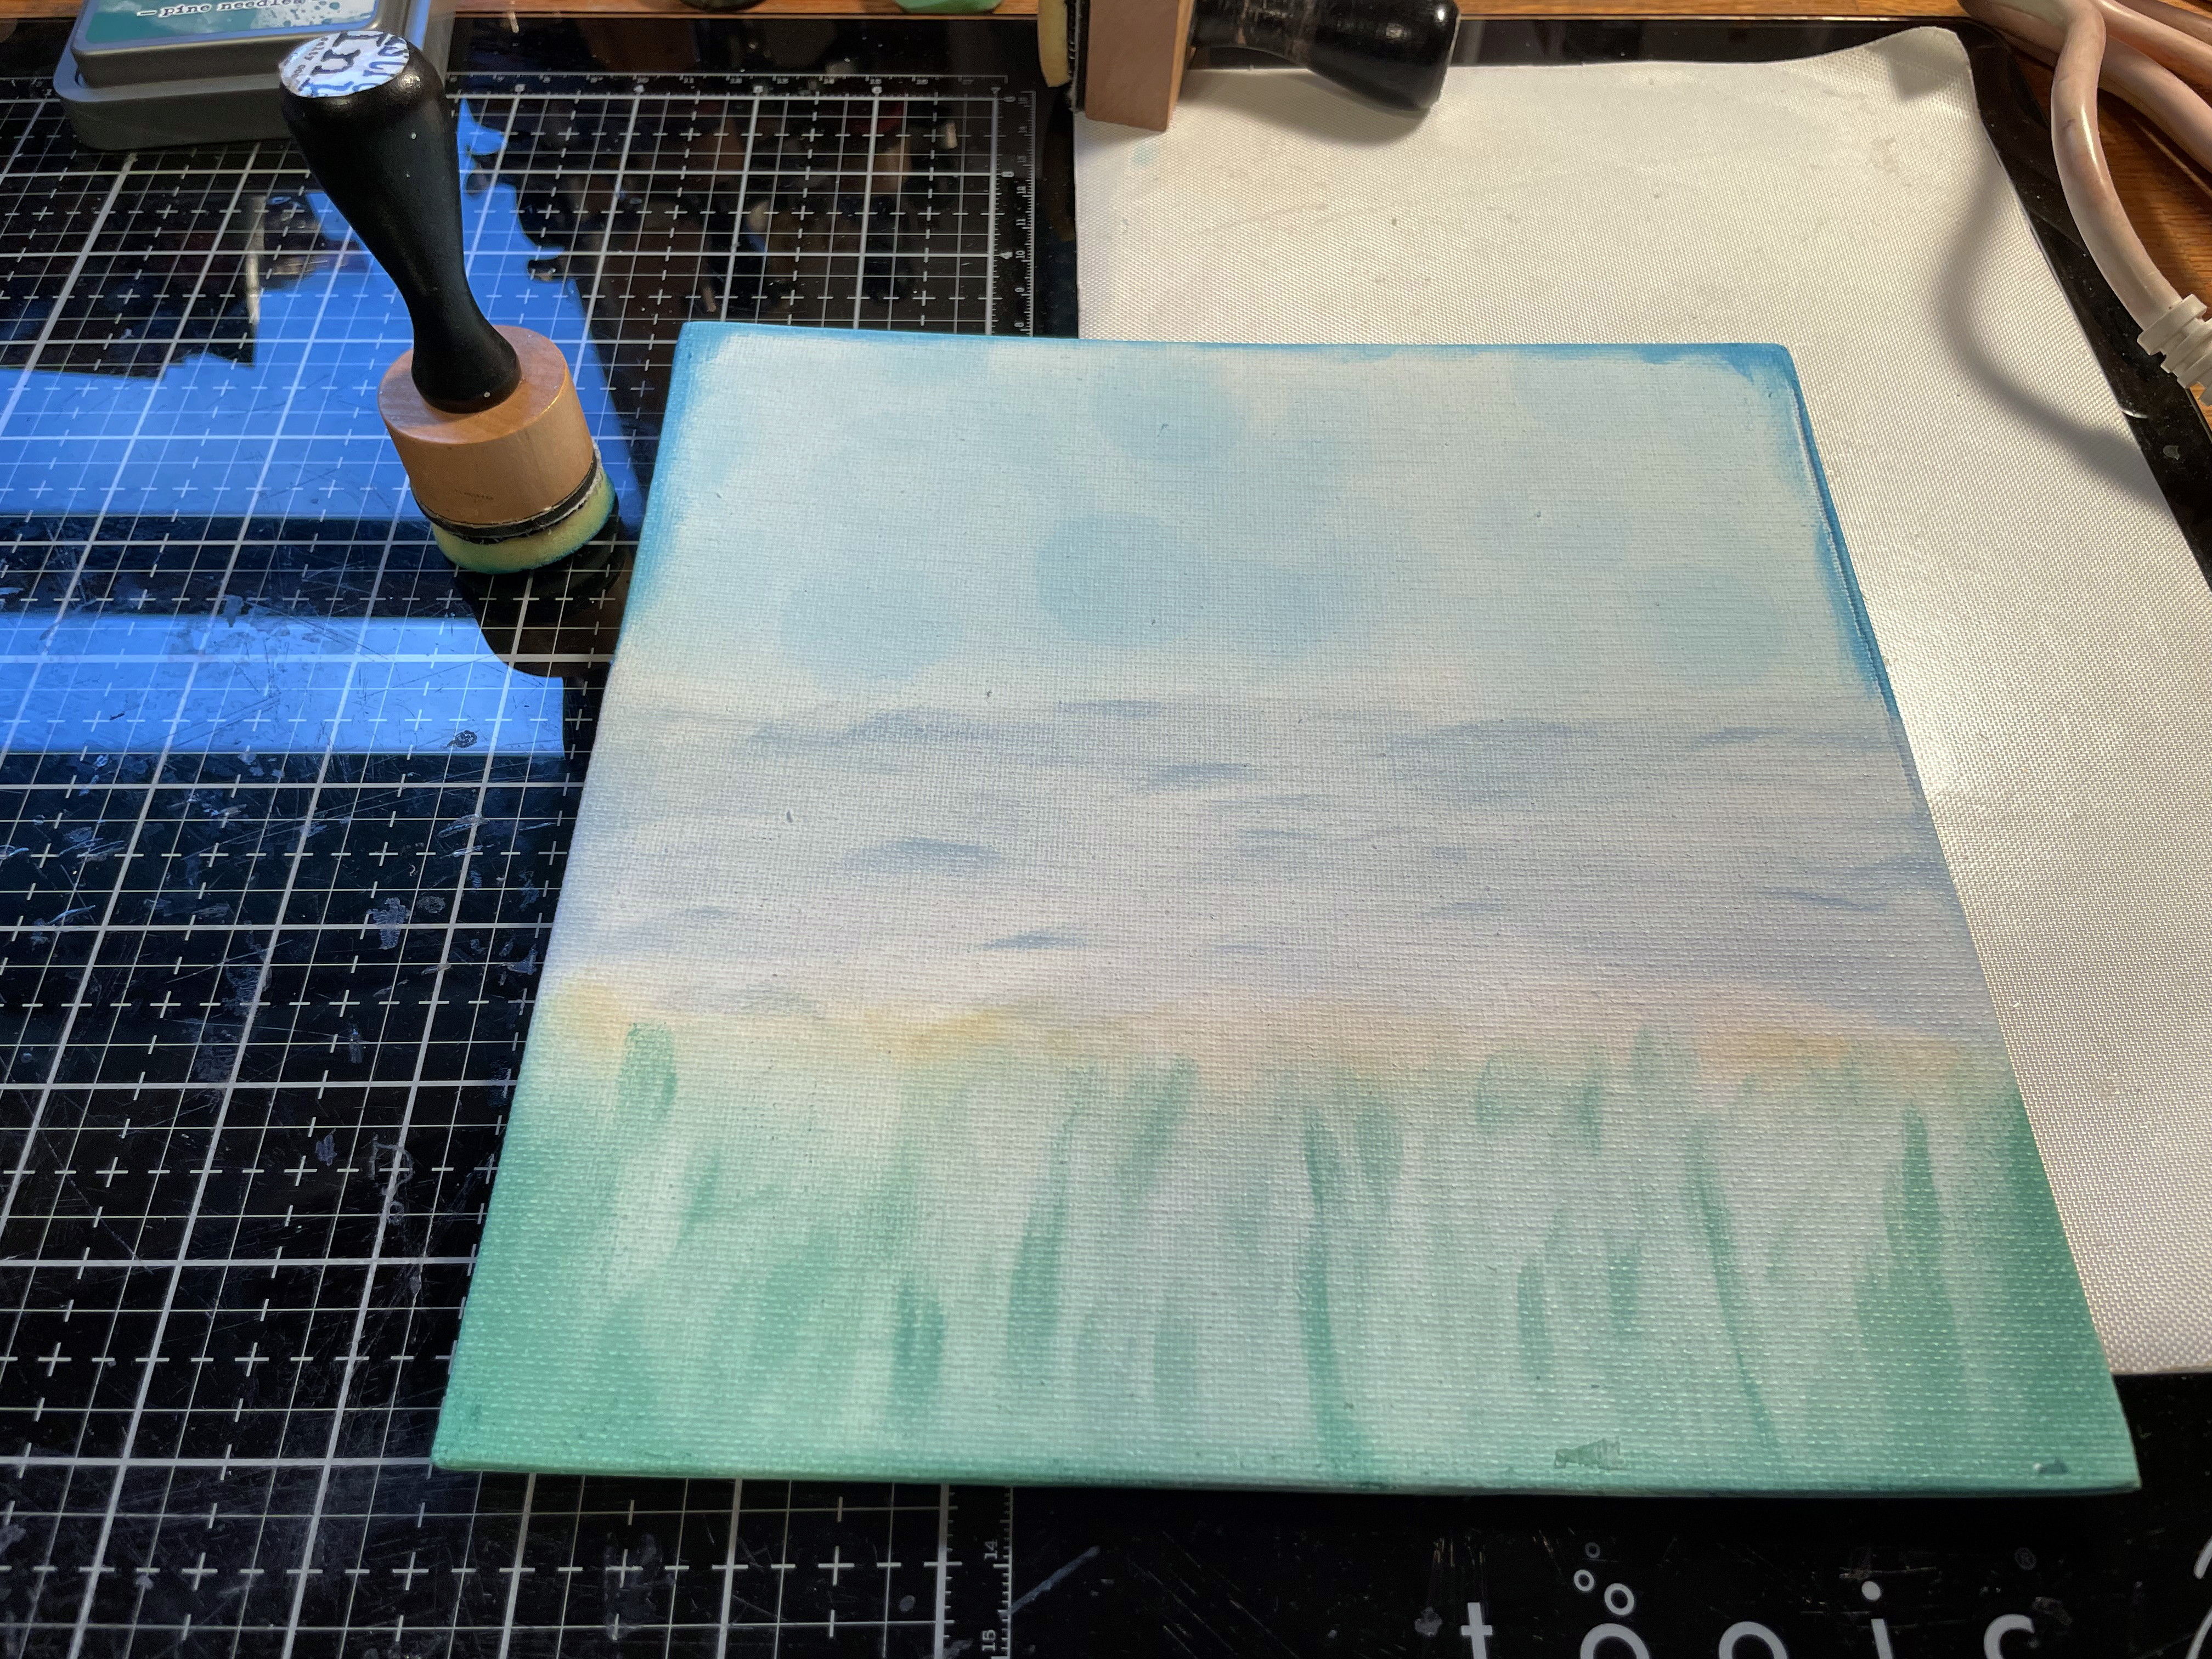
The first thing I did was to get out some shades that were close - but not spot on - matches to the Prima Marketing Watercolor Flowers. I chose a square panel for my base.


After choosing the shades of Distress Inks and Oxides, I got started on the background. "Sky" came first, by pouncing lightly with a round Mini Blending Tool to make subtle circles.


Then I opened up the Distress Ink Faded Jeans and used another Mini Blending Foam, holding the Mini Blending Tool at an angle so as to make arc-like strokes that I wanted to resemble water/ocean.


I used the same techniques - holding the Blending Tools at angles or flat on - to create sand/beachline, and tall grass.


I went over it all again until I was satisfied with the colors and shapes. I also deepened the sides a bit for depth. At this point, I had no idea I was going to want a frame.


Next came making Gladys and George (the names I've chosen for my girl and guy). I took out my stash of Tim Holtz Kraft Stocks for this job.


I wanted three birds - always an extra, just in case. The Colorize Thinlits are easy to follow since they are marked on the backs.


After I had all the bird pieces, I wanted to make shirts for the birds - matching "tacky tourist" shirts.


I first made a "pattern" by cutting around the body and the wing. Then I used the white pattern to make the matching shirts from.


Here's where the Simple Plaid Thinlits Die came in. I cut two lengths of the Plaid in a darker shade (for contrast), then used the shirt pattern to cut another layer of shirts. Then I glued the two layers together before putting the shirts together.


I was happy with the results because it looks cute yet "tacky" instead of going for Hawaiian shirts.


Next came making the leis for Gladys. I didn't want George to look tacky; Gladys is one of a kind and needs to stand out.


I chose only the 3-petaled flowers and set the 4-petaled flowers back into the package. You'll see those again in another project, I am sure! I have fallen in LOVE with these Prima Marketing Flowers! I used a rounded sailing needle (I always keep them on hand because of my sailboat), and strung each flower petal nearest the middle stamen pearl. It was very easy to do.


As I strung each petal, I spaced them evenly, using a bit of Glossy Accents on both sides of the petal, right on the string. (I used a thin crochet string that can be used for needlepoint. I keep an entire roll around in case of little needs like this.)


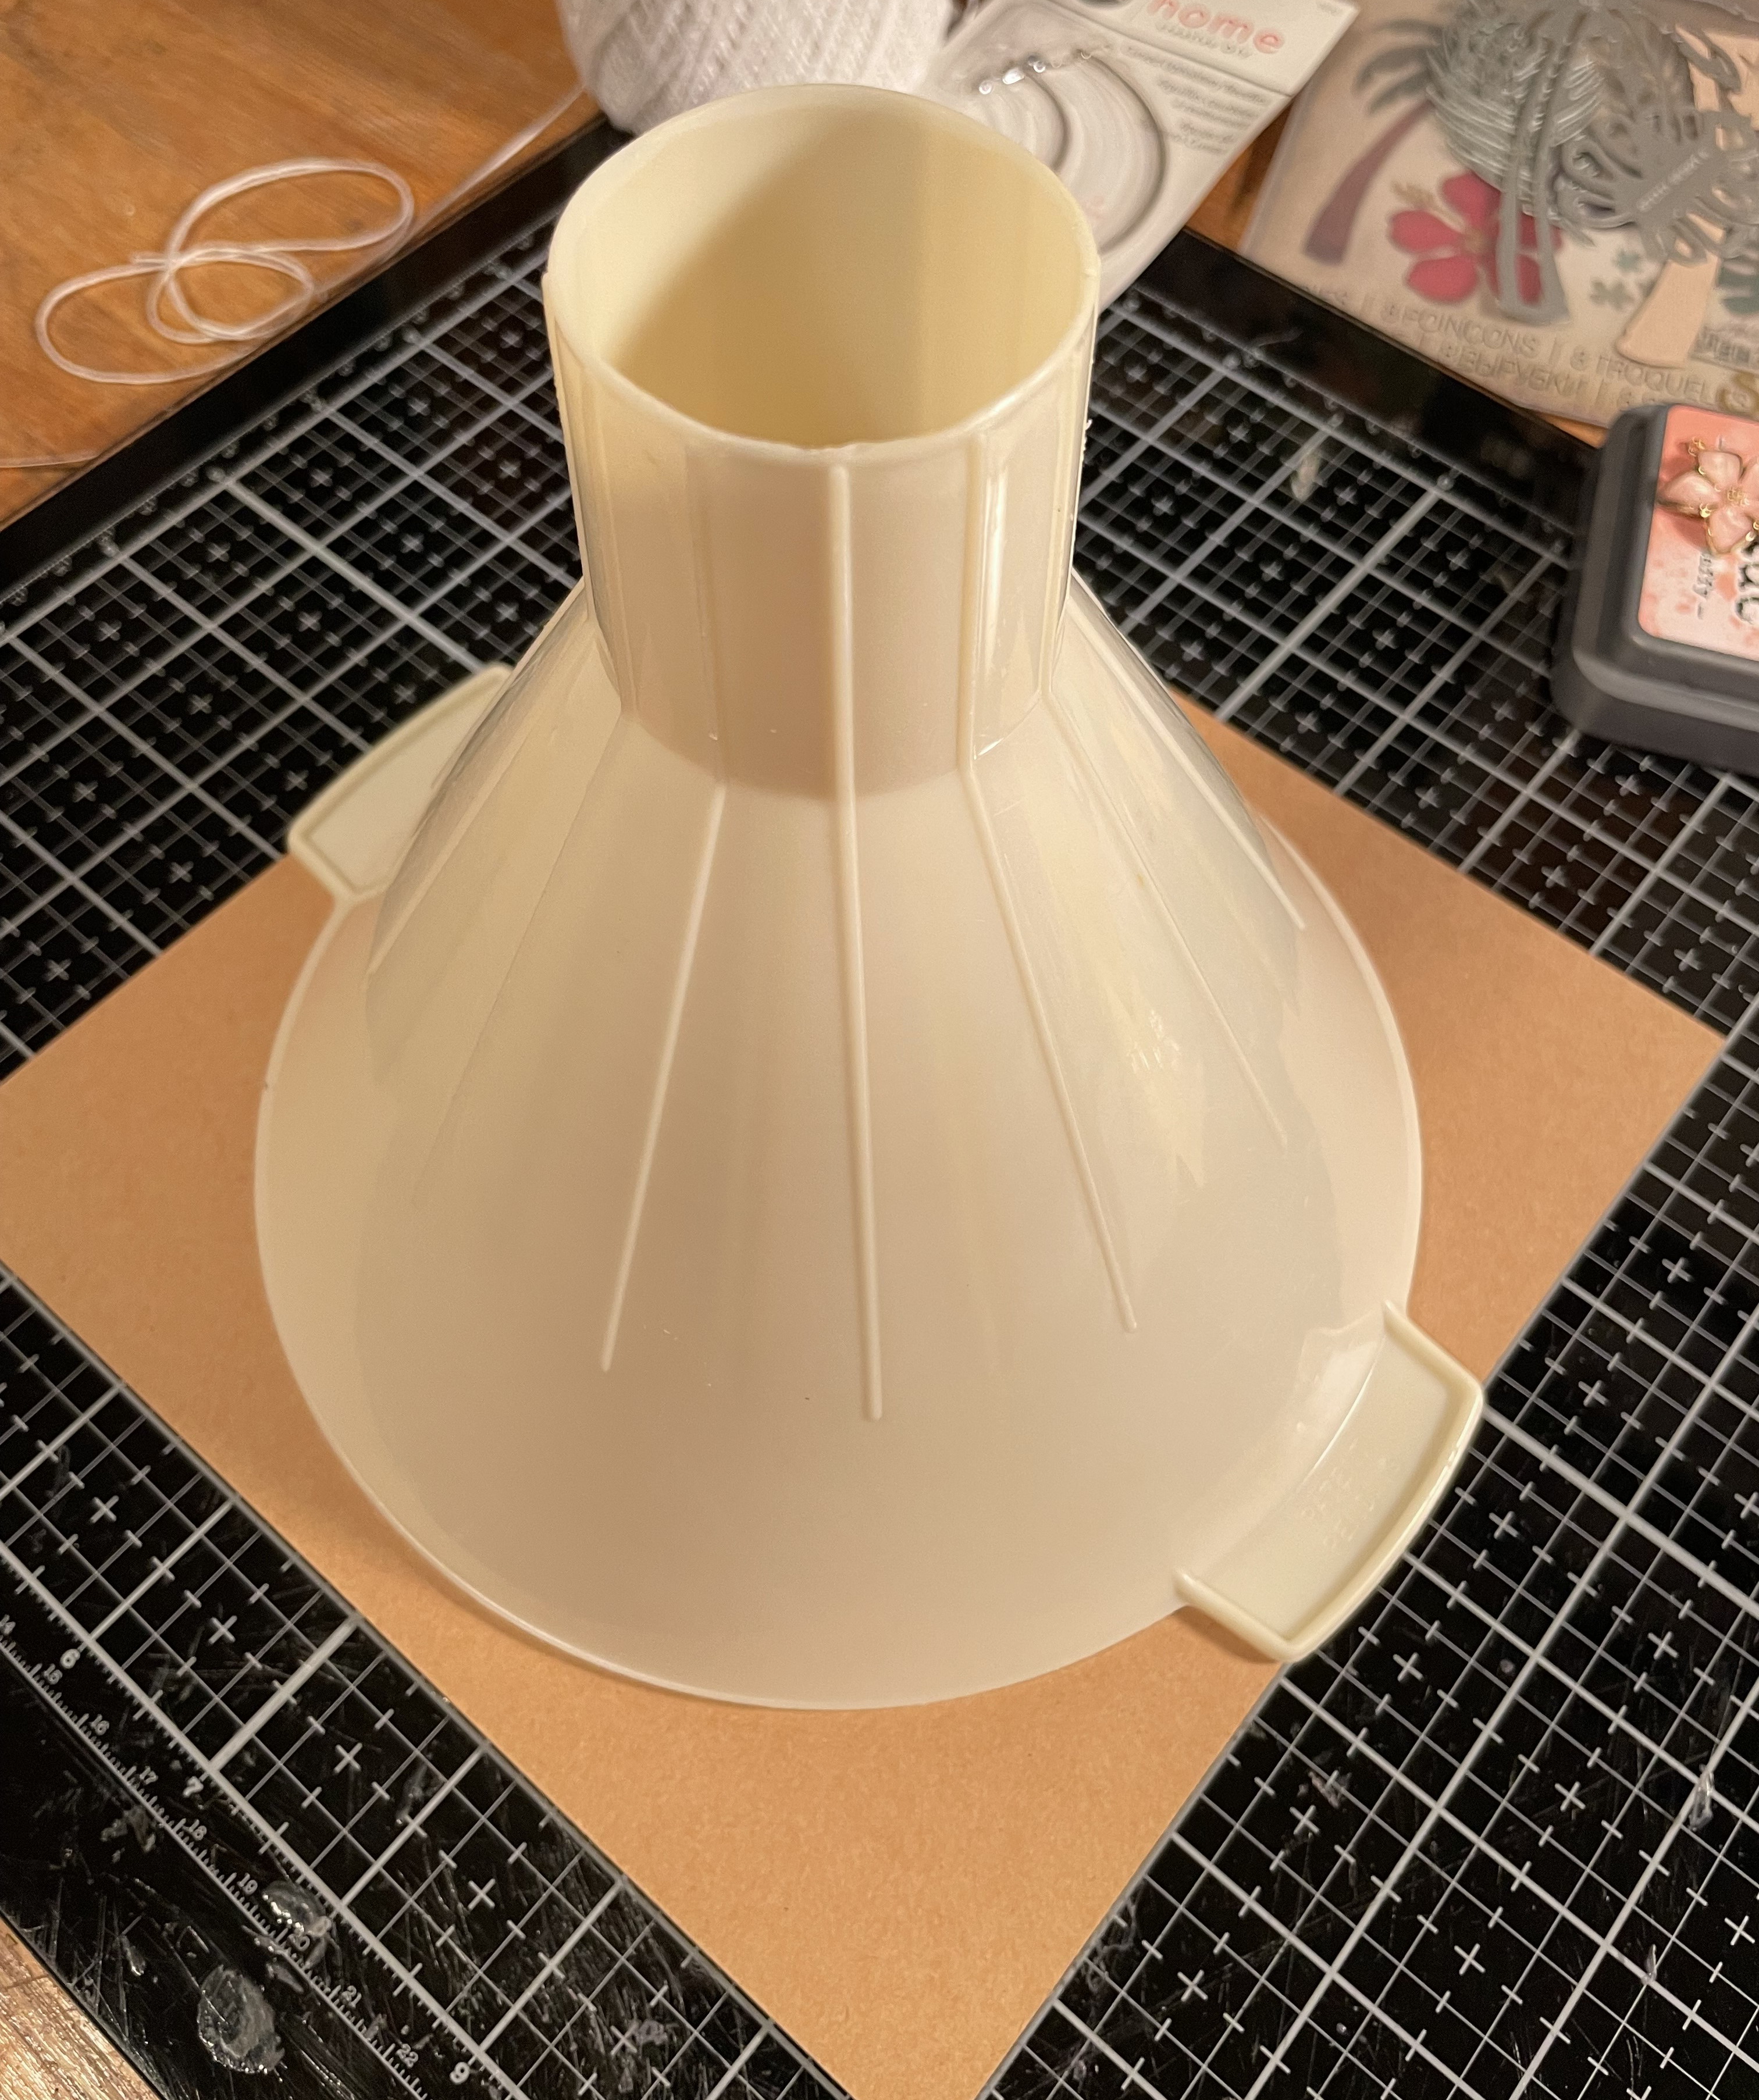
Yeah, it's tacky, but it WORKED! I needed a circle that was the same size as the panel, which was also the same size as the Tim Holtz Classic Kraft 8x8inches. I went to go get a plate or saucer, but saw this funnel and knew it would work. Fit PERFECTLY!


This is the wrong side (Kraft side) of the Classic 8x8 Kraft Stock. I simply used my pencil, then went in with my Tim Holtz Mini Snips.


Then, I backed that frame up with pieces of Mat Board for stiffness AND to pop that frame out. I added more pop out volume with Sizzix Double-Sided Adhesive Foam.


Now it was all starting to come together even BETTER than I had in my plan. The frame became the perfect "vehicle" for the Peach Tea Charms, which give it that BEAUTIFUL Hawaiian punch of color!!! Some plain gold stash brads helped hold them in the places I wanted, while layering them together and hiding the brads all at the same time! A leaf from the Tim Holtz Thinlits Set Tropical stood out as a compliment to the charms.


Here is where the palm and bushes came in....


I stretched out the palm tree by cutting more than one trunk and layering them for height. Cutting more palm tree tops in different shades, and turning them around, helped fill out the single palm top shown on the cover of the die set. I did the same with some other leaves to form a bush. I do this all the time: it's one of my fave sets.

The resulting make is a fun look:


Yes, Gladys is ME. And her googly eyes describe how I usually can be when I am on a roll. Life is about being who I was meant to be: a bit wild, a bit crazy, somewhat eclectically dressed, and usually with a camera in my hands. I seek out the warmth, sun, and waves, but have a penchant for creating with Tim Holtz stuff. ;)


Look at how BEAUTIFUL and simple those flowers are when put into a LEIS! She's even got a flower in her hair!


George is staying in the background.


The Peach Tea Charms are just FABULOUS looking and they are very thick and full of shine! These Charms would make an excellent bracelet...which I do have planned!!


This Tim Holtz Quote Chip (Theories) says just what I needed on this panel.


You can see how thick the frame ended up and made this panel into a type of pop-out picture.


Thanks so much for joining me on another Saturday Showcase at The Funkie Junkie Boutique Challenge Blog!


Products Used:
Tim Holtz Distress Ink Pads - Faded Jeans, Salty Ocean
Tim Holtz Distress Oxide Ink Pads - Antiqued Linen, Pine Needles, Saltwater Taffy, Salvaged Patina, Vintage Photo
Sizzix Making Essential - Foam Adhesive Sheets, 4"x6", Assorted 663042
Sizzix Tim Holtz Thinlit Die Set - Tropical 661207
Tim Holtz Idea-ology Theories Quote Chips TH94045