Saturday, December 30, 2023

Janna's Favorite Products From 2023

Welcome to TFJ Inspiration Ave blog. Today we’re going to be talking about our favourite Tim Holtz products for the year of 2023. This, of course is not easy because there have been so many wonderful products released this year. However, there are two that I’ve definitely found their way into my crafting pretty much year-round And those include Papercut café and distress glazes. There was a new set of 12 glazes released this year and there are so many great colours to play with that. I wanted to feature some of them today along with the Papercut Café die set.

If you would like to see an in depth step by step video tutorial click here.

Materials used: Sizzix Papercut Cafe, Distress Glaze Chipped Sapphire, Bundled Sage and Pumice Stone, Distress Crayon Walnut Stain, Sizzix 3D folder Damask, Distress White Heavy Stock, Distress Embossing Dabber, Idea-ology Christmas Sticker Book, Droplets, velvet trim, Metallic Kraftstock, Stencil THS032, Collage Medium.

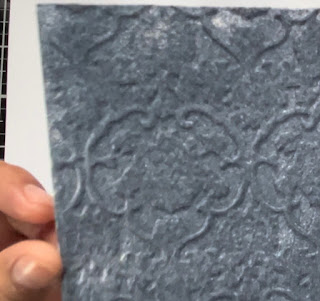
To start this card I ran some Distress White Heavy Cardstock through the Sizzix Switch with the 3D embossing folder Damask. This piece of cardstock will be used for some die cutting. Then I added some Distress Embossing Ink to it to prepare for some glaze.


For glaze I am using Chipped Sapphire, one of this year’s new glaze colors. I spread the glaze on fairly thickly, but then flicked some of the glaze off.


After embossing with the Sizzix embossing gun I added some Distress Walnut Stain Crayon over the top of the embossed surface.


Next I smudged the Distress Crayon with my fingers. After I took a damp paper towel and wiped away some of the Distress Crayons along the high points of the embossing.


Now for the background. Here I used stencil THS032 with some Distress Texture Paste Opaque and a pallet knife. I spread the texture paste through the stencil and scraped off any excess.


Then I sprinkled Bundled Sage and Pumice Stone Glaze over the top of the stencilling. This is going to create the background for our card. I then set this aside to dry for about 15 minutes.


While waiting for our background to dry I then die cut elements from Papercut Cafe. Here I have cut out parts for three sets of cups and saucers. I used our first altered background as a place to die cut cups from. I then paired the embossed Distress Heavystock with some Idea-ology Metallic Kraftstock. I absolutely love the contrast of the dark Chipped Sapphire and the metallic gold.


Now to check back on our background. Once the background was dry I embossed the Distress Glaze over the Texture Paste. Next I trimmed down the paper to 3.5in x 5in. Then under the first layer I added a layer of Deco Paper and Kraft Stock. I stuck the two layers together using ATG tape.


For the main focal point of the card I added the three coffee cups to the card front. I propped these up with a few pieces foam squares. Under the cups to anchor them I added a piece of Idea-ology velvet trim.


For finishing touches I added silver Droplets in each corner and a sentiment from this year’s Christmas sticker book.


Thank you so much for joining me here today for TFJB Inspiration Ave. Until next time, happy crafting!

Janna~ 💕🎨💕

I can also be found on :
Instagram: dunhamtreasuresofthesea_jannak

YouTube: The Crafty Corner with Janna


Supplies Used:
Distress Embossing Glaze

Friday, December 29, 2023

Lyla's Favorite Products from 2023


Merry Christmas to you all, and I hope you've had a bit of down time on your own to have some fun in your craft space, or at least surf through all the latest postings of ideas everyone else has crafted! Lyla here, to start off the last 2-week inspirational theme of 2023! We're choosing our favorite products from The Funkie Junkie Boutiqe's shelves from the entire year, and I'm taking my fave Tim Holtz Thinlits Die, Santa Greetings, to create some very special ornaments for some very special babies in my life! Join me for a tutorial showing you how I created these cute, personalized ornaments...


Now, this Seasonal Kraft-Core that you see here, is a very long time, now retired item. It was gifted to me by a Bestie earlier in the year, so I've tried to make use of it. I used 2 sheets of the Christmas in reds for the main bodies of my ornaments. But if you're looking for something similar to it, nothing comes closer than Tim Holtz's  Kraft-Stock paperie. It's very solid, won't tear, and holds its structure extremely well on its own. I've included all four packages in my list, since I did use these as well:


The first thing I did was open up my die package and make sure all the pieces were there. Then I found the video Tim Holtz Santa Greetings Colorize and took 2 screen shots to keep quick reference in my files. Taking screen shots helps me match colors of papers, too.


This is one of THE most detailed dies of the TH Colorized line that I've done yet.


I LOVE the stiffness of the Tim Holtz Kraft Stock paperie! It's so easy to work with- especially die cutting small pieces.


Just follow the backsides of the die set: they're all numbered and color-coded.


To make a front side AND back side; remember to use both sides of the paper/stock.


If I were to turn those brown/tan die cuts over to their red sides...Each would fit snugly right into the red top cuts to make a front and back match up perfectly. I started out only needing 4 Santas, but added a 5th for a very special teen, another for the Dixon Family exchange, and then 2 more just to do them differently. Four soon doubled into 8!


Finishing the rest of the cuts...


...took me a loooooong time!


Sanding the 2 "keepers" made them a bit more vintage-looking.


I keep some aluminum wire in my stash, and used it by threading 3 strips together and twisting before clipping to the sizes I wanted. I used pliers to curl the two ends before tucking them between the main 2 cuts. TIP: I found it much easier to glue only the middle, head and legs of  the two Santa sides together first. Then it was easy to hold the wire end between the 2 sides of the arm/hand and glue those together. Otherwise, the wire just kept slipping out while Santa flew apart.


I'm learning to put a gob of the Glossy Accents onto a baggie, then dip my cuts into it, and tap off any excess glue. This has been helping my "heavy handedness" with the Glossy Accents.


The hardest part of this Thinlits Set (INMO) would be the face; tiny pieces, but the resulting look is well worth the effort!


You can see the difference it made to sand down the two "vintage looking" Santas.


Ready to add the names to each of these. I chose 2 colors- purplish for girls and bluish for boys.


This die set is cool: I can think of tons of things Santa can hold across that string!


The last 2 get some vintage treatment with Idea-ology! The Christmas Confections, new 2023 Holiday Bells and the 2023 Baseboards and Transparencies were also my very faves of the year! I also added some Distress in my always-favorite Vintage Photo Oxide.


Using a handheld hole puncher on the IdeaOlogy Christmas Confections- EASY PEASY! They simply squish without tearing or breaking! Who knew?!? With that hole made, it was simply threading some aged twine ribbon through on a large bore needle. I added a tiny Candy Cane Charm that Linda sent as a FREEBIE with my last TFJB Happy Mail!

The Final Results...


All of the Ornaments together


The 2 for keeping with some Closeups following...


Backsides


These gifts fit easily into smaller manilla envelopes- with postcards-  mailed (for just a couple of dollars each) from our house in Florida to our Grandbabies in Indiana and Kylie in Alabama!

That's it for me for the 2023 year!
THANKS SO MUCH for joining me on my crafting journeys throughout this past year,
and I look forward to bringing you morefTFJB Inspiration Ave as a Design Team Member for Linda Coughlin's The Funkie Junkie Boutique in 2024!

Meanwhile, be sure to pop back in for the next two weeks as the rest of the Design Team posts their favorites for 2023!

Don't forget to head over to The Funkie Junkie Boutique for AWESOME CLEARANCE PRICES on all of these items !!!

For me...until next year, 2024...

Stay Safe &
HAPPY BLOGGING!!


Friday, December 22, 2023

Suzz's Holiday Homecoming!

Hi!  Suzz here. I was inspired by wreaths that my mother and I made years ago for holiday craft shows. It was fun picking out different flowers, garland, and embellishments to decorate the wreathes.  

My wreath of joy started from a collection of poinsettias cut from white cardstock.  I started by cutting many different shapes to play with in different mediums and ended up with poinsettias on white cardstock because of how I wanted the colors to saturate and stand out.

Next up was making the beautiful colors on the flowers and branches.  The flower pieces were all sponged with a red dye ink.  After that they smaller pieces received a distressing with a brown dye ink and the larger flowers were sponged around the edges with the brown dye ink.  

The branches were sponged with versamark and embossed with a shimmery silver.  (I am still glittering in random spots on my face and hair!)  

I next cut out a circle to hold onto my wreath from cardboard.

I sponged the front of the circle to match the flowers in case any of the cardboard peeked through the flowers. 

Then I heat set the flowers before attaching the layers as the distress ink can remain damp and cause the tape to not stick properly.  I attached the layers to the flowers petals.  Then the flowers were alternated on the frame of the wreath using tape for the bottom flower and pop dots to create depth on the alternating flowers.


After all the flowers were placed on the wreath the various branches were tucked into the wreath around the edges using tape and glue dots.  Then a lovely little sentiment was placed on the banner on the front with a few extra twigs. 

The centers of the flowers were a mixture of embellishments.  

Have a happy holiday! 

Suzz

Products: 

Wednesday, December 20, 2023

Lisa's Holiday Homecoming

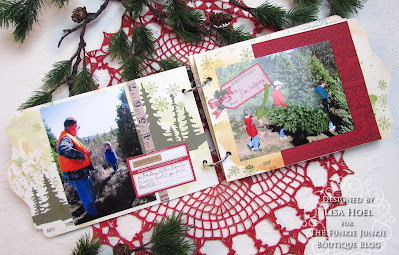
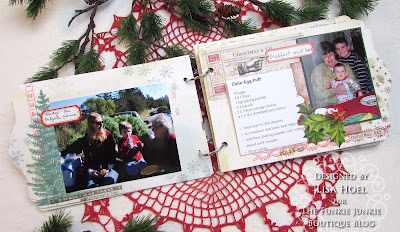
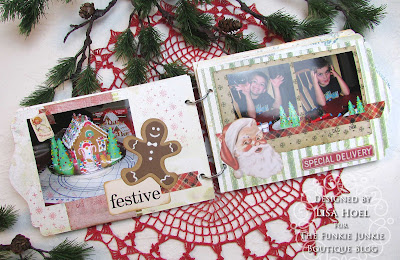
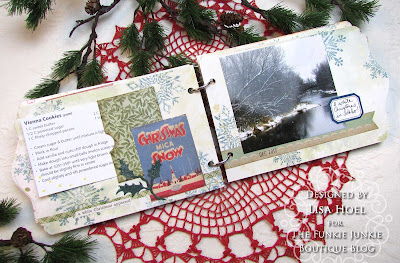
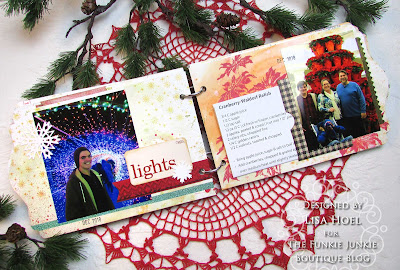
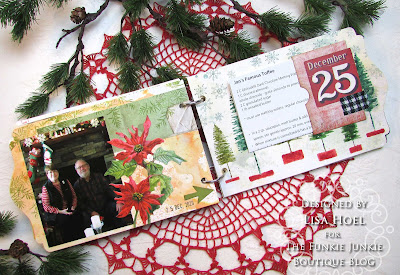
Merry Christmas Funkie Junkie fans! Lisa Hoel here. Our theme is "Holiday Homecoming" - celebrating the holidays with family and food. Our family has several favorite recipes for this time of year so I decided do create a photo recipe album.

Lisa Hoel for The Funkie Junkie Boutique  #creativejuicefreshsqueezed  #mymakingstory #tim_holtz #thefunkiejunkieboutique #sizzix

For the album structure I used Eileen Hull's Field Notes & Specimen Card Die. It has such a great shape. I used it this past fall to make another flip photo album and you can check that one out here.

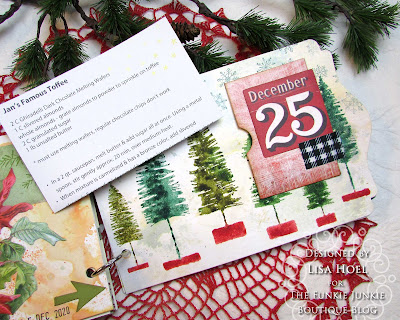
Inside I filled it with photos from past family festivities and pull out recipe cards tucked into pockets.

Lisa Hoel for The Funkie Junkie Boutique  #creativejuicefreshsqueezed  #mymakingstory #tim_holtz #thefunkiejunkieboutique #sizzix

Going to a Christmas tree farm the day after Thanksgiving to pick out our tree was a long-standing family tradition. Of course there was always a grand tailgate picnic!

Lisa Hoel for The Funkie Junkie Boutique  #creativejuicefreshsqueezed  #mymakingstory #tim_holtz #thefunkiejunkieboutique #sizzix

Lisa Hoel for The Funkie Junkie Boutique  #creativejuicefreshsqueezed  #mymakingstory #tim_holtz #thefunkiejunkieboutique #sizzix

Gingerbread cut out cookies are non-negotiable at Christmas-time!

Lisa Hoel for The Funkie Junkie Boutique  #creativejuicefreshsqueezed  #mymakingstory #tim_holtz #thefunkiejunkieboutique #sizzix

Lisa Hoel for The Funkie Junkie Boutique  #creativejuicefreshsqueezed  #mymakingstory #tim_holtz #thefunkiejunkieboutique #sizzix

When we moved to Idaho we had the chance to have white Christmases!

Lisa Hoel for The Funkie Junkie Boutique  #creativejuicefreshsqueezed  #mymakingstory #tim_holtz #thefunkiejunkieboutique #sizzix

Lisa Hoel for The Funkie Junkie Boutique  #creativejuicefreshsqueezed  #mymakingstory #tim_holtz #thefunkiejunkieboutique #sizzix

These Molasses - Spice cookies are a big family favorite around here. Yum!

Lisa Hoel for The Funkie Junkie Boutique  #creativejuicefreshsqueezed  #mymakingstory #tim_holtz #thefunkiejunkieboutique #sizzix

Lisa Hoel for The Funkie Junkie Boutique  #creativejuicefreshsqueezed  #mymakingstory #tim_holtz #thefunkiejunkieboutique #sizzix

There isn't really a tutorial for this but I took a few in progress pictures:

I cut all the pages first and lightly inked them up by smooshing them into Distress Mica Sprays sprized onto my craft mat.


I had lots of fun creating the cute Santa from the Santa Greetings, Colorize Die Set.


I used the pocket from Eileen Hull's Card Case Die to make the holders for the recipe cards. They fit perfectly!

Thanks for stopping by. Keep an eye here on the Funkie Junkie Boutique Blog, Inspiration Ave. because you are now getting regular doses of expanded (and inspiring) content each week. Don't miss it…

Supplies used:  

Eileen Hull Scoreboards Die - Field Notes & Specimen Card
Eileen Hull Scoreboards Die - Card Case
Tim Holtz Die Set - Forest Shadows
Tim Holtz Die Set - Santa Greetings, Colorize
Tim Holtz Die Set - Reindeer Sleigh
Tim Holtz Die Set - Paper Snowflakes, Mini
Tim Holtz Die Set - Christmas Cookies
Tim Holtz Die Set - Fresh Baked #2
Tim Holtz 3-D Texture Fades Embossing Folder - Cracked
Tim Holtz 3-D Texture Fades Embossing Folder - Holiday Knit

Tim Holtz stamp sets - Darling ChristmasBottlebrush TreesWinter WoodlandsTicking + Grain, Ornate Trims, Snarky Cat Christmas, Grunge Flakes, Tree Line, Mini Weathered Winter

Distress Mica Spray - Fresh Balsam, Frosted Juniper, Mulled Cider, Tree Lot, Peppermint Stick
Distress Spray Stain - Antique Linen
Gold & Silver Embossing Powder
Etcetera Bracket Trims
Idea-ology Christmas '23 - Backdrops
Idea-ology Christmas '23 - Sticker Book
Idea-ology Christmas Design Tape, various
Idea-ology Christmas Ephemera, various
Idea-ology Christmas - Tiny Bells
Idea-ology - Classic Label Stickers

Tim Holtz Deckle Trimmer