Friday, October 30, 2015

Friday Focus - Graphic 45

Hello, Cec here and today I am presenting a new Friday Focus segment and this one is about Graphic 45. This time I just used Graphic 45 papers but they also have wonderful stamp sets that compliment many of their paper collections.

While these papers are wonderful for making cards they are also fabulous for making other projects and this time I decided to show you a trinket box that I made with the Once Upon A Springtime collection.

I figured out my own measurements for the box, which is made from 1/16" thick chipboard.  I will post my measurements as I go along but your measurements will have to be altered depending on the thickness of your chipboard and the size of box you would like to make.  I will also give you some tips in the event that you have never tackled a box before.


Start by cutting five pieces of chipboard to make the "tray" portion of the box.  NOTE:  I discovered the even with a firm hand holding the chipboard down in my guillotine cutter, it started to slide so I had to start over with a couple pieces and cut them using a steel ruler and my X-Acto knife.  I am super fortunate that my husband has a laser cutter so the next time I will get him to cut them and I know they will be perfect.

Bottom - 1 piece 4 1/2" x 4 1/2"
Sides - 2 pieces 4 1/2" x 2 3/4" and 2 pieces 4 3/8" x 2 3/4"


Glue the pieces together to make the tray.  Start by gluing one long side to the bottom, then one short side, then another long side and finally the last short side.  The first piece will only have glue on the edge that attaches to the bottom, while the remaining pieces will have glue on that edge as well as glue on the edge that attaches to the adjacent side.


Either paint or use copy weight paper to cover the tray front and two sides.  The back will be attached to the lid and will not show but you should paint or wrap at least one inch of it so the edges that will show are covered.  You should also paint or cover the inside of the tray on all sides.


Next ink all the edges of the tray, inside and out. I used Vintage Photo Distress Ink. Don't worry if it looks a bit rough as this does because you are going to add some patterned paper that will cover almost all of the surfaces.


Cut patterned paper for the tray as follows and ink the edges with Vintage Photo DI:

Inside Sides - 4 pieces 4 3/8" x 2 1/2"
Inside Bottom - 1 piece 4 3/8" x 4 3/8"
Outside Sides - 3 pieces 4 1/4" x 2 9/16"

Adhere the patterned paper using double sided tape.  I did the inside sides first, then the inside bottom followed by the three outside sides.  Remember that one side and the bottom are going to be adhered to the lid so they will not show.


Next make the outside by cutting chipboard and covering it with paper with at least one inch folded over.  Make sure you leave a space between each piece of chipboard at least 3 times the thickness of your chipboard so my space is 3/16".  This is important so that your paper does not tear or crack when you bend it.  This is the same method you would use if your were making an album cover. 

The measurements are:

Bottom and Top - 2 pieces 5" x 4 3/4"
Spine - 1 piece 5" x 2 7/8"
Paper Cover - 1 piece 14 3/4" x 7"

The paper is adhered with double-sided adhesive on the folded edges and the corners are mitered.  Be sure to score in the space so it will fold easily.


Next, add a piece of paper to line the box outside.  I used double-sided tape and taped the spine (centre portion) down first, creased the spaces between the chipboard and then taped the rest down.  This ensured that it would still fold.  Ink all the edges, inside and out with Vintage Photo DI.

Outside Lining - 1 piece 12 1/2" x 4 7/8"


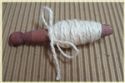
Cut a length of ribbon 17 5/8", fold each end over 1/2" and adhere to itself, then glue a thin magnet to each end and fold the ribbon over 7/8" and adhere to itself.


Add the ribbon across the middle of the inside of your outside with the folded edges facing up as shown.


Cut a piece of patterned paper 4 9/16" x 4 3/4", ink the edges and adhere on the left side as shown.  Add some double sided tape to the ribbon hanging over on the right (this is the front of your box).


Glue the bottom of your tray to the right side of your outside, bring the ribbon up and adhere it to the front of the tray and then bring the spine up and adhere it to the back of the tray.  The piece on the left is now the lid of your box and will open and close.  The ribbon hanging loose on the left is what will close your box and will grab the other magnet to keep it closed


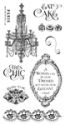
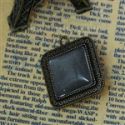
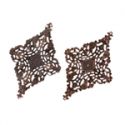
Make an embellishment to cover your ribbon and to act as the piece you lift up.  In this case I took a filigree medallion and a metal button with the shank removed and I painted them with some Aqua acrylic paint and then I dabbed some snow cap mixative alcohol ink on them and glued them together.  Glue your embellishment on top of the loose piece of ribbon.  If your embellishment is metal as mine is, the magnet will grab it but to be safe I recommend that you glue it to the ribbon or it might slide off the ribbon when you try to open the box.


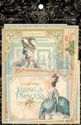
Next it is time to embellish the top of the box.  Graphic 45 paper lends itself to fussy cutting if you have the patience so I did a lot of that to create my box top.  I started by cutting a postcard from the paper pad, scored it in the middle and bent it to look like an open book.  Then I cut some fairies and a couple of tickets.

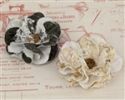
I also cut duplicates of numerous flowers and layered them with pop dots.  Each of the open flowers was given a pearl for a centre.  Finally I made 3 bead stick pins and while I wished I had some metal beads so I could have altered them to match the front embellishment, I didn't so I just dry brushed a bit of white paint on the aqua beads to tie them in.

I cut a few other element to put on the sides of the tray but in the end decided that they distracted from the top, which was where I wanted the focus to be so I set them aside for another project.

Here is another view of my finished box.


I hope you will try making a box - they make wonderful gifts and are such fun to create.  To help you get started there will be an extra 15% discount applied to the Graphic 45 line of products for the next two weeks at The Funkie Junkie Boutique so it is a perfect time to give it a go.

Before I go, here is another look at some of the other projects I have made with Graphic 45 - I have included links to the original posts in case you would like to see how they came together:

(Gilded Lily Collection)


(Home Sweet Home Collection)


(Precious Memories Collection)

Greeting Card
(Time to Flourish Collection)

Greeting Card
(Time to Flourish Collection)

Thursday, October 29, 2015

Welcome to today's Guest Designer, Suzan!

Today we are welcoming Suzan von Essen of 'Getting Inky With It' as our Guest Desginer. Suzan was chosen by the DT as the winner of the 'Chalk It Up!' challenge. So, without further ado let's move on to hear from Suzan.

I am super-excited to have this chance to be Guest Designer at Frilly and Funkie. This summer we moved and it took awhile to get my supplies unpacked. Once they were, I couldn’t wait to set up my craft space and start creating again. I absolutely love learning new techniques, and when I am not crafting, I enjoy showing my Quarter Horse, “Wally.”


Diving in to the theme, I wanted something other than a card. In looking through my dies, I came across a die for a rose. So I decided to do... wait for it... black roses!! Very spooky!! So I set out make a bouquet of creepy black roses any "ghoul" would love to get.


I diecut the petals and leaves from black card stock and using the leaf and ball stylus tools pictured, worked the fibers of the paper.( As you can see, I cut a lot of petals and leaves.) After shaping each individual petal and forming each rose, I painted some flower stems black, and adhered the everything to the stems. I used Tarnished Silver Distress Paint to highlight the petals of the roses, and gray PanPastel to shadow the leaves.


I made a vintage-y looking vase using Krylon's Looking Glass spray paint. A Graphic 45 label from their Steampunk Spells collection, and few more props completed my scene. Details and links are on my blog.


I hope you enjoy my version of "Something Wicked," and that you join in the fun on this challenge.

Suzan

I'm sure you'll all agree that Suzan's roses are totally wicked and will have given you lots of ideas for making spooky bouquets of your own! Thank you so much for joining us as a Guest Designer Suzan.

If you would like to be in with the chance to join us as Guest Designer all you need to do is join in with the current challenge 'Something Wicked'.

We'll be back tomorrow with a new Friday Focus and you are in for something special...

Wednesday, October 28, 2015

Something Wicked

FLASH SALE!!! - through October 27th - October 31st at The Funkie Junkie Boutique - this season's new Tim Holtz and Brett Weldele stamp sets and selected other products are an extra 10% off! (that's a full 30% off list)


Happy Wednesday, everyone! It's Shelly, back with you today to share some more spooky inspiration for the latest Frilly and Funkie Challenge.

With Halloween just a few days away, I decided to challenge you all to create Something Wicked. Whether your style is shabby or vintage, I want to see your spookiest work. It doesn't necessarily have to be Halloween related - feel free to interpret the theme in a way that suits you!

At the end of the challenge the team will choose their top four picks. Our first place winner will be invited to join us in a Guest DT spot here at Frilly and Funkie. Three additional talented participants will receive badges to display on their blogs. Everyone who enters and adheres to the challenge guidelines will be entered into a drawing to win a $25 spending spree at The Funkie Junkie Boutique!

The guidelines for entering are simple; create a new vintage or shabby chic project following the challenge theme, link it below to your post (not just your blog) and include a link back to this challenge in your post. You can combine our challenge with up to 10 challenges (including this one) to be in with a chance of winning. Make sure you follow the guidelines, as unfortunately we have had to eliminate entrants from the prize draws in the past when they have entered too many other challenges. If you are entering through a public forum please use keyword F&F. Also, please be sure to turn off your Word Verification so our design team can leave comments on your blogs.

Here's some wicked inspiration from the Funkie team (click on each one for a closer look):

Jenny Marples - Pushing The Right Buttons

Zoe Hillman - iGirlZoe

Shelly Hickox - Stamptramp

Linda Coughlin - The Funkie Junkie


****************************************************
WEEK ONE

Here's some wicked inspiration from the Frilly team (click on each one for a closer look):

 Cec Wintonyk - CW Card Creations


Nancy Dynes - Tattered Treasures

Our Frilly and Funkie designers have outdone themselves! I know you're inspired to create something now. We are all excited to see your Wicked work!


Monday, October 26, 2015

Challenge Winners - Autumn Splendor!

Welcome to the beginning of a new week here at Frilly and Funkie. It's time to announce the winners of the 'Autumn Splendor!' challenge. Thank you so much to everyone who took the time to enter with some gorgeous fall projects. The Design Team cast their votes and our winner on this occasion is #2 Astrid.

We loved the rich, jewel-like Autumn colors and fabulous stencilling in this clever mini book. Congratulations Astrid on being our favourite for the 'Autumn Splendor!' challenge and winning the opportunity to be a Guest Designer here at Frilly and Funkie for a future challenge.

And now for the next three winners of our Frilly and Funkie Top 3 Badges. In numerical order they are... #6 Lys, #16 Jane and #26 Sanderijn!!! Please email Linda at thefunkiejunkie@gmail.com for the codes for the Top 3 badges so that you can display them proudly on your blog.


And finally Random.org has chosen a winner for our $25 gift certificate to The Funkie Junkie Boutique. Our congratulations this time go (appropriately enough) to #18 Autumn!

A huge thanks from the Frilly and Funkie team to everyone who took part in this challenge and congratulations again to our winners. Please email Linda at thefunkiejunkie@gmail.com for the codes for the winner's badge and to give us your email address for the Guest Designer details (Astrid) for the Top 3 badges (Lys, Jane and Sanderijn) and for the gift certificate details (Autumn).

Our current challenge, 'Something Wicked', runs through Tuesday, November 3rd. The Funkie side of the team will be back this coming Wednesday, 28th October with more inspiration for you. We hope to see you entering this time around so that you too can be in with a chance to win. And please make sure you follow our rules as sadly we've had to discount entries from previous challenges.

For now have a great week everyone!

Saturday, October 24, 2015

Saturday Step By Step - Shabby Chic Art Journal Page

Hi Peeps

Georgie here with a Saturday Step By Step for you!

I've been loving playing in art journals recently so I thought I do a 'how to' on how I do a layout for my pages, and in particular, this shabby chic page:


So, without further ado...

(Please excuse my lighting, for the images below, where I'm set up to get messy has quite poor lighting)

Step 1
Using heavy watercolour paper, washi tape the edges to secure the paper as it will want to warp with all the moisture. Then apply some random stamping, this helps to create depth.


Step 2
Using a stencil apply some texture to the page.


Step 3
Apply splashes and drops of colour, then knock back with a white spray.


Step 4
Cut some strips of paper and some lace, and add to the page. Here I use Glossy Accents, this is the one glue that has never failed me.


Step 5
Punch out some leafy texture, I used the Laurel Leaf by Tim Holtz, then embossed with white embossing powder.


Step 5
Make a bow, then work out it's placement, with a flower but don't glue down just yet.


Step 6
Grab some other embellishments, anything can be used that you can get your hands on. Here I used a wooden element and some metal pieces. Give this a chance to dry a little before going over with a coat of gesso.


Step 7
Whilst waiting for the paint to dry, I created the charm. I gave this a few coats of gesso and fussy cut a Maja Design butterfly to go inside.


Step 8

Spray some colour again, using the same ones as before, then knock back with gesso and white spray again.


Step 9
After all the layer have dried add all the pieces as laid out above, add the leaves and then splatter some of the sprays to tie it all in. Then carefully remove the washi tape. Voila, ready to be stuck into your journal.

Here are some close ups in much nicer natural light:


Although the washi tape is quite garish, as soon as you peel it away it changes the feel of the page.


I added some Stickles to the centre of the flower and then added a button. 


Here you can see the beautiful shadows and texture of the stencil, creating some added interest to the page.


The metal embellishment just tucked underneath.


Here you can see some of that initial stamping, so even though it looks like you're completely covering it up, you'll be surprised at how little bits peek through.


The butterfly charm peering through and giving the eye something else to focus on other than the flower.


Finishing up with another view of the page. A list of products is included below, hope you enjoyed this post today and thank you so much for stopping by.

Big hugs
Georgie
xxx