Saturday, May 30, 2020

Saturday Showcase - Stampers Anonymous Flower Shop + Seth Apter Izink Dye Spray + Ranger Distress Texture Paste

Hi! Suzz here. Welcome back for another Saturday Showcase. This week I am featuring the Stampers Anonymous Flower Shop, Ranger Distress Texture Paste and the Seth Apter Izink Dye Spray.  

I tried to use varying shades of pink when making this wall hanging and to make it cohesive I needed to repeat colors, texture, and similar images. 


Where to start? I will take you through the various pieces of the wall hanging and how the different key products took part in the overall process.
Steps for the wall hanging background:

1.  Cut linen cloth to size desired.
2.  Put white gesso on craft mat and spray with ink.
3.  Mix gesso with ink to desired pinkness. :)
4.  Paint front let dry and paint back. This gave it a nice firmness.
5.  Cut up old ruler into pieces. My husband drilled holes for me based on my general instructions.
6.  Paint ruler with same paint and wipe off excess.
7.  After dry add screws and fasteners. (The piece of twine was on my old ruler and I liked it and left it there. I just painted it with everything else)

After that I worked on my textured pieces and die cuts.  They all followed the same process:


1. Cut pieces of white cardstock for panels or dies.


2. Place stencil over cardstock and smear on texture paste.


3.  Scrape off excess.


4.  Scrape up any excess and put back into the jar. :)
5.  Let dry. (I am not good at this. I usually will try to heat with the heat gun and keep the heat indirect to try to keep it from bubbling up.)
6.  Spray along the edge the darker inky spray.


7. Then spray the next lighter color on the other side.


8.  Add water to the ink to mix and blend.


9. I then sprayed the entire surface with the new Izink Dye Spray called Antique Pearl. It adds this beautiful shimmer.

I created two panels  using the Ranger Tim Holtz Layering Stencils, Ranger Distress texture Paste - crackle and Ranger Distress Oxide Worn Lipstick, Ground Espresso and the Seth Apter Izink Dye Spray - Antique Pearl. 


I then used some pretty butterflies and followed the same process with a different stencil.


I repeated the process with the Ranger Distress Texture Paste - Matte finish to show the difference between the two texture pastes.


Here are the finished panels:


And the top half of the wall hanging:


My next step was to create a few stamped panels.

Steps:
1.  Stamp images using pink and gray inks.
2.  Splatter with Antique Pearl spray.
3.  Distress edges of panel.


The bottom panel used a different mix of stamps and was paired with a trio of butterflies.


In the middle I decided to create some design tape to layer under the big butterfly. To create the design tape I followed these steps:


1. Paint the strips of tape with the same paint mixture used on the cloth background.
2. Let dry.
3. Stamp flourishes using Versamark onto tape.
4. Emboss with a mix of embossing powders (clear, distress, white)
5. Heat set the embossing powder.
6. Sponge over embossing with different inks.


I provided which combinations of inks and embossing powders used on my different design tapes.

When I had all these strips I played with different ways of using them.  I decided to create a collage.


 I added the buttons, butterfly and stamped sentiment as an accent.

That explains the wall hanging and how it was created but I had one more experiment. I decided to emboss paste on a scrap from my wall hanging.


Apply the crackle embossing paste stenciled across the painted cloth background.


Then spray with a mix of dye ink sprays.


 Finish with a shimmer spray if desired.


The end result was pretty and can be used on a card front in the future.

I hope this has you inspired to join us in the Tickled Pink challenge! The challenge runs until June 9th 11:59 EST.

Suzz

Products:
Stampers Anonymous Flower Shop
Seth Apter Izink Dye Spray - Antique Pearl 
Seth Apter Izink Dye Spray - Grenadine
Ranger Distress Texture Paste - Crackle, Matte 
Ranger Distress Oxide Worn Lipstick, Aged Mahogany, Victorian Velvet
Ranger Distress Oxide Spray Worn Lipstick, Ground Espresso
Ranger Distress Ink - Worn Lipstick, Aged Mahogany,
Idea-Ology - Fastener
Idea-Ology - Hangers
Prima Art Basics Heavy White Gesso
Ranger Layering Nordic
Ranger Layering Stencil - Boquet
Sizzix Tattered Butterfly
Sizzix Thinlits Mini Butterflies
Sizzix Chapter 2 Crochet
Stampers Anonymous Tiny Text 
Stampers Anonymous Urban Elements
Stampers Anonymous Field Notes 
Versamark Embossing Ink
Ranger Clear Embossing Powder
Ranger White Embossing Powder 
Ranger Distress Embossing Powder
Ranger Archival - Watering Can 

Thursday, May 28, 2020

Guest Designer - Jo of Let's Art Journal

It is time to say hello and welcome to our Guest Designer for the Tickled Pink challenge.  Meet Jo of Let's Art Journal who was the top pick from the A Mother's Love challenge.


Hello Everyone, I’m so pleased and honoured to be here as Guest Designer today.

My name is Jo and I blog at Let’s Art Journal. I live by the sea in the North West of England with my hubby. I started Art Journaling in 2015 as a way of expressing my life through words and pictures and it has now become a passion of mine which I like to share with others. I’m captivated by the variety of techniques and materials that can be used to create so many different styles of art and love everything Mixed Media. I’m often inspired by things I see and do, so my art journal pages are often happy reminders of my life.

For the Tickled Pink challenge here at The Funkie Junkie Boutique Blog I had lots of fun creating this art journal page as pink isn’t a focal colour that I often use. I took inspiration from the beautiful pink peonies that are currently flowering in my garden - I hope you like it!


I used lots of Tim Holtz products to create this page, to see more photos of my page and to find out which products and techniques were used please visit my blog here.

Thanks so much for having me as Guest Designer. I hope that you are inspired by the challenge too and are able to join in the fun!

Thank you. Jo x

* * *
After you have checked out Jo's lovely floral art journal page, please come on back and share your perfectly pink project with us - we would be tickled to see it. The challenge can be found HERE and runs through 11:55 pm EDT on Tuesday, June 9th.

Wednesday, May 27, 2020

Tickled Pink! Challenge

Maggi here today and  it's time for a new challenge and I'm hosting. This challenge I want you to be "Tickled Pink!" Design a vintage or shabby chic project using the color pink. You may use other colors as accents, but, pink must be predominant. There are many shades of pink ranging from fuschia to soft baby pink so let your pink imagination go wild!

The winner will earn a chance to be a Guest Designer at a future date here at The Funkie Junkie Boutique Challenge blog, and everyone who enters and follows the rules will go into the draw for the chance to win a $25 spending spree at The Funkie Junkie Boutique. There are also Top 3 Badges for three additional outstanding entries, chosen by the Design Team.

The guidelines for entering are simple; create a new vintage or shabby chic project following the challenge theme, link it below to your post (not just your blog) and also include a link back to this challenge in your post. You can combine our challenge with up to 10 challenges (including this one) to be in with a chance of winning. If you are entering through a public forum (such as Instagram) you'll need to include the words 'Funkie Junkie Boutique Challenge'. Also, please be sure to turn off your Word Verification so our Design Team can leave comments on your blogs. Make sure you follow these rules as unfortunately, we have had to eliminate entrants from the prize draws in the past.

Take a look at all the fabulous inspiration our designers have created for you. To get all the details of their projects, just click on their blog name and you will be taken directly to their blog.

Maggi Harding - Scrap, Travel & Bark!


Cec Wintonyk - CW Creations


Sara Emily Barker - sarascloset


Suzanne Czosek - Suzz's Stamping Spot 


Jenny Marples - Pushing The Right Buttons


Now it's your turn to get "Tickled Pink!" We can't wait to see your pink projects. Use the link below to enter them and be in with a chance of winning.

Saturday, May 23, 2020

Saturday Showcase - Graphic 45's Safari Adventure Deluxe Collector's Edition

Hello friends, welcome to the weekly Funkie Junkie Boutique Saturday Showcase where we share new techniques and products with you. Today I want to show you a new Deluxe Collector's Edition from Graphic 45, Safari Adventures. This collection was originally released in 2016 and is now back as a DCE. It contains 2 sheets each of 12 different designs, coordinating chipboard and stickers. AND of course it's available at The Funkie Junkie Boutique.


This is such a bright and pretty collection filled with rich bright colors and animals from the jungle. I'll also show you how to make a great folio styled card that I think would make a great card gift for a child. They will enjoy all the animal images in the collection. Lots of photos to share today so do get comfortable!


Tutorial

This card has lots of tuck spots and pages. If you have any questions about how it goes together, please be sure to leave a comment and I will get back to you.
1. Cut black cardstock as follows:
  • 6" x 12", score at 5 1/2" and at 6"
  • 6" x 6 " , score at 1/2" and 1"
Cut a 6" x 6" piece of chipboard and ink all around the edges. Adhere the chipboard to the 6" wide side of the 6" x 12" cardstock at the 6" scoreline. This is to give the folio some strength.


2. Adhere the 6" x 6" piece of black cardstock at the 1/2" scoreline to the right back side of the chipboard. It should look like the photo below. The flap on the left should be 6" wide including the scored section and the flap on the right side should be 5 1/2" including the scored section.


3. Die cut a policy envelope with the new Graphic 45 policy envelope die. Cut design paper 2 5/8" x 3 1/4" and adhere to the side of the envelope with the punched hole. Punch a hole through the design paper using the hole on the envelope as a guide and attach the small closure circle with an eyelet. Use another eyelet to attach the 2nd small circle on the envelope flap. (I added a decorative larger circle between the envelope flap and the small circle) Now you can fold the flaps over and assemble the envelope.


It should look like this when finished.


4. Cut design paper to fit the 3 panels. Adhere the policy envelope from step 3 to the right side panel. Locate the cut-apart shown on the left panel and add a thin line of glue to the sides and bottom leaving the top open to form a pocket.

Use the new Graphic 45 file folder die and die cut a file folder from black cardstock. Cover the front with design paper, then add a thin line of glue on the sides of the file folder forming another pocket and adhere to the center panel.

Cut a piece of black cardstock 5 1/2" x 6". Score the 6" side at 1/2". Fold on the 1/2" scoreline and adhere to the top of the center panel. Add design paper to the front and back of the flap.

Fold at the scorelines to create side spines for the folio. Cut 4 pieces of 3/8" x 6" design paper and adhere to the spines, on the inside and outside of the spines.


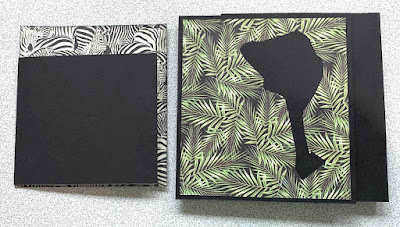
5. For the front, cut a piece of design paper 5 1/4" x 5 3/4". The design paper I used has a hole in the center, that is because I fussy cut a parrot from the other side of the paper. (You can do the same if you want the parrot on the front of the folio). That is ok because we are going to cover it with another piece of design paper (the black and white zebra paper, one of my faves in the collection!) that is 5" x 5 1/2".  

Cut a piece of black cardstock 5 1/4" x 4 1/4" and score the 5 1/4" side at 1/2". Fold the small scored section in and attach to the back side of the zebra paper on the left side as shown below.


6. Now adhere the zebra paper to the front over the green leafy paper as shown below.


7. Make a pocket on the zebra paper by adhering on 3 sides, a piece of design paper 4 7/8" x 3 1/8". Later we'll make a tag to slip into the pocket. Adhere design paper to the fold out flap.


8. Adhere a piece of design paper to fit the flap on the front, 4 1/2" x 4". (Sorry I didn't photo this step but you can see the design paper under the flowers and parrot in this photo.)


9. Now we'll make the closure mechanism. Cut the strip from the bottom of the page shown below. Cut the strip 8 1/4" long from the left side, between the flower and leopard. The remaining piece should be just a tad over 3" long. Score at 1 3/4" between the zebra and flower. Adhere a magnet on the backside near the scoreline, then fold and adhere the short end back over the magnet. Now adhere the strip to the center of the flap allowing the zebra end to extend beyond the flap as shown in the photo above. Trim the left side of the strip to fit the flap. Add the Safari Adventure chipboard piece over top the closure strip.

Safari Adventure Deluxe Collector's Edition

10. Take the remaining 3" piece of strip and adhere a magnet to the left side so that it will match up with the magnet on the front flap. Adhere another piece of design paper over the back of the small strip (this is to give it strength). Place the two strips together allowing the magnets to hold them in place and fold the small strip around the right side and secure on the back of the folio. Then add design paper cut to 5 3/4" x 5 3/4" to the back of the folio. In the photo below you can see both strips. The zebra folds nicely over the other strip creating a closure.

Finish off the front by adding the fussy cut parrot using dimensional foam to pop it up. Add some flowers too!


Closure secured in the below photo.


11. Add design paper to the right flap on the outside. I have used a folded ephemera card from when this collection first came out (not included with the Deluxe Edition), you can easily use any of the design papers or cardstock for this step. I used Graphic 45's new sentiment dies to to cut the hello that are part of the Folder and Sentiments die set.


12. To embellish the front of the center flap, fussy cut the tiger and hippo from the signature page, Safari Adventure.  Fussy cut some flowers to add at the bottom around the tiger and hippo.  Fussy ct a couple of tags from the collection and tuck in the pocket on the right.  Use the policy envelope to hide a gift card, cash, or a secret message.


13. Now lets make tags to fit inside the folio. For the regular sized tag, die cut design paper to fit using the Graphic 45 regular tag die. Make a little card and attach to the front. I've used a decorative die from the Graphic 45 Policy and Decorative Dies set to die cut a fancy label. Then I fussy cut the word "Wild" from the design paper and placed inside the decorative label. In the upper right corner of the card I die cut a corner piece using the same die set. I love that the die sets not only contain a main piece, i.e. the policy envelope, but also inclue some fun smaller decorative dies. The regular tag fits into the pocket inside the front. See the photo at step 7.
A Graphic 45 square tag fits nicely into the file folder in the center section. See the photos below.

Cover the square tag with die cut design paper using the Graphic 45 square tags die. Add the zebra cut apart to the tag.


View from the back of the folio.


That's it, I really love this collection! It has a bit of sentimental value and is quite special to me as it was the first collection that I used when I designed classes for Graphic 45. I know you'll love the rich colors and imagery in this collection. Have a super Saturday and please, stay well; now, it's time to get crafting!