
Hello friends, welcome to the weekly Funkie Junkie Boutique Saturday Showcase where we share new techniques and products with you. Today I want to show you a new Deluxe Collector's Edition from Graphic 45, Safari Adventures. This collection was originally released in 2016 and is now back as a DCE. It contains 2 sheets each of 12 different designs, coordinating chipboard and stickers. AND of course it's available at The Funkie Junkie Boutique.


Tutorial
This card has lots of tuck spots and pages. If you have any questions about how it goes together, please be sure to leave a comment and I will get back to you.
1. Cut black cardstock as follows:
- 6" x 12", score at 5 1/2" and at 6"
- 6" x 6 " , score at 1/2" and 1"

2. Adhere the 6" x 6" piece of black cardstock at the 1/2" scoreline to the right back side of the chipboard. It should look like the photo below. The flap on the left should be 6" wide including the scored section and the flap on the right side should be 5 1/2" including the scored section.

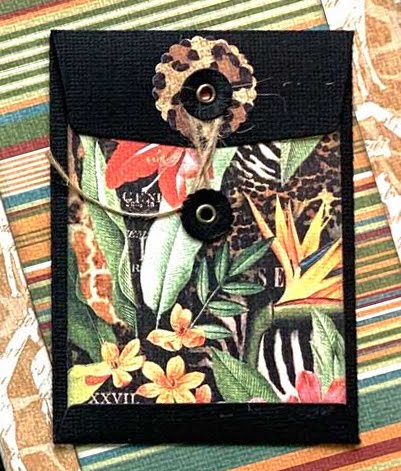
3. Die cut a policy envelope with the new Graphic 45 policy envelope die. Cut design paper 2 5/8" x 3 1/4" and adhere to the side of the envelope with the punched hole. Punch a hole through the design paper using the hole on the envelope as a guide and attach the small closure circle with an eyelet. Use another eyelet to attach the 2nd small circle on the envelope flap. (I added a decorative larger circle between the envelope flap and the small circle) Now you can fold the flaps over and assemble the envelope.

It should look like this when finished.
4. Cut design paper to fit the 3 panels. Adhere the policy envelope from step 3 to the right side panel. Locate the cut-apart shown on the left panel and add a thin line of glue to the sides and bottom leaving the top open to form a pocket.
Cut a piece of black cardstock 5 1/2" x 6". Score the 6" side at 1/2". Fold on the 1/2" scoreline and adhere to the top of the center panel. Add design paper to the front and back of the flap.

5. For the front, cut a piece of design paper 5 1/4" x 5 3/4". The design paper I used has a hole in the center, that is because I fussy cut a parrot from the other side of the paper. (You can do the same if you want the parrot on the front of the folio). That is ok because we are going to cover it with another piece of design paper (the black and white zebra paper, one of my faves in the collection!) that is 5" x 5 1/2".

6. Now adhere the zebra paper to the front over the green leafy paper as shown below.

7. Make a pocket on the zebra paper by adhering on 3 sides, a piece of design paper 4 7/8" x 3 1/8". Later we'll make a tag to slip into the pocket. Adhere design paper to the fold out flap.

8. Adhere a piece of design paper to fit the flap on the front, 4 1/2" x 4". (Sorry I didn't photo this step but you can see the design paper under the flowers and parrot in this photo.)

9. Now we'll make the closure mechanism. Cut the strip from the bottom of the page shown below. Cut the strip 8 1/4" long from the left side, between the flower and leopard. The remaining piece should be just a tad over 3" long. Score at 1 3/4" between the zebra and flower. Adhere a magnet on the backside near the scoreline, then fold and adhere the short end back over the magnet. Now adhere the strip to the center of the flap allowing the zebra end to extend beyond the flap as shown in the photo above. Trim the left side of the strip to fit the flap. Add the Safari Adventure chipboard piece over top the closure strip.

10. Take the remaining 3" piece of strip and adhere a magnet to the left side so that it will match up with the magnet on the front flap. Adhere another piece of design paper over the back of the small strip (this is to give it strength). Place the two strips together allowing the magnets to hold them in place and fold the small strip around the right side and secure on the back of the folio. Then add design paper cut to 5 3/4" x 5 3/4" to the back of the folio. In the photo below you can see both strips. The zebra folds nicely over the other strip creating a closure.
Finish off the front by adding the fussy cut parrot using dimensional foam to pop it up. Add some flowers too!

11. Add design paper to the right flap on the outside. I have used a folded ephemera card from when this collection first came out (not included with the Deluxe Edition), you can easily use any of the design papers or cardstock for this step. I used Graphic 45's new sentiment dies to to cut the hello that are part of the Folder and Sentiments die set.

12. To embellish the front of the center flap, fussy cut the tiger and hippo from the signature page, Safari Adventure. Fussy cut some flowers to add at the bottom around the tiger and hippo. Fussy ct a couple of tags from the collection and tuck in the pocket on the right. Use the policy envelope to hide a gift card, cash, or a secret message.

13. Now lets make tags to fit inside the folio. For the regular sized tag, die cut design paper to fit using the Graphic 45 regular tag die. Make a little card and attach to the front. I've used a decorative die from the Graphic 45 Policy and Decorative Dies set to die cut a fancy label. Then I fussy cut the word "Wild" from the design paper and placed inside the decorative label. In the upper right corner of the card I die cut a corner piece using the same die set. I love that the die sets not only contain a main piece, i.e. the policy envelope, but also inclue some fun smaller decorative dies. The regular tag fits into the pocket inside the front. See the photo at step 7.
A Graphic 45 square tag fits nicely into the file folder in the center section. See the photos below.
Cover the square tag with die cut design paper using the Graphic 45 square tags die. Add the zebra cut apart to the tag.


Supplies from The Funkie Junkie Boutique
Oh, my goodness, Maggi! This is such a masterpiece of a project, and your folio and all the tags really shows off just how magnificent this collection is! Gorgeous project and a wonderful, detailed post! Thank you for your inspiration!
ReplyDeleteSpectacular—i love that you cut out the parrot and then covered the extraction—gotta stretch that amazing G45 paper! I don’t have that collection, but plan to use your “structure” design for another, probably Lost in Paradise. Yes?
ReplyDeleteGorgeous- making this tomorrow!
ReplyDeleteMaggi your folio card is so professional and really shows off the vibrancy of the colours in this collection. I love those animal tags and the way you've given the front cover even more of a tropical feel with the addition of coordinating flowers. Thank you for sharing such a helpful tutorial xx
ReplyDelete