This week at TFJ Inspiration Ave blog we are creating to the theme of “How Scary is That?”. I absolutely love Halloween Idea-olohy. The second I saw the display dome I knew that would be the focal point of my creation. Here I have created a haunted church yard complete with spooky graveyard, ghost lights and a little demon. I hope that you enjoy the creation process of this project . Let’s get scary🧡🪦🖤
Part 1: Alterations with Ranger
Part 2: Building a spooky tree
Part 3: Assembling the Scene
Alterations with Ranger
For the first part of the blog post, I’m going to be going over some basic alterations with Ranger and Idea-ology products. If you’d like more in-depth details click here.
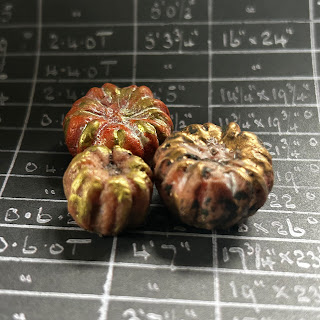
For our first alteration we are going to be altering some of the Tim Holtz pumpkins from Idea-ology. We are going to need a Distress Walnut Stain Crayon and some Gilded Foundry Wax. First, I scribbled some Distress Walnut Stain Crayon over the pumpkin. Then with my fingers, I pushed and blended the crayon into the cracks and crevices of the pumpkin. Next I took some Foundry Wax, Gilded and gently dry brushed it onto the pumpkin before setting the wax with an embossing gun. Below are the results.
Drippy Candles are definitely one of my favourite Halloween props. For the make, I have in mind, I decided to alter the candles with a dash of Brushed Pewter Distress Paint. I dry brushed the paint onto the candle to give it a new color. Then I took a candlestick and altered it with someDistress Foundry Wax Statue. I painted the Foundry Wax directly onto the candlestick and then embossed with an embossing gun. To add more drips I took a glue gun and dripped hot glue down the sides of the candle and onto the candle stick. Once I was happy with the drips, I then painted the hot glue drips with someAntique Linen Distress Paint. When the Antique Linen paint was dry, I then dry brushed on a layer of Brushed Pewter paint too.
Next, we are going to alter a few tomb stones. To start this alteration, I took some of last year’s Halloween rub ons, and chose a grave sentiment. Then I applied the rub on with the Idea-ology rub on tool. If you haven’t used or read the Halloween gravestone rub ons, they are absolutely hilarious. For some added grit and grunge, I scraped some Distress Texture Paste Crypt onto the tombstone to give it a decade mossy look.
Next, we are going to alter some bubbles. I took an entire pack of bubbles and drop them into a disposable plastic container and dripped some Vineyard alcohol ink on top of them. Then I put a lid over the container and shook the bubbles until they were coated in alcohol ink. Check out that fantastically creepy color. These will be perfect for this Halloween make. The bubbles took approximately 45 seconds to dry.
After I did the first batch of bubbles, I did a second smaller batch in green with the Ranger alcohol ink Citrus. Our next alteration will be with the Idea-ology urns. For the urns I painted them in a seven layer of Black Soot Distress Paint. After the black paint had dried I then dry brushed a thin layer of Brushed Pewter over the top. For the urns I am planning on lighting them up with some Tiny Lights. With a small hand drill, I drilled a small hole in the side of the urn to string some tiny lights though the urn.
Next, we are going to alter a couple of the window baseboards. To alter these windows I am using distress, crackle paste opaque, walnut stain crayon, and broken glass transparencies. First with a pallet knife, I scraped some of the opaque crackle paste onto the window frames. Then I let them dry for about 30 minutes. Off to the side of my media mat I scribbled down some walnut stain crayon and spritzed it with water to make a wash. With a Ranger Distress brush I brushed a layer of walnut stain distress crayon over the top.
Here we are going to make a small alteration to these fun curtains from Idea-ology layers. I altered this with some distress mica spray stain ominous twilight. I applied the mica spray stain with a Ranger fine detailer water brush.
For our last alteration I added some Transparent Crackle Paste to these fun Idea-ology bat wings. For the paper doll I added some Distress Mica Spray Stain Iron Gate and Ominous Twilight. Since paper dolls are slick surfaces, I dried the mica spray stain with the Ranger heat tool.
Below are all of the fun alterations that I will be using for this Halloween project.
Part 2:
Building a spooky tree
If you’d like more in-depth details click
here.
Below are a list of supplies I used to create this spooky Halloween themed tree.
To start the creation of the tree I cut 12 inch segments of 14 gauge wire.
I cut the wire with a guillotine set of jewelry cutters. In total I cut 31 pieces of wire.
Next I took the wire pieces and twisted them together to form a thick wire vine. I left about 2.5 inches at the bottom untwisted and four inches at the top untwisted. At the bottom I segmented the remaining wire into four bundles. Each bundle was twisted and became the roots of the tree. These I pressed into the cork base of the snow globe display. After I trimmed off the excess wire.
Next I split the wire on the top into seven small bundles and twisted them to make tree branches. On every bundle I divided and twisted to get smaller and larger branch segments. Then once I was happy with the branches I trimmed off the excess with the wire cutters.
Below is the finished wire structure. Next I used a combination of super glue and hot glue to attach the tree to the cork base.
Then I covered the base with some craft moss. Previously we had drilled a hole in the cork base. With the tree roots and messy hot glue hidden I then threaded a set of tiny lights through the base.
Taking the strand of tiny lights I then wrapped and twisted them around the tree structure. Once the lights were in place I started to attach the purple AI colored bubbles to the tree. To attach the bubbles I used a mixture of hot glue and glossy accents.
I worked my way outward from the centre of the tree adding clusters of bubbles. Then to fill in some of the gaps I added shredded pieces of mummy cloth dyed with black soot distress spray stain.
After I let all of the glue dry I then smooshed all tree branches together before gently sliding the glass dome over the top. Then I tilted the glass dome at an angle and used the Sizzix die pick to carefully bend and reshape the tree branches. Once I was happy with the tree branch placement I then hot glued the dome onto the cork base. After I ran several lengths of black velvet trim around the base to camouflage the hot glue.
Down below I have the tree lit up with Idea-ology tiny lights. I absolutely love how the purple tiny lights make the Vineyard dyed bubbles glow and shine with a deep purple color.
Part 3:
Assembling the Scene
If you’d like more in-depth details click here.
Now it is time to put together all of our elements. To start I am going to be working at creating a stage to set our spooky Halloween scene.
In the base of the stage, I am drilling three holes to run more tiny lights. The holes that I am drilling are approximately 1/8 of an inch.
After the holes were drilled I then attached the spiderweb Etcetera piece that was previously covered in nightfall glitter. This element was attached with hot glue to the front of the stage.
Next, to give our stage a little bit of lift, I added some silver Idea-ology corners. These were attached with hot glue.
Now onto the backdrop. Here on another Etcetera base piece, I glued a large piece of cathedral ephemera. I absolutely love the detail of the cathedral piece. It is absolutely gorgeous. Then around the edges, I added the stage curtains to give the scene a little bit more depth. These pieces were glued in place with collage medium.
Next, I added an another layer over the top with some baseboard windows that had these shattered glass ephemera added on the inside of them. Around the window frames I had also added some distress, crackle paste and smudged it with distress walnut stain crayon. I placed the windows onto our backdrop with a few foam squares to give it lift and dimension. The backdrop was then glued to the stage base with a combination of hot glue and superglue.
With our stage built, it’s now time to start the electrical work. I started by running a strand of Tiny Lights through the drilled hole closest to the snow globe. The section of lights is going to light up our bubbling cauldron. I pulled the lights through the bottom of the caldron in coiled them several times before sending the strand back through the same hole in the base of the caldron. Then running the lights under the stage I pulled them up through the second hole. This time I only kept one light and pulled it through the base of an urn. Then I super glued a green tinted bubble onto the top of the urn to create a ghost light. Next I ran, the lights back under the stage and up through the second to create our second ago, slight. Since I had several lights attached to our long strand, I ended up snipping these off. I then hid the light switch in the back of the backdrop with a couple of foam squares.
Now comes the fun part building the scene. Whenever I am working on a large scale vignette I like to do a rough placement of all my elements first. This allows me to shift things around and find the best configuration before I commit and start gluing things down.
After all the elements were placed include, I then went back with a variety of craft mosses to fill in some of the gaps in various places.


