Monday, April 24, 2023

Teri's Tim Holtz Idea-ology Make

 Teri Wilson - TerisMailbox

Hello friends! It's Teri from TerisMailbox I am posting for The Funkie Junkie Boutique. The DT challenge was to use the new Tim Holtz Idea-ology products and I started from the ground up with the Accordion Folio! I had so much fun creating this beauty using lots of Idea-ology Ephemera! This is a photo heavy post!

If you prefer to watch the YouTube Videos, I ended up with three shorter videos: the final overview, distress pencil techniques and building the base folio.

Accordion Folio Ideas (https://youtu.be/7o3mNKJoQN8)

Distress Watercolor Techniques (https://youtu.be/5Wa2yvsjczw)


Finished Accordion Folio Overview (https://youtu.be/4izFfE6hhc4)


Create the Folio Base

Start by selecting backgrounds from the Backdrops Volume 5. I used the orange flower panel for the front of the folio, the maps and a list for the inside of the base. I selected a small floral print from the set to use for decorating some of the panels.

You can see the Folio has multiple spaces to decorate in addition to the front and back.  


Here are the front and back images. As you can see besides the Backdrop 5, lots of smaller ephemera was used (some old and some new). An image from Portraits in addition to Layer Frames Collage make an interesting front for the Folio. Products listed below.


The group of women and girls makes a great focal point for the inside. The pocket on the left is covered with a floral print from backdrops.


An Idea-ology Word Plaque is the perfect accent for the side. Note how the twill tape is held on by threading under the plaque.


Check out how I applied the Quote Chip using twine in the center.

Make the Tags and Accordion Piece


The gentleman portrait is the perfect addition for this manly tag. I stenciled the base with the Splattered Stencil and stitched around the edges. The background is stamped with images from Distinguished and Noteworthy Stamp Sets.


This image reminds me of a photo of my husband and his Mom. So sweet. This is one of the projects featured in the second video Distress Watercolor Pencil Techniques. I started with packaging from a Tim Holtz product to make the base! Additional layers of Ephemera add interest.


This tag is also featured on the second video (link above). The image is from the Flower Shop Stamp Set.


The accordion piece is in the center. The assembly is featured in the first video above. In addition to the orange tag, there are two additional tags.


The dragonfly tag is cut from the Backdrops with the dragonfly and large floral image from Large Palette Ephemera.


This one started out with a Pocket Card trimmed to a tag with the additional images added.


I hope that perhaps I have inspired you to make a junk journal. It is so much fun to dig in your ephemera and assemble a colorful project. Be sure to check out all the wonderful products at The Funkie Junkie Boutique!

I'd love to have you follow/subscribe on my social media sites InstagramFacebookBlogger and YouTube.  Be well. Be creative!

Products Used:


Friday, April 21, 2023

Janna's Tim Holtz Idea-ology Make

This week for The Funkie Junkie Inspiration Ave we are creating to the theme of “it’s in the details” featuring the 2023 Tim Holtz Idea-ology line.

For my project today I have decided to create a layered card with a Distress crackle background. If you would like to see step-by-step details, click here for a in-depth video.

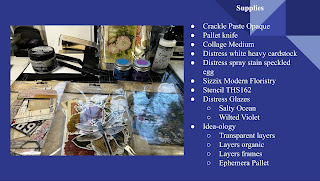
Below is a list of the materials that I used to create this project.


To start this card I am using a piece of Distress Heavystock white card stock for the base. To create the background, I will be using stencil THS162.


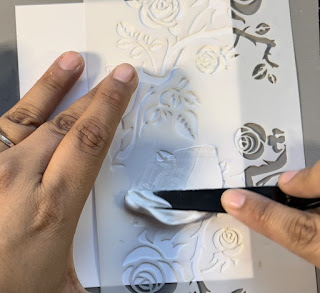
For the background, I am going to be stenciling with some Distress Crackle Paint to create a faux glass, crackle texture by combining the crackle paste with a Distress glazes. Here I am spreading the Crackle Paste Opaque with one of the Ranger Tim Holtz palette knives. The Texture Paste spreads with the consistency of butter. On average I have found the Texture Paste will take approximately 20 to 30 minutes to dry.


I love using these Stampers Anonymous stencils. They are great to place down parts and pieces of the stencil instead of just covering the entire background with a stencil pattern. I like to use small fragments, particularly in the corners to create backgrounds.


Once the crackle paste was spread through the stencil with a palette knife, I then sprinkled some distress glazes quickly over the top, so that they would stick to the opaque crackle paste. For colours I used Wilted Violet and Salty Ocean.


Once I had a generous sprinkling of the Distress Glaze spread over the crackle paste, I then tapped my fingers on the back of the card stock to evenly spread out the glaze.  Below are the radiated results of the Distress Glaze over crackle paste. Now I am going to let the crackle paste dry for about 20 to 30 minutes.


Next, we are going to start putting together the main focal point of our card. I am starting the focal point by altering one of the Idea-ology Layered Frames. These frames are really cool and have stitching all around them. I altered the frame with a little bit of Vintage Photo Distress Ink to darken up the stitching.


For the next layer, I am glueing a Transparent Layer piece on the back of the stitched frame. After the glue dried I trimmed off the overhang of the Transparent Layer.


Next, using the die set Modern Floristry I die-cut some pieces to create a layered flower. I die cut the flower using some various scraps that I had in my scraps stash. Then I gave the top layer of the flower, some dimension with the Sizzix shaping tools.


Here is the finished layered flower.


After sticking the flower to the bottom left corner of the frame, I then added a bird from the ephemera set Botanic Layers. This completes our focal point for the card.


Now going back to our crackle paste backdrop.  First I check to see if the crackle paste was completely dry. Then I used an embossing gun to melt the glaze over the crackled background.  This gave me a shattered glass look.


Next, I added a layer of Distress Spray Stain Speckled Egg. I then spritz the spray stain with droplets of water before drying the card off with the Ranger Heat Tool. 


After I ink the edges of the card base with a Ranger Mini Ink Blending Tool and some Distress Vintage Photo ink.


Now for some finishing details. To pull the entire card together I added a few pieces of ephemera from the Large Palette pack. I selected a variety of blue and neutral pieces of ephemera and added it around the stitched frame to add some more visual interest. I also included an Idea-ology Mini Paper Clip.


Here is the completed card with layers and texture. Some of my favourite details include the Distress Glaze crackle background and the transparent Idea-ology layer.


Below is our completed card full of details, such as the stitching around the Layered Frame, and the speckled inky details of the Modern Floristry flower.


Thank you so much for joining me here today for TFJB Inspiration Ave. Until next time, happy crafting!

Janna~ 💕🎨💕

I can also be found on :
Instagram: dunhamtreasuresofthesea_jannak

YouTube: The Crafty Corner with Janna


Supplies used:

Idea-ology Organic Layers 

Idea-ology Layered Frames


Wednesday, April 19, 2023

Lyla's TIm Holtz Idea-ology Make

Hello, It's Lyla again, welcoming you back to a new two-week theme for The Funkie Junkie Boutique's Design Team.  This fortnight, we are designing for the theme "It's In The Details".  Linda has asked us to create using the new Tim Holtz Idea-ology products.  

I'm getting back into the crafting mood and making some plans to go along with all the new Tim Holtz stuff coming out. The product releases are trickling out over time, but I find that easier to not only keep up with creatively, but it also helps the budget juggle the "I want!"s. The product theme for the next two weeks is Tim's latest Idea-ology release, and The Funkie Junkie Boutique was my first stop in getting hold of a few items that seemed to form their own plan in my mind. Let's get to it!


My Happy Mail came from The Funkie Junkie Boutique to our Florida house and we left just days later. Love those little wax envelopes of freebies!


These were the main Idea-ology products calling out to me. (List of products used will come near the middle of this tutorial.)

The first thing was a pull towards my older Idea-ology since the new looked like it was going to marry very well with the old! I'll give you a rundown on each new product as we go. I even brought out a couple of new TH Dies; (Thinlits Sets Postal and Specimen) in case I wanted to add any die cut elements to my Card File. I dug through one drawer because "I just KNOW I have some feet that would look great on the bottom of these and I KNOW they will match the new Large Word Plaques!" I was right: I did and they do.


This was last but I'm showing it first because you'll see how the new fits in with this. I needed a new Vignette Card File for this new project, because I took the old one to keep in the Florida house. I got out some OLD TH Backdrops Volume 1 (but just ordered the new Backdrops Vol 4 for more to go along with this later).


I needed to match the Backdrops- no worries for me with either old or new: Tim keeps "vintage" in vogue with the newer shades matching this older tape and blending everything perfectly! Here, I am showing how I make sure to clip the corners of the (older) Tissue Tape so it will fold down completely flat. I wanted to show that because  on my first Vignette Card File, I painted the inside and all the edges.


I did the Paula Cheney 'thing' to age everything by smashing my Ground Espresso Oxide Pad onto my TH Glass Craft Mat, spritzing the ink with water, and then dragging all the measured-twice-cut-once pieces through the droplets on the glass mat. I heat dried everything, and then gave all the edges a workout of the same Ground Espresso, but with a Blending Tool all around the edges only, then heat dried again.


I'm not sure how "dry" others do, but I like to dry BOTH sides of the papers I ink. My reasoning is that it not only gets the edges, but also dries any Distress Ink/Oxide that may have been on the glass mat and transferred to the backside unknowingly. Then I adhere all the papers to all the faces of the wood. I actually heat dry again, just in case any of it came into contact with water, since the Distress Inks and Oxides are water reactant.


The last touch on my now-decorated Vignette Card File was to add a brand new Idea-ology element to it: Large Word Plaque, by using my finger to add TH Distress Paint in Salvaged Patina to make that cool font pop with color! Now it was ready to hold a few new Idea-ology makes.


After getting home and unpacking all my craft bags, I found a nice stack of Tags I'd die cut but didn't put to use yet. I like to double up my Tags as it gives a stiffer Tag to work with, so I used some score tape to put 2 (cut edges facing in towards each other) togetherSince I always cut the reinforcers at the same time I cut Tags, I already had everything I needed- just to do the "Paula Cheney smoosh thing" again and Ink up the edges with a Blending Tool. Heat drying after each step, of course. I found some pieces of ribbon and lace I'd hurriedly stuck into that bag, and the light neutral coloring of the Idea-ology items matched with them.


The fun began: tearing up and smoosh/blending tool inking up photos from the TH Snapshots 2 pack, and picking through TH Ephemera Snippets Number Strips and TH Clipping Stickers for sayings to match the Snapshots 2. I had some TH Tiny Clips that looked great on the new Snapshots! There's more to choose from in the Snapshots 2 that are more geared towards vacation, which I really like. I got extra lucky here: Snapshots 2 has a boy with a dog!


Next up was the new Collage Paper Photographic. My thoughts on this? AWESOME! There are several new "photos" printed on this tissue roll and they can mix/match/go alone or all together. The printing is so CLEAR and the photos look realistic. I especially a huge fan of the near-the-water pics! You still get a pretty good sized roll that will be enough for many projects- a great value during a time we need it! I took another idea from what Paula Cheney did earlier in the winter; using a Water Detailer Brush to draw a line of water around my chosen scene, then allowing the water to 'cut' the tissue for me. This actually works VERY WELL and I find myself doing it as my go-to way to 'cut' TH Collage Papers since it gives a perfectly torn edge.


I decided to add a detail of my own, since I find that personalizing a lot of my projects just makes me happy! I finally purchased a thermal printer and was able to simply add my own touch to the backsides of my Tags. It acted like a journal photo instead of writing as journaling.


Here's a helpful list of product links:


And this is what it all looks like put together:


Those little Freebie envelopes just happen to fit inside the TH Vignette Card File, so I chose not to put a title into the front handle.


Fronts of Tags with Closeups...


LOVE the new shapes and sizes on the Quote Chip Labels!


Backs of Tags with Closeups...


The photo I described in my last post (My Puppi Pi, Hunni Pimatched in with the Snapshots 2 pic on the front of this Tag.


I added a bit of Distress Watercolor Pencil in Salty Ocean with a Detailer Brush just ever so slightly on top of this sealed Tag.


I did use the TH Thinlits Set Specimen to die cut a few plain file folders that fit inside the Card File, and set them into the middle compartment with some leftover Tag bases into the back compartment.

That's a wrap... for the just the first posting on Tim Holtz's newest IdeaOlogy. The rest of The Funkie Junkie Boutique's awesome Design Team has much more to come in the next two weeks! Be sure to stop back in for more Inspiration Ave, and click the links in every post to help you find great deals for  the just-released Idea-ology!

Until next time...

Stay Safe &
HAPPY BLOGGING!!