Thursday, January 28, 2021

Guest Designer - Jo

It is time for our Guest Designer for the So Delicate challenge. Please welcome back Jo of Let's Art Journal who was the Design Team's Top Pick from the A Time To Be Grateful challenge.


Hello Everyone, I’m so delighted and honoured to be Guest Designer here at The Funkie Junkie Boutique Blog again. My name is Jo and I blog at Let’s Art Journal. I live by the sea in the North West of England with my hubby and I started Art Journaling in 2015 as a way of expressing myself in words and pictures. It has now become a passion of mine and my pages are often happy reminders of my life, which I love!


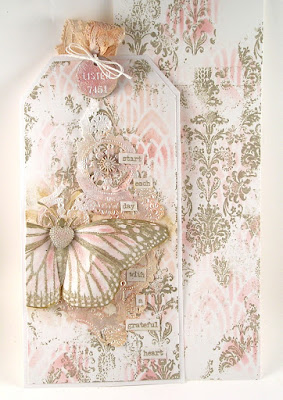
I enjoyed using different techniques and mediums to create this delicate page starting with the delicately painted background.


There are also elegant lace flower heads that were stamped and covered with Stickles to make them sparkle.


Both the butterflies and wording were very fragile as they were made from tissue paper that I had coloured using Distress Inks and cut using Tim Holtz Thinlits. To find out more please visit my blog Let’s Art Journal.

Thanks so much for having me as Guest Designer. I hope that you are inspired by the So Delicate challenge too and are able to join in the fun.

Thank you and stay safe! Jo x

* * * 
To check out all the details on how Jo created this delicate art journal page just click here to be taken to her blog post. Once you have looked around her blog, come on back and share your delicate project with us. The challenge can be found HERE and runs through 11:55 pm EST on Tuesday, February 2nd.

Monday, January 25, 2021

Challenge Winners - Put A Good Word In

It is time to announce our first winners of 2021 for the 'Put A Good Word In' challenge. Thank you to everyone who entered with wonderful projects featuring positive words.


The Design Team really enjoyed seeing the variety of ways in which you used words in your pieces and picked #14 Catherine (Catherine's Crafty Corner) as our overall winner this time; we loved her gorgeous journal page with its beautiful vintage colours, its textures and words of hope.

Congratulations to Catherine on winning the $25 gift certificate to The Funkie Junkie Boutique. Please email Linda at thefunkiejunkie@gmail.com for the gift certificate details and Top Pick Badge.

And now our picks of three additional outstanding entries for the The Funkie Junkie Boutique Blog Top Pick Badges. In numerical order they are #3 Tracey (hotchpotchcreations) #22 Repolainen and #26 Tina (Treebug). Please email Linda at thefunkiejunkie@gmail.com for the codes for the Top Pick Badges so that you can display them on your blog.

Thank you again to everyone who took part in this challenge from all of us here at The Funkie Junkie Boutique Blog and congratulations to all our winners. The current challenge 'So Delicate' runs through Tuesday, February 2nd at 11:55 pm EST so we hope you will join us.

Saturday, January 23, 2021

Saturday Showcase - Eileen Hull Designs Sizzix Chapter 1 new 2021 releases

Hi everyone and welcome to another Saturday Showcase, the Design Team's chance to share tutorials and products available from The Funkie Junkie Boutique with you. Today I have four versions of a card design to share with you, all of which incorporate Eileen Hull's new Sizzix Chapter 1 releases - 'Mandala' and 'Folio Page, Pocket & Flowers' Thinlits die sets - available now from The Funkie Junkie Boutique.

Here's the first version of the card which I shared with you on Wednesday as part of the current 'So Delicate' challenge;

(click on each photo for a closer look)

Let's show you how to recreate this one, starting with the background. I cut a background big enough to fit the white card blank and a couple of Mandala shapes from kraft card. Depending on how deep you want your 'embossed' look to be you can either go with one Mandala shape glued onto the background or two. Place the first one off-centre and then glue the second one over the top, ensuring they are correctly aligned (the design is not fully symmetrical so this is important). I would suggest using scissors to trim off the excess along one edge.


Paint the kraft background with a coat of white gesso followed by 'Buff' Acrylic Paint. These two steps are the basis for the other versions too.


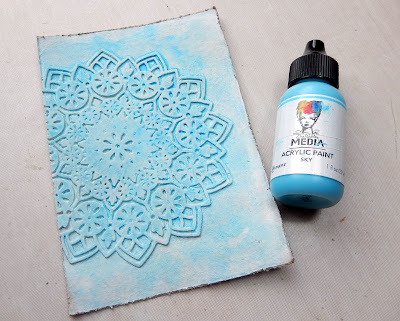
For the verdigris look spritz the background with water before adding a watery layer of 'Sky' Acrylic Paint. Dry this with a heat tool after allowing it to pool around the Mandala shape and dab off any excess with a dry cloth.


Dry brush over the whole background with 'Ancient' Acrylic Paint before sanding the surfaces back gently with a sanding block. This will help to reveal some of the lower layers including a little of the kraft base. Continue to dry brush and sand until you are happy with the look.


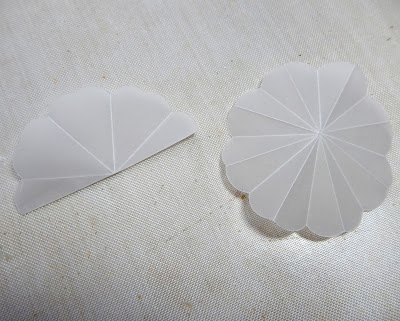
Moving on to the flowers begin by cutting the largest floral shape from the 'Folio Page, Pocket & Flowers' set out of vellum (or similar). Fold into eighths by matching two petals at the top from each angle as shown below.


Turn the flower shape over and fold in eights again matching the singular petal shapes at the top as shown below.


Using the smaller pf the flower shapes in the set die cut two from vellum. This die cuts the outside shape plus a second set of petals on the inside. Pinch the outer petals together and shape the inner ones upwards using a ball tool or even the bottom of a pencil.


Use the remaining dies from the set to cut smaller flowers and leaves from a mix of kraft card and vellum. Paint the kraft shapes in colours to coordinate with your background. For the verdigris version I used 'Blackberry' Acrylic Paint on the flowers and a mix of 'Evergreen' and Olive' Acrylic Paint for the leaves.


Layer the flowers together as shown below and finish them with a dot of Liquid Pearls (I used Wendy Vecchi's 'Prickly Pear' version for these cards). Finally die cut or stamp your choice of greeting and add to the card. I used the Tim Holtz 'Alphanumeric Type' dies for this and painted them with the 'Blackberry' colour. I would suggest using Wendy Vecchi's STAY-TION with its magnetized ruler to get your letters and words lined up properly. Mount your finished design onto the card blank and it's ready to send.


Now for the first of three further colour alternatives that has the look of a worn black book cover.


After mounting the Mandala on the kraft background and painting it all with white gesso and 'Buff' Acrylic Paint go over it all with a coat of 'Black' Acrylic Paint.


Gently sand over the surfaces with a sanding block, then dry brush with more 'Buff' and after some 'Gilt' Acrylic Paint. Sand it back again and repeat until you get the look you want.


I used the same mix of green paints for the leaves and 'Ruby' Acrylic Paint for the flowers and words on this version, though most colours would go with such a neutral background.


The third version is a softer neutral, this time replicating the look of aged plaster.


After adding the white gesso and 'Buff' Acrylic Paint layers to the background spritz it with water and add a dilute layer of 'Elephant' Acrylic Paint, allowing it to pool and dry. Dab off any excess with a dry cloth.


Repeat the process with diluted 'Umber' Acrylic Paint over a wet surface - you'll need less than you needed with the 'Elephant' layer. Sand back gently when dry.


To team with this paler neutral background I added more of the green mix to the leaves and teamed the flowers and words with 'Heather' Acrylic Paint.


The final version is more colourful than the last two with more of an aged velvet look.


This last one is a little different from the first three, beginning not with white and Buff but with a coat of 'Heather' Acrylic Paint.


Mist the dry surface with water and add a dilute mix of 'Blackberry' Acrylic Paint, allowing it to pool as before and after drying with a heat tool dabbing off any excess with a dry cloth.


Repeat the process with a smaller amount of dilute 'Umber' Acrylic Paint again allowing it to settle around the Mandala.


When dry gently sand back the surfaces before dry brushing them with 'Gilt' Acrylic Paint. Repeat this process until you achieve the look you want.


I teamed this final finish with the green leaves and this time added flowers and words coloured with 'Cheddar' Acrylic Paint.


Thanks for visiting to catch today's Saturday Showcase tutorial featuring Eileen Hull's new 'Mandala' and 'Folio Page, Pocket & Flowers' Thinlits die sets. I hope you've enjoyed seeing how it is possible to achieve several different looks using the same design and a range of colours.

There's still plenty of time to enter the current Funkie Junkie Boutique Blog challenge 'So Delicate' which runs through Tuesday, February 2nd at 11.55pm. We look forward to seeing your amazing creations.
Jenny

Products used to create this junk journal are available from The Funkie Junkie Boutique and are listed/linked below.

Wednesday, January 20, 2021

So Delicate

Hi everyone, Jenny here with our second challenge of 2021 and I am calling this one 'So Delicate';

"Although it's not always evident in my projects, I have a real passion for delicate laces, fragile flowers, fine stitching, intricate artwork and exquisite architecture. For this challenge create something delicate or a vintage/shabby chic project that features delicate things in it."

The overall winner will  receive a $25 gift certificate to go on a spending spree at The Funkie Junkie Boutique. And the winner, along with our top three picks from the remaining entries will receive badges to display on their blogs in recognition of their outstanding contributions.

The guidelines for entering are simple; create a new vintage or shabby chic project following the challenge theme, link it below to your post (not just your blog) and also include a link back to this challenge in your post. You can combine our challenge with up to 10 challenges (including this one) to be in with a chance of winning. If you are entering through a public forum (such as Instagram) you'll need to include the words 'Funkie Junkie Boutique Challenge'. Make sure you follow these rules as unfortunately, we have had to eliminate entrants from the prize draws in the past.

The Design Team share their own delicate creations below to get you started. To find out more about each of the projects just click on their blog names.

Sara Emily Barker - sarascloset


Cec Wintonyk - CW Creations


Jenny Marples - Pushing The Right Buttons


Suzanne Czosek - Suzz's Stamping Spot 


Once you have checked out the details, come on back and share your project(s) with us using the link tool at the end of this post. We always love seeing what you create.


Thursday, January 14, 2021

Guest Designer - Lyla Larimore

It is time to say hello and welcome to our Guest Designer for the Put A Good Word In challenge. Lyla Larimore of A Chief's Wife's Heart's 'aFire was the Design Team's Top Pick from the Celebrate challenge.


For those of you who may be new to my blog, my name is Lyla Larimore and I've been blessed to have been Guest Designer for The Funkie Junkie Boutique Challenge Blog several times now.

I've been crafting with paper in some way or form just about my entire life, beginning with making my own dollhouses, furniture, and then worked my way up to reality as a homemaker. Those skills came in very handy when my kids got into school. I spent my afternoons making whatever paper project the school's hallways needed for each subject of study, event, or holiday where help was needed. My projects since having to retire from school and photography have toned down quite a bit- but not in the sharing of it!

And just last week on Monday the 4th my ChiefHubby joined in on the retirement- living the dream of being able to stop his paying job so that he can still have time to do the work he wants to do for The LORD. Papers were signed and we rode off into the sunset, literally - crafting gear came with!!


I created some ATCs by altering playing cards with all sorts of Paper Dolls, Crackle Paste, word banners and tied them all together with a blue color palette.


You can get all the details of how they came together on my blog by clicking HERE.
* * * 
Once again Lyla has come up with some fabulous inspiration for her Guest Designer post and after you have checked out all the details, please come on back and share your project(s) with uplifting words. The challenge can be found HERE and runs through 11:55 pm EST on Tuesday, January 19th.

Saturday, January 9, 2021

Saturday Showcase - Dina Wakley Acrylic Paints

Hello. It is Cec here and I am presenting the Saturday Showcase this time. I am going to share how I made the whimsical little canvas for the Put A Good Word In challenge that began on January 6th.

My photos are not fabulous because it is winter here and the days have been cloudy for the most part, which doesn't help when my only natural light comes from a window facing the brick wall of my neighbour's house. And as usual, I got engrossed in creating and forgot to take a few photos along the way. I know you all have experienced much of the same so I know you will forgive me.

  • Cover a 6" square canvas panel with White Gesso (Dina Wakley)
  • Paint the top half with a mixture of Turquoise and Lapis Acrylic Paint (Dina Wakley) along with a bit of White Gesso
  • While the paint is wet, dab it with a rag to eliminate any obvious brush strokes
  • Paint underneath the blue with a mixture of Lime and Evergreen Acrylic Paint (Dina Wakley)
  • Paint the bottom with a mixture of Elephant and Umber Acrylic Paint (Dina Wakley) along with a bit of White Gesso
  • Using Olive Archival Ink (Ranger) and Fern Green Archival Ink (Wendy Vecchi) stamp some greenery (I used an old set from my stash)
  • Cut more greens using some green paper from the St. Nicholas paper pad (Graphic 45) and dies from the Garden Greens and Wildflower Stems 2 sets (Tim Holtz) and Petite Petals (Emily Tootle)
  • Ink the edges of the greens with Forest Moss Distress Ink (Tim Holtz) and add to the canvas
  • Paint the resin bicycle with Sand Acrylic Paint (Dina Wakley) and then rub with Metallic Gold Wax Paste
  • Use Gel Medium to adhere the bicycle to the canvas
  • Adhere teeny stones at the base of the greenery to create a stone wall (I used some limestone screenings my husband had left from fixing the driveway pavers)
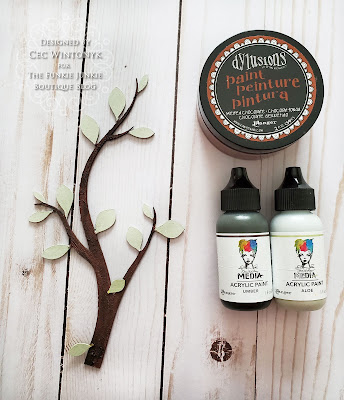
  • Cover a couple branches made from a cracker box with some Texture Paste (Ranger) and then paint with a mixture of Umber Acrylic Paint (Dina Wakley) and Melted Chocolate Acrylic Paint (Dylusions) and combine to make one more dense branch
  • Paint the leaves with Aloe Acrylic Paint (Dina Wakley)
  • Use a tiny flower punch and some scrap card stock to make little flowers
  • Ink the flower edges with Worn Lipstick DI and add an adhesive Pearl to the centre before adding them to the branch
  • Punch more flowers from scraps of paper from the Bloom paper pad (Graphic 45)
  • Use Worn Lipstick, Wild Honey and Spiced Marmalade DI to ink the edges and then add adhesive pearls to the centres
  • Add the flowers to the bicycle basket using dimensional foam bits
  • Add a tiny bee and ladybug button by first clipping the shank off the back
  • Print the sentiment, cut apart and ink the edges with Frayed Burlap DI
  • Finally adhere a larger bit of gravel (my metaphorical obstacle)
Please remember that even with all the obstacles that are thrown in our way and we all know that this year has given us more than enough, life is still a beautiful ride. I hope you will agree because we all need to choose to be happy and positive so we can overcome those obstacles.

Supplies list:

Dina Wakley Acrylic Paint - Turquoise, Lapis, Lime, Evergreen, Elephant, Umber, Sand, Aloe
Tim Holtz Distress Ink Pads - Frayed Burlap, Forest Green, Wild Honey, Spiced Marmalade, Worn Lipstick
Ranger Archival Ink Pad- Olive
Sizzix Chapter 3 Thinlits Dies - Petite Petals 664455
White Gesso
Tim Holtz Garden Greens Thinlets Die Set
Tim Holtz Wildflower Stems 2 Thinlets Die Set
Graphic 45 St. Nicholas 6"x6" Paper Pad
Wendy Vecchi Fern Green Archival Ink
Adhesive Pearls
Metallic Gold Wax Paste
Tiny Flower Punch
Limestone Screenings
Insect Buttons
Victorian Garden Stamp Set
Matte Gel Medium

Wednesday, January 6, 2021

Put A Good Word In

Hello, it is Cec here. I would like to welcome you to 2021 and introduce our first challenge of the new year. Now that 2020 has been kicked out the door it is time to look forward and focus on the light at the end of the tunnel. I am calling this one 'Put A Good Word In!' Here is what I have to say about it:

Create a shabby chic or vintage projects that includes a word or words that are positive or happy or uplifting in nature. Single words or sentiments/quotes can be used. Given what we have all been through for the last months nothing sad or negative please.

Since this is a new year we have decided to change up the prize package slightly. Beginning with this challenge the Design Team will choose their four top picks as they always do but the overall winner will receive the $25 gift certificate to go on a spending spree at The Funkie Junkie Boutique. We will not have a Guest Designer going forward; instead all four top picks will receive badges to display on their blogs in recognition of their outstanding contributions.

The guidelines for entering are simple; create a new vintage or shabby chic project following the challenge theme, link it below to your post (not just your blog) and also include a link back to this challenge in your post. You can combine our challenge with up to 10 challenges (including this one) to be in with a chance of winning. If you are entering through a public forum (such as Instagram) you'll need to include the words 'Funkie Junkie Boutique Challenge'. Make sure you follow these rules as unfortunately, we have had to eliminate entrants from the prize draws in the past.

Our designers have made some fabulous inspiration to get your creative juices flowing. To find out details of their projects just click on their blog names.

 Sara Emily Barker - sarascloset

Suzanne Czosek - Suzz's Stamping Spot


Cec Wintonyk - CW Creations


Once you have checked out the details, come on back and share your project(s) with us using the link tool at the end of this post. We always love seeing what you create.