Wednesday, January 21, 2015

Winter Wishes Challenge

Hello and welcome back to the second week of the current challenge! I hope that a happy holiday season was enjoyed by all. With the festivities over and the midst of winter upon us (unless you live in Australia, of course!) I thought it would be fun to share what we love most about the season. For this challenge create any type of project, layout, or card that expresses what you love about winter, whether it's sledding down a snowy hill or curling up with a book and cup of hot cocoa.

The winner will earn the chance of a Guest DT spot here at Frilly and Funkie, and everyone who enters and follows the rules will be entered into the draw to have the chance to win a $25 spending spree at The Funkie Junkie Boutique.

The guidelines for entering are simple and we need you to follow them: create a new vintage themed or shabby chic project following the challenge theme, link it below to your post (not just your blog) and also include a link back to this challenge in your post. You can combine our challenge with up to 10 challenges (including this one) to be in with a chance of winning.

Please make sure you follow these rules as unfortunately we have had to eliminate entrants from the prize draws in the past when they have not followed these rules. If you are entering through a public forum please use keyword F&F. Also, please be sure to turn off your Word Verification so our Design Team can leave comments on your blogs.

As promised, today we have the Funkie team offering up some inspiration for Week Two;

Nicole Wright- Canadian Nickel Scrap'n 

Sue Carrington - Stamping Sue Style

Jenny Marples - Pushing The Right Buttons

Linda Coughlin - The Funkie Junkie


*******************************************************
WEEK ONE

Today we have the Frilly team offering up some inspiration for Week One;
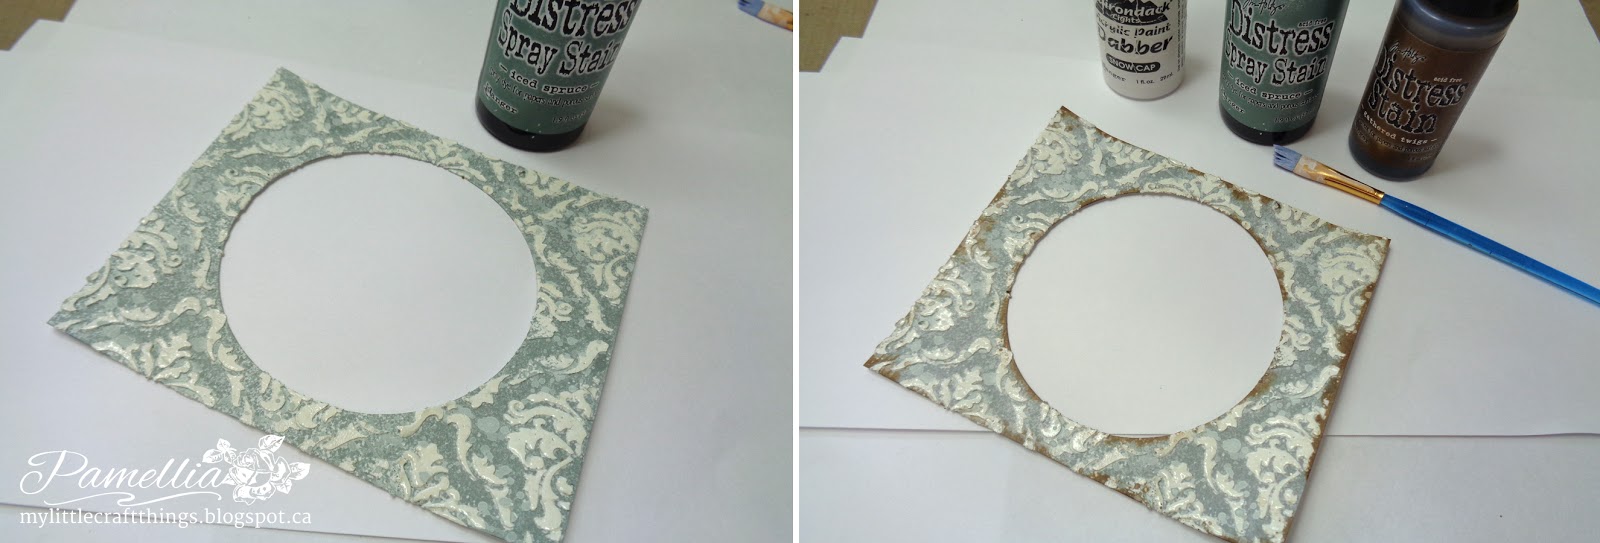

Cec Wintonyk - CW Card Creations

Nancy Dynes ~ Tattered Treasures

Linda Coughlin - The Funkie Junkie


Now it's time to get cozy in your own craft room and start creating. Each and every one of you is important to us. As a team we are constantly inspired by your work and are so excited to see the lovely entries this new challenge will bring.

We'll be back tomorrow when we will be joined by another Guest Designer with her take on our 'Winter Wishes' theme so please come back for that. Thank you so much for joining us here at the Frilly and Funkie Challenge Blog!

Hugs,
Nancy


Monday, January 19, 2015

Challenge Winners - Anything Goes

Welcome to the Frilly and Funkie challenge blog for the start of a new week, and it's winners day. Before we share our choice of winners for the last challenge, we want to take a moment to share news of a winner in our own team; DT member Nancy has recently been honoured by one of our favourite paper design companies here at Frilly and Funkie. Maja Design have put Nancy firmly in the spotlight for the incredible cards she makes using their collections. You can see the special post HERE. As a team we are so proud to congratulate Nancy on receiving this hugely deserved honour.

Now it's time to announce the winners of the 'Anything Goes' challenge. Thank you so much to everyone who took the time to enter with some fantastic projects. There were so many fabulous creations on display and we were really spoiled for choice when picking the winner. In the end the Design Team voted for #47 Nancy Smith at Shelby Doodle Designs.


Nancy's superb layered card really captured our hearts and we loved how she'd put together so many beautiful elements and textures. Congratulations Nancy on being our favourite for the 'Anything Goes' challenge and winning the opportunity to be a Guest Designer here at Frilly and Funkie for a future challenge.

And Random.org has chosen a winner for our $25 gift certificate to The Funkie Junkie Boutique. Our congratulations this time go to #9 Georgie C.


A huge thanks from the Frilly and Funkie team to everyone who took part in this challenge and congratulations again to our winners. Please email Linda at thefunkiejunkie@gmail.com for the codes for the winner's badge and to give us your email address for the Guest Designer details (Nancy) and for the gift certificate details (Georgie).

Our current challenge, 'Winter Wishes', runs through Tuesday, January 27th. We hope to see you entering this time around so that you too can be in with a chance to win. And please make sure you follow our rules as unfortunately we've already had a few who haven't; you can enter up to 10 challenges including ours, and a maximum of 3 entries per person to our challenge. Please remember to link back to our challenge in your entry and mention in your post that you are entering this Frilly and Funkie challenge.

Have a great week everyone!

Saturday, January 17, 2015

Saturday Step by Step - Festive Fun

Hello Everyone! Pamellia here with you today to do my very first Step by Step here at Frilly and Funkie! I hope you're not too sick of Christmas yet, because I want to share a fun holiday card with you that I made using a bunch of products that I just purchased from the Funkie Junkie Boutique!!

I included lots of high res pictures, so feel free to click on any image for a super sized version that you can zoom right it on! I hope you enjoy!


First up is this wonderful corrugated cardboard that I've been dying to get my hands on!! I flipped a piece over and tore off the backing in some random spots. Next I dry brushed on some white paint. Not a full coverage, just in some areas because it acts as a resist for the stains I applied next.


I rubbed Iced Spruce distress stain in the middle and Gathered Twigs around the outside and then I misted it with water so the colours would blend together nicely. The moisture made the edges of the cardboard curl up, giving the panel an amazing distressed look!!

I stamped on a design with a Tim Holtz stamp from the Distressed Damask set and some Ranger Archival ink Coffee. I also stamped some snowflakes with Iced Spruce, but they are hard to see.


For the top panel I used Tim Holt's Gothic stencil to lay down some texture paste and while the paste was still wet, I covered the paste with clear embossing powder. After the paste is dry, heat the embossing powder to coat the pattern with a nice gloss.


I sprayed the panel with Iced Spruced distress ink spray and then rubbed Gathered Twigs stains around the edges, spritzed with water and let it dry. The colour will easily rub off of the embossing powder leaving a nice white pattern.


I cut out the jumping reindeer from Tim Holtz Reindeer Flight, but instead of using the cut out piece, I took the negative piece and very carefully fussy cut around the edges to make this hollow reindeer. I coated it with glossy accents and Tarnished Brass distress glitter.


Instead of using ink pads for my trees, I dabbed the stamps with the stain dabbers in both Gathered Twigs and Iced Spruce giving the trees a water coloured look. I splattered some white and Iced Spruce with my paintbrush to look like snow.


For the sentiment, I inked only one word at a time, so I could flush them to the left margin of the sentiment frame without having to do any masking. Some more flicking of the Snow Cap and Iced Spruce.


I ended up layering some really dark brown card stock between the painted layers, just to add a little contrast. I dyed some seam binding to wrap the corners and make a bow. I used a Tim Holtz Gumdrop that I coloured with Sunshine Alcohol ink as the center of the bow. Lots of foam bits to give the card dimension.


I hope you enjoyed my tutorial . Please feel free to let me know if you have any questions and I would love to see any creations you make! There's still time to enter our current challenge "Winter Wishes", where we are looking for your shabby or vintage creations showing us what you love about the winter season! And we'll be back next Monday, January 19th to announce the winners of our last challenge, Anything Goes so put a reminder in your diary for that.

Thanks for stopping in!
Hugs, Pamellia :)

Friday, January 9, 2015

Friday Focus - Wendy Vecchi stamps

Hello it's Sue here and today I have the most pleasurable task of focussing on Wendy Vecchi stamps which will have an extra 15% discount applied through January 22nd at The Funkie Junkie Boutique. Have you seen the new releases too, which you can pre-order from The Funkie Junkie Boutique!


I started with some white card that I painted with Clear Gesso. I then covered the entire piece with acrylic paint, I wafted it lightly with my heat gun and then used a baby wipe and wiped it over the card. Some of the paint gets left behind and it creates a lovely distressed effect.


I repeated this process with two further colours of paint and as the Gesso is clear you still see the colour from the layers below.


I then stamped the card with Cornflower Blue Archival ink using the Wendy Vecchi Large Collage Background stamp.


Then I stamped it with the Dots and Dashes background stamp using Hydrangea Archival ink but without using an acrylic block.


I used the Splatter background stamp with white acrylic paint to add some contrast.


The vertical panel is made from white card then I used the Wendy Vecchi Add a Stencil with white Embossing Paste. When it was dry I used the same technique using the Clear Gesso and acrylic paint.


The flower is from the Forever Art set and was stamped using black Archival ink and then I've used my watercolour pencils to paint it.


The sentiment is from the Say it with Art set and I've added some lace, a button and metal embellishment to finish.


This is another example using the same design but different colours, I love how the flower looks painted with watercolour pencils! 


This tag is made using the Pansy SiSi and using the Clear Gesso technique on Kraft card.


This last piece is my DT project for the current challenge which is Anything Goes. The flowers and butterflies are from the Pansy SiSi set.

I hope you've enjoyed today's Friday Focus as much as I have!
Sue
x

Wednesday, January 7, 2015

Anything Goes

Happy New Year everyone! Nicole here hosting the second week of the 'Anything Goes' challenge.  Did you get some new creative goodies for Christmas you want to play with? Show us your creative side for the New Year and play along.

The winner will earn a Guest DT spot here at Frilly and Funkie, and everyone who enters will be entered into the draw to have the chance to win a $25 spending spree at The Funkie Junkie Boutique.

The guidelines for entering are simple: create a new vintage or shabby chic project following the challenge theme, link it below to your post (not just your blog) and also include a link back to this challenge in your post. You can combine our challenge with up to 10 challenges (including this one) to be in with a chance of winning. Make sure you follow these rules as unfortunately we have had to eliminate entrants from the prize draws in the past when they have entered too many other challenges. If you are entering through a public forum please use keyword F&F. Also, please be sure to turn off your Word Verification so our Design Team can leave comments on your blogs.

Now here's some inspiration from the Funkie team to start Week Two;

Nicole Wright- Canadian Nickel Scrap'n 


Sue Carrington - Stamping Sue Style

Linda Coughlin - The Funkie Junkie

Jenny Marples - Pushing The Right Buttons


***************************************************
WEEK ONE

Before we reveal the first week's DT projects some news for you... sadly one of our number, Rebecca is leaving to follow a new journey. We will really miss her and thank her from the bottom of our hearts for everything she has done over here at Frilly and Funkie over the past couple of years. Good luck and best wishes from all of us in your future endeavours.

That means we have a new DT member and are proud to announce that Pamellia (My Little Craft Things) has joined the Frilly team! We are all thrilled to have her on board and hope you will join us in giving her a huge welcome to the Frilly and Funkie family.

So now without further ado we have some inspiration from the Frilly team to start off Week One;


Nancy Dynes ~ Tattered Treasures

Cec Wintonyk - CW Card Creations

Linda Coughlin - The Funkie Junkie

The rest is up to you. We invite everyone to join in and share your amazing creations with us. We'll be unveiling the gorgeous cards from the Funkie team in one week, so don't forget to stop in and share in the excitement!

Nicole


Saturday, January 3, 2015

Saturday Step by Step - Tarnished Brass

Hi everyone and welcome! Jenny reporting for duty with the first Saturday Step by Step of 2015 here at Frilly and Funkie. Remember, every two weeks one of the Design Team will share a new tutorial with you so make sure you keep a note of that in your crafting diaries.

It's always a challenge to come up with new ideas but I'm thrilled with how this one turned out and hope you will enjoy it too. So let's get started (you can click on the photos to get a close up view)...


I cut a tag shape and some letters and glued them firmly in place with Multi Medium Matte (the Collage Glue Stick will also work). You can use any base design and die cut shapes you want for this as long as they are cut from a heavier weight of card for the next stage to work.


Apply a swipe of Barn Door and Black Soot Distress Paints to your craft mat. Mist your card completely with water before dragging it through the paint a couple of times to cover as much of it as possible.


Spritz more water over the surface to encourage the paints to bleed together. You can dab a little more on if there are bits with too much black/red or no paint at all, but make sure you spray water over these too so they blend with the paint that is already there. I left mine to air dry for a while so that the paints could continue to wick together in the way that only Distress Paints do (in my experience).


Once thoroughly dry add a little Tarnished Brass Distress Paint to your craft mat. Using a flat brush work a little of the paint across your mat to get it to the stage where it has almost dried out. 'Dry brush' your surface by sweeping the brush to and fro across the raised die cut areas. Work in different directions so you catch all of the edges. If the paint on your brush dries completely add a little more, remembering to 'work it' on your mat first so the paint isn't too wet.


Once it looked good to me I used a little of the remaining Tarnished Brass to paint the lettering that needed to stand out. If you have used detailed die cuts you'll find this stage much easier to do with a fine nib brush. To finish I blended a little Gathered Twigs Distress Ink onto the edges of the tag with the mini blending tool.


I wanted to use some 'brass' Idea-Ology trinkets on my finished card and needed to replicate their look on this die cut clock face. Again, you could use this idea with lots of die cut designs such as Gadget Gears, Rustic Lanterns, Picture Wheels, Ornate Frames... you get the picture! Start by covering the shape with Black Soot Distress Paint.


Having dabbed the dried painted surface with random patches of embossing ink I poured Distress Embossing Powder over it - in this case I used the Black Soot version but you could equally use the darker brown shades. I used a heat gun to set the powder and brushed off the excess once cooled to give that wonderful rough surface.


The clock and hands were finished with more dry brushing using the same Tarnished Brass Distress Paint. With these elements completed I assembled the card...


I've added a calendar from one of the Ephemera Packs, some Tissue Tape, Filmstrip Ribbon, a Hashtag sentiment and of course those Idea-Ology items onto white card splattered with the same Distress Paints used for the tag. And here are a couple of close ups...


I hope you've enjoyed this tutorial and if you use it to create something please let me know. That's all for now but we'll be back next week with the Funkie DT projects for the current 'Anything Goes' challenge and a new Friday Focus.

Have a great weekend and take care of yourselves,
Jenny xxx

Thursday, January 1, 2015

Welcome to today's Guest Designer, Jane!

First of all Happy New Year to everyone; we hope 2015 brings you everything you hope for!

To kick off the New Year, today we are welcoming Jane of Jane's Journal as our Guest Designer for the current challenge which is 'Anything Goes'. Jane was chosen by the DT as the winner of the 'A Gift from the Heart' challenge and was invited to join us a Guest Designer.


My name is Jane of Jane's Journal, I live in Surrey in the UK and I have been a "make and do girl" from the time I could hold a pencil or paint brush.  I kept scrap books as a child long before the term "scrap booking" was used. I work part time for the NHS as a physiotherapist and I craft in what little spare time I have. My family is the most important thing in my life and our newest addition is our 1 year old gorgeous granddaughter, Daisy Jane. I am also a silver smith, jewellery maker, keen photographer and gardener but paper crafting is my real passion at the moment. I love getting inky hands in my garden studio (when it is warm enough to work outside). Recently I have been dabbling in mixed media and I like to learn and explore new products, ideas and techniques. I have been blogging for over 4 years and I treasure the friendships I have found with fellow crafters the world over. I share my blog space with our great cat, Billy, who often features there.


I was thrilled to find myself chosen as a recent winner of the Frilly and Funkie challenge with my Christmas book box and decided to make my an inspirational wall hanger to "ring in" the New Year for my Guest Design spot today.


I have a detailed tutorial over at my blog which I hope you will enjoy. This project started it's life as the mount from a photo frame which I turned into a Christmas shadow box.


I knew it would come in useful, us crafters do like to up-cycle don't we! Wishing everyone a very happy, healthy and crafty 2015!

What a fabulous project from Jane! I'm sure you'll all agree that this has provided you with even more inspiration for the current challenge where 'Anything Goes'.

If you would like to be in with a chance to feature here as Guest Designer, all you need to do is join in!