Wednesday, July 22, 2015

Raise It Up!

Hello Everyone! Pamellia here hosting our next challenge here at Frilly and Funkie and I have chosen the theme Raise It Up! I want to see lots of layers, lots of panels and/or lots of elements on your shabby chic or vintage project, BUT they must be raised up! Whether you choose to use pop dots, foam squares, silicone glue or another means of support, make sure they stand tall!

The winner will earn the chance of a Guest DT spot here at Frilly and Funkie, and everyone who enters and follows the rules will be entered into the draw to have the chance to win a $25 spending spree at The Funkie Junkie Boutique.

The guidelines for entering are simple: create a new vintage or shabby chic project following the challenge theme, link it below to your post (not just your blog) and also include a link back to this challenge in your post. You can combine our challenge with up to 10 challenges (including this one) to be in with a chance of winning. Make sure you follow these rules as unfortunately we have had to eliminate entrants from the prize draws in the past when they have entered too many other challenges. If you are entering through a public forum please use keyword F&F. Also, please be sure to turn off your Word Verification so our Design Team can leave comments on your blogs.

And here is some gorgeous inspiration from the Funkie Team;

Sue Carrington - Stamping Sue Style

Shelly Hickox - Stamptramp

Jenny Marples - Pushing The Right Buttons


*******************************************
WEEK ONE

And here is some wonderful inspiration from the Frilly Team;

Pamellia - My Little Craft Things


Cec Wintonyk - CW Card Creations

Nancy Dynes ~ Tattered Treasures

Georgie Connelly - Little Blue Craft Box

Wow, look at all those gorgeous layers! I hope we have inspired you to head to your craft room and start layering! We can't wait to see what you create!

We'll be back on Friday with an amazing brand new Friday Focus from Shelly, and then on Saturday you'll be treated to a fabulous step by step from Georgie!!!

Hugs, Pamellia :)


Monday, July 20, 2015

Challenge Winners - Something to Say...

Welcome to the start of a new week. Here at Frilly and Funkie it's time to announce the winners of the 'Something to Say...' challenge. Thank you so much to everyone who took the time to enter with so many fabulous projects. Once again we were spoiled for choice when picking the winner. In the end the Design Team voted for #46 Ruth (a love to create).


Those words really did make sense when we looked even closer at this amazing textural journalling. Congratulations Ruth on being our favourite for the 'Something to Say...' challenge and winning the opportunity to be a Guest Designer here at Frilly and Funkie for a future challenge.

And now for the next three winners of our Frilly and Funkie Top 3 Badges... #14 Kerstin F, #22 Jane and #23 Jennie!!! Please email Linda at thefunkiejunkie@gmail.com for the codes for the Top 3 badges so that you can display them proudly on your blog.

And finally Random.org has chosen a winner for our $25 gift certificate to The Funkie Junkie Boutique. Our congratulations this time go to #44 Patti Painter!


A huge thanks from the Frilly and Funkie team to everyone who took part in this challenge and congratulations again to our winners. Please email Linda at thefunkiejunkie@gmail.com for the codes for the winner's badge and to give us your email address for the Guest Designer details (Ruth) for the Top 3 badges (Kerstin, Jane and Jennie) and for the gift certificate details (Patti).

Our current challenge, 'Raise It Up!' runs through Tuesday, July 28th. We hope to see you entering this time around so that you too can be in with a chance to win. And please make sure you follow our rules; you can enter up to 10 challenges including ours, and a maximum of 3 entries per person to our challenge. Please remember to link back to our challenge in your entry and mention in your post that you are entering this Frilly and Funkie challenge.

Have a great week everyone!

Friday, July 17, 2015

Friday Focus - Dylusions Paints Part 2

Hello ! It's Sue here for part 2 of the Dylusions Paints Friday Focus.  Apologies for the delay but I've had major blog issues which has resulted in me having to create a new blog. So, if you were following me you'll now find me here. It would be great if you could join me again for the ride !

I've had great fun playing with the new Dylusions paints, you'll definitely need a cuppa as there's lots to share !


The first project I'm sharing with you is a journal page and I've painted the pages with Gesso then used a babywipe with Fresh Lime Dylusions paint.


I then used my fingers and blended Cut Grass and Squeezed Orange over the pages. I stencilled the diamonds using London Blue and a Dylusions stencil.


I carried on stencilling this time with Dina Wakley stencils but using Cut Grass and Vibrant Turquoise.To do the stencilling I've used a Mini Blending Tool and really worked the paint into the foam pad.


I wanted this page to have impact and what better way than to use black ! I cut a piece of paper in to the wavy shape and used it to mask off the page so I could add Black Marble across the centre. As the paints are semi-opaque it needed three coats before the underneath colours were completely covered. I used a black Fude Ball pen to draw the scalloped edge.


There was plenty of paint left on the Mini Blending Tool so I used it to stamp the Dylusions flowers onto the page.


I pressed the Mini Blending Tool foam onto the pages to add circles of white then dabbed over the top with Lemon Zest. I also dabbed a circle onto a piece of paper then cut the circle out to create a mini stencil


I placed it over the top of the circles then used the Wendy Vecchi script stamp with Watering Can Archival ink and stamped over it.


I've written the words over the black centre panel using a white Sharpie pen. I then used the Mini Blending Tool that still had some White Linen on it and blended it around the edge of the page. To finish I've rubbed Black Marble around the edge to frame the page.


A couple of close up shots to finish with, the eagle eyed among you can see there are some bubbles in the black panel. I got distracted while I was drying the paint and it bubbled !


This next journal page started life by using the paint up from the blending tools that I used for the first page. I was lucky to attend one of Dyan's classes and one of the things she did all the time was to use up any left over paint on a different journal page. So, I did just that !


I carried on adding the dots of paint covering both pages.


I wanted to make this page more pastel than bright and by using the blending tool with White Linen and rubbing it it over the page it knocks the colours back.


 I stencilled the border using the Dina Wakley Plastic Canvas Stars stencil using London Bus.


I've stamped the Wendy Vecchi flowers with Cut Grass and used the small circle stencil I made for the previous page and stamped the script onto circles of Lemon Zest.


The larger circles are made in the same way, I die cut a circle from paper and used it as a stencil, first using White Linen and then a little Fresh Lime around the edges.


 I stamped the flower from the Dylusions set into each circle, then went in search of a quote !


I was inspired by a crafty friend who has been using quotes around circles on journal pages. The quote I found is anonymous but it said just what I wanted it to 'Focus on what matters...'


'and let go of what doesn't'. The shadow around the edges of these two circles is created using a Gelato. By pressing the blending tool with Black Marble on it over the small circles it just added the slight black outline as there wasn't much paint left.

I've just one last thing to share with you, if you're still awake !


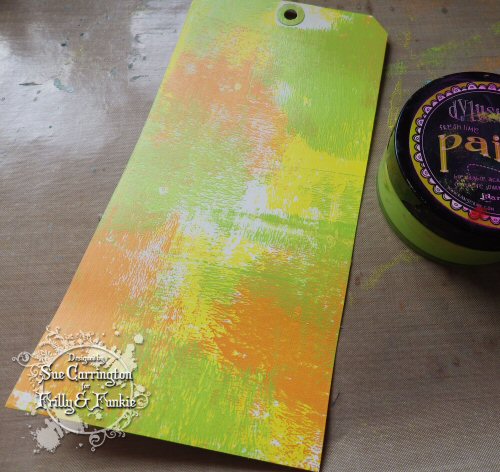
I wanted to use the paints with a brayer, so painted a jumbo tag with Gesso then started with Lemon Zest and brayered some over the tag.


I dried the first colour then used Squeezed Orange. 


 The last colour is Fresh Lime, I was careful not to completely cover the previous colours.


Dylusions sprays co-ordinate with the paints and also spray over them beautifully. So I took one of the Dina Wakley stencils and spritzed the tag with Squeezed Orange. Not wanting to waste the ink I flipped it over and pressed it onto a journal page that I'd already brayered with the excess paint.


I used a plastic card and dipped it into Black Marble and dragged it over the tag to create the lines. The dots are created by using the end of a paintbrush.


 I added some more stencilling using Vibrant Turquoise using another Dina Wakley stencil.


To add some texture I mixed some Wendy Vecchi embossing paste with a little Vibrant Turquoise and spread it over Wendy's Alphabets stencil


 To finish off I stamped the two sentiments, which are by Dina Wakley, with black Archival ink.


There was still a small amount of Black Marble on one of the Blending Tool so I pressed it onto the tag to create shadow circles.


I also rubbed Black Marble around the edges to frame the tag.

As you can see I've had lots of fun playing with the Dylusions paints. I hope you've enjoyed it too and remember that there is a special discount on the paints so what better time to stock up !

Sue
x 

Thursday, July 16, 2015

Welcome to today's Guest Designer, Kathy!

Today we are welcoming our next Guest Designer, Kathy Clement of Kathy by Design. Kathy was chosen as the DT winner of the 'It's Summer!' challenge and was therefore invited to join us as Guest Designer. Let's move on to hear from Kathy!


Hello, Friends! I’m thrilled to be a guest designer at the Frilly and Funkie Challenge blog. I’ve enjoyed a lifelong love affair with paper, color and design and made my first card with Crayola Crayons and a Doodle Pad when I was about 4 years old. I married my sweet husband, Dale, in 1976 and together we have raised 5 lovely children and are now enjoying our 3 darling granddaughters. For many years, I was so busy with our home, homeschool, volunteer work at our church, and family business that I did not have time to play with paper. But I always kept a well-stocked art cupboard and even hosted a small art class for home schooled children for a time.


When my children had all fled the nest, I finally had time to pursue my love for paper and began making cards and little projects for my friends and family. Lo and behold, their friends and families began asking me to create cards and projects for them and before I knew it, Kathy by Design was born! I currently design for Crafty Secrets, Really Reasonable Ribbon, Polly’s Paper Studio and Canvas Corp Brands. Past design teams include Heartfelt Creations and 613 Avenue Create. I also design and create custom souvenir menus for BMW executive banquets held all over the world. I had no idea that this creative, exciting and fulfilling time lay ahead of me when I opened my first box of Crayola Crayons. Life really is full of wonderful adventures around every corner! I invite you to visit my blog, Kathy by Design to find out more about how I put today's card together.


I'm sure you'll all agree that Kathy's card is beautiful, and a big thank you from all of us at Frilly and Funkie for providing even more inspiration for the current challenge 'Raise It Up!'

If you would also like the chance to join us as Guest Designer all you need to do is join in with the current challenge!

Friday, July 10, 2015

Friday Focus - Dylusions Paints

Welcome everyone to the start of a new Friday Focus! For the next two weeks the spotlight will fall on Dylusions Paints, with an extra 15% discount added through Thursday, July 23rd at The Funkie Junkie Boutique.

Sue Carrington will be back soon to share a new project she's created with these fabulous paints. Before she 'reveals all' though we thought it would be a great idea to introduce you to the world of Dylusions Paints, especially for anyone who is unfamiliar with using them. And who better to do that than the Ranger Signature Designer behind this range, Dyan Reaveley...


Bet you are excited to get started now! Head on over to The Funkie Junkie Boutique to stock up on your Dylusion Paints whilst they are on a special discount and then get creating!

Wednesday, July 8, 2015

Something to Say...

Hi everyone and welcome! Jenny here as your host for the second week of our latest challenge, 'Something to Say...'. There are so many fabulous quotes and sayings now available for use on our projects. Whether you stamp it, print it, write it or die cut it, make your sentiment the main focus of attention on your vintage or shabby chic entries.

The winner will earn the chance of a Guest DT spot here at Frilly and Funkie, and everyone who enters and follows the rules will go into the draw for the chance to win a $25 spending spree at The Funkie Junkie Boutique. AND, there are new Top 3 Badges for three outstanding entries, chosen by the Design Team, because choosing just one winner has become so hard!

The guidelines for entering are simple: create a new vintage or shabby chic project following the challenge theme, link it below to your post (not just your blog) and also include a link back to this challenge in your post. You can combine our challenge with up to 10 challenges (including this one) to be in with a chance of winning. If you are entering through a public forum please use keyword F&F. Also, please be sure to turn off your Word Verification so our Design Team can leave comments on your blogs.

Let's take a look at more fabulous inspiration from the Funkie side of the Design Team to get those creative juices flowing (just click on each image for a closer look);


*************************************************************
WEEK ONE

Before we show you the Frilly DT's work we are waving goodbye to one Funkie DT member and saying hello to the latest member of the Funkie DT. As we said at the end of the last challenge post we are sad to announce that Nicole is leaving us for pastures new having been with us since the end of last year. Linda, myself and the whole team want to thank Nicole for all her hard work, enthusiasm and gorgeous projects along the way, and wish her every success in the future. And we are thrilled to confirm that the amazing Shelly Hickox will become the newest member of the Frilly and Funkie family! Shelly creates the most incredible pieces and we are sure you will join us in welcoming her.

Let's start with some amazing inspiration from the Frilly side of the Design Team to get your creative juices flowing (just click on each image for a closer look);

Georgie Connelly - Little Blue Craft Box


Cec Wintonyk - CW Card Creations

Nancy Dynes~ Tattered Treasures


Now it's over to you. What do you have to say? Will you head down the Frilly or Funkie route?

Have fun! Jenny x