well it is Trace here with a stepXstep to make a small gift holder. This could be used to include a gift card or greeting or a small gift. It is simple to make and all from a size 10 tag and piece of card and some seam binding and lots of fun.
So here is the finished make :
and inside:
So there are lots of pictures, to show the stepXstep stages, just click on them to get a larger view..
Start with a #10 tag, and fold in half, trimming the corners so both sides match. Also punch a hole in the back piece of the tag so that the ribbon tie can be threaded through at the end.
Next colour the whole tag using the fab seasonal distress colour, now part of the distress ink family, peacock feathers. Using blending foam on a blending tool gives a great smooth finish to the tag.
Now to add some interest to the piece, start by placing a stencil over the tag and spritzing the surface with water, then remove and leave the water to sit on the surface for a few seconds. then blot off with some kitchen paper.
This will remove some of the colour giving a soft pattern..sorry forgot to take a picture of this step till the end!
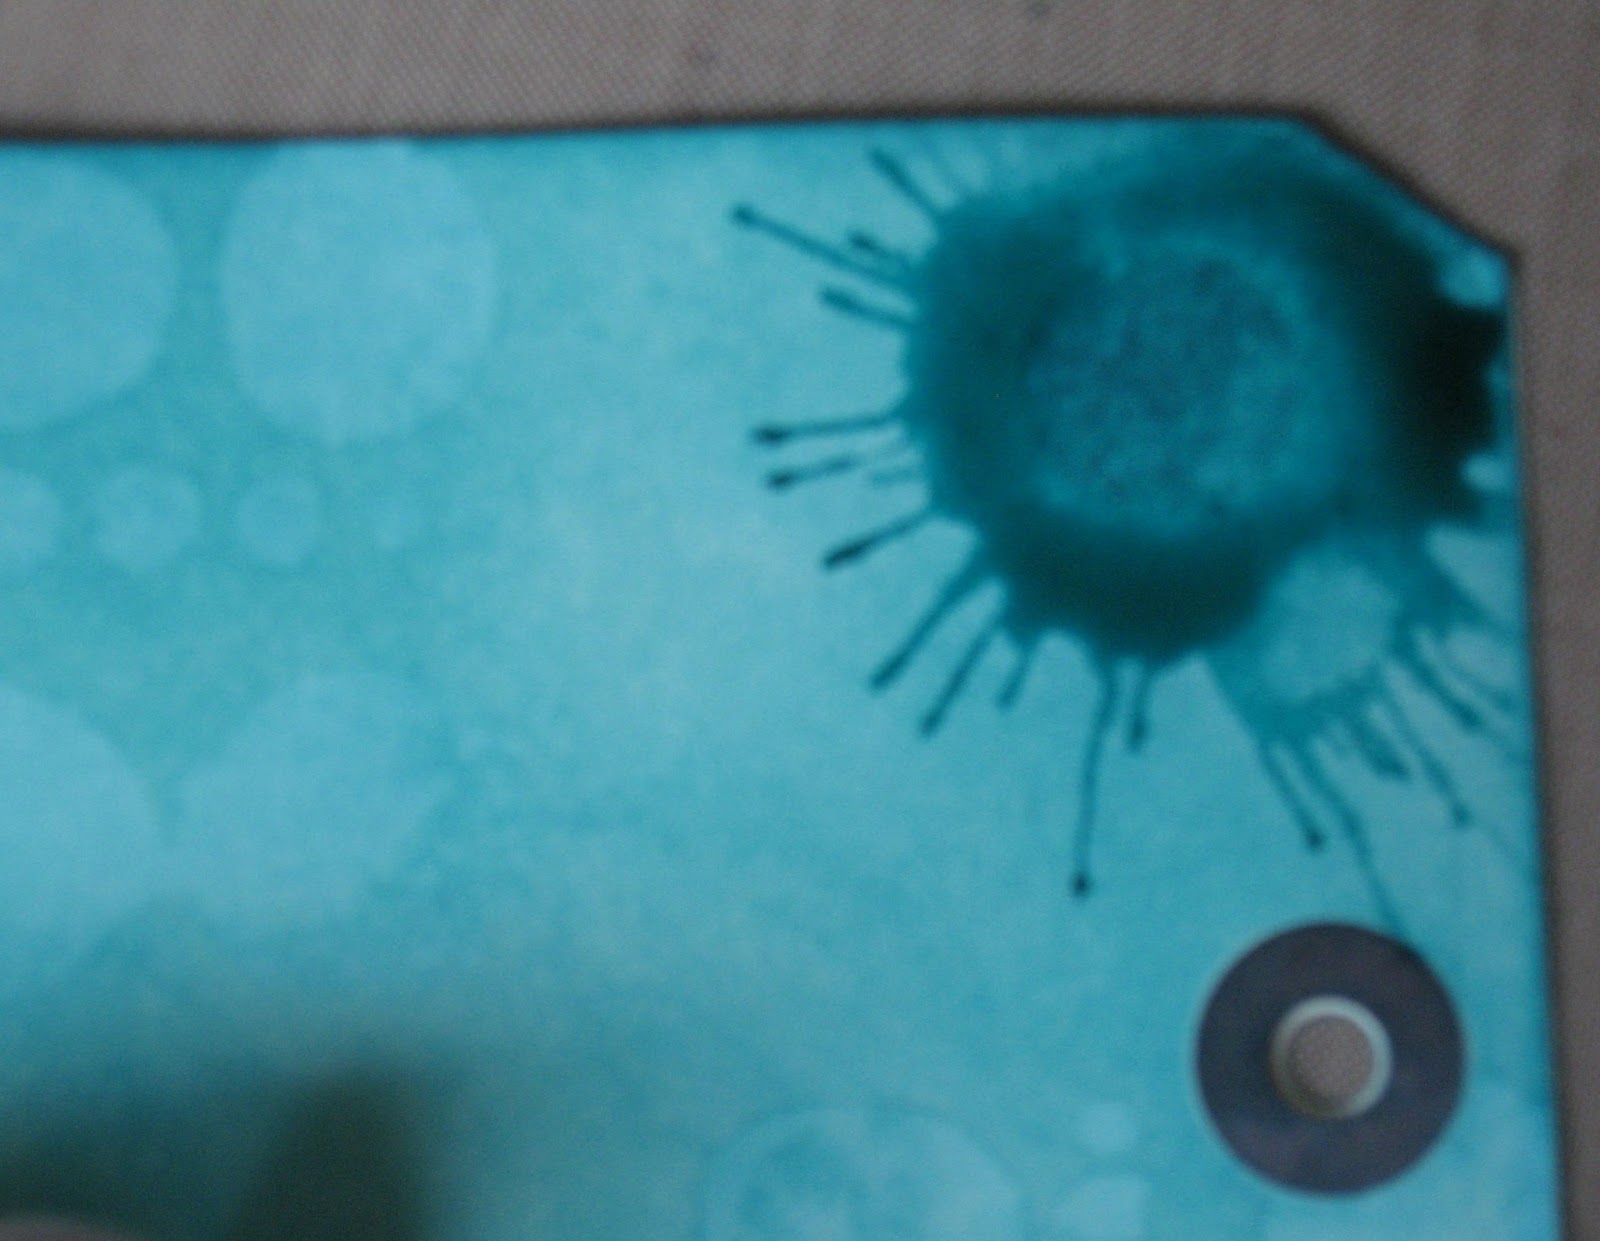
Now to add these fab splats using the coordinating colours of distress stain, showing how well all the distress products work so well in the same colour for different effects!
Push the stain down onto a craft sheet so that the inks starts to collect in the sponge top part then lift up and splat down onto the project, repeat and then leave for a few seconds and dry with a heat tool.
To create the pocket on the inside cut a piece of card to fit, colour on outside using peacock feathers and then add wonder tape on three sides as shown, to adhere inside.
To complete I added some stamping using distress stains in peacock feathers and evergreen bough distress stains, using the splatter stamp from spills and splatters set. I also added splats using evergreen bough in the inside too.
I added some tissue tape, some letters from the word play die ( coloured picket fence distress crackle paint, then when dry I rubbed peacock feathers into the crackle)..
... and on the inside I added a sentiment from simple sayings and dyed some seam binding with peacock feathers and evergreen bough distress stain.
Well hope you have enjoyed my stepXstep for this Saturday and maybe you will have a go at making a tag gift holder, for some mini pencils, notebook, gift card or any other small gift.
hugs trace x
And don't forget, all these fabulous products are available for sale, at seriously awesome prices, at The Funkie Junkie Boutique:


Ohhh I love this!!! And just because turquoise (and peacock feathers) is my favorite color isn't the only reason! Fabulous!
ReplyDeleteWhat a superb step by step Trace! Love the idea for using this for a gift card as they can be hard to wrap in an interesting way. Hugs, Jenny x
ReplyDeleteSooo wonderful. Thank you for this tutorial
ReplyDeleteGreat tutorial Trace. I love the colours you have used too. Enjoy your weekend. Hugs Rita xx
ReplyDelete...love this creation, a beautifully designed gift card with great technique and a totally yummy colourway, just perfect for those hidden gifts...great step by step Trace Melx :)
ReplyDeleteGreat tutorial Trace.....love the finished piece. Great techniques.
ReplyDeleteHope your hand is improving
Hugs
Annie x
fabulous work Trace - really gret splats - love them xx
ReplyDeleteA wonderful way to hold a small gift or gift card - really love your splatting. The Peacock Feathers is such a gorgeous colour. Thanks for the tutorial, your instructions are so clear. Hugs, Anne x
ReplyDeleteSuch a cute gift card, and I love the full-on Peacock Feathers blow out... Lovely texture from the bleaching and splatting. Look at your poor hand all bandaged up... hope it's improving!
ReplyDeleteAlison x
Fabulous tutorial Trace and you've just given me the perfect idea for Mother's Day tomorrow ! Sue C x
ReplyDeleteA good step by step; easy to follow...
ReplyDeleteBrilliant tuto. Love to make one for buisiness cards (:o)
ReplyDeleteLooks great, love all the little details, like the splats and the tissue tape!
ReplyDeleteGreat work wth beautiful colors and detaisl .
ReplyDeletei love the tutorial
Thanks.
Greetings Janny
Look at you with your brace! Way to go! Fabulous tag card! Love the splotches!
ReplyDeleteA gorgeous creation Trace and wonderful clear instructions too. Delicious colour.
ReplyDeleteJuliaxx
Fab gift tag! Way to go, bum hand n all! :)
ReplyDeleteIt looks so fabulous, I'm exited. Thanks für sharing the steps.
ReplyDelete