Hi there, it is Cec here and it is my turn to present the Saturday Step X Step so I decided to share how I made my card for the current challenge with you.
The challenge is Called Chalk It Up and asks that you use chalks in the creation of your project. In the past I have used chalk in place of distress ink to highlight the edges of a panel or the raised areas of embossing but I decided to try something a little different this time.
I started by stamping my flower image on vellum using Snowcap Pigment Ink. Note: This has been replaced by Glacier White so my thumbnail link to The Funkie Junkie Boutique will reflect that.
Next I embossed the flower with some Snow White embossing powder from Michaels.
Then I turned the vellum over and started to colour the flower using chalk pastels from Mungyo. I found that it is best to use the corner of the stick to lay your chalk down and to use a light hand.
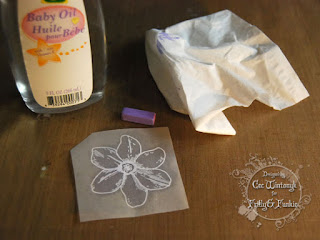
I blended the colour with some baby oil and a tissue or my finger. After the first blend I turned the vellum over and checked against some white paper to see if there was enough colour and there wasn't so I repeated the process.
Then to add more shading I used some chalk pencils that have been in my stash for a million years - or at least ten. They are a bit harder than the pastel stick and don't crumble as easily.
In order to make the flower colouring more visible I glued the vellum to a scrap of white card stock. Because I did not want any adhesive showing through the vellum I found the best way was to use a pen glue and follow the stamping lines. Once the flower was dry I fussy cut it.
In this photo you can see that I got a bit of creasing on the flower but I didn't bother redoing it because I knew I was making two more flowers and could tuck the creased part under the petal of the flower on top. When I did the other flowers I laid the vellum down starting at the bottom and used my fingers to smooth it out as I continued to lay it down a bit at a time - no creases.
The next step was to make the background and I started by covering a sheet of card stock with Blush Fresco Finish paint, which is a chalk acrylic.
Next I added some embossing with texture paste through a Wendy Vecchi Polka Dotty Stencil.
Then I used some Cut and Dry Foam to add some Candy Floss Fresco Finish paint.
The next step was to give it a little spray with some Lindy's Stamp Gang Starburst called Ramblin Rose Pink but this could be replaced with any of the other Lindy's Starburst Pink sprays (I would not suggest using the Moonshine Mist sprays because they all have a brown base to them) or even Worn Lipstick Tim Holtz Distress Spray.
Next I dyed some seam binding with Worn Lipstick Distress Ink and then swiped it with some Dusty Concord DI. I also ran a scrap piece of white card through the Tim Holtz Bubbles Texture Fade to mount the flowers on. I actually chalked the highlights with a cotton ball but it clashed with the flowers so I scrapped it and embossed another panel and just left it au natural.
Here is the finished card with some pearls and pearl flourishes added. You have lots of time to create a project using chalks so I hope you will head to your craft space and make something to share with us.
The following products used in the creation of this card came from The Funkie Junkie Boutique:


Love how you created those flowers, and on vellum too - genius!! Great work, Cec! xx
ReplyDeleteThank you for the step by step instructions, for newbies like me it really is very welcome. I love the colours of your card, the layout and those gorgeous vellum flowers. Really beautiful and off to give this idea a go! Thank you x
ReplyDeleteThis is fabulous, Cec. I loved it when I saw it on this week's challenge. The colors are just so pretty and I'm delighted to know how you achieved those lovely flowers.
ReplyDeleteHugs,
Linda
Love your card Cec! The chalk works so well on the vellum and I love all the different textures. Thanks for the great step-by-step. :)
ReplyDeleteThis is amazing, Cec! What a fantastic tutorial and great techniques! Love your absolutely beautiful card! Thank you so much for a detailed step by step!
ReplyDeleteHugs! Branka xxx
What a pretty card!
ReplyDeleteStunning! For a change it's some supplies I actually already own and recently re-found! Thanks for sharing Karen x
ReplyDeleteOh Cec, the effect you've got with the chalk on vellum for these flowers is gorgeous!!! So soft, subtle and delicate. They work perfectly with the pearl centre, the beautiful background and that fabulous ribbon flourish. Outstanding. Jenny xxx
ReplyDelete