Hello and welcome to the first Saturday Showcase of 2019! We hope you enjoyed your Christmas and New Year's celebrations and are ready to get back to crafting! Today I am shining the spotlight on Tim Holtz' Ice Flake Bigz die and some of the embossing powders Linda stocks in
The Funkie Junkie Boutique.
I was a little sad that I only got to use my Ice Flake die once for Christmas crafting on my
altered book, but with most of winter still ahead of us (in the Northern Hemisphere, anyway), I think it will get plenty of use for winter birthday cards and other wintry projects. And there's no time like the present to get started on
next year's Christmas cards. In keeping with our current challenge '
Inspired By', I stalked a few of my favorite blogs for ideas.
I wanted to make some winter cards to send as New Year's/thank you cards, so I grabbed my die and started cutting into all kinds of substrates. I ended up using thin chipboard, Metallic Kraft Stock and corrugated card board waste packaging for my projects. Sadly, the thicker cardboard didn't cut cleanly due to a die cut machine problem. But I thought it looked kind of cool, so I set it aside to use. I discovered I can get a clean cut from this detailed die if I rotate the die one turn before removing the substrate and then make a second pass. Let's get started! Remember to click on any photo to zoom in.
Boundless Imagination
I was really inspired by Zoe Hillman's grungy
Christmas card for my first make. Well, I'm just inspired by anything she creates.
Here's how I made the background:
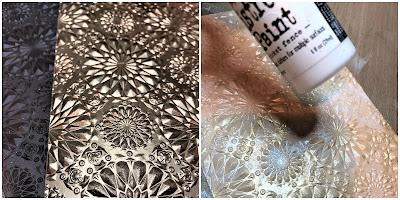
Cut Metallic Kraft Stock to size and emboss with Kaleidoscope 3D Texture Fade. Apply Picket Fence Distress Paint with a cosmetic sponge randomly.
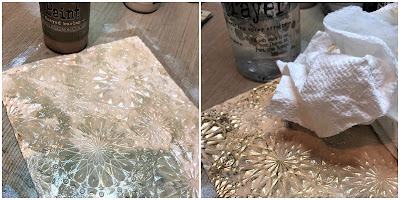
Next apply Frayed Burlap paint and spritz the panel to blend the colors. Heat dry a bit, and wipe with clean paper towel to remove some of the wet paint.
Make sure the panel is dry before sanding with sanding grip, exposing the kraft from the raised areas. Lastly, swipe Ground Espresso Distress ink pad over the panel to ink the exposed kraft.
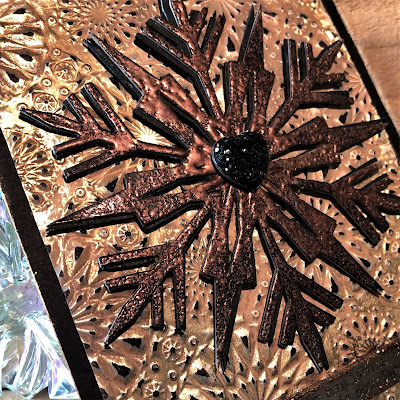
Die cut the Ice Flake from chipboard and heat emboss with Ranger Hammered Mixed Media powder. I love the variation of coverage of the powder from a single application which it makes it look like authentic hammered copper. Cut a second Ice Flake from black chipboard and adhere the two with Distress Collage Medium Matte, off setting a bit. (Sorry, I grabbed the wrong jar for the 'missed steps' photo shoot in this photo and others further along.)
Alter an Ideaology Word Band by rubbing Black Soot paint into the recesses; then wipe the paint from the face. Edge the band with Antiqued Bronze paint and emboss with the Hammered powder.
To complete the card, wrap the gold panel with Ideaology Jute String strung with the altered Word Band and adhere that panel to black card. Swipe Prima White Gold Metallic Wax around the edges of the black card before adhering to a card blank. Adhere the Ice Flake with black adhesive foam tape and add a black heart diamond cluster sticker.
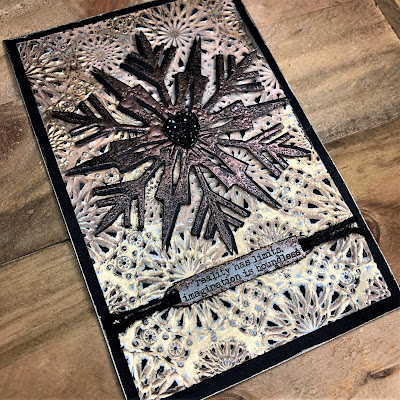
Now let's take a closer look at the finished card so you can see how it all came together. Excuse the bad photo--the relentless grey skys we've had here are terrible for photographing metallic images.
Here's a closer look which shows the true colors.
Possibility
This make was inspired by the way the Ice Flake did not cut entirely from the waste packaging, but I turned to
Tim Holtz for the background details.
After cutting the Ice Flake make sure all points are set back into the panel and use the chipboard waste from the previous project to act as a mask. Pounce through the mask with an embossing dabber.(You can see I forgot to take a photo of the panel before I applied the embossing ink.) I chose the dabber over an embossing ink pad, so I could get it in all those fine areas. Sprinkle with Bone Mixed Media powder with the mask in place. Tap off the excess powder, pop out the parts that are cut through before heat setting, so they won't stick into the background.
Ink the panel with Ground Espresso ink and wipe off the ink from the embossed Ice Flake. Mask the flake with another die cut and splatter with Ground Espresso and Tarnished Brass spray stains. I made sure the darker color was dry before splashing with the metallic.
To capitalize on the peekaboo areas left behind the Ice Flake, cut a backing panel from Metallic kraft stock. The Stamp Platform makes it easy to stamp a pattern around the edge. I used the pattern on the left from the Ornate Trims set, inking it with my Versamark embossing pad. The stamp on the right is not inked and is just there to provide stability when pressing down on the platform cover. The piece of tape marks where I need to stop applying ink to the stamp, so there's no overlap.
Heat emboss with clear embossing powder then swipe with Black Soot paint. Let it dry just a bit and then wipe off the excess with a clean paper towel.
Adhere the Ice Flake panel to the gold background, and add embellishments. Cut 2019 from a scrap of Distress Mixed Media Heavystock using the smallest of the Stencil Numbers dies, then heat emboss with more of the Bone powder. Color the Ideaology Word Band and Hex Fasteners with Picket Fence paint and the gumdrop with Mushroom alcohol ink.
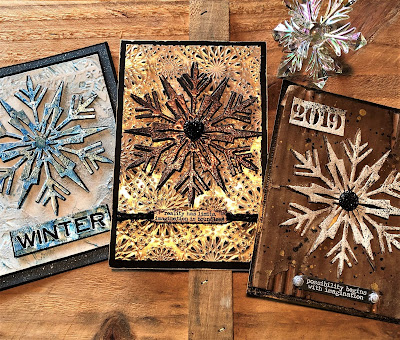
Here are some photos of the completed card and closeups that show the details.
Winter
I love Tami Bastiaans
Ice Flake Etcetera Tag! Her Ice Flake is so ICY, and her background is mixed media magic! I didn't want to make a direct copy, so I used different products and techniques to achieve a similar look on my Winter card.
Die cut a Layered Snowflake and emboss with the included Texture Fade. Cut the snowflake into sections and adhere to a Heavystock panel using matte collage medium (not the multi medium shown in the photo). Paint over the entire card with Impasto Snow White paint. I used my finger for this. This is very thick, and works to add another layer of texture. (I also chose this medium to see how it would react with the crackle paste.) Thickly apply Opaque Crackle Texture paste and leave to dry over night.
After the crackle thoroughly dries give it a coat of Collage Medium before and after applying and wiping back Weathered Wood Distress paint. Finally, scribble with Tumbled Glass Distress Crayon and blend it around the panel with a dampened finger. Adhere this panel to black card.
Adhere an Alcohol Ink Foil Tape Sheet to a piece of scrap card. These are adhesive backed sheets of thin metal that come in two sizes. The 4 ¼ x 5 ½ inch size is perfectly sized to cut out this snowflake and word embellishment.
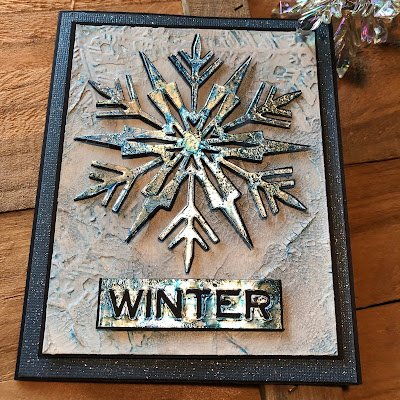
Cut the Ice Flake and a small panel from the metal card and from black card. Die cut the word Winter from the Holiday Words Thin Thinlits set. Color both pieces with Sailboat and Mushroom alcohol inks using an alcohol ink applicator and then heat emboss them randomly with Emerald Creek Fractured Ice powder. This powder is one of my favorites for creating authentic icy looks. Adhere both the Ice Flake and Winter panel to the black panels.
Cut a sparkly panel, (this is from my stash) mount on a black card blank and adhere the crackled background to it. Adhere the Ice Flake and Winter panel to the background using black adhesive foam tape.
Here are some shots of this completed card.
I hope you've found some inspiration in these ideas on how to use this versatile die and these gorgeous powders. A list of the products I've used is listed below, all available from
The Funkie Junkie Boutique. And remember there's still plenty of time to enter our current Frilly and Funkie challenge,
'Inspired By'. Be sure to stop back on Wednesday when the Funkie side of the team will be showing you how they are inspired.
Happy crafting!
Sara Emily








Sara Emily these are absolutely incredible!!! I love how each of the Ice Flakes gets a different treatment that coordinates beautifully with the sumptuous backgrounds. The ageing details and the way you've added layers of texture give so much to learn from and admire. Thank you for sharing three outstanding tutorials xx
ReplyDeleteOh Sara these really are sweet treasures. I was instantly drawn to this die because of the endless possibilities it gives. So many beautiful techniques and twist on design to take in and the miss cut die just adds to it's interest. Stunning creations, Thank you for sharing with us all. Hugs Tracey x
ReplyDeleteP.S The Kaleidoscope die is on my wish list :))
My dear Sara...these cards are STUNNING! I definitely need the Kaleidoscope 3D folder and that Snowflake die! You did an amazing job, as you always do...and you are such an Inspiration for sure! Huge hugs ❤❤❤ Simo.
ReplyDeleteThese are just such beautiful cards, and like snowflakes, each one is special in its own way. I love the icy blues in the final card, the grungy background of the middle card, and the aged copper glow of the first. You really are so inspiring, Sara Emily! Thanks for shining the spotlight on these amazing products and techniques!
ReplyDeleteAll I can say is "wow"!
ReplyDeleteFantastic cards and a superb tutorial, - one of my all time favourite dies and you have just demonstrated its versatility..
ReplyDeleteBrilliant work!
Sara Emily, you are starting the year off strong with these amazing cards! I love the die cut and those powders really created wonderful effects! Fabulous inspiration to start 2019! Thanks for sharing
ReplyDeleteJust getting ready to start working on my January cards. You have provided lots of layering techniques to try. I love all of Tim's snowflakes but this one is especially versatile. thanks as always for sharing.
ReplyDeleteThank you for all your kind words! I truly love this die, and it was especially fun to use with these amazing embossing powders. Hugs! Sara Emily
ReplyDeleteAmazing looking projects! Cathy x
ReplyDeleteThese are brilliant and beautiful! What a fantastic tutorial and showcase!
ReplyDeleteAwesome crteations! I love all the icy goodness!
ReplyDelete