Below are the steps I took to make three different cards using the puffy effect. I've also included some observations and tips in italics.
Ghost Town Card
1. Emboss heavy black card panel with Crackle 3D embossing folder following manufacturer's suggestions. (It doesn't matter which way you place it in the folder since there's no pattern or color difference from front to back.)
2. Spritz puffy side lightly with Pumice Stone Distress Oxide Spray and allow to dry.
3. Blend with Antique Linen and Chipped Sapphire Distress Oxide ink.
4. Cut the large foreground bat (Bat Crazy), the curl of smoke (Ghost Town) and one of the mat panels from sanded Confections Metallic Card. Color each of these die cuts with Black Soot crayon.
5. Cut a second Bat Crazy from black card and layer the metallic one over it to create a shadow.
6. Cut house (Ghost Town) from Classic Kraft stock and sand. Layer the house over a stamped scrap in Forest Moss oxide ink. (This was in my stash.)
7. Die cut the tree (Ghost Town), the moon and tiny bats (Haunted House) and a little door from scraps (the door is colored wood grain card stock).
8. Darken a panel from Tim's old Regions Beyond Paper Stash and layer with prepared Confections and 3D panels. Edge a Halloween Clippings sticker with ink and adhere die cuts and sticker with Collage Medium.
Look how cool it looks when you flip your black paper over and blend the ridges with Antique Linen Oxide ink!
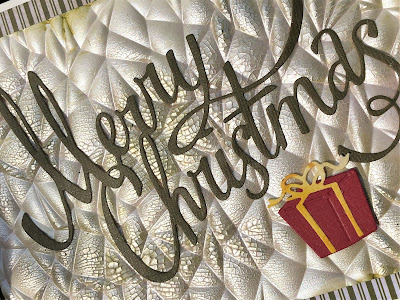
Merry Christmas Card
1. Cut a panel of Mixed Media Heavystock to desired size. Smear it with Prima Platinum Crackle Paste using a palette knife and set it aside to dry.
2. When paste is completely dry, emboss it with the Crackle 3D folder, placing it in the folder with the crackled side down, over the recesed side of the folder. **Because it is thicker, I adjusted my embossing sandwich before running it through my die cut machine: base plate with no tabs, followed by the dampened paper in the folder, with a cutting plate on top. Adjust your sandwich according to your individual machine. Never force the sandwich through to avoid damage to your machine.**
3. Enhance the cracks with Peeled Paint crayon.
4. Layer the embossed panel over a panel of old Christmas paper stash using foam adhesive and adhere to card blank.
5. Die cut Merry Christmas (Christmas Ribbons) from Classic Kraft Stock and gift (Festive Things) from scraps. Adhere die cuts with collage medium. You could also use Sizzix Adhesive Sheets.
It's a simple card that truly takes less than 10 minutes, except for dry time for the paste. I think this will be my assembly line card this year--I can make it different by adjusting colors, leaving off the paste and using different Festive Things die cuts to embellish.
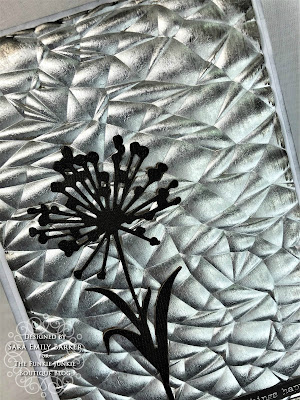
All Purpose Card
2. Cut and emboss silver Metallic Kraft Stock with Star Trim 3D Impresslits embossing folder/die. Swipe with Black Soot paint, following the same steps as above.
It's so easy to customize this trim by swiping it with Distress paint color of your choice.
3. Die cut Wildflower Stem from black card. Adhere Wildflower Stem, Star Trim and an Occasions Small Talk sticker with collage medium.
Try using this adaptable embossing folder on your favorite color of Metallic Kraft Stock. This is a super easy way to add impact to a simple design. This card is so simple to make; it literally took just a couple minutes to put together.
*******
You could also use the folder to add interest to patterned paper. Here's a scrap of Regions Beyond paper embossed and blended with Ground Espresso and Black Soot inks to give you an idea. The one on the left was placed with the spiders facing down into the recessed side of the folder. The one on the right, the concentric squares are facing up into the puffy side.
I hope I've given you lots of ideas for how to get creative with your Crackle 3D Texture Fade! Remember, you have until August 27 at midnight to enter our current challenge Let's Do It Again! I hope to see you there!
Happy crafting!
Sara Emily
Links to the products used from The Funkie Junkie Boutique:
Sizzix Chapter 3 Sizzix 3-D Texture Fades Embossing Folder - Crackle
Sizzix 3-D Impresslits Embossing Folder - Star Trim
Sizzix Chapter 3 Sizzix Thinlits Die Set - Ghost Town
Sizzix Chapter 3 Sizzix Thinlits Die Set - Bat Crazy
Sizzix Chapter 3 Bigz Die - Cauldron
Sizzix Chapter 3 Sizzix Thinlits Die Set - Christmas Ribbon
Sizzix Chapter 3 Sizzix Thinlits Die Set - Festive Things
Tim Holtz Sizzix Thinlits Die Set 5PK - Wildflower Stems #2
Sizzix Thinlits Die Set - Haunted House 3PK by Tim Holtz
Tim Holtz Idea-ology 8 x 8 Classic Kraft Stock
Tim Holtz Idea-ology 8 x 8 Metallic Kraft Stock
Tim Holtz Idea-ology 8 x 8 Metallic Confections Kraft Stock
Tim Holtz Ranger Distress Mixed Media Heavystock 8.5x11 inches
Tim Holtz Distress Woodgrain Cardstock 8.5x11"
Tim Holtz Ranger Distress Paint - Black Soot
Ranger Tim Holtz Distress Ink Pad: Black Soot, Frayed Burlap, Ground Espresso
Ranger Tim Holtz Distress Oxide Spray - Pumice Stone
Ranger Tim Holtz Distress Oxide Pad: Antique Linen, Chipped Sapphire, Forest Moss
Ranger Tim Holtz Distress Crayons: Black Soot, Peeled Paint
Ranger Tim Holtz Distress Collage Medium Matte
Ranger Texture Paste - Transparent Matte
Tim Holtz Ranger Distress Grit Paste
Tim Holtz Idea-ology Clippings Stickers, Halloween
Prima Art Extravagance: Texture Paste Platinum Crackle


WOWZERS! This is my first day to see the new 3D folder and I am so IMPRESSED!
ReplyDeleteFabulous makes, Sara Emily!!!!!!!!!!
ReplyDeleteWow! Girl, your creative mind is just amazing! So many different ways to use this embossing folder. Standing O for the Queen of Mixed Media Techniques!
ReplyDeleteI so enjoyed Reading this post and learnt lots. Thank you for the marvellous inspiration and tons of new ideas x.
ReplyDeleteWow!
ReplyDeleteWonderful showcase of this versatile folder - love everything you've done (and looking forward to seeing more of your tease of a Halloween project!) xxx Lynn
ReplyDeleteAnother fabulous tutorial Sara Emily! I love how you've really emphasised the puffiness of the design on each piece and the clever way you've then used them. The spooky sky is so effective and I love the crackle over the Christmas background. So inspiring!
ReplyDeleteSara Emily I just want to reach out and touch these! The texture is amazing and you have made them really stand out! Wonderful tutorial and fabulous designs using the new folder!
ReplyDelete