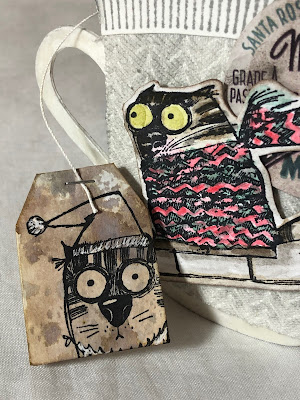
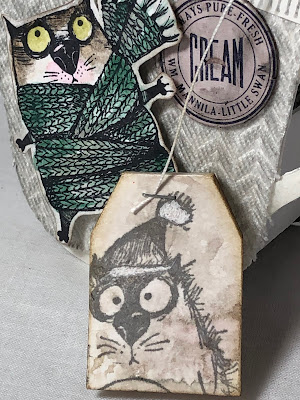
First, here are some photos of each of the teacups, front and back. Click on any photo to zoom in.
Let's get started on the making! Starting with an idea to make a teacup with the appearance of having a knitted wrap, I chose a scrap of heavy white denim fabric from my stash and trimmed it to cut three teacups using the 3D Teacup and Spoon Bigz die. The Bigz dies cut through just about everything!
I embossed each of the teacups using Sizzix 3D Knitted embossing folder, first spritzing the die cut with water and then running it through my die cut machine three times. There is a broad and a narrower side to the folder. By placing the surface you wish to emboss with the desired side facing toward the wider side of the folder, you get the lovely knitted pattern shown below.
I trimmed the handle and the bottom from each of the fabric tea cup die cuts and discarded them.
Next, blend the teacups with Hickory Smoke Archival ink to bring out the pattern.
Cut a total of nine additional teacups from chipboard. Six die cuts were coated front and back with gesso. It would be a lot easier and require fewer cuts if you have white matboard, but I had to use what I had on hand. (You will see the remaining three die cuts cut from white card further down in the post.)
Using one of the stamps from the Ornate Trims set inked with Hickory Smoke Archival ink and holding the stamp in both of my hands, I shaped it to fit the curved of the rim of each cup and made my impression.
After stamping, this portion is trimmed from the cup and set aside. I adhered the remaining die cut to a second gessoed die cut, before taking the following steps (not pictured): I heat embossed the handle and just the base of the teacup with Eileen Hull's Glistening Glass Molten Dimension Embossing Powder. (I borrowed this idea from Jenny's Saturday Showcase post. Thank you, Jenny!) I finished assembling the front of the teacup by gluing the fabric portion to the layers shown below, and then adhering the reserved rim of the cup over the fabric. I did need to do a little trimming of the fabric cup once it was adhered, since when it is embossed, the fabric stretches slightly.
Next, I covered the reverse side of the three remaining gessoed die cut teacups with Collage Paper applying a coat of Collage Medium Matte to the die cut, laying the paper over it and smoothing out any bubbles or wrinkles with a paint brush loaded with more of the collage medium. I chose an older neutral paper, but I've linked to the more colorful Holly below, which is currently available in Linda's shop. You will notice that I goofed on one of my cups by applying collage paper to the wrong side initially. My plan was to keep all the interiors plain white.
When the paper/glue is dry, I trim the excess paper and sand the edges with a file. I blended the edges with Hickory Smoke Archival ink and heat set. Having cut and gessoed three of the middle supporting pieces, I assembled the cup. (Please refer to Jenny's post to see how this is done.)
Now for the fun part--decorating! I chose three Milk Caps from Tim Holtz Christmas pack and aged them with Hickory Smoke crayon. I scribbled crayon on my craft mat, spritzed with a very little bit of water and picked up some of the color with my finger, smearing it on the cap. Allow to dry or dry with a heat tool.
I stamped three of the Christmas Snarky Cats in Black Soot Archival on Distress Watercolor card and colored them with Distress Crayons and a water brush.
I fussy cut them and blended the edges with Pumice Stone ink. The caps were adhered to the assembled teacup with Collage Medium and the cats with dimensional foam adhesive tape.
Lastly, I cut some of the tea bags from the die to make tags for each of the cups.
The tea bags were cut from Heavystock and other card scraps and dipped into diluted puddles of brown inks, dried between colors. I heat embossed the Snarky sentiments from the Snarky Cat set using Black Soot Archival ink and clear powder. The cats were stamped on two with Black Soot and Hickory Smoke Archival inks and highlights added with a gel pen. The one with Jingle Your Own Bells was glued at the bottom after each of them had a string attached with my Tiny Attacher.
If you're still with me, I made some gift card holders I'd like to share using the same 3D Teacup die, but these are flat, so they can be tucked in a Christmas card and be easily mailed. Below, they are shown from the front.
After the paste dried, I blended the cups with Pumice Stone ink.
I cut the backs from Christmas Worn Wallpaper and blend them with Pumice Stone ink. You can see the difference between one inked and one left 'clean' below.
To finish the cups, I splattered with Picket Fence paint. I ran a line of collage medium around the edges and over the entire handle to adhere front to back, leaving them open at the top to insert a gift card. In the end, I decided to stencil one of the cups with Flurries and Faded Jeans Distress and Archival inks.
I cut two tea bags from Distress Specialty Stamping Paper and blended them with Pumice Stone ink.
After drying them, I stamped trees, pine branches and snow from the Into the Woods set with the inks shown below. I fussy cut the Santa on a reindeer and house from the same Worn Wallpapers as are on the backs of the gift card holders, adhered to the tea bag and trimmed. I left the bag open at the bottom so I could write a personal message inside.
Finally, I made one more Teacup gift card holder using linen which I stiffened with Prima Clear Sculpture Medium before cutting. I decorated it simply with Funky Festive Florals die cuts, Ideaology Metallic Trimmings, and some trim from my stash.
Thanks for hanging in there with me! I hope you have found an idea or two to use in your last minute Christmas decorating or gift giving. But don't forget that this die and embossing folder can be used year round in your crafting endeavors.
In the meantime, there's still plenty of time to play along in our current challenge, Deck the Halls! which runs through Tuesday, December 22th at 11.55pm. I can't wait to see what you will make!
Happy Crafting and *Merry Christmas*!
Sara Emily
These products were used and can be purchased at The Funkie Junkie Boutique:
Chapter 4 Eileen Hull Bigz L Die - 3D Teacup & Spoon
Chapter 4 Jessica Scott 3D Textured Impressions Embossing Folder - Knitted
Sizzix Tim Holtz Thinlits Die Set - Funky Festive Florals
Stampers Anonymous Tim Holtz Stamp Set - Snarky Cat Christmas
Stampers Anonymous Tim Holtz Rubber Stamps - Ornate Trims
Tim Holtz Cling Stamps - Into The Woods
Stampers Anonymous Tim Holtz Stencils - Tree Lot, Tree Lot Mini, Flurries Mini
Tim Holtz Distress Ink Pads- Black Soot, Peeled Paint, Faded Jeans and Hickory Smoke Archival Inks, Pine Needles, Pumice Stone, Frayed Burlap, Hickory Smoke, Walnut Stain, Faded Jeans
Tim Holtz Distress Crayons - Antique Linen, Antiqued Bronze, Brushed Pewter, Candied Apple, Crushed Olive, Evergreen Bough, Fired Brick, Hickory Smoke, Pumice Stone, Spun Sugar, Stormy Sky, Tarnished Brass, Vintage Photo
Emerald Creek Eileen Hull Molten Dimension Embossing Powder - Glistening Glass
Ranger Tim Holtz Alcohol Pearls - Smolder
Ranger Tim Holtz Distress Mixed Media Heavystock
Tim Holtz Distress Specialty Stamping Paper
Tim Holtz Idea-ology Collage Paper, Holly
Tim Holtz Idea-ology Worn Wallpaper Christmas
Tim Holtz Idea-ology Trimmings Metallic
Tim Holtz Distress Collage Medium Matte
Tim Holtz Idea-ology Tiny Attacher


Absolutely love your knitted teacups Sara Emily. The embossing works so well teamed with the fabric and using the tissue wrap on the back is an inspired idea. And then the way you've used the teacups to create gift card holders is so clever and such a cool idea. Thank you for sharing all these festive tips and techniques with us (and thank you so much for the shout outs) xx
ReplyDeleteSo much fun, so many techniques with so many pictures. What an page to bookmark for other holidays.
ReplyDeleteI adore these tea cups and those tea bags with the fun sentiments just puts them over the top! Fantastic cheer!
ReplyDeleteAbsolutely wonderful, Sara Emily! These teacups are beautiful! Love the little tea bags. I've not seen this die before. I'll have to add it to my wish list. Merry Christmas!
ReplyDelete