Sunday, September 30, 2012

Sunday Share

Wow, I'm thrilled that we had a record number of Sunday Share players this fortnight - a total of 13 sharing some really beautiful pieces!  Thank you so much for everyone who shared their work with us this week.  And you know how much I love seeing what you are all doing with products you purchase from The Funkie Junkie Boutique!
Random.org has chosen Sue Butler #9 as our 25% off discount winner this time.  Sue shared this colorful beauty using Venise lace and corrugated cardboard from The Funkie Junkie Boutique.
Congratulations Sue!  Now you can shop again at The Funkie Junkie Boutique, only this time you will get 25% off on your entire order!

And a huge thank you to everyone who shared their beautiful work with us this fortnight.  I'm so happy to see so many of you joining in our Sunday Share!

All you have to do to enter is to link up any creation you have made using products from my boutique here at Sunday Share. The only requirements are:
1) you must use something you purchased from The Funkie Junkie Boutique (the new one or Zibbet or Etsy)
2) you haven't shared it already here at Sunday Share
3) you have to mention the product in your post as well as my boutique and provide a link to my boutique

That's it - easy peasy and a fun way for you to showcase your work over here at Frilly and Funkie! So what are you waiting for? Link your work up below. If you need some guidance in knowing how to share your work here, read this post and let us know if you need further assistance.

Sunday Share is currently running for two weeks, every other Sunday from 5:00 a.m. ET until midnight on Saturday night. We will do a random drawing of all the entires that week and the winner will receive a coupon to shop with a 25% discount at the shop. This is our little way of rewarding those who shop at The Funkie Junkie Boutique. What are you waiting for. I know lots of you have already purchased items from The Funkie Junkie Boutique. Link them up here - it's a great opportunity to share your work with us and you just might shop next time for 25% OFF!

Saturday, September 29, 2012

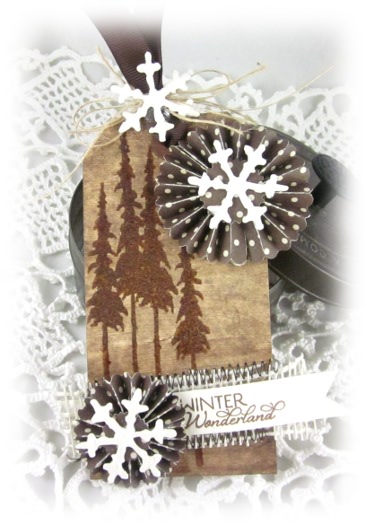
Saturday Step x Step:Snowflake Rosette Tag

Good morning F&F friends  I am sharing today's step x step.  I have made a tag, you know Linda is challenging us to the 12 Tags of Christmas, I hope you can join us here.  I was inspired by the snowflakes.  I wanted to make snowflake rosettes  very cute I think!  


I have cut out the rosettes using the Tim Holtz Mini Rosettes Die.  I luv placing all of my elements on my work table; this is the designing process and most of us luv it! 


I have folded all of the rosettes and glued the circle pieces to the rosettes.  I cut the snowflakes from a heavy duty watercolor paper, I luv he texture of this paper. 


I am adding the Tim Holtz glitter here....did I tell ya how much I luv this glitter..... A LOT!


Here is my tag, after I have used the Tim Holtz distressed stain.


I stamped the tree image, luv these trees!  Added the piece of burlap and stitched it place.  Preparing to place the rosettes and add the ribbon and burlap bow.    


A perfect Christmas tag, especially for the men in your life.  Not super fancy, but yet very homey and handmade.  Be sure to stop by The Funkie Junkie Boutique and check out the new arrivals and must have tools, stamps, ink, and embellies!


Friday, September 28, 2012

Friday Focus - Artistic Outpost

Welcome to today's Friday Focus, it's Sue here and I want to share with you my love of the Artistic Outpost stamps. The images from these stamp sets are gorgeous and that coupled with the superb quality just make them irrestible so I'm  soooo happy that Linda has decided to stock them in The Funkie Junkie Boutique!


It has also given me the perfect excuse to start my Christmas cards! First of all I wanted to show you how deep the rubber images are.


 The stamps are really detailed and you get a really clear image every time you stamp.


 As always I started with my background and I used Dylusions Sprays on white card stock.


Then I stamped the trees across the background to create a continuous row. You will see that I've stamped with funky foam underneath my card. The reason I do this is because I'd not had time to mount my stamps on to EZ Mount so my stamp is glued (temporarily) to an acrylic block. If you stamp using funky foam underneath it makes sure you get a clear image when your stamp isn't mounted.


I stamped the main image onto white cardstock and also onto a Post-it note so I could mask it off and then stamp some snowflakes with white acrylic paint over the top.


I painted the image using Distress Markers but only giving it a little colour as I didn't want the vintage feel to be lost with too strong a colour. 


I dried it all off with my heat gun then blended Distress Ink around the edge and wiped over the image with a damp piece of kitchen towel to reveal the snowflakes. 


 I used a Sizzix snowflake embossing folder, blended Distress Ink over, painted it lightly with white acrylic paint and when dry sanded it with a sanding block to distress it. 


The snowflake is a filigree one from Linda's shop and I've painted it with white acrylic paint as well as the button.


I also made this tag using a diffuser to create the flat area to stamp on in the centre. The border of pine cones has been done by masking off the first image and stamping over the top.


This was also my first dabble with the Tattered Pine Cone die, which is also available in Linda's shop. I'm not quite sure I've mastered it yet!

Be sure to stop by The Funkie Junkie Boutique and check out our Friday Focus section where you can always find products at 15% off Linda's already low prices (name brands like all the Ranger lines and Melissa Frances are always available at 20% off MSRP).


Wednesday, September 26, 2012

Fall into Fall

Hello and welcome!  Thanks so much for stopping by today.  We're kickin' off week #2 of the Fall Into Fall challenge.  This week, our Funkie designers have a beautiful line up of fall colors to share with you.

We already have a great group of players for this challenge and they've submitted some amazing artwork.  But you still have one more week, whether your vintage style is frilly or funkie, you can play along anytime during the challenge.

Marjie Kemper - She Who Stamps & Scraps

Terry Horrall - Terry's Work In Progress

Anita Houston - The Artful Maven Haven

Linda Coughlin - The Funkie Junkie


Week #1 Post
Good Wednesday morning friends of Frilly and Funkie.  Linda here, back as hostess for this fortnight.  Our challenge theme this time is Fall into Fall.  It's my absolute favorite season! I love the rich colors of nature and the bounty of the harvest. Celebrate autumn with us this week by using a fall color palette in your work (suggestions - brown, orange, olive, rust, cranberry, harvest gold).  Easy peasy this time, folks.  Hope you will all take this opportunity to play along with us!

Here's some inspiration from our designers to get you started.

Linda Coughlin - The Funkie Junkie

Sue Carrington - Stamping Sue Style


Teresa Kline-Paperie Blooms
Our challenge offers two opportunities for prizes - a random drawing for a $25 gift certificate to shop at The Funkie Junkie Boutique and a best project competition, judged by the voting of the design team members. The Funkie Favorite winner receives a winner's badge to display on their blog sidebar. In order to qualify for a prize, you must follow the challenge requirements and provide a link back to our challenge site in your post.

Thanks again for stopping by. Be sure to stop back next Wednesday for even more inspiration from our Funkie designers!

Whatever your style, Frilly or Funkie, you are welcome to play along with our vintage inspired challenge. You may upload your project at any time. If using a public forum, please use keyword F&F. Please be sure to provide a link back to our challenge in your post. Please please pleasebe sure to turn off your Word Verification so our design team can leave comments on your blogs.

Tuesday, September 25, 2012

The Great Outdoors Challenge Winners

Hello and happy Tuesday!  We're back to announce the winners of the Great Outdoors challenge.  This was a tough decision.  We had so many wonderful entries and really enjoyed seeing what you all did for this challenge.  A big thank you to everyone who shared their wonderful art with us for this challenge.  After visiting all the blogs and casting votes, the design team has chosen our Funkie Favorite for this challenge and the winner is #21 Julia from Julia's Stuff and here is her gorgeous tribute to nature.
Congratulations Julia!  This tag is sensational!  We love the way you built up the layers of color with the watercolor pencils.  The flowers are phenomenal and the Vintage Lace die cut along the bottom is exquisite - amazing work on coloring and embossing that die cut lace.  Please email Linda at thefunkiejunkie@gmail.com to get the code to install the Funkie Favorite winner's badge on your blog's sidebar.
Wait, there's another winner too!  The winner of the $25 gift certificate to my new Funkie Junkie Boutique is #16 Paula-Kay Bourland.  Congratulations Paula.  Please email Linda at thefunkiejunkie@gmail.com to get your gift certificate code.

Thanks again to everyone who played along with us for this challenge.  Have you made your entry to our Fall into Fall challenge?  You still have one whole week to join in the fun!  You may be our next winner.


Saturday, September 22, 2012

Saturday StepxStep - Candles

Happy Saturday and with that comes a new Saturday StepxStep!  I decided to have fun with candles for this DT post.  It is fast approaching the time of year that we all become quite busy, so I wanted to make something a little quick and easy.  Not to mention that candles make really nice gifts or decorations.  Well I wanted to go with Halloween themed candles, especially as I am so loving this new stamp set.  I cannot wait until the Sizzix die is out for those "trick or treaters."

I know that most of you have already done this, but some have not and others have forgotten how much fun this is!  The biggest trick here, is to remember to not hold the heat tool in the same area too long!  It is easier working with smaller candles, so if you have never tried this, start there!

Select your candle!  You will also needs white tissue paper and waxed paper.  You do not need to ink up tissue paper, but I wanted a multi-colored background.  So I inked up two different sizes of tissue paper, after measuring my candles height and width around.  This does not have to be exacting as you can always trim off any excess.
Once covered with Distress Inks, I stamped my images where I desired.  Sorry I forgot to take a picture of the larger candle with the stamped images, but you get the idea with the little owl candle.
Tissue wrapped candle with waxed paper
This was the candle that I added the spider web and spider after, but I found it makes no difference, so just stamp on the tissue paper!  At this point, cut your waxed paper to fit around the candle and tissue paper, grasp this tightly in one hand and use the heat tool to melt the tissue paper into the candle.  While one areas has melted, move onto another area.  This happens pretty quick, so just watch.  You also don't want the heat tool too close to the wax paper and candle, but close enough.  Walmart has plenty of cheap candles to practice with! 
It is perfectly fine to just stamp and color if desired you image on the tissue paper, cut close to the stamped edges and then wrap your waxed paper around the image and watch it melt into place.  This web would work well on an neutral or orange candle.  The tissue paper does not have cover the entire candle, so just have fun!

Thank you for stopping by and I hope you have a wonderful weekend! 

Friday, September 21, 2012

Friday Focus

Good Friday morning friends, Linda here with you for a Friday Focus which I am shamelessly combining with an advertisement for my Funkie Junkie 12 Tags of Christmas.  (Some of you read my personal blog so I apologize for the duplication.)

Last year in the 12 weeks before Christmas I did a little challenge on my personal blog, one inspiration tag each week and had a linky for people to share their holiday tag for that week.  You could enter any of the 12 weeks at any time all the way through the end of the 12 weeks, which gave plenty of time and flexibility to compete.  I'm running the same challenge again this year and kicked it off this past Monday.  Check my blog post here to read all the challenge details and requirements.  I hope some of you might want to play along.

For our Friday focus, I'm going to share my first tag and the details.  The products on the Friday Focus sale this week will be the new Tim Holtz Metallic Distress Stains, the new Stickles Dry Glitter and the new Sticky Embossing Power.  All are 15% off at The Funkie Junkie through next Thursday.

Starting with a jumbo manila tag, I did the Marbled Stains technique using the new Tarnished Brass metallic distress stain (Marbled Stains - page 46 Compendium of Curiosities 2).  LOVE that way it came out.  Then I stamped the flourish stamp with Tea Dye DI and sprinkled the new sticky embossing powder on, tapped it off and heated it.  When hot and shiny, I poured the new Stickles Distress Dry Glitter on it and it stuck - very cool.  Here's a shot I took of the tag so far.
I cut the 25 using my new Cargo Numbers die from white chipboard and coated with Tarnished Brass metallic stain.  I gave them a little pop by backing them with a brown set of numbers.  I must say, the numbers cut with this die are tricky because they come out in pieces.  It's kind of a fiddley process to lay them out properly.  The stars were cut with an old Sizzix die also from white chipboard and painted with Tarnished Brass DS, then run through the Snow Flurries Texture Fade.  I used some jewelry findings for centers painted with gold alcohol ink mixative.
The rusty heart and lovely Venise lace wings are also from my boutique.  The sentiment/title was printed on my printer and cut with the Tattered Banner die. The sentiment was embossed with one light coat of UTEE and then I  the bottle of metallic stain and ran it around the edges.  I also dry brushed some stain on the rusty heart. 
That's it for my first inspiration tag.  I hope you will play along with me on this challenge.  It's lots of fun.  If you are into making your own Christmas cards, you can make your cards and play in the challenge.   If you want to play, here is a link to the challenge on my blog.

Here are all the products I used from The Funkie Junkie Boutique: