
You'll get everything you need to get started in the FlitterGlu Starter Kit, including the FlitterGlu itself and the Phat Foam for applying it. Start by cutting yourself a piece of Phat Foam (at least one inch square) and add a teaspoon of the FlitterGlu (direct from the twist top nozzle on the bottle) onto the spongy side of the Foam. Make sure you close up the bottle and wipe any excess glue from the nozzle so it's easy to reopen next time you come to use it.

Use the spatula in the kit to push the glue into the sponge until it is all absorbed - think of it that you are making yourself a 'glue ink pad', then wash your spatula in cold water straight away (no soap needed). The glue is water soluble and it is also a fast grab glue so you need to clean up as you go.

Now you have your FlitterGlu 'ink pad' made use it to apply the glue across your stamp in a patting motion. The glue should appear white when you apply it - if it is clear you may not have enough on your Phat Foam or it may be drying out. You can add more FlitterGlu to your sponge to reactivate it if you still have more projects to complete. The 'ink pad' should be good for 2-4 hours if you store it face down in between uses on a non-porous surface, like a tile or saucer.

Now you need to stamp your image (I used the Peony Posey stamp) - this bit is different from stamping using your regular inks and it's important for getting a good result every time. You need to 'KISS' the stamp to the card (or other surface) for a couple of seconds WITHOUT pushing down onto your stamp. Then lift away quickly and put your stamp straight into cold water for washing.
It might feel like you're not going to get a proper image by stamping so lightly but FlitterGlu is a super fast grab glue designed to work in seconds. If you press down on your stamp for too long you are likely to stick the card to the stamp. Should this happen you'll need to put the whole lot into cold water to clean your stamp. Once you've stamped your image it will remain tacky for at least 24 hours, so there's no rush to get it covered.

I can't stress enough how important it is to work really quickly when you stamp and then get your stamp and hands into that cold water to wash away any remaining glue. It gives your stamped image time to get even tackier and also means your hands will be clean and dry for the next stage.
Now take a few Mega Flakes from your tub and add them over the FlitterGlu stamped surface. You don't need to use handfuls of flake at this stage and move your flake around to cover all the sticky areas. If you find your flakes are expanding out of their pot you can decant them and store them in the handy box that comes with your kit. These flakes are super fine so stay away from drafts when you're using them.

Now you've got those Mega Flakes all over the stamped image (and have the lid back on your pot/box) you need to bond the glue to the flakes. Gently rub your fingers over the surface in a circular motion to do this. You'll find some of the excess flake will start to come off already.

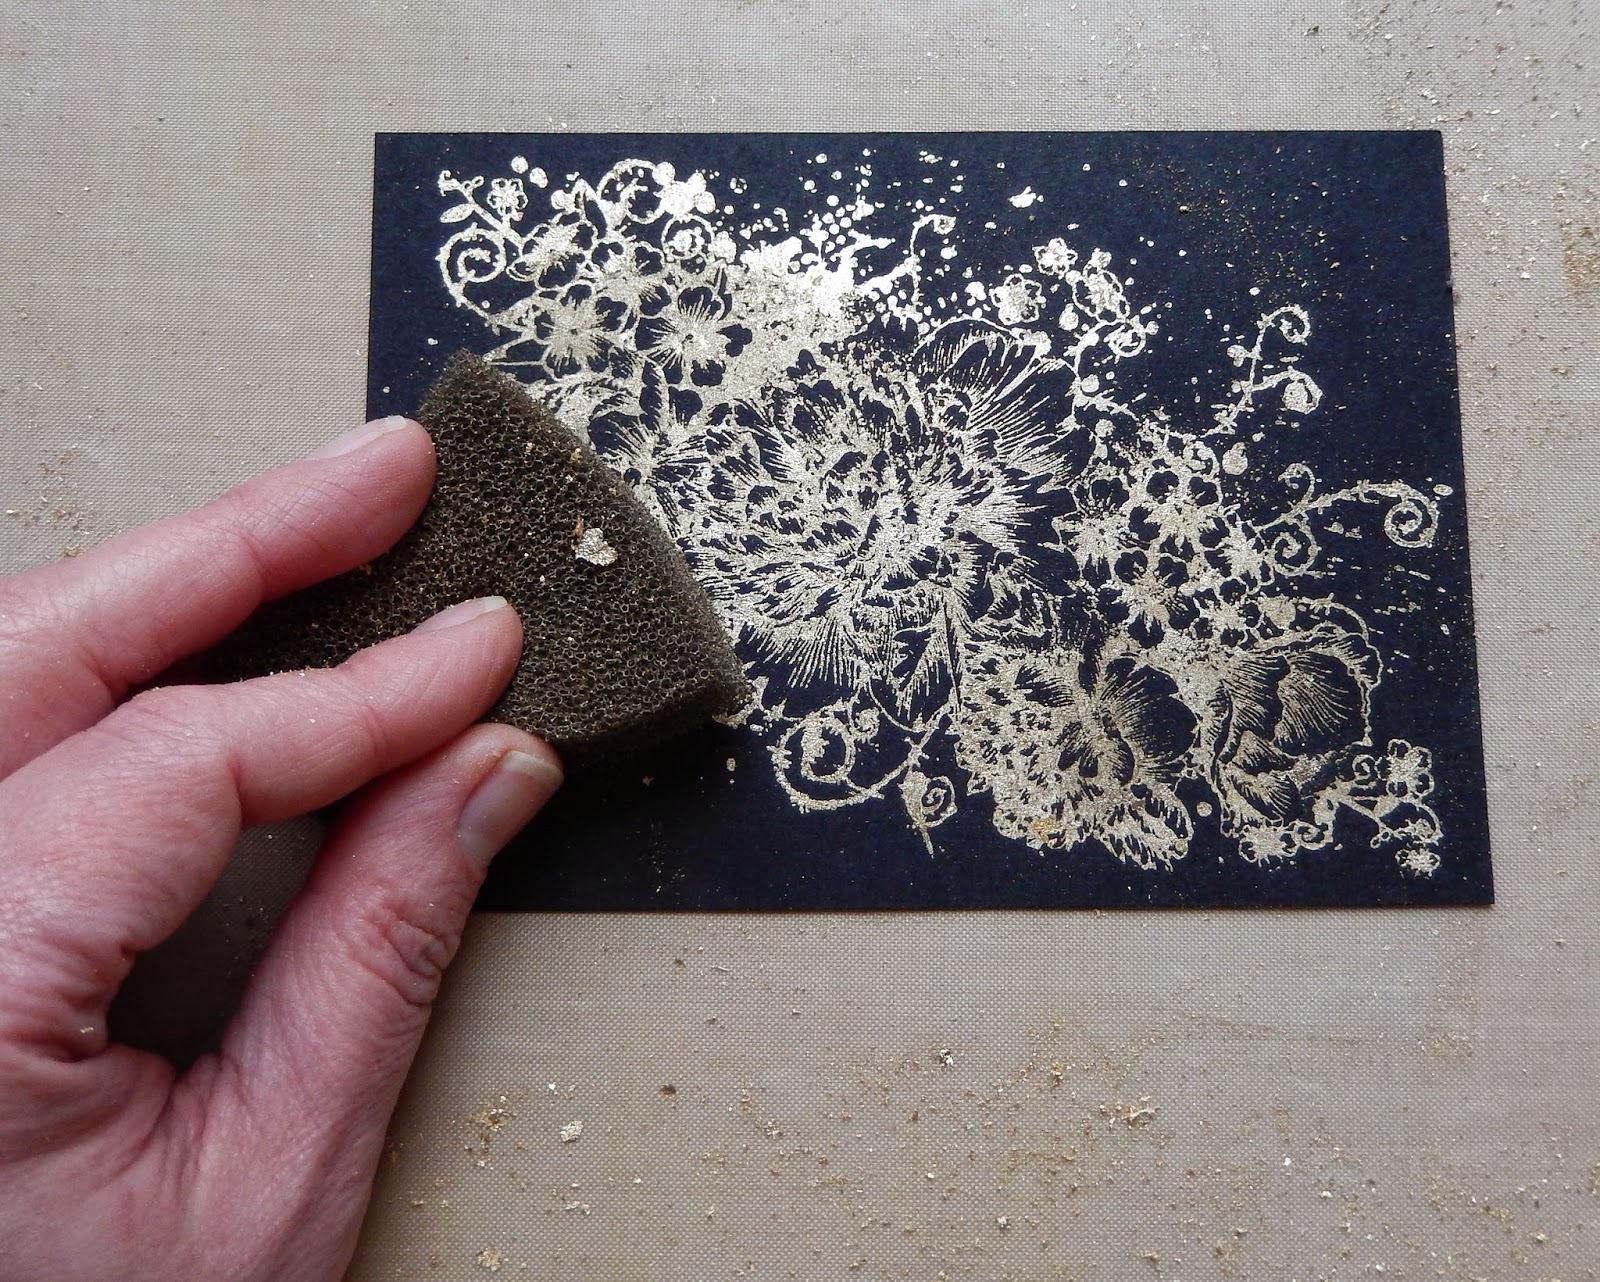
To get that beautifully crisp image to come through completely use the Scoochy pad in your starter kit. By gently rubbing over your flittered surface in circular motions and turning your card to repeat this you'll remove any remaining flake dust. Make sure you don't scrub at your image though as you risk removing more than you want. And now you have your gilded image ready for adding to your card.
You'll notice on my finished card there are thin gilded and stamped strips layered on top of this first black panel - this is easy to achieve. By swiping your FlitterGlu filled Phat Foam across a plain piece of card you'll create a sticky panel.

Now repeat the process of adding a few flakes at a time to this surface (with clean, dry hands) until you've covered all of it. Rub over with your fingers to bond the glue to the gilding flakes, then remove any excess by gently rubbing over with your Scoochy pad. I simply stamped the same Peony Posey image in black gesso over the glided surface before cutting it into strips. You can also die cut this piece of gilded card with all your favourite dies or use it to mat and layer another image!

To create the central flower on my finished card I used the coordinating Peony Dinkie stamp with the FlitterGlu to stamp onto plain white card in exactly the same way as described before. This time I added black embossing powder over the surface and heat set it with my heat gun in the usual way. Having repeated this several times I painted the flowers with Victorian Velvet Distress Stain before fussy cutting and layering them.

The card was finished with some gilded leaves (created in the same way as described above using the leaves from the Giant Peony set on white paper and vellum) a beautiful sentiment (from the Becca set, stamped onto card painted with Aged Mahogany Distress Paint) and some burgundy coloured burlap string, twisted behind the central layered peony. I used a white gel pen to colour a few of the smaller flowers on the black panel. You'll also spot some Melissa Frances white pearl embellishments which are guaranteed to complete a card beautifully.

I hope you've enjoyed today's tutorial and feel ready to give FlitterGlu and Mega Flakes a go (if you haven't done already) to add a touch of elegance to your cards and other projects. If you have any questions please ask and I'll do my best to help. There is also a really great video tutorial HERE from Kay Halliwell-Sutton, one of the co-founders of IndigoBlu.
And don't forget, there's that special Friday Focus 15% discount applied to the FlitterGlu Starter Kits at The Funkie Junkie Boutique through the next two weeks.
Great step by step tutorial Jenny x
ReplyDeleteA fab tutorial Jenny and a great reminder for my fussy brain.... the finished card is a beauty!
ReplyDeleteGreat tutorial Jenny, made wonderfully clear. Not played with flakes in a while, going to get them out but might have to buy the glue! Oh yes wonderful card too xx
ReplyDeleteStunning tutorial, Jenny! I love the flakes! Hugs, Sandra
ReplyDeleteGorgeous card and love the tutorial!
ReplyDeleteA fantastic tutorial, Jenny! Your card is gorgeous!
ReplyDeleteLove your explosion of gold and red over the black. That flower is amazing!! Great tutorial, thank you for sharing with us. Huge hugs, Georgie xx
ReplyDeleteGorgeous card and wonderful tutorial Jenny! I have bookmarked this to come back to soon as I can get me some of those amazing flakes! hugs :)
ReplyDeleteLove, love your gorgeous card Jenny and your tutorial is just wonderful! Anne xx
ReplyDeleteI have been trying to get to this all day! Such a great tutorial Jenny and I will be coming back to this as I am sure I want to try this new technique. I love the wonderful gold effect and the flower is just stunning! Such a great card. Thank you for such a detailed tutorial. Jennie x
ReplyDeleteLove the flitter glue Jennie. Must get some of the glue you used days I have not had much success with others.
ReplyDeleteAs always a fab step by step. Tfs and hugs Annie x
Fantastic tutorial Jenny and a fabulous card. Nicola x
ReplyDeleteGorgeous gilding with the flakes and a great tutorial. Beautiful!
ReplyDeleteAlison xx
Oh just as gorgeous as can be! Jenny, I love the effect and not to mention the share elegance of the sparkle! Great share! Hugs!
ReplyDeleteGreat tutorial Jenny, thanks so much! I've heard folks talk about FlitterGlu and Mega Flakes but had never seen it in action. Gorgeous card!
ReplyDelete