I love using metals on my papercrafts and mixed media projects. I've spent a lot of time tracking down cool little bits of metal that you can use on your cards, layouts and mixed media. Most of the embellishments in the boutique are bronze tone metal and are wonderful to use as is. But sometimes you want to take it up a notch which you can do by altering and embellishing your metals.
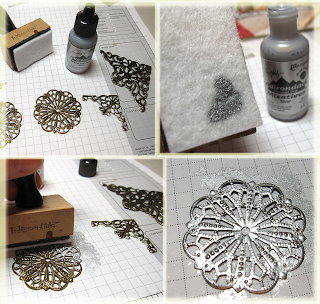
One of my favorite treatments for metals is to use alcohol inks to alter them. Here I am using Ranger Pitch Black alcohol ink, applying it to a felt pad on an applicator and dabbing it onto the metal. It doesn't change the bronze to a really deep black, rather almost an espresso tone. If you want a true shiny black, I recommend using embossing powder. (double click the photo to enlarge and see details)
Alterations include white, black and silver acrylic paint, embossing powder as follows: white, verdigris and Vintage Photo distress EP.
Here are some examples of where I have altered metals for my work:
There you have it. Just some fun little ways to spice up your work. If you are interested in purchasing some of the filigree metals, shop here. Everything in the Filigree Metals category is reduced by 15% between Friday and Thursday, April 5th. And don't forget, you can get 10% off on your entire purchase by using MARCH10 at checkout. Shop early - supplies are limited!
Thanks for stopping by and have a great day!


Wow - how clever! Love all these "tiops" for changing the colour of the metal! Thanks!
ReplyDeleteThank you for the tutorial Linda, the embellishments look incredible.
ReplyDeleteSmiles:)
Great tutorial, I have tried alcohol inks but never tried embossing powder - ingenious idea.
ReplyDeleteI have a collection of metal embellishments (several are from your wonderful shop), and these ideas for altering them are lovely. Thank you for sharing.
ReplyDeleteGreat ideas, Linda. I love all the different effects, especially the patina.
ReplyDeleteLove all your ideas Linda...I need to emboss on one...haven't tried that! Thank you!
ReplyDeleteThanks for all the tips on altering the Filigrees Linda
ReplyDeleteI just submitted my card for the Vintage style challenge and had changed a brad from silver to gold. How timely to read your metal tutorial this morning as I learned a few new tricks!
ReplyDeleteSharon
aka celticrafter
Oh I do love this! I have done a few of those techniques on thicker metal, but am so delighted to see how beautiful on filigrees! Fabulous tutorial! Got some playing to do!
ReplyDeletewow, Linda...these are great tips...thanks so much!
ReplyDeleteenjoy *~*
Oh how I adore my filigrees! I haven't tried the embossing powder, but I can't wait now! Wonderful tutorial and tips, Linda!
ReplyDeleteGreat tips! I have to try them soon.
ReplyDeleteI think the filigree's are just beautiful as they are, :) so much that so that I want to KEEP them - not USE them, LOL.
ReplyDeleteI HAVE used one ...or two... for special cards though.
The results are great to see so thank you for the tips.
x
They are so intricate and beautiful.
ReplyDeleteDrum roll please! This is so very informative....like watching ah ah can I say it...Tim's blog.........GREAT ideas GF, love the post! hugs
ReplyDelete