Wednesday, September 30, 2015

Chalk it Up!

It's Shelly back with you today, which means a second week of fun with my first Frilly and Funkie challenge! I thought it would be fun to experiment with chalk techniques - whether it's stamping with chalk inks, using a faux chalkboard technique, coloring with chalks, or even dabbling in your art journal with sticks of chalk - we want to see what you can create using chalk as a theme!

The team will choose their top four picks with the winner being invited to join us in a Guest DT spot here at Frilly and Funkie and the next three will receive badges to display on their blogs. Everyone who enters and follows the rules will be entered into the draw to have the chance to win a $25 spending spree at The Funkie Junkie Boutique.

The guidelines for entering are simple; create a new vintage or shabby chic project following the challenge theme, link it below to your post (not just your blog) and also include a link back to this challenge in your post. You can combine our challenge with up to 10 challenges (including this one) to be in with a chance of winning. Make sure you follow these rules as unfortunately we have had to eliminate entrants from the prize draws in the past when they have entered too many other challenges. If you are entering through a public forum please use keyword F&F. Also, please be sure to turn off your Word Verification so our Design Team can leave comments on your blogs.

This week we have some amazing inspiration from our Funkie team (click on each image for a closer look!)

Jenny Marples - Pushing The Right Buttons

Sue Carrington - Stamping Sue Style 

Shelly Hickox - Stamptramp

Zoe Hillman - iGirlZoe

And now, we have some wonderful inspiration from our Frilly team (click on each image for a closer look)!


Cec Wintonyk - CW Card Creations


Nancy Dynes - Tattered Treasures

I love all the different ways our talented designers used chalk! Are you inspired? We can't wait to see what you create!

Have a great week!
Shelly


Monday, September 28, 2015

Challenge Winners - Stamps Be Gone!

As we start a brand new week it's time to announce the winners of the 'Stamps Be Gone!' challenge. Thank you so much to everyone who took the time to enter. The Design Team were spoiled for choice with your fabulous entries. This time our winner is #5 Karen H.


We loved the way the papers, trims and embellishments were combined to create a beautiful gift. Congratulations Karen on being our favourite for the 'Stamps Be Gone!' challenge and winning the opportunity to be a Guest Designer here at Frilly and Funkie for a future challenge.

And now for the next three winners of our Frilly and Funkie Top 3 Badges. In numerical order they are... #1 Martinel, #23 Alison (Butterfly) and #31 Kathy!!! Please email Linda at thefunkiejunkie@gmail.com for the codes for the Top 3 badges so that you can display them proudly on your blog.


And finally Random.org has chosen a winner for our $25 gift certificate to The Funkie Junkie Boutique. Our congratulations this time go to #26 Jess M (Two Mad Dahlias)!

A huge thanks from the Frilly and Funkie team to everyone who took part in this challenge and congratulations again to our winners. Please email Linda at thefunkiejunkie@gmail.com for the codes for the winner's badge and to give us your email address for the Guest Designer details (Karen) for the Top 3 badges (Martinel, Alison and Kathy) and for the gift certificate details (Jess).

Our current challenge, 'Chalk It Up!' runs through Tuesday, October 6th. We hope to see you entering this time around so that you too can be in with a chance to win. And please make sure you follow our rules as sadly we've had to discount entries from previous challenges; you can enter up to 10 challenges including ours, and a maximum of 3 entries per person to our challenge. Please remember to link back to our challenge in your entry and mention in your post that you are entering this Frilly and Funkie challenge.

Have a great week everyone!

Sunday, September 27, 2015

The Funkie Junkie Boutique is Partnering With the New Wanderlust 2016 On-line Art Classes

The Funkie Junkie Boutique is excited to announce our new promotional partnership with Wanderlust 2016, a series of on-line art classes that will stretch over an entire year.  We have been selected as one of the preferred vendors from which the students may purchase art supplies.  You can read a bit about it in the following press release.

Wanderlust press release:

Wanderlust is a whole year long journey - an online event offering you videos from 24 guest teachers (including Finnabair, Andy Skinner, Flora Bowley, Nathalie Kalbach, Kate Crane and many others) and 2 resident teachers (Kasia Krzyminska and Jamie Avery) one every week (each one downloadable and with PDF instructions provided), 50 amazing videos, which will run for over 50 hours in total, access to a community forum, inspirations, challenges, discussions, galleries, workshops, giveaways and generous discounts from Wanderlust partners. The perfect alternative to in-person classes!


Saturday, September 26, 2015

Saturday Step X Step - Chalk Card

Hi there, it is Cec here and it is my turn to present the Saturday Step X Step so I decided to share how I made my card for the current challenge with you.

The challenge is Called Chalk It Up and asks that you use chalks in the creation of your project.  In the past I have used chalk in place of distress ink to highlight the edges of a panel or the raised areas of embossing but I decided to try something a little different this time.


I started by stamping my flower image on vellum using Snowcap Pigment Ink.  Note: This has been replaced by Glacier White so my thumbnail link to The Funkie Junkie Boutique will reflect that.


Next I embossed the flower with some Snow White embossing powder from Michaels.


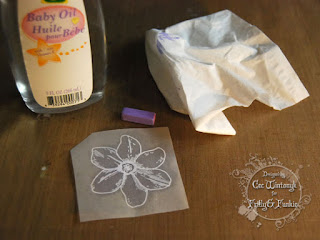
Then I turned the vellum over and started to colour the flower using chalk pastels from Mungyo.  I found that it is best to use the corner of the stick to lay your chalk down and to use a light hand.


I blended the colour with some baby oil and a tissue or my finger.  After the first blend I turned the vellum over and checked against some white paper to see if there was enough colour and there wasn't so I repeated the process.


Then to add more shading I used some chalk pencils that have been in my stash for a million years - or at least ten.  They are a bit harder than the pastel stick and don't crumble as easily.


In order to make the flower colouring more visible I glued the vellum to a scrap of white card stock.  Because I did not want any adhesive showing through the vellum I found the best way was to use a pen glue and follow the stamping lines.  Once the flower was dry I fussy cut it. 

In this photo you can see that I got a bit of creasing on the flower but I didn't bother redoing it because I knew I was making two more flowers and could tuck the creased part under the petal of the flower on top. When I did the other flowers I laid the vellum down starting at the bottom and used my fingers to smooth it out as I continued to lay it down a bit at a time - no creases.


The next step was to make the background and I started by covering a sheet of card stock with Blush Fresco Finish paint, which is a chalk acrylic.


Next I added some embossing with texture paste through a Wendy Vecchi Polka Dotty Stencil.


Then I used some Cut and Dry Foam to add some Candy Floss Fresco Finish paint.


The next step was to give it a little spray with some Lindy's Stamp Gang Starburst called Ramblin Rose Pink but this could be replaced with any of the other Lindy's Starburst Pink sprays (I would not suggest using the Moonshine Mist sprays because they all have a brown base to them) or even Worn Lipstick Tim Holtz Distress Spray.


Next I dyed some seam binding with Worn Lipstick Distress Ink and then swiped it with some Dusty Concord DI. I also ran a scrap piece of white card through the Tim Holtz Bubbles Texture Fade to mount the flowers on.  I actually chalked the highlights with a cotton ball but it clashed with the flowers so I scrapped it and embossed another panel and just left it au natural.


Here is the finished card with some pearls and pearl flourishes added.  You have lots of time to create a project using chalks so I hope you will head to your craft space and make something to share with us.

The following products used in the creation of this card came from The Funkie Junkie Boutique:

Friday, September 25, 2015

Exciting News!!! A New Funkie DT Member!!!

Hi everyone. We have some amazingly exciting news for you (that was supposed to have been shared with you on Wednesday, so huge apologies for the delay).

Here at Frilly and Funkie we are proud to announce the arrival of the incredibly talented Zoe (IGirlZoe) to the Funkie side of the DT!!!


So many of you will have seen Zoe's beautiful work both on her blog, in samples for Tim Holtz himself and as a guest artist on the RangerInk blog! Now there's an impressive CV for you, and you can understand why we are thrilled that she has become part of the Frilly and Funkie family. Please join us in giving her a huge welcome.

You'll get to see Zoe's first DT project next week as part of the 'Chalk It Up!' challenge. Meantime make sure you join us again on Saturday for a fabulous Step by Step tutorial from our very own Cec - you won't want to miss this one!

Thursday, September 24, 2015

Welcome to today's Guest Designer, Mary Elizabeth!

Today we are welcoming Mary Elizabeth of 'M.E. and My Walk on the Creative Side' as our Guest Desginer. Jane was chosen by the DT as the winner of the 'Stitch in Time' challenge. So, without further ado let's move on to hear from Mary Elizabeth.

I have always enjoyed being creative. In fact, I thought I might go to art school after I finished high school. Instead I ended up getting a mathematics degree and being a university professor. Life is funny … isn’t it. Although I absolutely love teaching, I find that my crafting keeps me sane. I can let go of life’s stresses and just lose myself amidst paints, inks, and paper.


The project that I made for Frilly and Funkie’s “Chalk It Up!” challenge combines my love of crafting with my love of teaching. September is when many students go back to school after the summer holiday comes to an end. What a great time for a chalk-themed challenge! As a mathematics teacher, I use a a lot of chalk; so, of course I made a tag dedicated to going back to school. I took some of Tim Holtz’s Idea-ology paper that had the alphabet on it and adapted Tim’s “chalkboard” stamping technique for use with a stencil. (You can find a complete tutorial of Tim’s technique on his November Tag for 2013 blogpost.) For my stencil adaptation, I began by applying Distress Embossing Ink through Tim’s Numbered stencil with an ink blending tool. I sprinkled on Ranger Ink’s frosted crystal embossing powder over the stenciled numbers. I heated the embossing powder per Tim’s directions on his blog. Then I put the stencil back over the embossed numbers and applied white chalk over through the stencil on top of the frosted crystal embossed numbers. A cotton swab made the perfect tool for rubbing in the excess chalk through the stencil. I then removed the stencil. I was so excited because only the stenciled image had chalk on it! (Usually I get chalk everywhere on a project like this!) A thin black marker was used to provide some shadows around my chalked numbers. What a really cool background for my school-themed tag.


I stamped three apples from Tim Holtz's Mini Schoolhouse blueprint stamps on watercolor paper. I colored them with Distress Markers and a water brush detailer. After that dried completed, I fussy cut the apples and gave them three coats of Ranger’s Melt Art Ultra Thick Embossing Enamel (UTEE). I also fussy cut some of Tim’s Found Relatives (that looked like they were dressed up to go back to school). I added the relatives and apples to my tag with foam adhesive squares. Some tissue tape, a remnant rub sentiment, and a pencil stub tag tie completed the project.


I'm sure you'll all agree that Mary Elizabeth's mathematical tag is sensational and has really measured up to our challenge! Thank you so much for joining us as a Guest Designer Mary Elizabeth.

If you would like to be in with the chance to join us as Guest Designer all you need to do is join in with the current challenge 'Chalk It Up!'.

Friday, September 18, 2015

Friday Focus - Idea-ology

Hi there, Cec here with the Friday Focus segment and this time it is about Idea-ology.  For the next two weeks these products will be available in The Funkie Junkie Boutique for a 15% discount (editor's note:  Friday Focus 15% off sale does not apply to the brand new Yuletide Christmas Idea-ology collection that just arrived in the store this week), which is a fabulous buy since they are already discounted from the suggested retail price.

I have made two cards to show you.  I did this on the few days we had rain this past week so there are some missing photos because they just didn't turn out, but I know you will be able to picture what I did from my description.

I used Idea-ology products I had in my stash but there are so many others to choose from so I will  give you alternatives at the end of the post if you want to make cards/projects for different occasions. 


I started by pulling a piece of Tim Holtz Color Core card stock to create the blank for this card that could be used for winter or Christmas and then added a couple layers of paper from the Maja Design Vintage Frost pad that I distressed around the edges and topped with some Deco Art Snow Writer.


The next step was to add some Idea-ology Frosted Film to some more of the Color Core card stock and to a scrap of white card stock to give them a bit of a sheen and then cut snowflakes using the Tim Holtz Paper Snowflakes Thinlits die.  Note:  The snowflakes did not cut as cleanly with the frosted film added as the card stock would have on its own so I added a thin piece of card stock to the sandwich and also used a blunt tapestry needle to coax the pieces out - there is always a workaround.  I inked the edges of the snowflakes with some Weathered Wood Distress Ink and added some Idea-ology Mirrored Stars to the centres.


Next I cut a sled from Idea-ology Grunge Paper using my Cameo. This stuff cuts like butter and can be altered in so many ways.  In this case I coated it with some Brushed Corduroy Distress Stain first and then went over it randomly with some Walnut Stain Distress Ink.  I added some burlap string for the "rope" to pull it.

I took some white paint and covered an Idea-ology Christmas Word Band and then immediately wiped the paint off so that it only remained in the text recesses.  Then I added a piece of the burlap string and added it to the bottom of an Idea-ology Found Relative card from the Occasions set.

So for this winter card I used five different Idea-ology products - Frosted Film, Word Band, Mirrored Stars, Grunge Paper and Found Relatives.


For this Halloween card, I started with more Color Core card stock for the blank and added a piece of paper from the Tim Holtz Regions Beyond paper pad for the background, also an Idea-ology product.


I cut a haunted house from Grunge Paper with my Cameo and then coated it with Clear Rock Candy Crackle Paint and when it was dry I inked it with some Vintage Photo DI. I didn't think it looked spooky enough so I also inked it with Black Soot DI after I took this photo.


Next I drew the outline of the house on some acetate and added some Frosted Film to it.  I didn't care if there were bubbles since the glass in an old house would not be perfect anyway.  After I cut the house shape out I attached it to the back of the Grunge Paper house and then added some Sunshine Yellow Alcohol Ink to the acetate side where the windows were.


Next I added some spiderweb stamping with a stamp from the Tim Holtz Ultimate Grunge set and Jet Black Archival Ink.  In this photo, you can see the coloured windows.


I cut the tree and fence from scraps of black card stock using my Cameo and covered them with Wendy Vecchi Black Embossing Paste by patting it on with a palette knife so it would look rough.  The skeleton is an Idea-ology charm from the Adornments - Oddities set and he has been coated with Wendy Vecchi Watering Can Embossing Powder and hangs from the tree by some burlap string.


I cut a circle of card stock and inked it with Scattered Straw and Wild Honey DI and then crumpled it up and smoothed it out to make the moon.  The cobwebs are pieces of cheesecloth dyed with Black Soot DI and the bats are just clipart as are the gravestone, evil pumpkin and scary cat.

This card has four Idea-ology products - Patterned Paper, Grunge Paper, Frosted Film and Skeleton charm. but I saw quite a few neat new Halloween themed Idea-ology products in Linda's store that I wish I had been able to get my hands on.

If you are making cards/projects for other occasions, here are some suggestions for different Idea-ology items you might want to consider:

Frosted Film -can be replaced with Tissue Wrap (not self adhesive like Frosted Film but is thicker than gift wrapping tissue, adheres beautifully with a thin layer of glue, is see through and acts as a resist if you want)

Word Bands - come in many different sets or can be replaced with Typed Tokens in different sets (all can be altered with paint or alcohol ink if you want some colour)

Mirrored Stars - can be replaced with Gumdrops (come clear but can be coloured with alcohol ink), Star Fasteners, Brads of many types

Skeleton Charm - can be replaced with other charm sets or metal embellishments (can also be altered with alcohol ink or embossing powder for colour)

Halloween Paper - can be replaced with Christmas papers or Florals to name a few

Found Relatives - come in other sets and there are also Photo Booth strips

There are lots of embellishments for a variety of creative styles and I could go on and on but would encourage you to check out the Funkie Junkie Boutique to see what is available in this line that suits your creative style. 

I hope I have given you a few ideas and since my teammates also use lots of Idea-ology in their projects check their creations out for even more ideas and then let's see what you are creating.  There are still a few days left to join our  current challenge 'Stamps Be Gone!'.

Wednesday, September 16, 2015

Stamps Be Gone!

Hello Everyone!! Pamellia here and I am hosting our next challenge here at Frilly and Funkie. How would you decorate your project if you didn't own any stamps? Embossing folders, stencils, or perhaps a little hand doodling? Well, let's put it to the test for this challenge. Other than a small sentiment, I would ask that you use no stamps at all on your vintage or shabby chic creations.

The team will choose their top four picks with the winner being invited to join us in a Guest DT spot here at Frilly and Funkie and the next three will receive badges to display on their blogs. Everyone who enters and follows the rules will be entered into the draw to have the chance to win a $25 spending spree at The Funkie Junkie Boutique.

The guidelines for entering are simple; create a new vintage or shabby chic project following the challenge theme, link it below to your post (not just your blog) and also include a link back to this challenge in your post. You can combine our challenge with up to 10 challenges (including this one) to be in with a chance of winning. Make sure you follow these rules as unfortunately we have had to eliminate entrants from the prize draws in the past when they have entered too many other challenges. If you are entering through a public forum please use keyword F&F. Also, please be sure to turn off your Word Verification so our Design Team can leave comments on your blogs.

This week we have some inspiration from the fabulous Funkie team! (click on each image for a closer look)

Sue Carrington - Stamping Sue Style

Shelly Hickox - Stamptramp

Jenny Marples - Pushing The Right Buttons

And now for some inspiration from the talented Frilly team! (click on each image for a closer look)

Wow, look at all those creative decorating ideas! I hope we have inspired you to head to your craft room and start crafting! We can't wait to see what you create!

Tomorrow we'll be back to share the incredible artwork of our latest Guest Designer, and next week the Funkie team will provide you with their own inspiration.

Hugs, Pamellia :)


Monday, September 14, 2015

Challenge Winners - Touch of Gold

Here we are at the start of a brand new week and it's time to announce the winners of the 'Touch of Gold' challenge. First off, thank you so much to everyone who took the time to enter. The Design Team poured over the gorgeous entries before casting their votes and our winner this time is #20 Suzanne C.


We thought this project was truly magical and perfectly demonstrated how a touch of gold can bring a piece to life. Congratulations Suzanne on being our favourite for the 'Touch of Gold' challenge and winning the opportunity to be a Guest Designer here at Frilly and Funkie for a future challenge.

And now for the next three winners of our Frilly and Funkie Top 3 Badges. In numerical order they are... #1 Alison (Butterfly), #26 Kathy and #33 Maryvonne!!! Please email Linda at thefunkiejunkie@gmail.com for the codes for the Top 3 badges so that you can display them proudly on your blog.


And finally Random.org has chosen a winner for our $25 gift certificate to The Funkie Junkie Boutique. Our congratulations this time go to #41 Mac Mable!

A huge thanks from the Frilly and Funkie team to everyone who took part in this challenge and congratulations again to our winners. Please email Linda at thefunkiejunkie@gmail.com for the codes for the winner's badge and to give us your email address for the Guest Designer details (Suzanne) for the Top 3 badges (Alison, Kathy and Maryvonne) and for the gift certificate details (Mac Mable).

Our current challenge, 'Stamps Be Gone!' runs through Tuesday, September 22nd. We hope to see you entering this time around so that you too can be in with a chance to win. And please make sure you follow our rules as sadly we've had to discount entries from previous challenges; you can enter up to 10 challenges including ours, and a maximum of 3 entries per person to our challenge. Please remember to link back to our challenge in your entry and mention in your post that you are entering this Frilly and Funkie challenge.

Have a great week everyone!