Wednesday, January 31, 2024

Rosettes Out of The Vault for Lisa's Scene

Hello, Lisa Hoel here. January has seen the release of several "Out of the Vault" Sizzix Die Sets from Tim Holtz. These are designs pulled from previous sets that were given a new twist! Our current Funkie Junkie Focus is to see what creative magic we can come up with using them. I was inspired by our current winter weather and landscape to create this piece…

Lisa Hoel for The Funkie Junkie Boutique  #creativejuicefreshsqueezed  #mymakingstory #tim_holtz #thefunkiejunkieboutique #sizzix

I've always been inspired by the soft and subdued color palette of a snowy winter day. The greys and browns of the leafless trees and sleeping garden are quietly subtle as the snow is sifting down.

Lisa Hoel for The Funkie Junkie Boutique  #creativejuicefreshsqueezed  #mymakingstory #tim_holtz #thefunkiejunkieboutique #sizzix

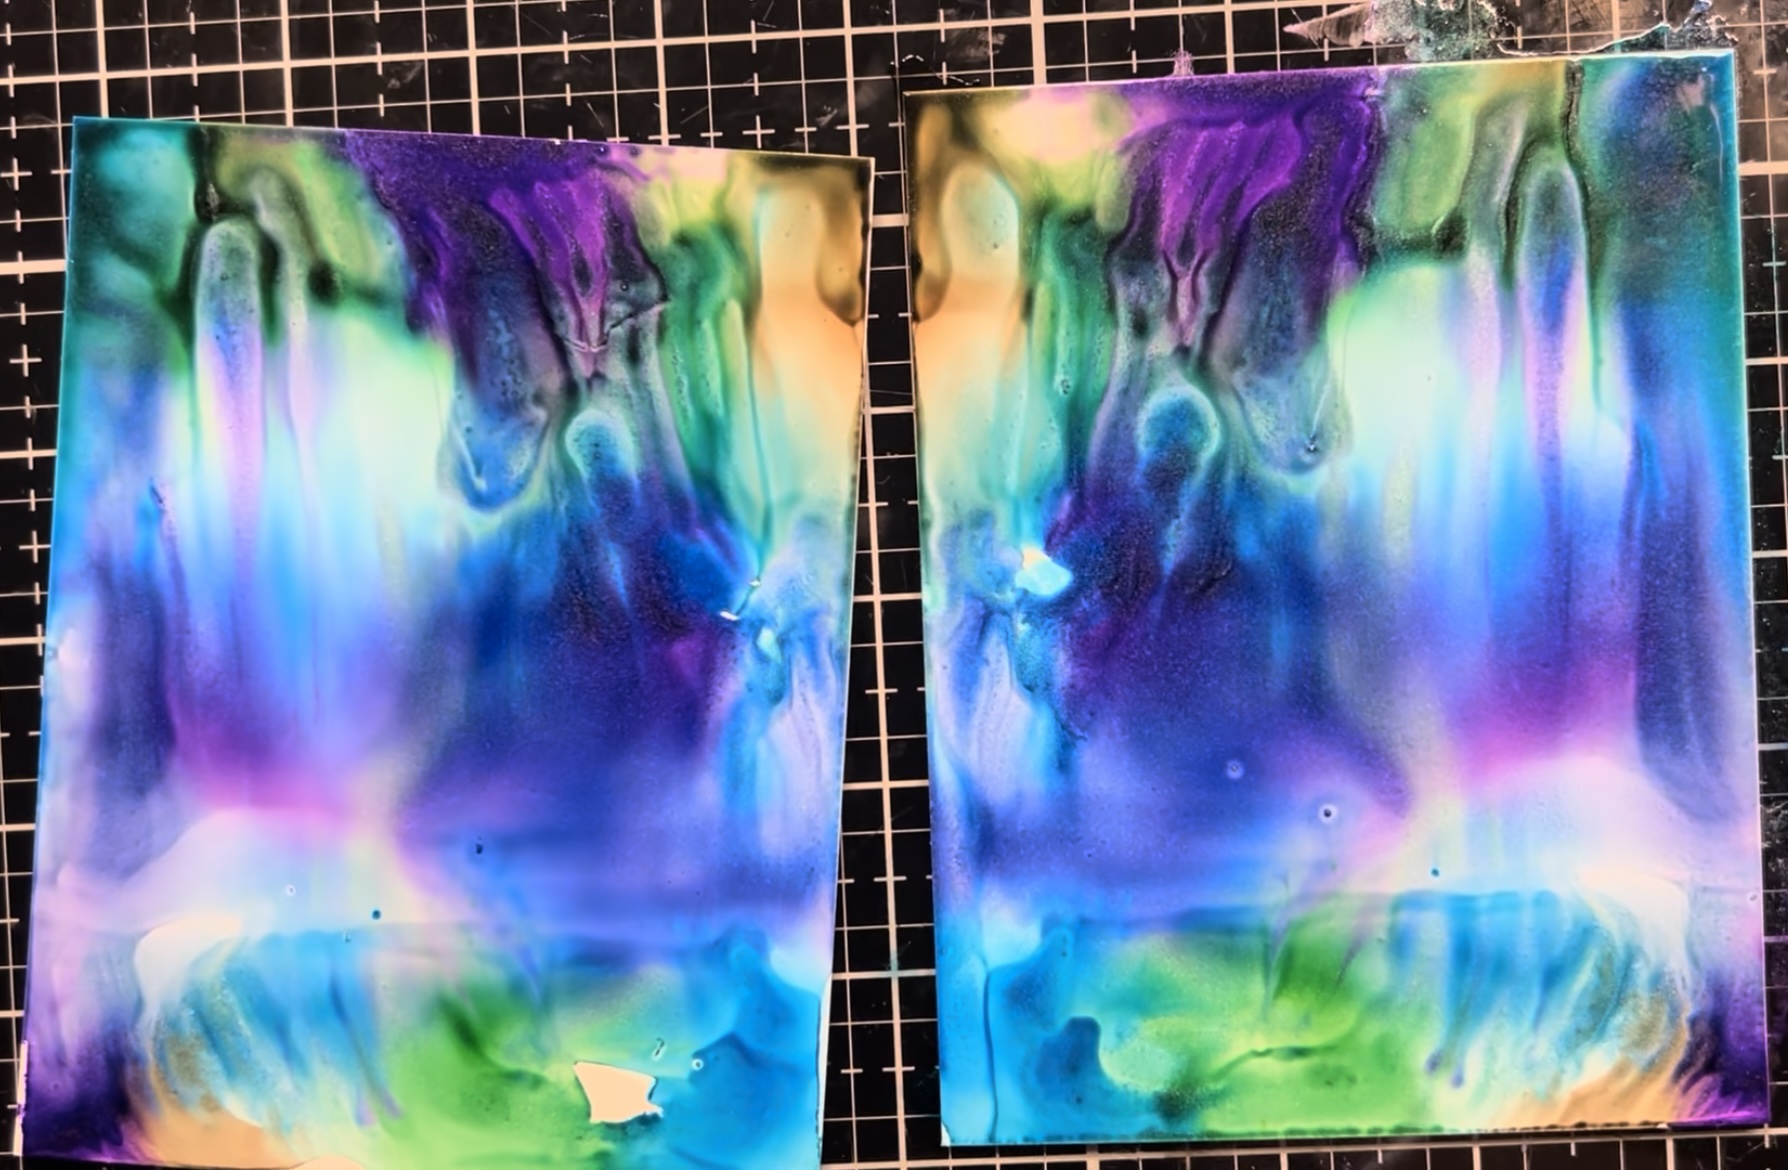
I started off by creating a color palette of inky backgrounds to work from. Distress Oxide and Distress sprays combined to give a wonderful wintery look. I also used the new Distress color Scorched Timber products in various ways. I love how it gives a dark punch but isn't as stark as a black would be. 


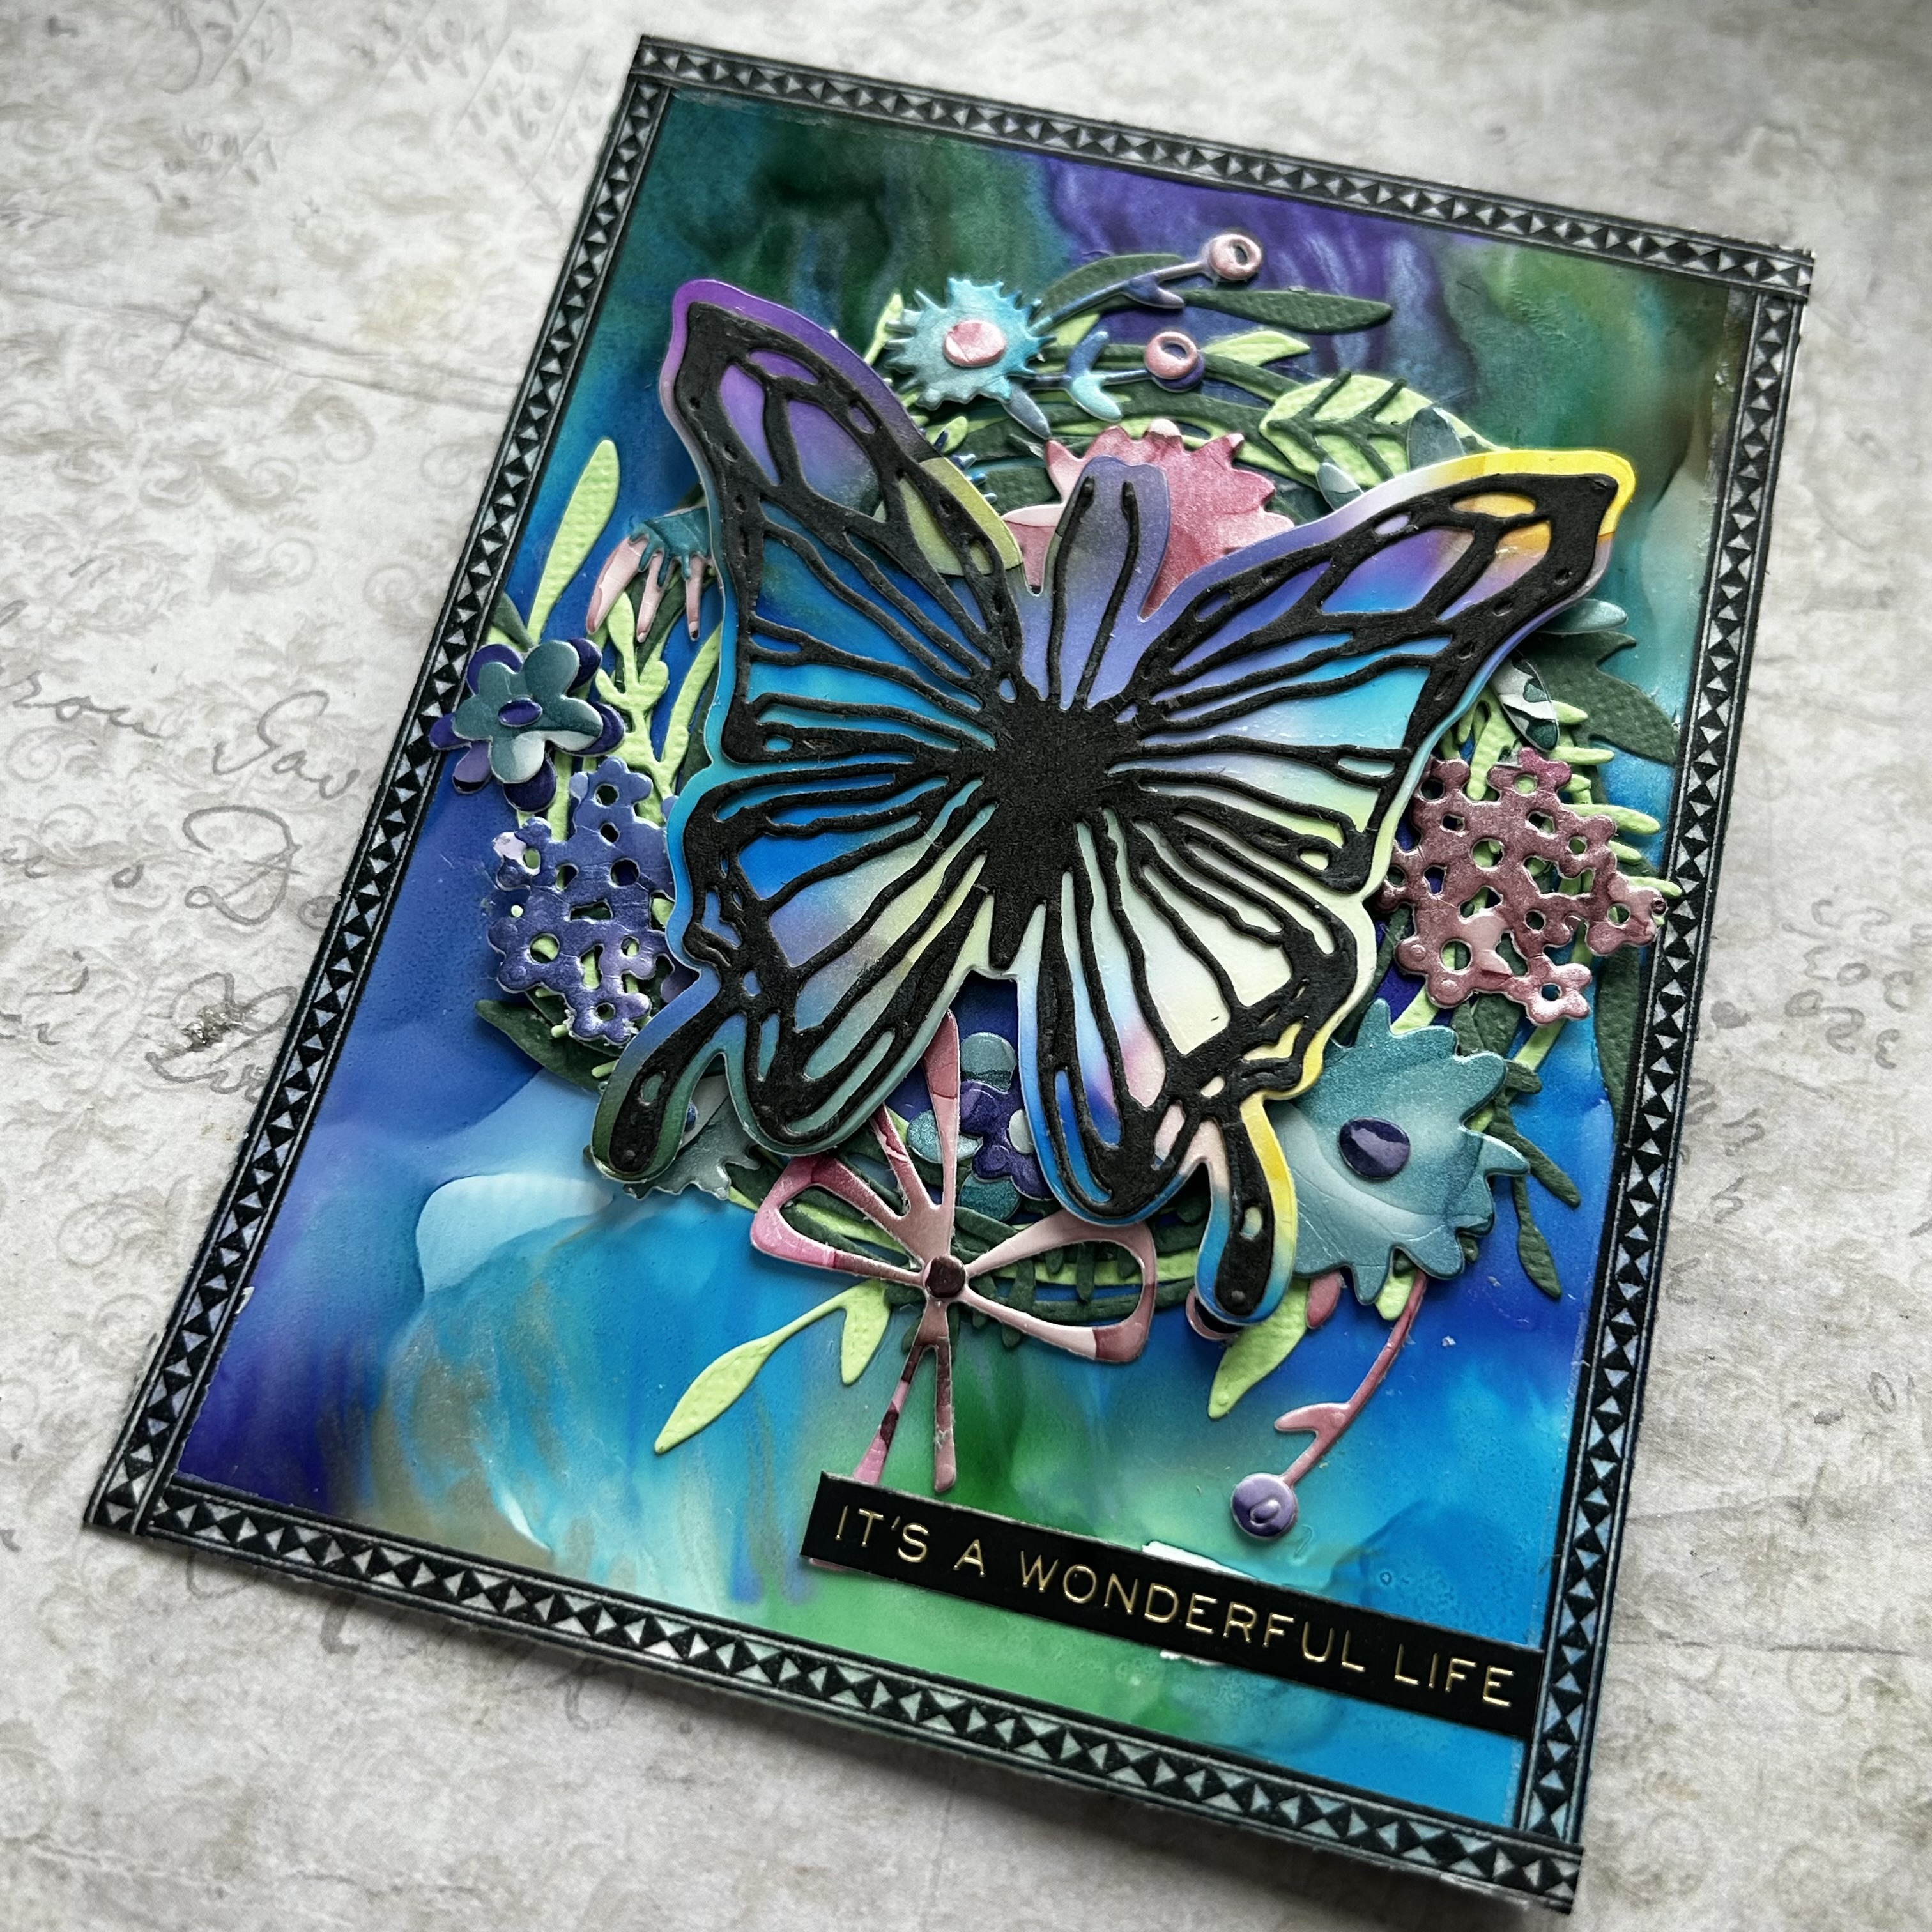
The base is an Idea-ology Framed Panel. I painted the frame with Scorched Timber and Hickory Smoke Distress Paint. The back panel was covered with one of my inky background papers.


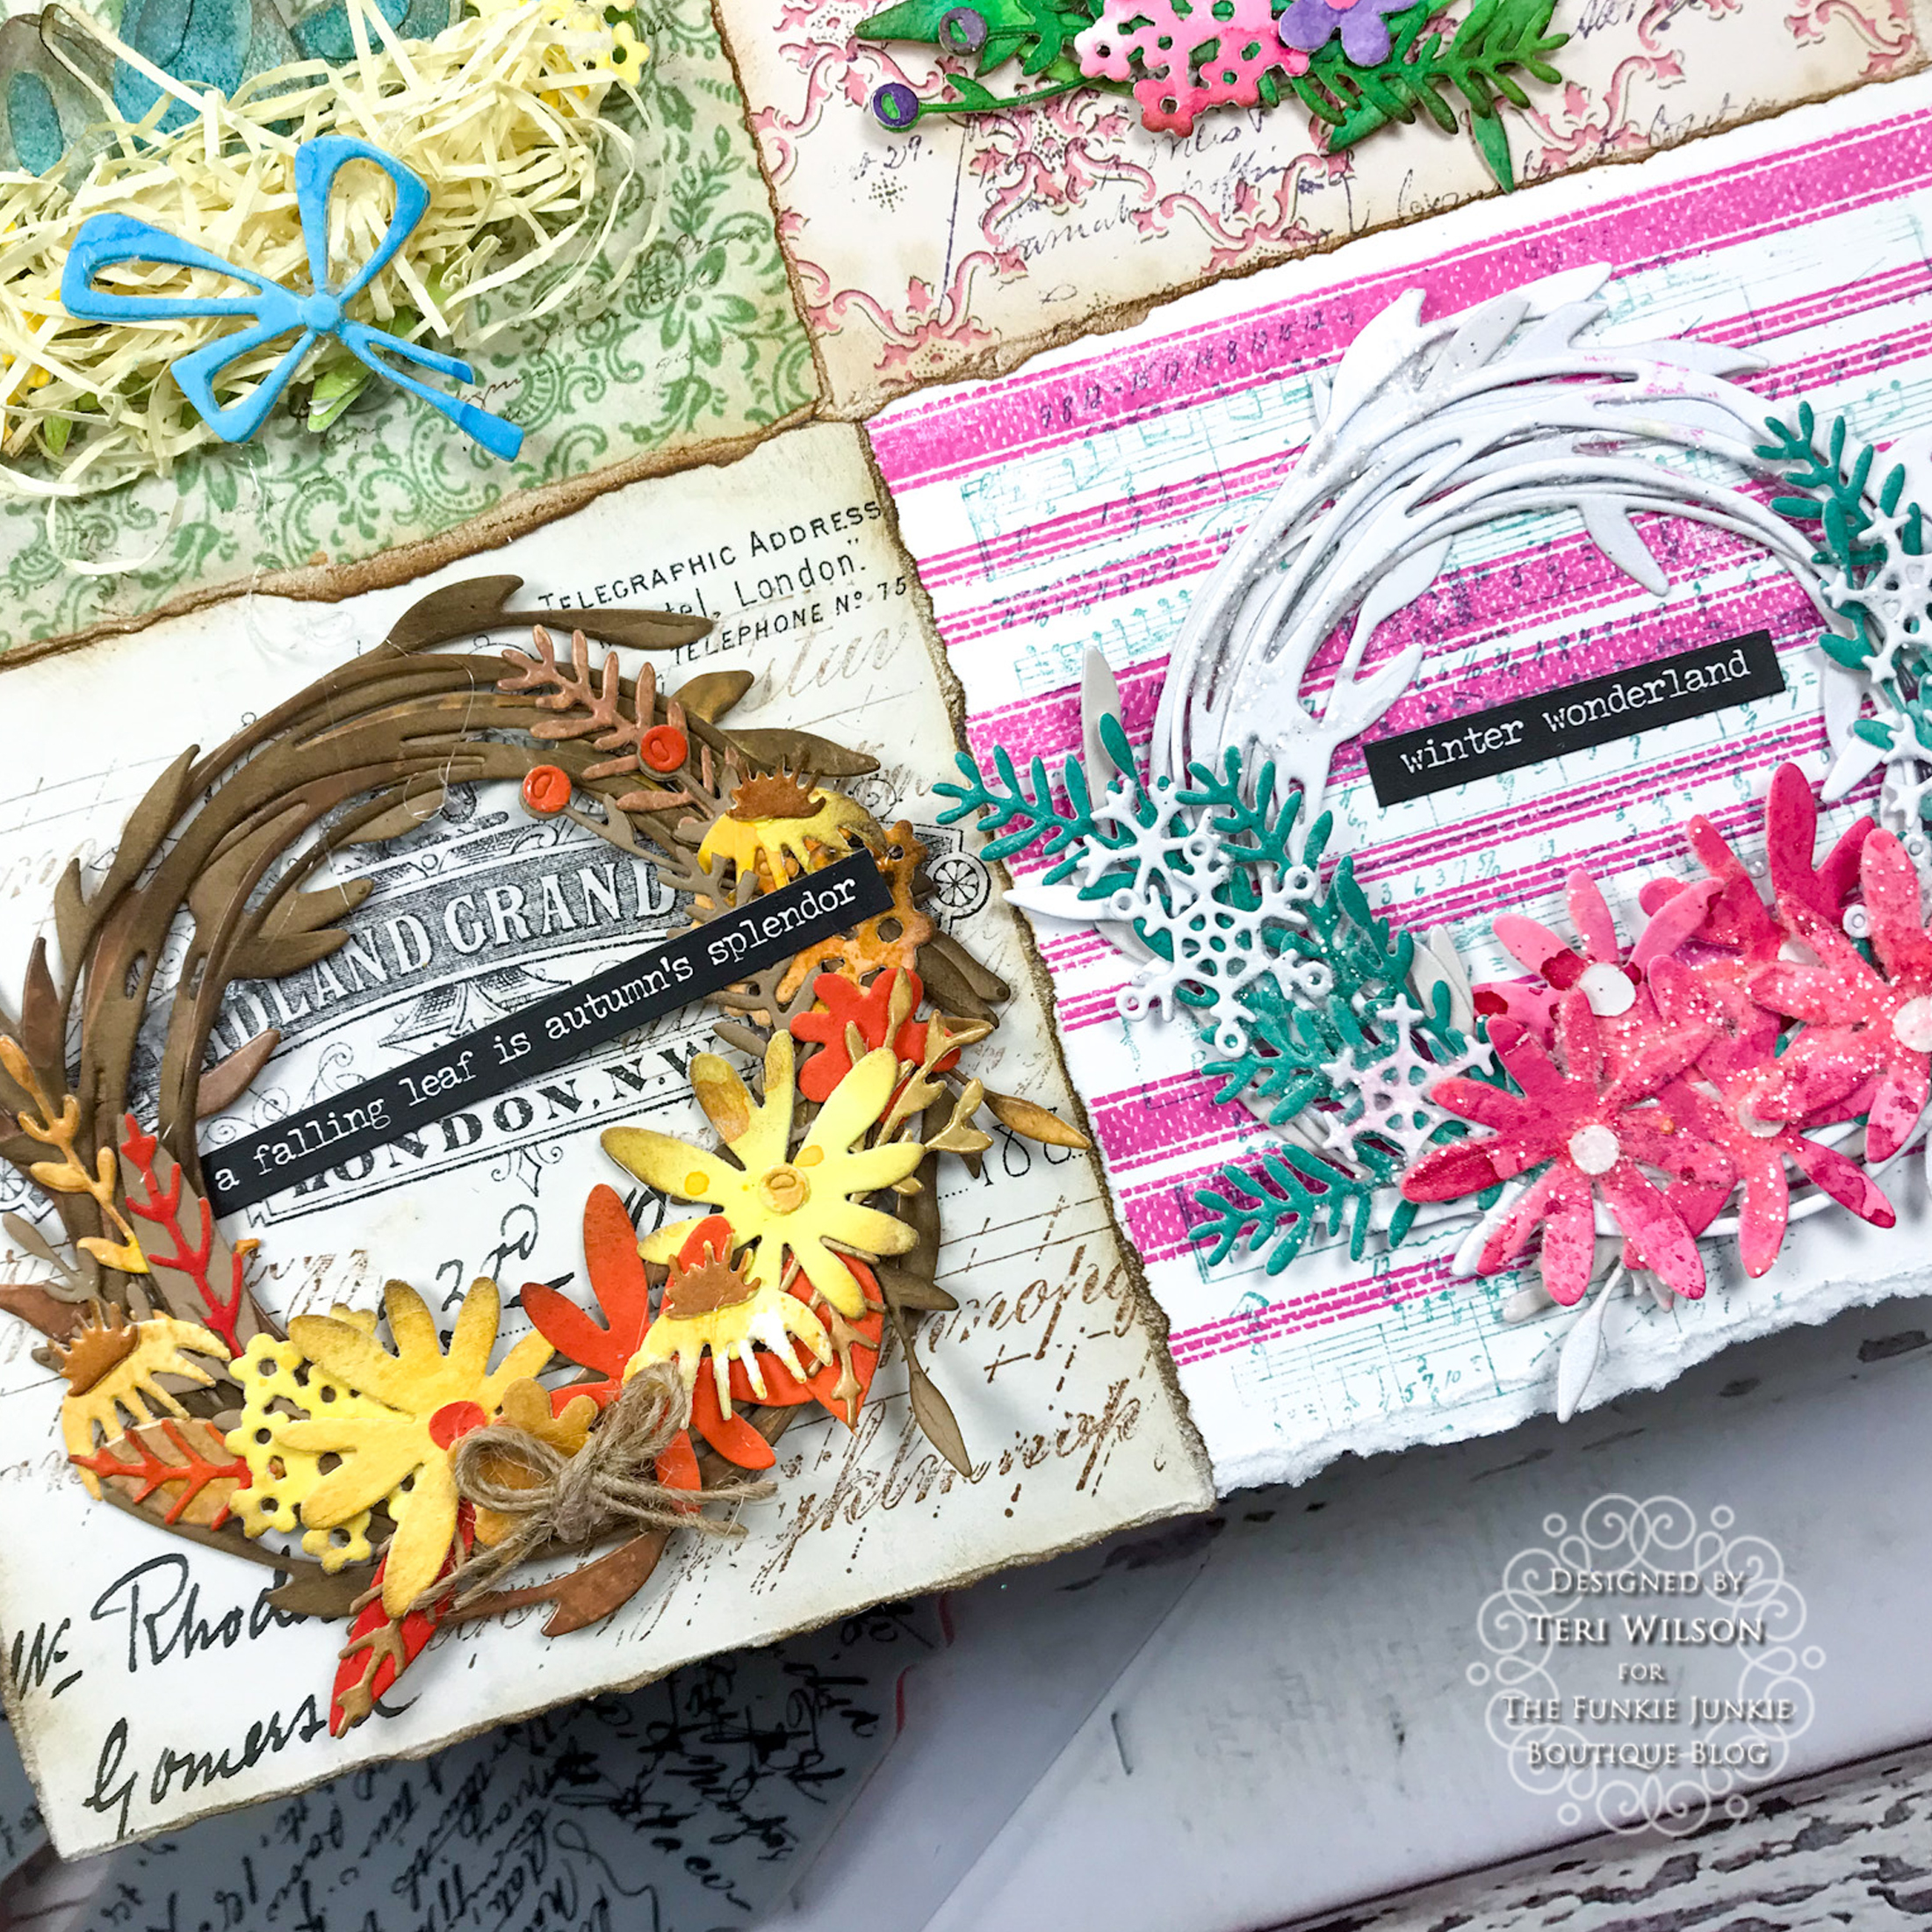
Using the Vault Rosettes Die Set, I created three rosettes to use as part of the layer bases. You can alter the diameter of the rosettes by trimming the die cut sections. I used three sections for each rosette.


You can see my layering process:


A splatter of white paint over the background adds to the "snowy" feel.

Thanks for stopping by. Keep an eye here on the Funkie Junkie Boutique Blog, Inspiration Ave. because you are now getting regular doses of expanded (and inspiring) content each week. Don't miss it…

Supplies used:  

Tim Holtz Die Set - Forest Shadows
Tim Holtz Die Set - Vault Rosettes
Tim Holtz Die Set - Vault Wildflowers
Tim Holtz Die Set - Vault Lovebirds
Tim Holtz Die Set - Tangled Twigs
Tim Holtz Die Set - Paper Snowflakes, Mini
Tim Hotz Stamp Sets - Reindeer Flight, Slight Alterations
New Distress Scorched Timber
Distress Collage Medium Matte 
Distress Spray Stain - variety
Distress Oxide Spray Stain - variety
Distress Paint - Scorched Timber, Hickory Smoke, Picket Fence
Distress Glaze - Scorched Timber
Distress Grit Paste - Snowfall
Distress Stickles Rock Candy Glitter Glue
Distress Mica Spray - Phantom Mist
Idea-ology Framed Panel

Monday, January 29, 2024

Out of The Vault With Teri's 4 Seasons Wreaths

 Teri Wilson - TerisMailbox

Hello friends! I am so excited to present this four season home decor piece for The Funkie Junkie Boutique.  As soon as I saw Tim's live with the release, I knew I had to have The Vault Funky Floral Wreath. KathStewart's four season cards confirmed my original idea of a colorful vintage seasonal panel!


I have a YouTube Video HERE;


I'd love to count you as one of my subbie friends! 

It all started with my Distress Ink smooshed stash. Many of you know I love to make backgrounds and play with inks. I have a hoarded box of backgrounds inks smooshed and sprayed on previous play days. I selected the appropriate colors for each of the seasonal wreaths and die cut them all out prior to starting the assembly on a 9 inch square Vignette Box!


I had a left over piece from my spray box that was blue oxides on Kraft. I decided it was the perfect color for the eggs from The Bunny and Chick Set also new from the vault! I used green, blue and yellow die cuts from the Funky Wreath set to cut out flowers and leaves. The next is made from shredded packing material I have hoarded as I knew I'd find a great use for it! 


The summer wreath used a deeper green smooshed panel along with pink and purple floral images. I purple piece of twine completes the wreath.

What else would you use for a fall wreath besides oranges, yellows and brown? On all the wreaths except the winter wreathn I edged the images with Vintage Photo Distress Ink. A twine bow finished this one!


The winter panel is the only one I created the background for using the CMS 475 Ticking Grain Stamp with Picked Raspberry and Evergreen Bough. After stamping the ticking, I over stamped with CMS358 Music and Advert stamp with Evergreen Bough. I tore using a ruler to 4.5 x 4.5 inches to cover a fourth of the Vignette Tray. The other backings are from a variety of Backdrop Sets with additional stamping using Faded Type CMS 397, Entomology CMS 328 and my most used background stamp Ledger Script CMS 475.

For the wreath, I die cut it in Cougar 100 lb. White Cardstock twice and layered it. After attaching the pink flowers and Evergreen Bough inked branches, I added some snowflakes from Twing and Stump Die set.

Rock Candy Glitter and Collage Medium add the sparkle!


I used my hot glue gun to attach the wreaths and selected a few seasonal Small Talk Strips to add.

I hope you have enjoyed this creation! I had too much fun creating it. Be sure to visit The Funkie Junkie Boutique for all the wonderful vault products released. TFJB Inspiration Avenue has lots of inspiration!

Products used:

Distress Inks
Distressed Spray Inks
  • Twig and Stump Die Set
  • CMS 475 Ticking Grain Stamp 
  • CMS358 Music and Advert stamp 
  • Vignette Tray
  • Faded Type CMS 397
  • Entomology CMS 328 
  • Ledger Script CMS 475
Small Talk


All of my channel and affiliate links are listed in the Profile on Instagram I appreciate your support. By using my links, I earn a small commission at no cost to you.

Thanks so much for stopping by today! I'd love to have you follow/subscribe on my social media sites InstagramFacebookBlogger and YouTube all named TerisMailbox. Be well. Be creative!

Friday, January 26, 2024

Janna's Scribbly Butterflies & Floral Wreath Out of the Vault Inspiration

Welcome! This week at TFJB Inspiration Ave we are creating to the theme of “From the Vault” featuring the new from the vault die sets from Tim Holtz and Sizzix. The two die sets I am working with today include Scribbly Butterflies and Floral Wreath. These dies are just so much fun I just had to make two cards.

For full video tutorial click here.


For today’s project I used: Yupo paper, mat black AI cardstock, decorative Idea-ology Washi tape, Metalic Sticker Book, Holiday Droplets, Sizzix TH Scribbly Butterflies and fForal Wreath, alcohol inks Mushroom and Glacier, AI Blending Solution, AI Pearls Elixir, Opulent, and Tanquil, Enchantment,  AI Blower, Collage Medium, Tonic Snips,


To start today’s card I set down a piece of 4.5x5.5 piece of Yupo paper. First I sprinkled some blending solution on the paper and then added some Mushroom and Glacier alcohol ink.


Then I added a few drops of Elixir, Tranquil, and Opulenct AI Pearls. To get the colors to flow I then used the AI Ranger Blower Tool to spread the inks out.


After the inks were spread out on the piece of Yopo paper I took a second sheet and smooshed it over the top to get a mono print.


Below are the results of the mono print. Two inky backgrounds to make a set of cards.


With the first background I decided to feature the Scribbly Butterflies in the background. I die cut five of the smaller butterflies out of TH black mat cardstock and then glued them to the Yopo base with some Collage Medium.


While the butterflies where drying I then pulled in stamp set CMS463 Note Quotes in to make a sentiment and focal point.


I started with the round ink splotch stamped with Distress Archival Ink Dusty Concord.


Next I stamped with some Distress Archival Black Soot with the outline ring stamp.


To add the sentiment I embossed the words Shine Brightly with some Ranger fine detail gold embossing powder.


Here is the dried butterfly background.


Next I added some decorative Idea-ology washi tape to the outer edge of the card.


To finish card number one I added the embossed sentiment and four metallic droplets to the corners.


For the second card I wanted to feature the floral wreath die set. Here I have die cut several wreath pieces out of Sizzix textured cardstock. I then added some collage. 


Then I stuck down the wreath pieces on to the second AI background.


I also added another washi tape boarder to this card.


Here I die cut the larger Scribbly butterfly out of distress black cardstock and added a base layer of AI Yupo for the backshadow cut out. I love how the AI colors pop with the black outlines.

Now onto building the wreath. Here I die cut lots of floral elements out of some AI panels. I used double sided tape with the flowers. This made it super easy to peel and stick the flowers and bow to the wreath.


Next I added some foam squares to the back of the butterfly to give it some lift on the card.


Below is card number 2 all completed. Here I pulled in a sentiment from the TH Idea-ology sticker book.

This is the first card that we constructed. I absolutely love how we were able to get two backgrounds while using one technique, mono printing. Below are a few close up detail photos of each card.


 Thank you so much for joining me here today for TFJB Inspiration Ave. Until next time, happy crafting!

Janna~ 💕🎨💕

I can also be found on :
Instagram: dunhamtreasuresofthesea_jannak

YouTube: The Crafty Corner with Janna

Projects Used:
Ranger Tim Holtz Alcohol Inks:

Ranger Archival Ink Black Soot 
Kit 2 Dusty Concord 
Ranger Embossing Powder Fine Detail Gold
Distress Embossing Dabber
Matt Black Distress Cardstock 
Yupo Paper 
Sizzix Tim Holtz from the Vault Floral Wreath 
Sizzix Tim Holtz From The Vault Scribbly Butterflies
CollageMedium 

Wednesday, January 24, 2024

Lyla's Pillow Box Out of the Vault Inspiration


W
e've got a new theme starting with this post: Lyla here, kicking off 2 weeks of the latest "Out of the Vault" dies from Sizzix! Linda Coughlin, owner of The Funkie Junkie Boutique, is getting out all the orders for these brand new Thinlits Dies by Designer Tim Holtz, and they're going like... well... like Tim Holtz's most-well-loved Bigz-Dies-turned-Thinlits-Dies go: FAST!!

I had a chance to not only play around with one of these cool newbies, and I paired it up with another set from last year's January releases to make a ringed booklet with fun elements of pockets, tuck spaces, and some vintage Tim Holtz Adornments.

Join me for a scroll and see how I created this booklet I'm calling "Time for Tea"!


Beginning with some Happy Mail: an order from The Funkie Junkie Boutique that brought the TH Thinlits party to me!


My choices of paperie that are more like cardstocks - Tim Holtz's brand is a thicker, sturdier type of paper/cardstock that would stand up on its own for the "pages" of this ringed booklet. Backdrops are the "new" kind of stacks that have replaced the 12x12 stacks.

Here's a List of LINKS to help you find items like I used for this make:

(Hippity Hop will be used on a later project!)


I needed some kind of base for all of the elements and mixed media I wanted to use, and it needed to be strong with a way to stay together. I took a sheet of Backdrops and gave it 2 folds. I didn't measure for this - I went only by what looked pleasing to my own eye. Above; 2 different sets of folds on these 2 sheets.


When I was finished with all the folds on all 3 sheets, I opened them all back up to decide where the top part would stay closed on each sheet. This top part of these 2 sheets (above) would be the connecting piece to keep each section together into one booklet. Those cut areas were folded closed again and glued, as shown by the top sheet. 


Opening the new TH Vault Die; Pillow Box and Bag. I always check to make sure all the pieces are there- this set only has 5 dies. I have the TH Bigz L Pillow Die (Movers & Shapers) back home in Indiana and I use it pretty often. But it's also a bit heavy to take your Bigz, Bigz L, and Bigz XL dies on your travels. These Vault Thinlits are absolutely the answer to that!!


After looking at the Pillow die set, I remembered that I hadn't yet gotten to use a TH set from LAST January... I had an idea!


I made 3 sets of cuts from the die sets - shown above - (only 2 die pieces were used from the older set).
and dug up a few things like: a vintage TH Adornment set that was a gift from a Bestie who came from Indiana to serve here at TriState last month, and some die-cut reinforcers I keep in my stash, and my go-to-fave Distress Oxide.


I distressed each set of cuts with Vintage Photo Oxide, then used Glossy Accents to put that set together, then moved on to the next set. Along the way: I scored and folded more pieces, cut and glued together pockets, and made closures from leftover bits of "windows" from the die cuts and some hemp string.


The pocket and tuck cards and all other ephemera needed some "smooshing" in ink and spritzed water, then heat-dried.


While the die cuts were basically all the same; the way each booklet used those cuts was different- that kept it from being repetitive, yet creatively fun!


Here's the set of gifted TH Adornments- I did play around with them before finally deciding how to use each piece. I still have 3 leaves leftover for later use, too!


I was happy to find that I did bring down some of my TH Type Charms! Spelling out the word TEA after using some Black Soot Crayon around each sticker.


More Distress Crayons colored other Idea-ology.


And just for the fun of it: some TH Tissue crumpled onto one die cut and then Distressed with Oxides in Vintage Photo and Ground Espresso. My first time using the Field Notes Collage Tissue!


I got out so much to choose from and I actually had to stop myself, lol!!


Here's the booklet: Time for Tea!


The fronts of the "Pages". Each "page" unfolds to tell a story... Enjoy!


Time for Tea is created with a TH clockface, TH Spinners, and older TH Type Charms. An older TH Key is tied with a ribbon Linda adds in orders for Freebies!


Page 1: Welcome to the School for Young Ladies... Tea served promptly at 4:00 pm. Proper manners suiting a Lady's behavior are required.


Studies include lessons on the origins of Tea and its consumption. Long live a Princess...


...or TWO!

Young Ladies who have completed all courses and are ready to graduate to higher educations.


Welcome to the Garden. Tea is served mid-morning.


Hidden pocket with (Flashcards) intentional cards.


The neighbor children are happy to always be invited to play in the gardens under the watchful eyes of Nanny. Mr. is a bit gruff, but loves to show off his green thumb abilities and impart his extensive knowledge of various flowers.


The Mrs is delighted to have guests!


Welcome to the Conservatory; tea served after musical performance by the Children for their Nanny. 


Making the formal invitation for you to join them.


Patiently waiting to begin- at your pleasure, of course!


How cute is this pocket?! TH File Cards are ready-made to use; just cover or Distress Ink. Or do both!


Frontside of Pillow with Backsides of the Pages


The resulting Pillow Box has plenty of room in it for more than just these 2 teabags!


Having tea and enjoying the view of the Smokies from Gatlinburg, TN's Vista Park Hilton.

That's another wrap for this girl, but there's 2 more weeks of Inspiration Ave makes coming from 
The Funkie Junkie Boutique's amazing Design Team! Be sure to pop in every few days so you don't miss anything!

Until next time...

Stay Safe (Especially in this cold/snowy weather!) &
HAPPY BLOGGING!!