Wednesday, September 29, 2021

Guest Designer - Sara Emily Barker

It is time to welcome our Guest Designer for the 'Chalk It Up' challenge. Say welcome back to someone you will all be very familiar with - our former team mate Sara Emily Barker who was the Design Team's top pick from the 'Triple The Heat' challenge.

(Sara Emily is the one without the hat!)

Hi! It’s Sara Emily from sarascloset. I’m thrilled to be back at The Funkie Junkie Boutique blog as this week’s Guest Designer. Some may remember that I had the honor and privilege of being a member of the Design Team for almost three years. I enjoy all sorts of arts and crafts, but especially love to experiment with my mixed media supplies to find new ways combine and use them.


For my contribution, I decided to create a nature scene using an Ideaology Trinket Tin as my base. I believe we can learn so much from nature if we open our eyes and ears.


I’ve used plain old school chalk on each of my three backgrounds as well as on the leaves created with the Sizzix Oak Leaf 3D Impresslit by Tim Holtz. On the front of the tin, I used a floating chalk dust technique, combining with Distress paint and Oxide spray to create an organic look behind the Field Notes Ephemera.


I’m always happiest when I’m in the woods, so I’ll enjoy displaying my tin to serve as a reminder when I can’t be there in person. I hope you’ll pop over to my blog to see how I’ve used my chalk on the backgrounds and oak leaves and maybe learn a new technique you might not have seen before. I’m looking forward to seeing how you all use chalk on your projects!

* * *
What an amazing trinket tin packed with so many Fall treasures and so perfect for the current challenge! Thank you Sara Emily for your incredible inspiration and for being our latest Guest Designer. Make sure you check out her blog to see a more detailed tutorial. Then come on back and share your 'Chalk It Up' projects with us.

The challenge can be found HERE and runs through 11:55 pm EST on Tuesday, October 5th.

Monday, September 27, 2021

Challenge Winners - Creating Die-na-mite

Thanks for joining us today as we announce the winners for our 'Creating Die-na-mite' challenge and thank you to everyone who played along with your wonderful projects featuring die cuts.


The Design Team really enjoyed seeing all the entries and in the end picked  #12 Lisa Hoel (Creative Juice) as our overall winner. Lisa's Fall Lantern is quite incredible, with a beautiful bow on the top, an fabulous tree inside that even lights up and a weathered rural homestead surrounded by a pumpkin patch. Make sure to go see the tutorial and more wonderful photos showing her lantern in more detail on her blog post.

Congratulations to Lisa on winning an opportunity to be a Guest Designer at a future date here at The Funkie Junkie Boutique Blog. You will be contacted shortly with all the details.

And now our picks of three additional outstanding entries for the The Funkie Junkie Boutique Blog Top 3 Badges. In numerical order they are #2 Jean (Krafty Jean), #8 Katy D (I Like To Cut and Paste) and #11 Lyla Larimore. Please email Linda at thefunkiejunkie@gmail.com for the codes for the Top 3 badges so that you can display them proudly on your blog.

And finally for the lucky randomly drawn winner for the $25 gift certificate to The Funkie Junkie Boutique; our congratulations go to #4 Jo (Let's Art Journal). Please email Linda at thefunkiejunkie@gmail.com for the gift certificate details.

Thank you again to everyone who took part in this challenge and congratulations to all our winners. The current challenge 'Chalk It Up' can be found HERE and runs through Tuesday, October 5th at 11:55 pm EST so there's still plenty of time to link your projects.

Saturday, September 25, 2021

Saturday Showcase - 6 Easy Cards with 1 Tim Holtz Stamp Set

Hello Crafty Friends!

Today I wanted to share a fun challenge I gave myself. I challenged myself to use only 1 stamp set to create 6 simple cards that can be good for any occasion.  I chose to use the Tim Holtz Set - CMS385 "Into the woods".  I wanted a woodsy look that could be good for fall, Christmas, or masculine cards.


3 of the cards are A2, one just a bit shorter than A2, a slimline card, and one that's about 2/3s the size of an A2 (made from the scrap from cutting the slimline card).


A simple frame card (you could easily switch out any of the animals to the bear or the fox from the set).


Simple and woodsy.


Woodsy with a splash of color.


A touch of plaid for simple color.


A simple and easy wreath card. (This could also be a bird nest. I should have done a touch less stenciling for my preferred look).


My favorite of all the cards, and yet the simplest!


What do you think of these cards?
This stamp set could easily make so many more simple cards, or awesome elaborate ones!!

Products Used:

Stamp Set - Tim Holtz Into The Woods
Inks:
    Distress Oxides - Vintage Photo, Frayed Burlap, Walnut Stain,  Forest Moss, Crackling CampfireCandied Apple, and Black Soot
    Original Distress Inks - Scattered Straw, Walnut Stain
    Other Inks- Delicata Golden Glitz, Embossing Ink
Embossing Powders - Black and Red
Tim Holtz Layering Stencil - THS021 Speckles
Tim Holtz Small Talk Stickers
Plaid Scrapbook Paper
Blending Tool

Wednesday, September 22, 2021

Chalk It Up!

Hi everyone!  Laura here as your host to a new challenge 'Chalk It Up'!

September is normally when kids head back to school, it is when the learning begins again....Create a project about learning, does not have to be a school themed project, learning is not just about books and school, sometimes it learning a new scrapbooking technique, or a cool fact and you must include chalk  IE - chalk paint, chalk board, actual chalk....

The overall winner will be offered the chance to be a Guest Designer at a future date here at The Funkie Junkie Boutique blog, and everyone who enters and follows the rules will go into the draw for the chance to win a $25 spending spree at The Funkie Junkie Boutique. There are also Top 3 Badges for three additional outstanding entries, chosen by the Design Team.

The guidelines for entering are simple; create a new vintage or shabby chic project following the challenge theme, link it below to your post (not just your blog) and also include a link back to this challenge in your post. You can combine our challenge with up to 10 challenges (including this one) to be in with a chance of winning. If you are entering through a public forum (such as Instagram) you'll need to include the words 'Funkie Junkie Boutique Challenge'. Also, please be sure to turn off your Word Verification so our Design Team can leave comments on your blogs. Make sure you follow these rules as unfortunately, we have had to eliminate entrants from the prize draws in the past.

Now, time for some samples from our amazing design team. Be sure to check out all the details on each artists blogs.

Laura Gilhuly - AngelScraps 


Teri Wilson - Teris Mailbox


Suzanne Czosek - Suzz's Stamping Spot


Janna Ketchum - treasuresofthesea_jannak


Tera Callihan - the Crafty Sugar Addict


Thanks for joining us and we look forward to seeing your creations!
Laura


Wednesday, September 15, 2021

Guest Designer - Susan Babcock

It is time to welcome our Guest Designer for the 'Creating Die-na-mite' challenge. Say hello to Susan Babcock (susanbcards) who was the Design Team's top pick from the 'Shimmering Summer Fun' challenge.


Hello! I am so honored to be Guest Designer for the current challenge, "Creating Die-na-mite".

My name is Susan Babcock, also known as Susanbcards. I have been making cards as a hobby for several years but about 2 years ago, my daughter encouraged me to post on Instagram. I found this community of cardmakers, all of whom I have never met, who are posting daily, sharing their work and encouraging others. During the stay at home order, I became a Tim Holtz fan, watching his YouTube demos and trying his techniques. I now make several cards a week, which I send out to friends, family or charities.


I was so excited to make a card for the challenge "Creating Die-na-mite" as I wanted to use the new Sizzix Chapter 3 dies by Tim Holtz with some older dies. I always have inked paper on hand and a box full of leftover diecuts from previous projects, all ready to go.


This is a close up photo of the "Potted #2" cut from Kraft cardstock, embossed with the Sizzix "Lumber" embossing folder with a bit of Gathered Twigs Distress ink. I cut a second pot from cardboard and attached it under the woodgrain pot to pop it up off the card.


Using the "Leaf Fragments" dies, I cut the leaves from inked Distress Mixed Media Heavystock paper. I stamped veins onto the leaves using Ground Espresso ink and Stampers Anonymous "Pressed Foliage".


I diecut "Small Tattered Flowers" from some inked MM Heavystock paper and using a shaping tool, added some dimension to the flowers.

I attached all the diecuts with glue to the slimline card panel. A detailed tutorial can be found on my blog.

Thank you,
Susan

* * *
What a fantastic card with beautiful fall colours and so perfect for the current challenge! Thank you Susan for your amazing inspiration and for being our latest Guest Designer. Make sure you check out her blog to see a more detailed tutorial for Susan's card. Then come on back and share your 'Creating Die-na-mite' projects with us.

The challenge can be found HERE and runs through 11:55 pm EST on Tuesday, September 21st.

Monday, September 13, 2021

Challenge Winners - De-stress with a little distressing

Thanks for joining us today as we announce the winners for our 'De-stress with a little distressing' challenge and thank you to everyone who played along with your wonderful distressed projects.


The Design Team loved seeing all the entries and in the end picked  #24 Lyla Larimore (A Chief's Wife's Heart's 'aFire) as our overall winner. Lyla is a master of all things distress and this panel is no exception - we were in awe of all the layers and textures she created to make it come together. Make sure to go see the detailed step by step tutorial on her blog post.

Congratulations to Lyla on winning an opportunity to be a Guest Designer at a future date here at The Funkie Junkie Boutique Blog. You will be contacted shortly with all the details.

And now our picks of three additional outstanding entries for the The Funkie Junkie Boutique Blog Top 3 Badges. In numerical order they are #12 Monika Gulyas (Mistletoe Home), #15 Lisa Hoel (Creative Juice) and #20 Lucy Foxworth (PaperGlitterGlue). Please email Linda at thefunkiejunkie@gmail.com for the codes for the Top 3 badges so that you can display them proudly on your blog.

And finally for the lucky randomly drawn winner for the $25 gift certificate to The Funkie Junkie Boutique; our congratulations go to #19 Susan (susanbcards). Please email Linda at thefunkiejunkie@gmail.com for the gift certificate details.

Thank you again to everyone who took part in this challenge and congratulations to all our winners. The current challenge 'Creating Die-na-mite' can be found HERE and runs through Tuesday, September 21st at 11:55 pm EST so there's still plenty of time to link your projects.

Saturday, September 11, 2021

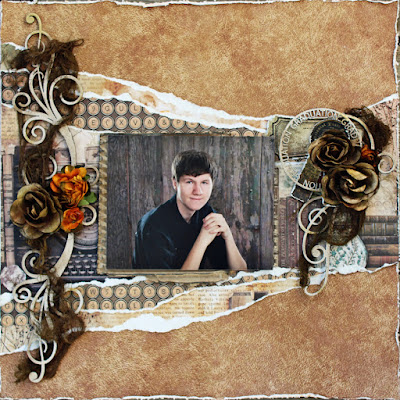
Graduation - Spotlight on Ciao Bella 'The Muse'

Good morning!

When I saw the paper pack 'The Muse' by Ciao Bella I knew I had to have it! I know by looking at the papers you could think that it is perfect for feminine projects like the project I created earlier this week for the current 'Die-na-mite' challenge.


But this paper creates awesome masculine projects as well!


Look at how gorgeous these papers are!

To create this layout;


1 - Tear 3 papers and adhere to a fourth sheet like shown. Distress the edges of the background sheet.


2 - Use Ground Espresso Distress Oxide Ink and heat emboss using 2 colors of embossing powder some chipboard from your stash


3 - Fussy cut these images from one of the papers.


4 - Take some flowers and a piece of cheesecloth from your stash and spray with the new Tim Holtz Crooked Broomstick and Flickering Candle Mica Stain

5 - Adhere everything as shown

Here are some details!


Thanks for stopping by
Laura

Wednesday, September 8, 2021

Creating Die-Na-Mite

Hello Everyone! Tera here, as your host to welcome to our newest challenge, 'Die-Na-Mite'.

Dies can make a simple or boring project extra mighty... I want you to use your dies to make a project! They can be your main focus, or work in the background to make your project a little extra mighty.

The overall winner will be offered the chance to be a Guest Designer at a future date here at The Funkie Junkie Boutique blog, and everyone who enters and follows the rules will go into the draw for the chance to win a $25 spending spree at The Funkie Junkie Boutique. There are also Top 3 Badges for three additional outstanding entries, chosen by the Design Team.

The guidelines for entering are simple; create a new vintage or shabby chic project following the challenge theme, link it below to your post (not just your blog) and also include a link back to this challenge in your post. You can combine our challenge with up to 10 challenges (including this one) to be in with a chance of winning. If you are entering through a public forum (such as Instagram) you'll need to include the words 'Funkie Junkie Boutique Challenge'. Also, please be sure to turn off your Word Verification so our Design Team can leave comments on your blogs. Make sure you follow these rules as unfortunately, we have had to eliminate entrants from the prize draws in the past.

Now, time for some samples from our amazing design team. Be sure to check out all the details on each artists blogs.

Teri Wilson - Teris Mailbox 


Suzanne Czosek - Suzz's Stamping Spot

Stampers Anonymous Rubber Stamp Set Observations Sizzix Chapter 3 Tim Holtz Perspective


Laura Gilhuly - AngelScraps
 

 Jenny Marples - Pushing The Right Buttons


Tera Callihan - The Crafty Sugar Addict


Thanks for joining us!


Saturday, September 4, 2021

Saturday Showcase - Dina Wakley Media Scribble Sticks Kraft Journal Collage Pages

Hi everyone and welcome to another Saturday Showcase, the Design Team's chance to share tutorials and products available from The Funkie Junkie Boutique with you. Today I have some new Kraft Journal pages to share with you featuring backgrounds made with Dina Wakley Media Scribble Sticks. This kind of journaling with faces and lots of colour is new to me and has been so much fun to experiment with.

Let's get started with peeks at the finished pages before getting into looking at each one in more detail;


Here is the first journal spread in full, featuring a stamped lady from the 'Better Together' stamp set and words from the 'Be Willing' stamp set.


I started by laying down a blend of warm colours from the Scribble Sticks 2 set, making sure to apply lots of the dry paint onto the kraft card so that it would blend a little better when water was added in a few places. As a contrast torn pieces of music score were added over the top followed by some white gesso.


That layer of white over the colour helped the complimentary scraps of design tape and some contrasting stencilling to stand out more. I used one of the patterns from the 'Marks' stencil with 'Turquoise' acrylic paint for this.


Finally the scribbled circles, cut from one of the sheets in the 'Elements' Collage Paper pack, were added with gel medium and the words and lady were stamped on with permanent black ink. I extended the design by drawing in extra lines and adding more asemic writing. White gesso was used to paint in the top of the lady's head and I emphasised the colour running across her eyes by re-applying more 'Sedona' Scribble Stick.

Here are a couple of close ups of the finished spread showing more of the detail;


Here is the second journal spread in full, featuring a stamped head from the 'Ledger Girls' stamp set and words from the 'Not Subtle' stamp set.


In much the same way as before I started by laying down a blend of cool colours from the Scribble Sticks 2 set before adding more torn pieces of music score over the top followed by some white gesso.


This time, after adding complimentary scraps of design tape over the top I applied white gesso through another of the patterns from the 'Marks' stencil. The three block design from the 'Be Willing' stamp set was stamped in places using 'Mulberry' Archival Ink and then I splattered contrasting 'Lemon' and 'Cheddar' paint from the Scribble Sticks over the top.


Be aware that Archival Ink will bleed through whatever is applied on top, including paint. I learned this after finding that it happened to the tags I applied over the top (cut from the 'Elements' Collage Paper pack and painted on the reverse with 'Sand' acrylic paint). To rectify this I simply re-stamped the blocks with the same ink over the top. The head and words were stamped onto tea stained heavyweight paper with black permanent ink before being cut out and mounted on top of the tags.

Here are a couple of close ups of the finished spread showing more of the detail;


Here is the last journal spread in full, featuring a face from the 'Elements' Collage Paper pack and words from the 'Be Willing' stamp set.


For this final journal spread I tried something different, starting by applying a layer of white gesso onto the kraft card before adding lots of colour from the 'Lime' Scribble Stick on top. I found that the gesso made blending out the paint from the Scribble Stick with a little water much easier. As a contrast this time torn pieces of kraft wrapping paper were added over the top followed by more white gesso.


This time lots of different layers were added including vertical strips of masking tape, a horizontal line of stencilling using 'Evergreen' acrylic paint through the 'Bumps' stencil, a coordinating strip of design tape and a strip cut from one of the sheets in the 'Elements' Collage Paper pack. I drew on a zig zag line of faux stitching with a black pen and wrote some asemic script over the top of the whole background with a white pen.


To finish I splattered contrasting 'Sedona' and 'Marine' paint from the Scribble Sticks over the top. The Collage Paper head was painted on the reverse with 'Buff' acrylic paint and cut out before being applied over the background with some gel medium. I extended the design with more paint and a black pen before using the Scribble Sticks to add a little colour to the lips, cheeks and eyes. The words were stamped onto white card with permanent black ink before being added onto the background.

Here are a couple of close ups of the finished spread showing more of the detail;


Thanks for stopping by to see today's showcase. I hope you've enjoyed seeing how to create these collages with the Dina Wakley Media Scribble Sticks and other products from the Dina Wakley Media range.

There's still time to enter the current Funkie Junkie Boutique Blog challenge 'De-stressing with a little distressing' which runs through Tuesday, September 7th at 11.55pm. We look forward to seeing your creations.

Jenny

Products used to create these journal pages are available from The Funkie Junkie Boutique and are listed/linked below.
Dina Wakley Media Collage Paper - Elements
Dina Wakley Media Acrylic Paint - Evergreen