
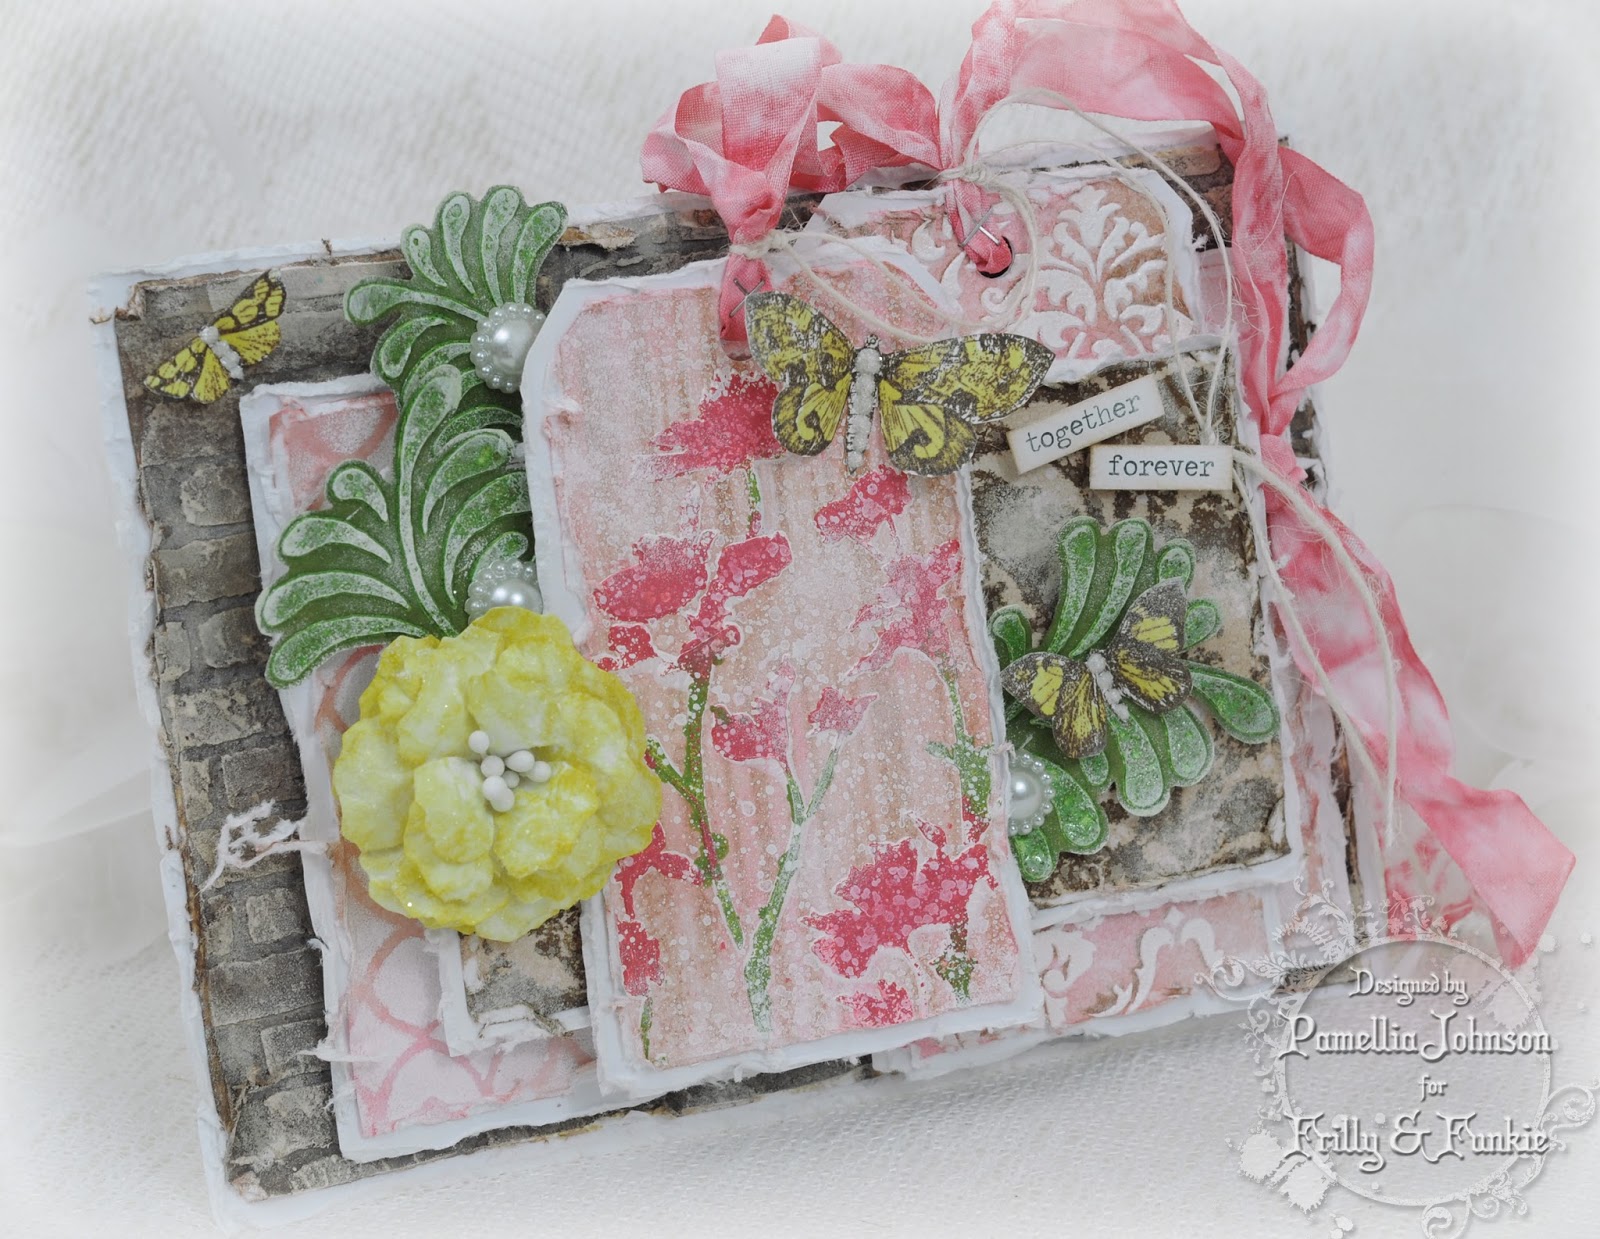
I decided to put together a card that can be used for a wedding card or for an anniversary card. The "together forever" sentiment is from the Tim Holtz Chit Chat sticker book and I think it will work for both occasions just fine.

For the back panel, I used some texture paste and the Wendy Vecchi Basically Bricks stencil to lay down the pattern. I coloured the bricks with some Gathered Twigs distress ink spray and Dylusions Melted Chocolate ink spray. I dabbed a little Picket Fence paint on the top to highlight the ridges.


For the middle panel, I coloured a piece of paper with Tim Holtz distress inks Worn Lipstick and Vintage Photo, then I used the Latticework stencil and dabbed the Picket Fence paint through the stencil to create the pattern. I did two coats to get a nice stark white.


For the top panel, I coloured the paper with Vintage Photo and spritzed on a little water to create some interest, then I sprayed the Flourish stencil with Gathered Twigs distress spray. I turned the stencil over and pressed it down onto the paper created a wonderful distressed version of the negative part of the stencil.


Both of the tags were cut with the Sizzix Tag Collection die set and coloured with Worn Lipstick and Vintage Photo. For the top tag, I used the Tim Holtz Stripes stencil and sponged on some Vintage Photo to create stripes.


I used some texture paste and the Wildflower stencil to lay down the pattern. Once the paste was dried, I placed the stencil back down on the tag in the same position and used Distress paints Barn Door and Peeled Paint to add colour to the texture paste. This is a great technique for experimenting with colours. The paste changes the hues of the paint, turning the red and green into more of a deep salmon pink and olive.


For the second tag I used the Gothic stencil and sponged on some Vintage Photo to create the base pattern. I slightly nudged the stencil a bit and then put down a layer of texture paste creating a shadowed look on the design.


I used the Wendy Vecchi 3 Flourishes stencil and some texture paste on a scrap piece of paper and while the paste was still wet, I covered it with Wendy Vecchi's Fern Green embossing powder. When the paste was dry I heated the powder and melted it.

I fussy cut out the leaves and sprayed them with Twisted Citron and Chopped Pesto ink sprays. I ended up going back after I put the camera away and spritizing it again with some Peeled Paint to darken it up a bit, then I dabbed a little Picket Fence on them to mute the colour.

I layered everything with some white backing panels just to break up the colours a bit. I added some butterflies from the French Flight stamp set which I stamped with Wendy Vecchi Potting Soil ink and coloured with Mustard Seed. The flower was cut with the Tattered Florals die and also coloured with Mustard Seed and dusted with Rock Candy Dry distress glitter. The beautiful pearls are from Linda's shop.


The seam binding was coloured with Tim Holtz distress ink Festive Berries and I dabbed it with Picket Fence to mute the colour to match the flowers on the tag. The bodies of the butterflies was done with Liquid Pearls covered in Distress Dry Glitter Rock Candy. I included a close up so you can see the pretty glitter.


I hope you enjoyed my techniques on different ways you can use stencils to decorate you cards. There are many more stencils available at Linda's shop that I know you will just love! And all the stencils (with the exception of the new 2015 Summer Releases) are on sale.
All of the below products can be found at The Funkie Junkie Boutique and don't forget that all the stencils in the shop will have an extra 15% discount applied for the next two weeks.
Happy crafting, Pamellia :)
Awesome ways to use stencil ! Beautiful card and I loved the tutorial :)
ReplyDeleteGorgeous Pamellia ! I love how you always use so many layers ! Sue C x
ReplyDeleteJust goes to show how versatile stencils are - super tutorial Pamellia. Really love the wildflower panel - stunning and I am off to try worn lipstick and vintage photo together. xxx
ReplyDeleteEach piece is so meticulously done and each piece is so lovely without the others. When you put them all together you have a beautiful creation. Thanks bunches for the wonderful description of your process Pamellia. Lots of wonderful imagination for using stencils so amazingly. j.
ReplyDeleteA labor of love for sure! Beautiful!
ReplyDeleteBeautiful Pamellia, I especially love the flourish background piece with the gathered twigs and the tag where you offset it with the texture paste. Wonderful layering of all of your pieces.Thanks for the information and inspiration.
ReplyDeleteWow Pamellia you really have shown just how versatile stencils are and you have used them in so many ways so beautifully. I love the layers you added to your design in so many different ways and the flowers are particularly striking coloured with the Distress Paints. Gorgeous design. Tracy x
ReplyDeleteOh wow, this is absolutely stunning, Pamellia!! I love how you layered everything and the stencils you used!! The tutorial is fabulous!! What a gorgeous project this is!! I love it!!
ReplyDeleteLisa
A Mermaid's Crafts
Just perfect Pamellia..such fabulous layers and colours. You are so uber talented. Hugs xx
ReplyDeleteYour cards are always breathtakingly beautiful Pamellia and it has been wonderful to see how many layers you actually do have on a card!!!! and ....... All those wonderful techniques with stencils are just gorgeous. The leaf technique is just amazing! Thank you for sharing so many wonderful ideas. Jennie x
ReplyDeleteEach one of the tags look incredibly beautiful, like others have already said, it just shows the versatility of stencils. I love the wall at the back, the butterflies are stunning in their light coats of sparkle... a truly wonderful design and a great step by step Pamellia! Hugs, Anne xx
ReplyDeleteAmazing!
ReplyDeleteBrilliant step by step and love all your layers and it still amazes me what you achieve with stencils and paste
ReplyDeleteCarol x
Pamellia, your card is a masterpiece... a treasure chest of stenciled inspiration! I love your tutorial and am so thankful you share your process with us. Each technique you used resulted in beauty and the combination leaves me speechless! Exquisite work, my friend! You are amazing.
ReplyDeleteHugs and blessings,
Karen
This is incredible, Pamellia!! I don't think I've ever seen so many different techniques with stencils - I feel like I've just taken a master class! And the idea for creating a shadow layer with the paste on top is absolutely brilliant. Thanks so much for such a wonderful tutorial!!
ReplyDeleteAbsolutely stunning Pamellia! I love the colors and all of the stencils you've use!
ReplyDeleteHugs, Tammy
Thank you for the fabulous tutorial, I now feel that my stash is woefully inadequate.
ReplyDeleteDionne xx
Fabulous tutorial Pamellia, you've really demonstrated how versatile stencils are and how many different effects you can accomplish with them! Beautiful card, love that colour combination of Worn Lipstick and Vintage Photo. Pinning this for future reference, thanks for all the great tips!
ReplyDeleteA beautiful creation Pamellia and fabulous step by step, thank you for the inspiration
ReplyDeletePauline
x
Wow! Pamellia, you used so many wonderful techniques on this beautiful card, it's hard to pick a favorite, but when so artfully arranged, each just compliments the next. What a great tutorial you put together, and I'll be heading to the Closet to give each one of your amazing techniques a try! I am particularly in love with the blossoms tag, but don't have that one yet...guess I shall take advantage of such a generous sale! Thank you for all your inspiration and hard work on this one! Big hugs!
ReplyDeleteOh! to be able to play and produce something like this, just wish I had the patience and the know how, an incredible and beautiful card.
ReplyDeletePamellia, you are the queen of shabby chic! Your stenciled creation is breathtaking and inspiring!
ReplyDeleteHugs,
Nancy
Absolutely SUPERB Pamellia!!! Jenny x
ReplyDeleteWonderful tutorial. hugs, Pat K x
ReplyDeleteStunning shabby chic hun! Love the tutorial xx
ReplyDelete