We are back today with a beautiful Christmas card by Design Team member Janna. Janna created her challenge using our Mood Board and also Sizzix Tim Holtz Chapter 4 dies. In Janna's own words, here is her project.
Today I am creating with the Sizzix Tim Holtz die sets Modern Festive and Layered Plaid.
Click here for instructional video.
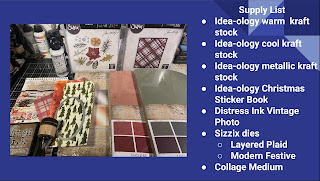
Used: warm kraft stock, cool kraft stock, distress heavy white cardstock, Sizzix Layered Plaid, Modern Festive die set, collage medium, Idea-ology Christmas sticker book, and Vintage Photo distress ink.
To start the layered plaid card I chose a combination of green, red, and gold kraft stock. I also set aside a base of brown craft stock and some distress white heavy stock to build the card on. Each of these layers I then back with some double-sided adhesive tape.
For diecutting I decided to use the Tim Holtz Vagabond. To die cut the Layered Plaid I used the following: base plate, thinlit plate adaptor, chrome plate, paper die, and cutting plate. I cut down each section of craft stock to measure at 5 1/4 x 4“.
Layered Plaid has many die cut pieces to it so I used the Sizzix die pick to help pop out some of the pieces.
Here is the first layer of our plaid.
Now it's time to start layering up our plaid pieces. I centered the red section on top of the white foundation and then carefully lined up the gold section with the red section. The neat thing about this plaid pattern is that you can change how the pattern looks depending on which direction you layer each of your papers.
This green piece is the final layer of our plaid design. I absolutely love the intricacy of the stye and how versatile it is when constructing different plot patterns.
Next I die cut an oval from a tag created with a Distress Mika spray stains and a Tim Holtz stencil. For the base of the focal point you could choose any stencil that you like to act as a background anchor. Using Distress spray stain is a quick way to create a repeating pattern.
Once an oval was cut I edged the oval with some Distress Vintage Photo ink.
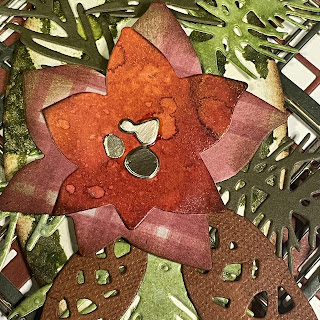
Now for the main focal point. Here I decided to use the die set Modern Festive to create a poinsettia and leafy branch arrangement.
Below is my rough arrangement of the leafy greens and poinsettia for my card layout.
I then secured each of the leafy branches with collage medium and added a couple of golden accents to the poinsettia.
The last step on this card was to add a sentiment sticker from an Idea-ology Christmas sticker book.
Next are a few close-up pictures of this card.
Thank you so much for joining me here today for this quick card tutorial featuring Layered Plaid and Modern Festive die cuts.
Thank you so much for joining me here at The Funkie Junkie Boutique's Inspiration Ave. Until next time, happy crafting!
Thank you to Janna for such a detailed tutorial. Here are some of the products used in this card. All available at The Funkie Junkie Boutique.
If you post a project on FaceBook or Instagram using any of these products, please tag us to be entered into our monthly drawing for a $25 gift certificate to shop at
The Funkie Junkie Boutique.


No comments:
Post a Comment