
Hello I’m Janna and welcome to this weeks Funkie Junkie Saturday showcase. This week we are featuring Tim Holtz Idea-ology Halloween. Here I am going to show you how to alter different pieces of Idea-ology ephemera and metal pieces. Then we will be creating a Halloween vignette featuring the new Curio clock from Idea-ology.

What is Saturday’s showcase I’m going to be dividing it up into three parts for part one we’re going to be Lakeitha altering some ideology pieces and parts you were going to look at constructing a Candy Corn tree. In the final part we will be assembling a full spooky fun Halloween Vignette.
For videos click the links below.
1. Altering Idea-ology: The Funkie Junkie Saturday Showcase Part 1
2. Building a candy corn tree: The Funkie Junkie Saturday Showcase Part 2
3. Idea-ology curio Clock Vignette: The Funkie Junkie Saturday Showcase Part 3

Material list part 1: Idea-Ology adornments, Halloween paper dolls, Confections, candy corn, flat-back stars, distress glitter clear rock Candy, Distress Foundry wax gilded, Ranger alcohol ink pitch black, distress mica spray stain fortuneteller and tree lot, distress pearlescent crayon burning ember, Ranger glossy accents, distress glitter nightfall, and collage medium.

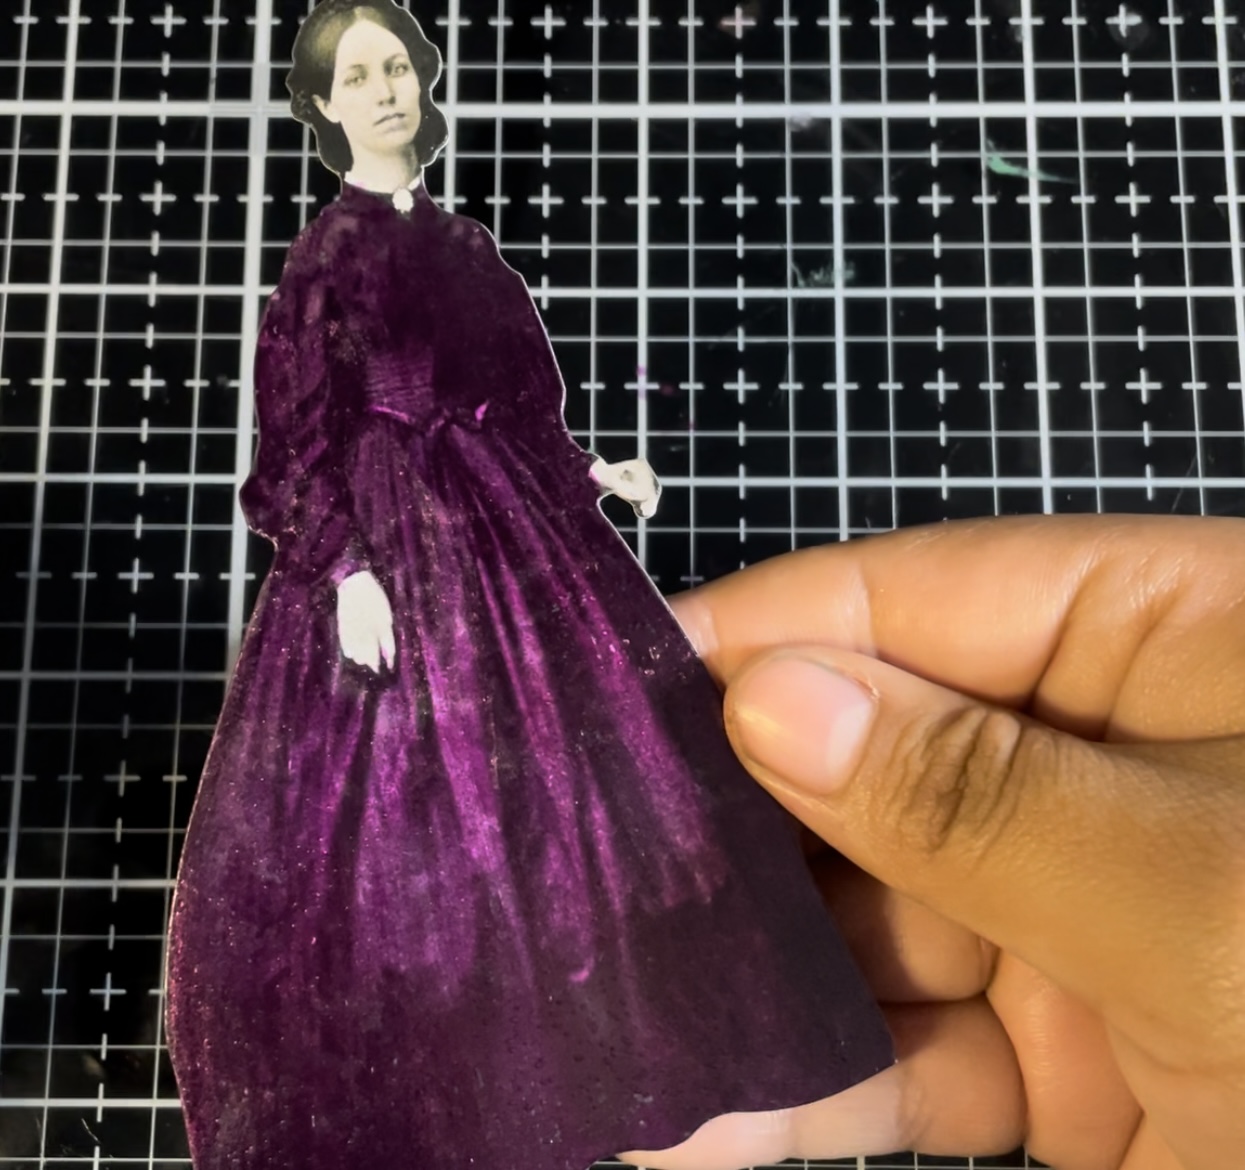
For our first alteration we are going to be using distress pearlescent crayons in the colors of Burning Ember and peppermint stick.

To start this alteration I scribbled a bit of the Distress cram directly onto the paper doll. Then using a Tim Holtz fine tip detailer water brush by spread out the Distress crayon over the paper doll.

Once I had good coverage on the Paperdoll I then finished the alteration by smudging out the color with my fingers.

For the second alteration I decided to use some distressed mica spray Stains in the colors of fortuneteller and tree lot.

Again using the fine tip detailer waterbrash I painted the distress mica spray stain over the paper doll. As you can see below the spray stain beads up on the slick surface of the paper doll, but I found that if I applied very small amounts of the spray stain and dried in between each little section the spray stain would stick to the slick surface of the paper doll.

Below are my finished colouring results with the Distress mica spray stain. I did discover that the spray stain will flume off the paper doll if it is touched at all.
To stop the fluming I sprayed a very light coating of acrylic spray over the top of the paper towel to seal in the spray stain.

For the second Paperdoll alteration I coloured just scared of his paper doll with a bit of distress mica spray stain tree lot. Again I also gave a quick misting of acrylic spray to make sure the green pigment would not flume off.

For an added accent I decided to add some distressed nightfall glitter.

On the spaces that I wanted to add glitter I put down a thin layer of collage medium. Then I sprinkled on the distress nightfall glitter over a piece of scrap paper.

Next I gently tapped off the extra glitter on the paper doll. Then using a small paintbrush I gently brushed off any straight pieces of glitter in spots where it was not needed.

Below are our finished paper doll alterations first with just distress Pearlescent crayon, then distressed mica spray stain, and with Distress mica spray stain and distress nightfall glitter.

For our next alteration we are going to be playing with some of the new Tim Holtz Idea-ology Candy corn pieces. These candy corn pieces are so fun and Tim showed a couple of great tips and tricks during the Idea-Ology live demo that I had to try out here as well. For this alteration we are going to need the candy corn pieces distress glitter clear rock candy and glossy accents. For tools I also used the Sizzix squeezers

To start I placed some of the glossy accents onto a piece of scrap paper then I coded a candy corn piece in the glossy accents.

Next using this is a Squeezers I dipped each piece of candy corn into the Distress clear rock candy glitter. This created a sugary candy like effect.

After dipping each piece of candy corn I set these aside to dry. Dry time took about 20 minutes and the results were absolutely spectacular and sparkling.

You are going to alter more candy pieces in this case we will be all training some confection candy pieces. For our alteration we are going to be using alcohol ink ember, the Tim Holtz alcohol ink blending pen, and some Ranger stickles sunflower.

To start I dripped a few drops of the alcohol ink Amber onto the media mat. Then I picked up the ink with the Tim Holtz blending tool and transferred it onto the confection pieces.

Next on the longer pieces of confections I added a thin stripe of sunflower stickles onto the piece. Next on the longer pieces of confections I added a thin stripe of sunflower stickles onto the piece. I did this by gently rotating the long cylindrical cane and drizzling a very thin strip of stickles onto it.

Here are our confection pieces completely altered into fun sparkly Halloween candies.

This next alteration is a quick tip that I learned from one of the Tim Holtz live demos. Here we are going to alter some of the Idea-ology bubbles with some Everglades alcohol ink.

Using a small plastic cup I added the bubbles and then added 3 drops of alcohol ink. I placed a second small cup on top and then shook up the bubbles.

Here are the finished results!

Next we are going to be working with a Tim Holtz Idea-Ology Halloween Adornments.

First we’re going to be altering the two metal baths. For our first alteration I’m going to be using the Tim Holtz alcohol ink blending marker and some pitch black alcohol ink. To start a drip some alcoholic onto the medium out then picked it up with a blending brush and applied it to the metal bat.

Here are the finished results of our first alteration.

For the second that we are going to be altering it was a Distress Foundry wax gilded. Here I dripped a bit of the wax onto the craft mat and then picked it up with a paintbrush and gently brushed it onto the metal bat.

What’s that was covered in foundry wax I’ve been picked up the bat with the Sizzix squeezers and melted it with the Ranger heat tool.

Here is the bat as the founder wax turns into a gorgeous molten metal.

Next I grunged up the bat with a bit of distress crayon walnut stain. I scribbled a little bit of distress crayon onto the bat and then smetched it out with my fingers.

Below are our two altered bats.

Next we’re going to alter some of the metal spiders. We are going to turn these metal spiders into some sugary Halloween treats.

First I cut off the little loops on the spiders using a pair of jewellery pliers.

Next I attach each slider to a one and a half inch piece of wire with some super glue.

Once the spiders were dry I then coated each spider in a thin layer of distress collage medium.

After the clutch minimus dry then put distress embossing ink on it’s just spiders with a Distress embossing ink brush pen.

Now the fun part of embossing the spiders. More colours I decided to use Villainous potion, candy apple, and twisted citron.

Below are they finished results of embossing with distress embossing powders.

For some added sparkle I then applied some glossy accents and a dusting of Distress clear rock candy glitter to the back of each spider.

Don’t below our our finish creations for part one of altering Tim Holtz Halloween Idea-ology
Below are some links for some inspired shopping at the Funkie Junkie.
Part 2:
Building a candy corn tree and more alterations: The Funkie Junkie Saturday Showcase Part 2
For video link click here.

Now we are going to start building the show stopper for this Saturday showcase. For our centrepiece we are going to be creating a candy corn tree with tiny lights. To start I’m going to be cutting seven segments of 16 gauge wire at 9 inches each. Then we will cut 12 cage wire in seven segments at 9 inches each too. To cut the wire I used some jewellery wire cutters.

Next I stacked all the wires together and twisted the middle section into a tree trunk. I left about 2 1/2 inches on twisted at what will become the base of the tree and about 3 inches on twisted at what will become the branches of the tree.

Next high divided the wires at the base of the tree into four chunks these are going to become the roots of the tree. For all four chunks I then twisted the wires together and bend the wire bundles to form roots.

At the top of the tree I twisted groups of three wires together to form a tree branches of these I meant in Fort to create limbs and twigs. At the top of the tree I twisted groups of three wires together to form a tree branches of these I meant in Fort to create limbs and twigs.

No the tree fully formed it’s time to turn our attention to creating a candy corn light strand with Tim Holtz Idea-Ology tiny lights. To create the moisture and I first pierce the bottom of each candy corn with the Sizzix die pick. This give me a pilot hole that will help align the drill bit for when I drill out the inside of each candy corn.

For drilling are used an electric hand drill and a 1/8 of an inch bit. Using small bristo of speeds with the drill I was able to safely drill out the inside of the candy corn while holding it tightly between two fingers.

For the next part we are going to be assembling the candy corn light strand. To do this I used a set of Idea-ology tiny lights and some Ranger glossy accents. Carefully I folded and pinched each light and wire closer together to place it into the base of each candy corn before setting the wire and I added a couple of drops of glossy accents to the bottom of each candy corn.

Below is one of our candy corns all that up with a tiny light.

Next I decided to add some colour to these white tiny lights by adding a few drops of ember alcohol ink.
Here is our finish candy corn light strand with alcohol ink died lights.

Next I twisted the light strand around the tree branches and then wrap the remaining wire around the trunk of the tree.

After I was done wrapping I noticed how the silver light strand stood out in stark contrast on the black tree. To fix this I added some pitch black alcohol ink to the exposed silver wire.

For next alternation we are going to be creating a stony walkway with some Ice spruce distress oxide and some Ranger crypt paste. First I blended some distress oxide onto a piece of mixed media cardstock.

Then I spritzed the card stock with the distress sprayer to get droplets and dried with the Ranger heat tool.

For the stencil I used THS 086. Then I spread crypt paste through the stencil using the Ranger TH pallet knife.

Here are the finished results of the stone path walkway.

For our next alteration we are going to be altering some alcohol ink foil tape sheets with alcohol inks mushroom, Dijon, bottle, and Laguna.

Just start I used a mini blending tool with a circle fell and drip dropped the alcohol ink onto the felt pace. Then I gently tapped the ink onto the full tape to get a lovely patina effect.

For the next step I pulled out and embossing folder foundry mini 3D to run through the vagabond.

Here are the results of the 3D emboss folder.

To finish this alteration I decided to add some black soot distress crayon to add a bit of grunge to the foil sheets.

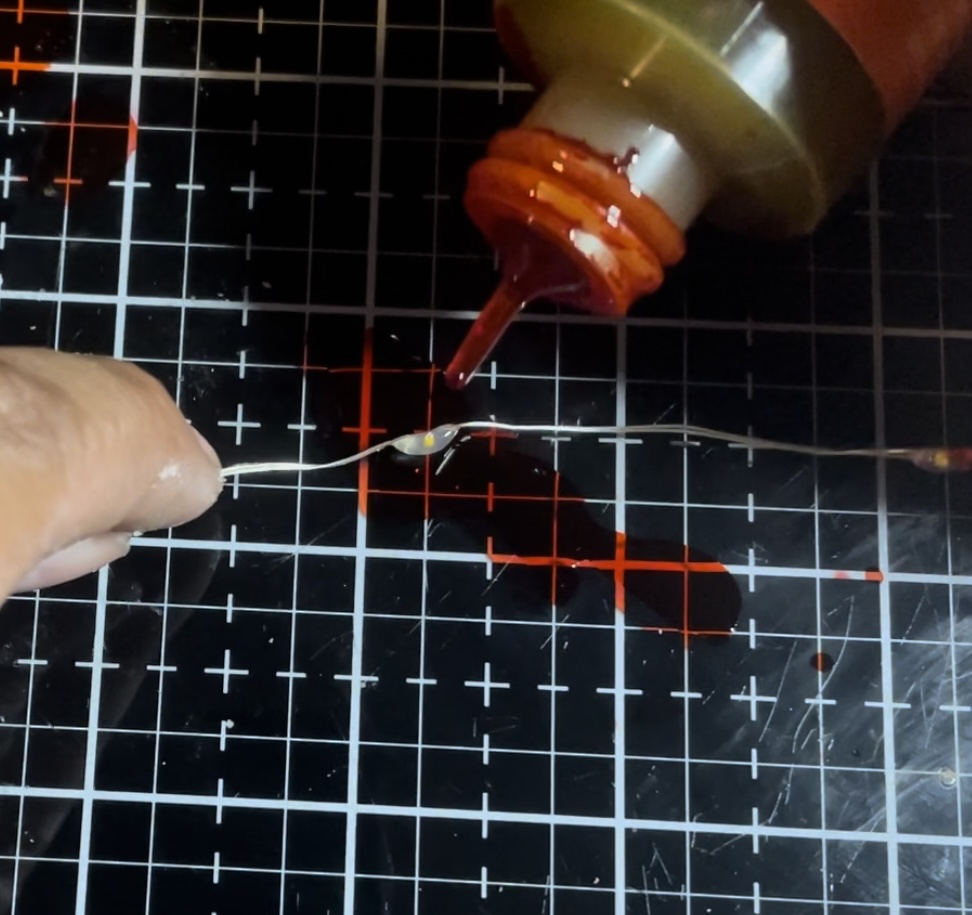
For the last alteration I created some glitter bones with distress collage medium and some distress glitter clear rock candy.

To start this alteration I covered each bone in collage medium and then dunked each into the glitter. Dry time took about 20 minutes.

Inspired shopping links
3. Idea-ology curio Clock Vignette: The Funkie Junkie Saturday Showcase Part 3. For instructional video click here.

Now to put all of our pieces together for our Halloween themed vignette. To showcase all of the wonderful Idea-ology parts and pieces I decided to create a vignette inside of the Tim Holtz Idea-ology curio clock.

Taking our previously altered foil tape I cut this into strips and pressed it around the exterior of the curio clock.

Next to form the base I super glued together for Etcetera trim pieces.

Below are all for Etcetera trim pieces glued together to form our base for the curio clock.

Next I spread crypt paste over our base with one of the Ranger pallet knives. I then let the base dry for about 30 minutes.

Next I decide to alter the back plate of the curio clock. To do this I painted the interior of the back plate with some chipped sapphire distress paint.

I the let the paint dry for about five minutes, to assist with this I did dry it with the Ranger heat tool. Then to add some more visual interest I pulled out the stencil THS131 and scraped distress texture paste through it.

Again I used the Ranger pallet knife to add the texture paste.

Once I finish stencilling I then added a layer of Distress clear out candy glitter over the top of the stars.

Below are the finished stencilled results with the distress glitter.

Now it’s time to start lighting up this project. To do this I’m going to be adding some tiny lights inset to the back plate of the curio clock. First I marked out some points on the back plate with a sharpie marker that I will be drilling out and inserting lights into.

I then set the back light on top of a couple of texture paste jars. Next using a small electric hand drill I then drilled holes into the back plate of the curio clock.

With the holes are drilled it is now time to start altering the tiny lights. To do this I am going to be using some Vineyard alcohol ink.

On the first of the lights I dropped a tiny drip of Vineyard alcohol ink onto each light.

Next I ran the first seven lights around the edge of the curio clock. I poke the lights through one of the pre-drilled holes and then used hot glue to hold those seven lights in place on the edge of the curio clock interior.

On the backside of the cure o’clock I poked the lights one at a time through each of t his holes that I drilled. Then I fasten each light in place with a small drop of hot glue.

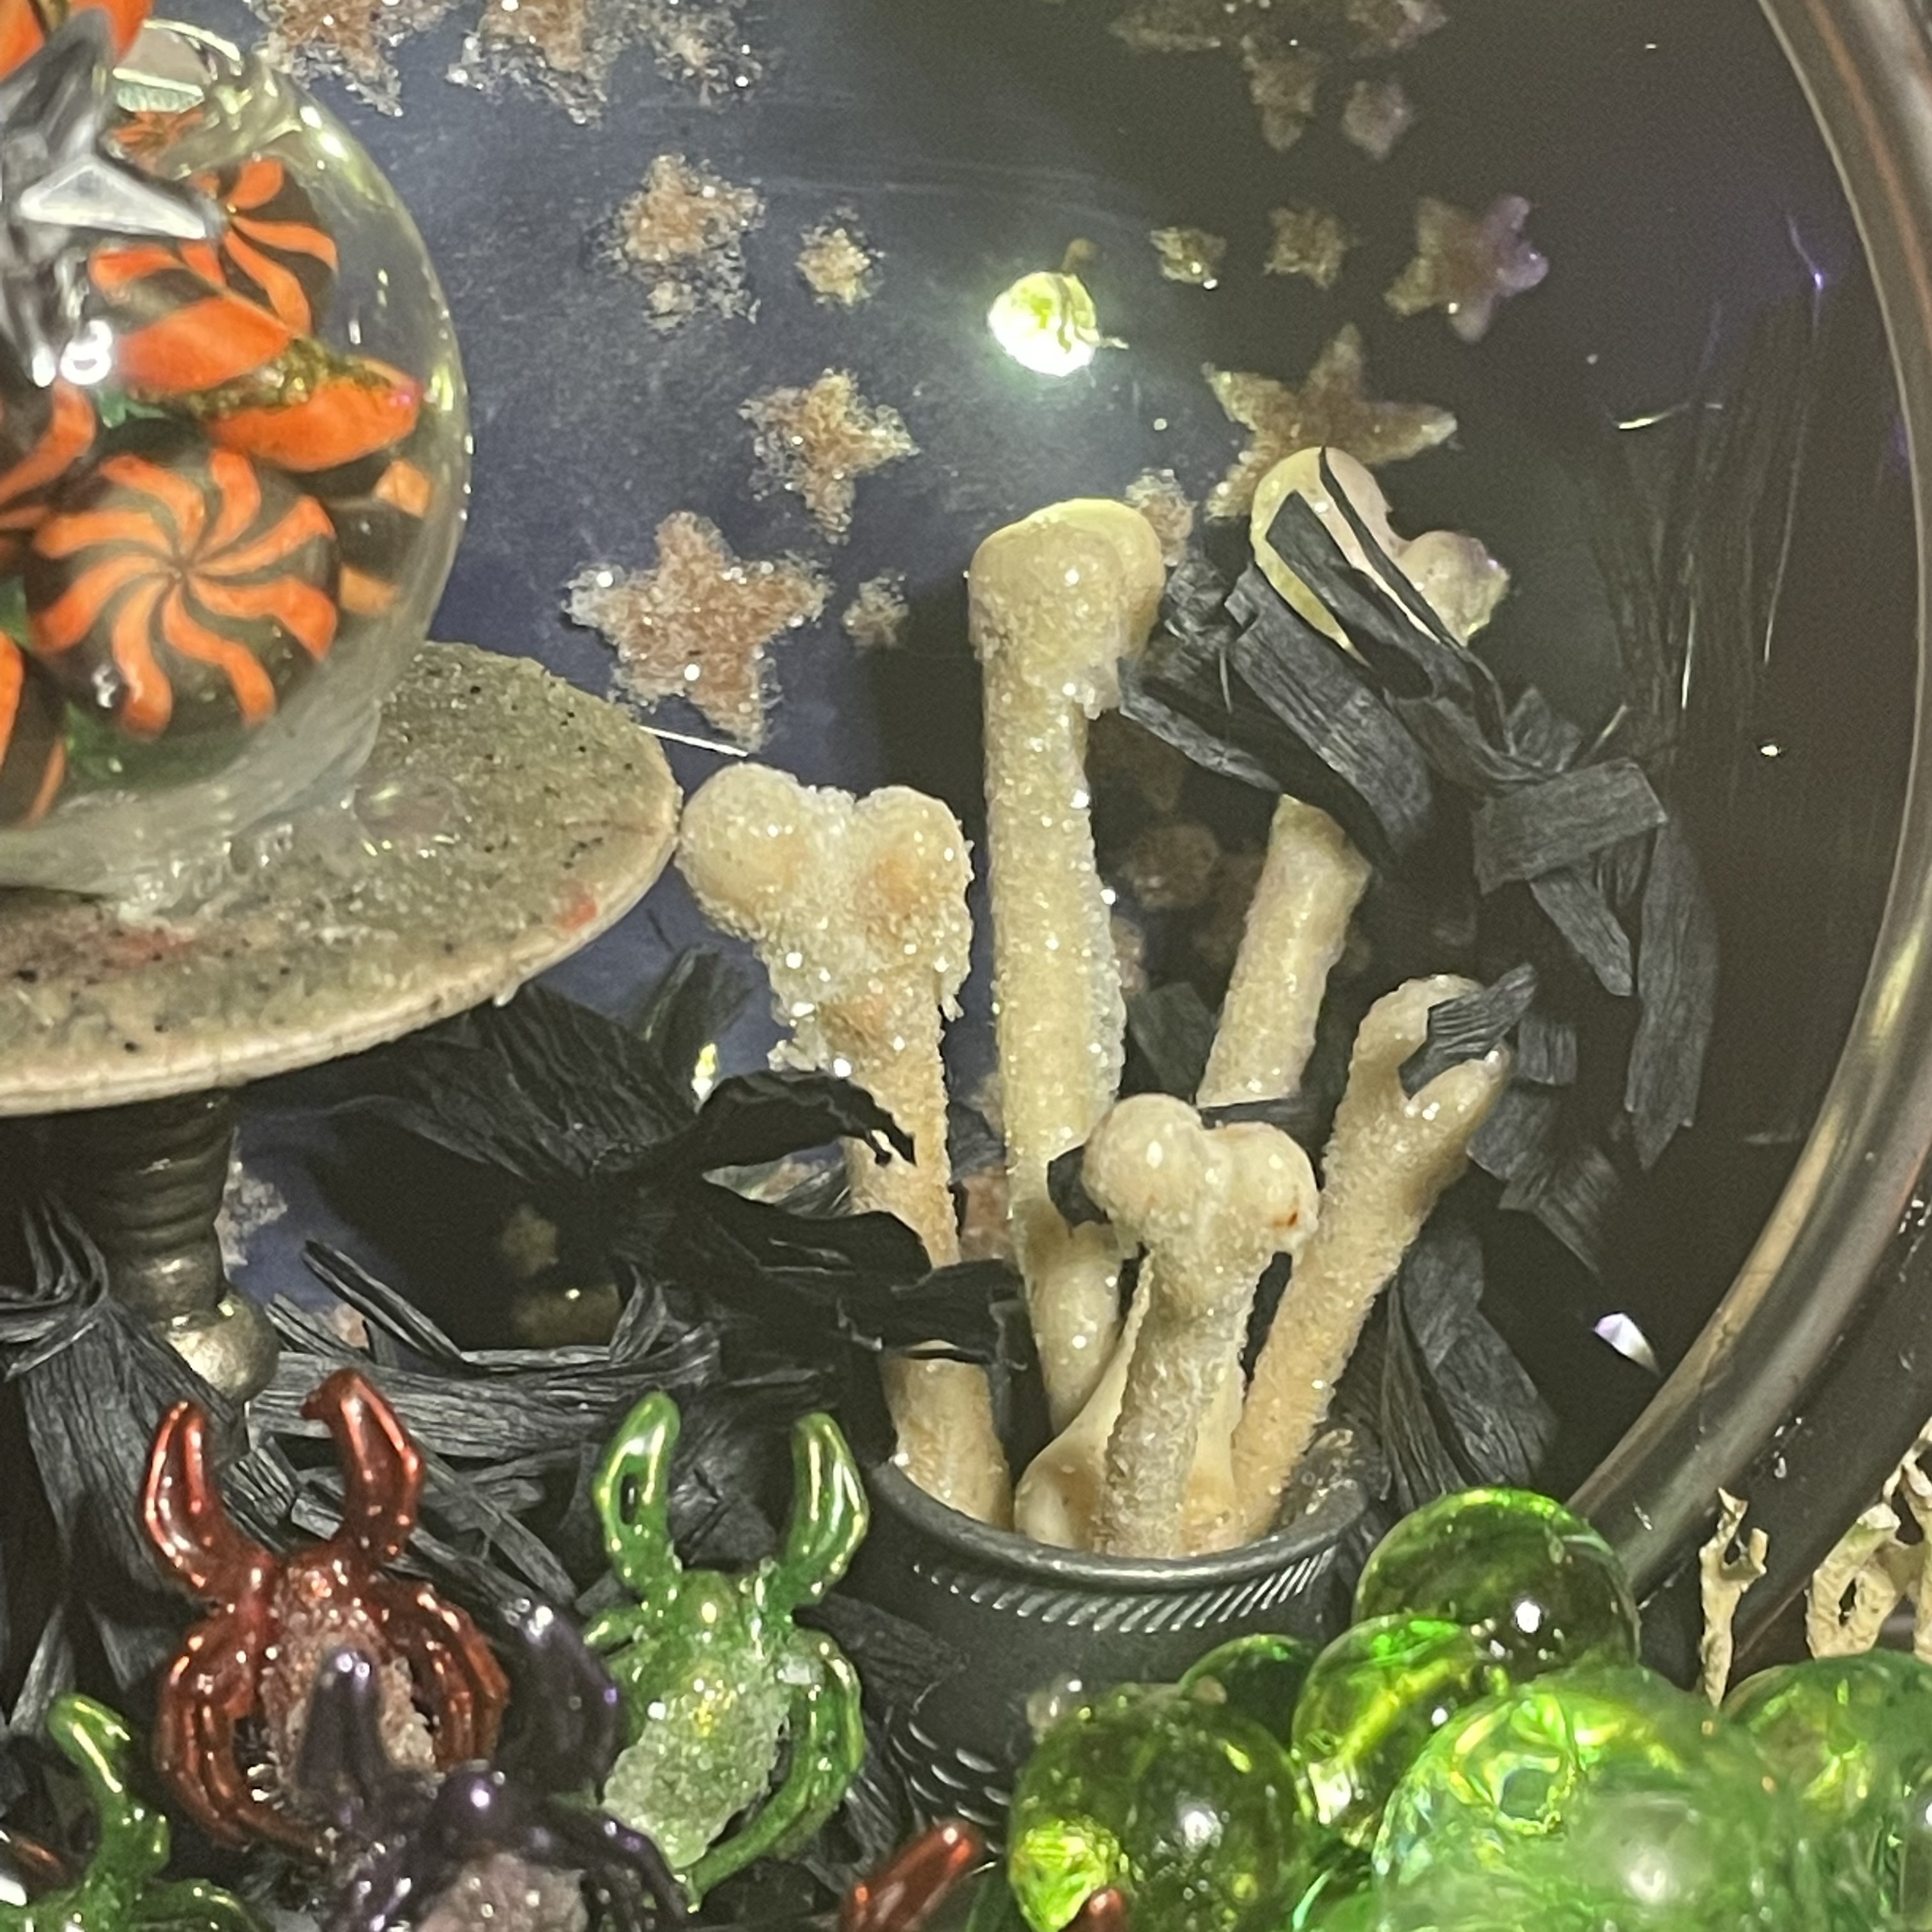
Below are the finished lights in the background. I absolutely love the effect of the lights sparkling off of the Distress glitter and adding illumination to our spooky Halloween scene.

For the last part of this project I highly recommend that you check out the YouTube video for the full assembly of the curio clock in the blog I wanted to walk you through all of the parts and pieces and then showcase the completed design elements in the video. To check out the assembly process go to timestamp 00:31:11
Below are some close-ups of all of the Idea-ology elements that I have put into the curio clock.


Thank you so much for joining me here today at the Funkie Junkie challenge blog for this week Saturday showcase
Until next time happy crafting!
~Janna 🖤🎨🧡
No comments:
Post a Comment