Teri Wilson - TerisMailbox
Hello crafty friends. It's Teri with TerisMailbox here to share another chapter with Distress Paints! I am sharing these cards for The Funkie Junkie Boutique. Check out all the designer's creations here.
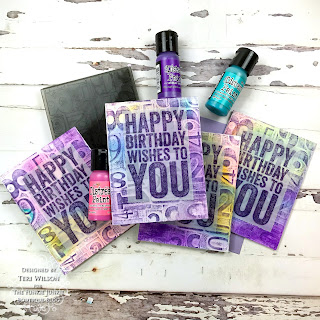
I have been having too much fun with all of the Distressed Paints! The DT challenge is numbers so I used the Numbers 3D embossing folder to emboss the paint smooshed backgrounds!
Create the Background Panels
It all started when I spent the day playing with Distressed Paints. The video outlining the entire process is here: https://youtu.be/42z-qU5vQTg
Add drops of each color onto your craft mat and spritz with water. Spritz the watercolor cardstock as well. Lay the wet side of the cardstock into the inks and pick up. Do not move it around. Spritz the colored piece with more water to allow it to run and wick. Use a second piece of the watercolor cardstock and lay over the painted piece. There is so much paint on the initial print that you can get a two for one! Spritz both pieces with water and allow the paint to move around until you are happy with the results.
You can get additional prints by simply adding more water before printing. Note: you can remove muddy sections prior to printing additional panels.
Allow the panels to dry prior to the next step.
Emboss and Ink the Panels
Now comes the fun part. Let's add lots of texture to the panels!
Use a large brayer to apply Villainous Potion Distress Ink to the embossed panels. See how the numbers pop!
Create the Sentiment Panel
Use a heavier Vellum and stamp the selected sentiment using Villainous Potion Ink. You may need to stamp more than once to get good coverage. Heat dry, but be careful to move your heat tool around so the vellum doesn't melt.
Use the Deckle Edge Trimmer to trim close to the sentiments.
Love how both the numbers and the sentiments pop!
Assemble the Card
Attach the watercolor panels to A2 card bases. Glue the vellum sentiments to the front of the card. Hide the glue by adding glue drops under the embossed letters!
I encourage you to try Distress Paint Smooshing and Printing. It is so much fun to watch the colors move! The Funkie Junkie Boutique has a great selection of Distress Paints and all the additional supplies for playing with paper! Too much fun!
Thanks so much for stopping by today! I'd love to have you follow/subscribe on my social media sites Instagram, Facebook, Blogger and YouTube all named TerisMailbox. Be well. Be creative!
Products used:


No comments:
Post a Comment