
In the spotlight this time are Wendy Vecchi Embossing Powders; I love these powders because they are available in such bright colours, and that makes them perfect for this 'painting' technique. Hold on to your hats people, this is as close as I get to doing CAS!!!

Next swipe uneven lines of FlitterGlu over a plain piece of card using the Phat Foam. Why choose FlitterGlu rather than embossing ink? It can be added exactly where you need it and, most importantly, it remains tacky permanently. That means there's no rush with the next steps.

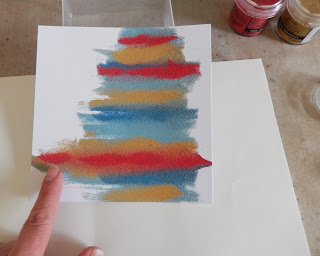
Using a small spoon sprinkle lines of your first colour embossing powder across the areas you've added the glue to (these will become more visible as we go along). In this case I used Red Geranium, returning the excess powder to the pot by catching it on a piece of paper.

Repeat the process using two further colours (for this one I chose Cornflower Blue and Tree Branch). Finally fill in the gaps with the lightest colour (Sky Blue).

At this point you may have some straight edges or bits you want to alter so go in with your finger and gently remove any excess powder. This may mix the colours a little on the paper underneath your card but that's good. Now heat set the embossing powder with a heat gun, and here's a hint - if your background warps at this point try misting a little water on the back of the card and putting it under some heavy books for a while to flatten it.
Put the mixed powder into a container, adding extra powder from each of the chosen colours to create your own custom colour. This is a trick Wendy Vecchi does to great effect and you can even get spare empty pots to save them in. For this project I was careful only to use the amount needed for the die cut butterfly.

Cover the butterfly (from Tim Holtz' duo set) in FlitterGlu using the same piece of Phat Foam.

Cover the butterfly in the mixed embossing powder and again, set it with your heat gun, allowing the melted powder mix to cool completely before moving on to the next step.

Run your embossed butterfly through the coordinating embossing folder, then rub a Red Geranium Archival Ink pad over the raised areas.

Setting the butterfly aside, return to your embossed background and apply white embossing paste through a stencil over part of the design.


I enjoyed making this first card so much I made a second! This time I used Orange Blossom, Fern Green, Buttercup and Tea Rose embossing powders. The highlighting on the butterfly was done with Orange Blossom Archival Ink and the sentiment coloured with Tea Rose Archival Ink.


Start by adding FlitterGlu to with a spatula to a piece of Phat Foam (all of which comes in the FlitterGlu starter kit).

(click on any of the images for a closer look)
Next swipe uneven lines of FlitterGlu over a plain piece of card using the Phat Foam. Why choose FlitterGlu rather than embossing ink? It can be added exactly where you need it and, most importantly, it remains tacky permanently. That means there's no rush with the next steps.

Using a small spoon sprinkle lines of your first colour embossing powder across the areas you've added the glue to (these will become more visible as we go along). In this case I used Red Geranium, returning the excess powder to the pot by catching it on a piece of paper.

Repeat the process using two further colours (for this one I chose Cornflower Blue and Tree Branch). Finally fill in the gaps with the lightest colour (Sky Blue).

At this point you may have some straight edges or bits you want to alter so go in with your finger and gently remove any excess powder. This may mix the colours a little on the paper underneath your card but that's good. Now heat set the embossing powder with a heat gun, and here's a hint - if your background warps at this point try misting a little water on the back of the card and putting it under some heavy books for a while to flatten it.

Put the mixed powder into a container, adding extra powder from each of the chosen colours to create your own custom colour. This is a trick Wendy Vecchi does to great effect and you can even get spare empty pots to save them in. For this project I was careful only to use the amount needed for the die cut butterfly.

Cover the butterfly (from Tim Holtz' duo set) in FlitterGlu using the same piece of Phat Foam.

Cover the butterfly in the mixed embossing powder and again, set it with your heat gun, allowing the melted powder mix to cool completely before moving on to the next step.

Run your embossed butterfly through the coordinating embossing folder, then rub a Red Geranium Archival Ink pad over the raised areas.

Setting the butterfly aside, return to your embossed background and apply white embossing paste through a stencil over part of the design.

To finish the card I added lace, a die cut sentiment (coloured with Cornflower Blue Archival Ink) and the embossed butterfly (with added pearl embellishment).

Here are some close ups...


I enjoyed making this first card so much I made a second! This time I used Orange Blossom, Fern Green, Buttercup and Tea Rose embossing powders. The highlighting on the butterfly was done with Orange Blossom Archival Ink and the sentiment coloured with Tea Rose Archival Ink.

Here are more close ups...


Gosh, this took longer to explain that to create! I hope you've enjoyed this tutorial and feel inspired to try your hand 'painting' with your embossing powders. Personally I can't wait to have a go again with the latest colours, Tiger Lily, Pink Peony and Violet!!
Remember, these wonderful Wendy Vecchi embossing powders have an extra 15% discount applied for the next two weeks at The Funkie Junkie Boutique so it makes sense to stock up now.
For now I hope you have a wonderful weekend and, whatever you're up to, take care of yourselves.
Jenny xxx
A beautiful effect.
ReplyDeleteThank you so much Deborah. Jenny x
DeleteFantastic Jenny! Love the 'splashes' of embossing powder and the white paste over the top is perfect! Sue C x
ReplyDeleteThank you so much Sue. Jenny x
DeleteBoth cards are stunning Jenny and such clever techniques!! Love the addition of the lace, it makes them so soft and feminine! Really beautiful both of them!
ReplyDeleteThank you so much Astrid. Jenny x
DeleteFabulous outcomes using this technique Jenny :-) you have certainly been busy!!!!
ReplyDeleteTFS and best wishes
Annie x
Thank you so much Annie. Jenny x
DeleteGreat techniques and both cards look awesome! Perfection! X
ReplyDeleteThank you so much Ingrid. Jenny x
DeleteAwesome tutorial Jenny! TFS
ReplyDeleteThank you so much Shilpa. Jenny x
DeleteBeautiful Cards! Love the bright colors. Hadn't heard of flitter glue before but like the way you used it here. I haven't tried embossing paste over embossing powders either. Love the look.
ReplyDeleteThank you Ruby. So much for you to try out! I'm glad you've learned a few things from this tutorial. Jenny x
DeleteStunning effect!
ReplyDeleteThank you Suzz. Jenny x
DeleteLove that Jenny and that's a great idea with the Flitter glue staying tacky then there's no rush. Elizabeth x
ReplyDeleteThanks Elizabeth. Yes, that's the bonus of using the FlitterGlu rather than normal embossing ink - no rush! Jenny x
DeleteWhat fun techniques, Jenny! Just the kick I needed to get out my stash of Wendy embossing powders. The embossing paste and lace are perfect finishing touches for your gorgeous cards!
ReplyDeleteThank you so much Elizabeth. So glad to have inspired you! Jenny x
DeleteHoly cow Jenny, what an amazing technique! I am seeing a very unique texture on the embossing powder, is that because of the FlitterGlu?? It looks like it's all crackled. The finished cards are just stunning! hugs :)
ReplyDeleteThank you so much Pamellia. Yes, the texture is partly due to the glue and partly as you only need a fine coat of embossing powder (a thicker layer makes the results much smoother). Jenny x
DeleteThanks Jenny. Think I will add some of these products to my shopping cart, I sure do love how your cards turned out.
DeleteVery cool technique Jenny! Awesome result, lurving it!!
ReplyDeleteThank you so much Lori. Jenny x
DeleteThanks so much for sharing this inspiring post. Must have a go as the results are stunning and so effective.
ReplyDeleteJulie x
Thank you so much Julie. Jenny x
DeleteFabulous Jenny - what wonderful colours!Jennie x
ReplyDeleteThank you so much Jennie. Jenny x
DeleteSo much fun Jenny! It has an organic feel to me. Love how different each set of colors look. Thanks for the steps.
ReplyDeleteThank you so much Sharon. Jenny x
Deleteooo Jenny - this looks so fab - so cool - will be trying this! Hugs rachel x
ReplyDeleteThank you so much Rachel. Jenny x
ReplyDeleteAmazing cards Jenny, I love the look of this technique too - gosh it looks like tons of fun xx
ReplyDeleteThank you so much Georgie - it was! Jenny x
DeleteIncredible!!! Leaving more detailed love on your blog :-) xxx Lynn
ReplyDeleteSo glad it gave you some more ideas Lynn. Thank you so much. Jenny x
DeleteInspired use of embossing powders, absolutely brilliant results, just adore the colour palette on the first. Stunning work Jenny!! Ruth x
ReplyDeleteThank you so much Ruth. Jenny x
DeleteWhat an awesome inspirational post! Thank you so much - I have a lot of embossing powders I need to use up so guess I will be trying this soon Karen x
ReplyDeleteThank you so much Karen. Jenny x
Deletewhat a fun technique for using Wendy's embossing powders Jenny! love the look of both of your cards! Julia xx
ReplyDeleteThank you so much Julia. Jenny x
DeleteWhat a lovely way to use up embossing powders and love the textures it has created. The colors are beautiful. Thanks for sharing.
ReplyDeleteThank you so much Rupa. Jenny x
DeleteWhat a fun technique!
ReplyDeleteThank you so much Stephanie. Jenny x
DeleteAMAZING Jenny! I love this technique! What a great way to use these awesome powders. I was using them yesterday after I saw your project! Always an inspiration.
ReplyDeleteThank you so much Nicole. So glad to have inspired you. Jenny x
DeleteWow Jenny, both cards look fabulous, I just love the vibrant colours and the simplicity of your embellishments. Lovely to see you on Wendy's blog too! Anne xx
ReplyDeleteThank you so much Anne. It was so exciting and a real privilege to see that Wendy liked these enough to show them on her blog too!!! Jenny x
DeleteWhat a great technique! You are SO creative...can't wait to give it a try.
ReplyDeleteThank you so much Kimberly. Jenny x
DeleteA huge Wow from me Jenny! Not only is the technique brilliant but your designs stopped me in my tracks. Beautiful cards! Nicola x
ReplyDeleteThank you so much Nicola. Jenny x
DeleteGorgeous background Jenny, beautiful colour combinations and those butterflies are lovely using the mixed embossing powders. The touches of lace finish your cards beautifully, thanks for your great tutorial!
ReplyDeleteThank you so much Deb! Jenny x
DeleteWOW...love this totally. Thanks for the great tutorial.
ReplyDeleteThank you so much Sylvia. Jenny x
DeleteYour cards are amazing. Great tutorial. Thank you for the inspiration.
ReplyDeleteThank you so much Carol. Jenny x
DeleteBeautiful card and great technique. Thanks for sharing. Is there anther glue that can be used besides Flitterglu?
ReplyDeleteLove this technique, and will definitely give this a go. Thanks for sharing.
ReplyDelete