
Hello, Lisa Hoel here with a new Saturday Showcase for you. For our current challenge, "Rather Blustery Day", you are supposed to focus on a technique, supplies, etc. that you find challenging. I chose to focus on Alcohol Inks for my challenge and I'm continuing that theme here today! I used the alcohol ink backgrounds I created to decorate two phone stands made with Eileen Hull's new Phone Stand Die.
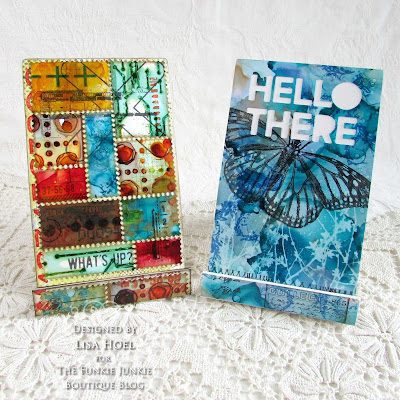

These stands are so quick to make and are great for gifts!

I'm really glad I dove in and just played around with the alcohol inks. I started off by watching again some of Tim Holtz's educational videos (soooo informative!). You can find two here and here. I used Yupo cardstock for my substrate. Yupo is a non-porous synthetic paper that is perfect for alcohol ink. I have a list of other supplies used at the bottom of this post but you can browse products here in the Funkie Junkie Boutique.
Here are some photos of the results of my background experiments:


Here's one technique that Tim shared that I really liked. He showed us how to make prints with stencils.

Mist a stencil with isopropyl alcohol and "stick" it down onto the Yupo. Drip various colors of ink onto the stencil/paper. It will wick under the stencil but that is what you want it to do. Let it sit there until all the ink dries underneath the stencil.
Peel off the stencil and you get your first generation print!

You can create several successive prints with the ink left on the front of the stencil. Mist it with more isopropyl alcohol and lay it on a new sheet of Yupo. Let it dry and peel it off. Repeat.

Another fun product to use is Alcohol Lift-Ink.

I cut a piece of one of my backgrounds very slightly larger than the face of the phone stand. Also a smaller piece to cover the front of ledge on the bottom.

A stamping platform is very helpful for this technique because it often needs several applications of Lift-Ink to remove enough alcohol ink. Start with a CLEAN stamp! Residual ink on your stamp will stain your ink pad.

Amount of ink removed after one stamping.
Position and ink your stamp, then stamp it onto your background. The lift-ink reacts with the alcohol ink. Dab (don't wipe, smear warning) the stamped areas with a clean paper towel. When most of the inks have been picked up by the towel, you can buff the rest off.

Results after repeating process 3x.
If you want a stronger contrast repeat the above steps to keep removing alcohol ink. Don't forget to clean your stamp each time.
You can also stamp over alcohol ink using Archival Ink. Be careful stamping on the Yupo because it is slick and can easily smudge as you apply pressure.

Next I cut out the "HELLO THERE" words out of the background using the Bold Text #1 Die Set . Thinlits dies cut through Yupo just fine. I glued it to the stand and trimmed off any overhanging paper.

Phone Stand assembly time!
It only takes one pass through your die cutting machine to cut all the pieces you will need. Cut it out of mat board or heavier chipboard so it will be sturdy.

Fold all the parts at their score lines. I find it easier to insert the tabs of the ledge piece through the slots before I glue the back brace into place.

Put some dabs of glue under the tabs.

Glue back brace in place.

You can change the pitch of your stand depending on where you adhere the brace.


Glue the front piece of the ledge in place.
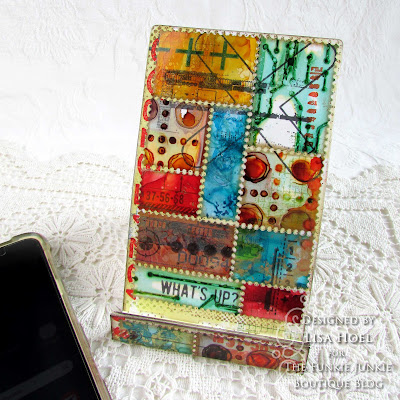
Details about the second phone stand:
I used Eileen Hull's new Snail Mail Die Set to cut "stamps" to make the collage on the front. First I picked out complementary alcohol ink backgrounds from my pile and cut them up into sheets with the Snail Mail Die. With regular paper you can tear them apart like stamps but since the substrate was Yupo I cut them with scissors.


I mixed and matched my stamps into a collage covering the front of the phone stand. I also put some extra stamping on the back because, why not? ;-)

Lastly, I stamped with various of colors of Archival Ink over the whole collage. I assembled the stand as shown above.
Whew, that was a lot! I hope you are inspired to go play and try some new techniques. Supplies are listed below. Have a great weekend!
Supplies used:
Tim Holtz Die Set - Bold Text #1
Eileen Hull Scoreboards Die - Phone Stand
Eileen Hull Thinlits Die Set - Snail Mail
Tim Holtz stamp sets - Halftone & Rings, Glitch 1, Glitch 2, Mini Glitch, Inquisitive, Evolution, Field Notes, Specimen, Spring Sprung
Ranger Archival Ink - Black Soot, Vintage Photo
Alcohol Ink Blower tool
Stamping Platform
91% Isopropyl rubbing alcohol (from drug store/grocery store)
Sizzix Making Essential - Mat Board
What a great tutorial with lots of great inspiration! You worked your magic with the alcohol inks on your backgrounds and I love the phone stands ! Excellent post! Thank you for all your hard work and inspiration!
ReplyDelete